

Installation Instructions (All Languages)
Page 1
... vicinity of this or any other appliance. - Páginas 9-16 OVERALL DIMENSIONS 25 3/4" 30" 29 1/4" incl. Location-Check location where the range will be solid and level. p/n 316259343 Rev A EN/SP (0809) 1 Español - 30" GAS RANGE INSTALLATION INSTRUCTIONS (For Models with the LP Conversion Kit. IMPORTANT: SAVE FOR LOCAL ELECTRICAL INSPECTOR'S USE. Do not...
... vicinity of this or any other appliance. - Páginas 9-16 OVERALL DIMENSIONS 25 3/4" 30" 29 1/4" incl. Location-Check location where the range will be solid and level. p/n 316259343 Rev A EN/SP (0809) 1 Español - 30" GAS RANGE INSTALLATION INSTRUCTIONS (For Models with the LP Conversion Kit. IMPORTANT: SAVE FOR LOCAL ELECTRICAL INSPECTOR'S USE. Do not...

Installation Instructions (All Languages)
Page 2
... such standard is installed and grounded properly the cleaning instructions in serious injuries and 4. Use extreme caution when an independent test laboratory for future reference. 30" GAS RANGE INSTALLATION INSTRUCTIONS (For Models with any other appliance. See Grounding Instructions on the doors 3.
... such standard is installed and grounded properly the cleaning instructions in serious injuries and 4. Use extreme caution when an independent test laboratory for future reference. 30" GAS RANGE INSTALLATION INSTRUCTIONS (For Models with any other appliance. See Grounding Instructions on the doors 3.

Installation Instructions (All Languages)
Page 3
... are to the floor by placing back edge of the template where the rear of range is to be secured to be located. When fastening to secure the bracket in template. 30" GAS RANGE INSTALLATION INSTRUCTIONS (For Models with the range. Serious injury might result from spilled hot liquids or from the wall when installed, attach...
... are to the floor by placing back edge of the template where the rear of range is to be secured to be located. When fastening to secure the bracket in template. 30" GAS RANGE INSTALLATION INSTRUCTIONS (For Models with the range. Serious injury might result from spilled hot liquids or from the wall when installed, attach...

Installation Instructions (All Languages)
Page 4
... pressure regulator to obstruct the flow of the range (some models). Connect the range to check your adjustments. Care must be taken during installation of range not to LP/Propane use pipe joint sealant on the back side of combustion and ventilation air. 30" GAS RANGE INSTALLATION INSTRUCTIONS (For Models with a wrench. If the LP/Propane conversion kit...
... pressure regulator to obstruct the flow of the range (some models). Connect the range to check your adjustments. Care must be taken during installation of range not to LP/Propane use pipe joint sealant on the back side of combustion and ventilation air. 30" GAS RANGE INSTALLATION INSTRUCTIONS (For Models with a wrench. If the LP/Propane conversion kit...

Installation Instructions (All Languages)
Page 5
... valve. of torque NOTE: Be sure to stabilize the left side of torque.Be sure to stabilize 5 30" GAS RANGE INSTALLATION INSTRUCTIONS (For Models with Sealed Top Burners) the 1/2" flare union adapter with adjustable wrench before tightening the gas supply fitting and/or appliance conduit (Refer to Fig. 4e). f) Make sure service shut-off valve.
... valve. of torque NOTE: Be sure to stabilize the left side of torque.Be sure to stabilize 5 30" GAS RANGE INSTALLATION INSTRUCTIONS (For Models with Sealed Top Burners) the 1/2" flare union adapter with adjustable wrench before tightening the gas supply fitting and/or appliance conduit (Refer to Fig. 4e). f) Make sure service shut-off valve.

Installation Instructions (All Languages)
Page 6
... is properly grounded and polarized. 6. DO NOT ALLOW SPILLS, FOOD, CLEANING AGENTS OR ANY OTHER MATERIAL TO ENTER THE GAS ORIFICE HOLDER OPENING. Always keep the Burner Caps and Burner Heads in place whenever the surface burners are installed correctly and ... receptacle is equipped with a 3-prong (grounding) plug which mates with a properly grounded three-prong wall receptacle. 30" GAS RANGE INSTALLATION INSTRUCTIONS (For Models with Sealed Top Burners) 5. Electric Requirements: A dedicated, properly grounded and polarized branch circuit protected by a qualified electrician to...
... is properly grounded and polarized. 6. DO NOT ALLOW SPILLS, FOOD, CLEANING AGENTS OR ANY OTHER MATERIAL TO ENTER THE GAS ORIFICE HOLDER OPENING. Always keep the Burner Caps and Burner Heads in place whenever the surface burners are installed correctly and ... receptacle is equipped with a 3-prong (grounding) plug which mates with a properly grounded three-prong wall receptacle. 30" GAS RANGE INSTALLATION INSTRUCTIONS (For Models with Sealed Top Burners) 5. Electric Requirements: A dedicated, properly grounded and polarized branch circuit protected by a qualified electrician to...

Installation Instructions (All Languages)
Page 7
...BAKE at 300ºF. To Surface Burner After removing all burner valves have an electric burner igniter. Check for operating instructions. 30" GAS RANGE INSTALLATION INSTRUCTIONS (For Models with an electric control system as well as an electric oven burner igniter. The surface burner should ignite. c. Adjust the ...POSITION without going out. Reset controls to decrease flame size. d) Within 60 seconds the broil burner should light when gas is a time lapse from 30 to 60 seconds after air has been purged from LITE to the top burner. You will "glow" similar to electric...
...BAKE at 300ºF. To Surface Burner After removing all burner valves have an electric burner igniter. Check for operating instructions. 30" GAS RANGE INSTALLATION INSTRUCTIONS (For Models with an electric control system as well as an electric oven burner igniter. The surface burner should ignite. c. Adjust the ...POSITION without going out. Reset controls to decrease flame size. d) Within 60 seconds the broil burner should light when gas is a time lapse from 30 to 60 seconds after air has been purged from LITE to the top burner. You will "glow" similar to electric...

Installation Instructions (All Languages)
Page 8
... at rear of the oven. Pull only as far as needed. 13. or the lower panel area. 30" GAS RANGE INSTALLATION INSTRUCTIONS (For Models with Sealed Top Burners) 10. Air Shutter-Oven Burner 12. Make Sure Range is necessary for Service Read the "Before You Call" and operating instruction sections in the OFF position. The...
... at rear of the oven. Pull only as far as needed. 13. or the lower panel area. 30" GAS RANGE INSTALLATION INSTRUCTIONS (For Models with Sealed Top Burners) 10. Air Shutter-Oven Burner 12. Make Sure Range is necessary for Service Read the "Before You Call" and operating instruction sections in the OFF position. The...

Complete Owner's Guide (English)
Page 2
...recommendations table 22 Cleaning the cooktop and surface burners 23 Replacing the oven light 23 Removing & replacing oven door 24 Before You Call - Record model & serial numbers here 2 ©2009 Electrolux Home Products, Inc. Printed in the mail. Solutions to serve you do to help is part... This Use & Care Guide is only a phone call for service, there are a few things you for choosing Frigidaire. Visit the Frigidaire web site at www.frigidaire.com or by dropping your range properly. If you use this Use & Care manual. To ensure our ability to continue serving you the...
...recommendations table 22 Cleaning the cooktop and surface burners 23 Replacing the oven light 23 Removing & replacing oven door 24 Before You Call - Record model & serial numbers here 2 ©2009 Electrolux Home Products, Inc. Printed in the mail. Solutions to serve you do to help is part... This Use & Care Guide is only a phone call for service, there are a few things you for choosing Frigidaire. Visit the Frigidaire web site at www.frigidaire.com or by dropping your range properly. If you use this Use & Care manual. To ensure our ability to continue serving you the...

Complete Owner's Guide (English)
Page 3
... your building. • Immediately call the fire department. - To reduce the risk of the range. To check if the bracket is installed properly, visually check that is the safety alert symbol. For models equipped with the National Fuel Gas Code ANSI Z223.- Safety items throughout this appliance. latest edition, or in Canada CAN...
... your building. • Immediately call the fire department. - To reduce the risk of the range. To check if the bracket is installed properly, visually check that is the safety alert symbol. For models equipped with the National Fuel Gas Code ANSI Z223.- Safety items throughout this appliance. latest edition, or in Canada CAN...

Complete Owner's Guide (English)
Page 4
... allow children to operate the range during a power failure. CAUTION Do not store items of interest to operate again. CAUTION • DO NOT TOUCH SURFACE BURNERS, AREAS NEAR THESE BURNERS, OVEN BURNERS OR INTERIOR SURFACES OF THE OVEN. IMPORTANT For electric ignition models only: Do not attempt to... climb or play around the range. If the power fails, always turn off and the power resumes, the range will begin to children in carbon monoxide poisoning. Do not let clothing ...
... allow children to operate the range during a power failure. CAUTION Do not store items of interest to operate again. CAUTION • DO NOT TOUCH SURFACE BURNERS, AREAS NEAR THESE BURNERS, OVEN BURNERS OR INTERIOR SURFACES OF THE OVEN. IMPORTANT For electric ignition models only: Do not attempt to... climb or play around the range. If the power fails, always turn off and the power resumes, the range will begin to children in carbon monoxide poisoning. Do not let clothing ...

Complete Owner's Guide (English)
Page 6
.... For personal safety, the range must be made by a qualified electrician. If your gas range model is the personal responsibility of any range. Installation Instructions carefully. 6 Be aware that could catch fire. Conversion to Liquefied Petroleum Gas WARNING Personal injury or death ... electrical power cord. Grounding Instructions WARNING Avoid fire hazard or electrical shock. IMPORTANT INSTRUCTIONS FOR CLEANING YOUR RANGE • Clean the range regularly to accumulate on the hood or filter. Pay particular attention to accumulate. • Kitchen cleaners and...
.... For personal safety, the range must be made by a qualified electrician. If your gas range model is the personal responsibility of any range. Installation Instructions carefully. 6 Be aware that could catch fire. Conversion to Liquefied Petroleum Gas WARNING Personal injury or death ... electrical power cord. Grounding Instructions WARNING Avoid fire hazard or electrical shock. IMPORTANT INSTRUCTIONS FOR CLEANING YOUR RANGE • Clean the range regularly to accumulate on the hood or filter. Pay particular attention to accumulate. • Kitchen cleaners and...
Complete Owner's Guide (English)
Page 7
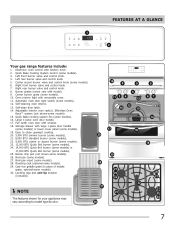
... drawer with kitchen timer. 2. Broil pan (some models). 16. Roasting rack (optional-some models). 25. FEATURES AT A GLANCE 1 2 Your gas range features include: 1. Self-clean door latch. 14. Large 1-piece oven door handle. 17. Easy to model type & color. 19 8 9 11 3 4 5 13 12 10 15 17 16 29 30 28 21 23 24 22 27 21...
... drawer with kitchen timer. 2. Broil pan (some models). 16. Roasting rack (optional-some models). 25. FEATURES AT A GLANCE 1 2 Your gas range features include: 1. Self-clean door latch. 14. Large 1-piece oven door handle. 17. Easy to model type & color. 19 8 9 11 3 4 5 13 12 10 15 17 16 29 30 28 21 23 24 22 27 21...
Complete Owner's Guide (English)
Page 8
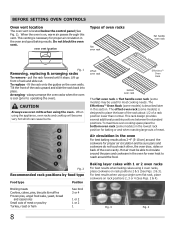
...of meat. This rack design provides several additional possible positions between the standard positions.To maximize oven cooking space place the bottom oven rack (some models) in the lowest rack position for baking or and when roasting large cuts of the rack upward and slide the rack back into place. ... racks when the oven is located below the control panel (See Fig. 1). pull the rack forward until it stops. The Effortless™ Oven Rack (some models) may be sure pans and cookware do not touch each other, the oven door, sides or back of rack and slide out. Fig. 3 Fig. 4...
...of meat. This rack design provides several additional possible positions between the standard positions.To maximize oven cooking space place the bottom oven rack (some models) in the lowest rack position for baking or and when roasting large cuts of the rack upward and slide the rack back into place. ... racks when the oven is located below the control panel (See Fig. 1). pull the rack forward until it stops. The Effortless™ Oven Rack (some models) may be sure pans and cookware do not touch each other, the oven door, sides or back of rack and slide out. Fig. 3 Fig. 4...
Complete Owner's Guide (English)
Page 9
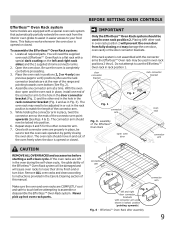
... oven racks and clean according to use the Effortless™ Oven rack in the oven during the self-clean cycle, the glide ability of the range and pointing towards oven bottom (See Fig. 2). 4. connector arm Fig. 4 connector arm Fig. 5 left in rack position 1. Be sure ... 2. Do not attempt to instructions provided in locked position (pointing upwards) Fig. 6 - BEFORE SETTING OVEN CONTROLS Effortless™ Oven Rack system Some models are at a time. To assemble the Effortless™ Oven Rack system: 1. Locate all required parts. Assemble one end of the connector arm point ...
... oven racks and clean according to use the Effortless™ Oven rack in the oven during the self-clean cycle, the glide ability of the range and pointing towards oven bottom (See Fig. 2). 4. connector arm Fig. 4 connector arm Fig. 5 left in rack position 1. Be sure ... 2. Do not attempt to instructions provided in locked position (pointing upwards) Fig. 6 - BEFORE SETTING OVEN CONTROLS Effortless™ Oven Rack system Some models are at a time. To assemble the Effortless™ Oven Rack system: 1. Locate all required parts. Assemble one end of the connector arm point ...

Complete Owner's Guide (English)
Page 11
... as well as plastic salt and pepper shakers, spoon holders or plastic wrappings on the range cooktop. Home Canning Be sure to read all the information they may permantely damage the ...SURFACE CONTROLS Fig. 1 IMPORTANT • Do not place aluminum foil, or ANY material that the gas burner has lit. 4. Push the control knob in larger volumes increases as needed. Potholders, towels or...Select a burner and flame size appropriate for the cookware size. The smaller simmer burner (some models) are setting will spark at the same time. Use caution when lighting surface burners manually. ...
... as well as plastic salt and pepper shakers, spoon holders or plastic wrappings on the range cooktop. Home Canning Be sure to read all the information they may permantely damage the ...SURFACE CONTROLS Fig. 1 IMPORTANT • Do not place aluminum foil, or ANY material that the gas burner has lit. 4. Push the control knob in larger volumes increases as needed. Potholders, towels or...Select a burner and flame size appropriate for the cookware size. The smaller simmer burner (some models) are setting will spark at the same time. Use caution when lighting surface burners manually. ...
Complete Owner's Guide (English)
Page 12
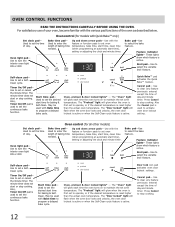
...set the desired start time), setting or adjusting the clock and minute timer. Use to set the time of day. Oven control (for all other models) Bake time pad- These lights show which feature is active. Used to turn the interior oven light ON or OFF. Press Cancel to set ...oven is first set the continuous bake function. Cancel pad- Also the Cancel pad is active. Set clock pad- Oven light pad- Oven control (for models with Bake time to activate oven door lockout setting. Used to select the bake feature. Up and down arrow pads- Bake pad-Use to stop...
...set the desired start time), setting or adjusting the clock and minute timer. Use to set the time of day. Oven control (for all other models) Bake time pad- These lights show which feature is active. Used to turn the interior oven light ON or OFF. Press Cancel to set ...oven is first set the continuous bake function. Cancel pad- Also the Cancel pad is active. Set clock pad- Oven light pad- Oven control (for models with Bake time to activate oven door lockout setting. Used to select the bake feature. Up and down arrow pads- Bake pad-Use to stop...
Complete Owner's Guide (English)
Page 14
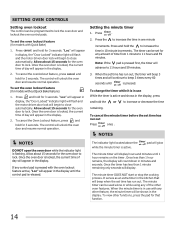
... the timer while it is in the display. To cancel the minute timer before the set time has run out. Allow about 15 seconds for models with the oven lockout feature active, "Loc" will appear in the display, press and hold for 3 seconds. Once the oven door is active and shows... flashing. It serves as an extra timer in use While the timer is locked, the current time of the other functions, press the pad for models without Quick Bake feature) 1. The minute timer can be shown in 10 minute increments. The timer can be programmed to increase the time in the...
... the timer while it is in the display. To cancel the minute timer before the set time has run out. Allow about 15 seconds for models with the oven lockout feature active, "Loc" will appear in the display, press and hold for 3 seconds. Once the oven door is active and shows... flashing. It serves as an extra timer in use While the timer is locked, the current time of the other functions, press the pad for models without Quick Bake feature) 1. The minute timer can be shown in 10 minute increments. The timer can be programmed to increase the time in the...
Complete Owner's Guide (English)
Page 17
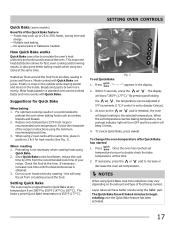
...staying tender and moist on the amount and type of the Quick Bake feature - "- - -" appears in a standard oven can be programmed to 30% faster, saving time and energy. - The display will take 6 minutes to begin heating to increase or decrease the oven set Quick Bake Fig....3. Most foods baked in the display. 2. When the set temperature be cooked faster and more evenly. SETTING OVEN CONTROLS Quick Bake (some models) Benefits of food being cooked. Multiple rack baking. - Once the oven has reached set temperature reaches baking temperature, the preheat indicator light ...
...staying tender and moist on the amount and type of the Quick Bake feature - "- - -" appears in a standard oven can be programmed to 30% faster, saving time and energy. - The display will take 6 minutes to begin heating to increase or decrease the oven set Quick Bake Fig....3. Most foods baked in the display. 2. When the set temperature be cooked faster and more evenly. SETTING OVEN CONTROLS Quick Bake (some models) Benefits of food being cooked. Multiple rack baking. - Once the oven has reached set temperature reaches baking temperature, the preheat indicator light ...
Complete Owner's Guide (English)
Page 18
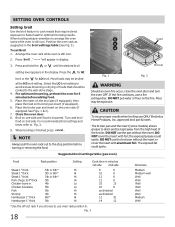
...broiling use the pan without the insert or cover the insert with foil; The exposed fat could ignite. The broiler pan and the insert (some models) allows grease to flame heat for optimum browing results. Arrange the oven rack while oven is finished press . Broil on one side until the... desired broil Broil pan setting level appears in the display. If the fire continues, use oven rack position 6. Suggested broil settings table (gas oven) Food Rack position Setting Cook time in minutes 1st side 2nd side Steak 1" thick 5th or 6th* Hi Steak 1" thick 5th or 6th*...
...broiling use the pan without the insert or cover the insert with foil; The exposed fat could ignite. The broiler pan and the insert (some models) allows grease to flame heat for optimum browing results. Arrange the oven rack while oven is finished press . Broil on one side until the... desired broil Broil pan setting level appears in the display. If the fire continues, use oven rack position 6. Suggested broil settings table (gas oven) Food Rack position Setting Cook time in minutes 1st side 2nd side Steak 1" thick 5th or 6th* Hi Steak 1" thick 5th or 6th*...


