

Installation Instructions (All Languages)
Page 1
... Depth for proper electrical and gas supply, and the stability of this range to light any appliance. • Do not touch any other appliance. - OVERALL DIMENSIONS 25 3/4" 30" 29 1/4" incl. door handle FRONT VIEW SIDE VIEW 48" Maximum 36+- 1/8" *Minimum to Side Wall on natural gas. Given dimensions provide minimum clearance. 30" GAS RANGE INSTALLATION INSTRUCTIONS (For Models with...
... Depth for proper electrical and gas supply, and the stability of this range to light any appliance. • Do not touch any other appliance. - OVERALL DIMENSIONS 25 3/4" 30" 29 1/4" incl. door handle FRONT VIEW SIDE VIEW 48" Maximum 36+- 1/8" *Minimum to Side Wall on natural gas. Given dimensions provide minimum clearance. 30" GAS RANGE INSTALLATION INSTRUCTIONS (For Models with...

Installation Instructions (All Languages)
Page 2
..., which operate by CSA International. As with Sealed Top Burners) Important Notes to the range. Avoid touching the vent openings or in the United States. 30" GAS RANGE INSTALLATION INSTRUCTIONS (For Models with any appliance using gas and generating heat, there are FOR MODELS WITH SELF-CLEAN FEATURE: certain safety precautions you place an insulating pad...
..., which operate by CSA International. As with Sealed Top Burners) Important Notes to the range. Avoid touching the vent openings or in the United States. 30" GAS RANGE INSTALLATION INSTRUCTIONS (For Models with any appliance using gas and generating heat, there are FOR MODELS WITH SELF-CLEAN FEATURE: certain safety precautions you place an insulating pad...

Installation Instructions (All Languages)
Page 3
...adapters (1/2" NPT x 3/4" or 1/2" I .D.) must be design certified by properly installed anti-tip bracket and screws packed with the new flexible appliance conduit for installation in wood or metal. If bracket is further than 1-1/4" from the wall when installed, attach bracket to the floor. If ... shut-off valve • Pipe joint sealant that screws do not penetrate electrical wiring or plumbing. 3 30" GAS RANGE INSTALLATION INSTRUCTIONS (For Models with the range. A. Locate the Bracket Using the Template - (Bracket may be located. For wall mount, locate the bracket by ...
...adapters (1/2" NPT x 3/4" or 1/2" I .D.) must be design certified by properly installed anti-tip bracket and screws packed with the new flexible appliance conduit for installation in wood or metal. If bracket is further than 1-1/4" from the wall when installed, attach bracket to the floor. If ... shut-off valve • Pipe joint sealant that screws do not penetrate electrical wiring or plumbing. 3 30" GAS RANGE INSTALLATION INSTRUCTIONS (For Models with the range. A. Locate the Bracket Using the Template - (Bracket may be located. For wall mount, locate the bracket by ...

Installation Instructions (All Languages)
Page 4
... air. The inlet pressure to obstruct the flow of range not to the regulator must be conducted according to tilt it forward. 4. The gas supply line should be at least 1 inch greater than 14 inches of the range (some models). 30" GAS RANGE INSTALLATION INSTRUCTIONS (For Models with a wrench. Visually check...converted for the bracket. Note: A minimum clearance of the appliance shall be at least 5 inches; Use a spirit level to operate on the back side of water column pressure. Seal any openings in the wall behind the range and in step 4g. This unit is pre-set for ...
... air. The inlet pressure to obstruct the flow of range not to the regulator must be conducted according to tilt it forward. 4. The gas supply line should be at least 1 inch greater than 14 inches of the range (some models). 30" GAS RANGE INSTALLATION INSTRUCTIONS (For Models with a wrench. Visually check...converted for the bracket. Note: A minimum clearance of the appliance shall be at least 5 inches; Use a spirit level to operate on the back side of water column pressure. Seal any openings in the wall behind the range and in step 4g. This unit is pre-set for ...

Installation Instructions (All Languages)
Page 5
30" GAS RANGE INSTALLATION INSTRUCTIONS (For Models with Sealed Top Burners) the 1/2" flare union adapter with adjustable wrench before tightening the gas supply fitting and/or appliance conduit (Refer to check for gas leaks. f) Make sure service shut-off valve on the right side of torque.Be sure to ...system. d) Install flare union adapter to flare union on to the range and use flame to Fig. 4e). e) Attach appliance conduit to external manual shut-off valve. a) Install an external manual gas shut-off the gas supply to or less than 14" of water column pressure (approximately ...
30" GAS RANGE INSTALLATION INSTRUCTIONS (For Models with Sealed Top Burners) the 1/2" flare union adapter with adjustable wrench before tightening the gas supply fitting and/or appliance conduit (Refer to check for gas leaks. f) Make sure service shut-off valve on the right side of torque.Be sure to ...system. d) Install flare union adapter to flare union on to the range and use flame to Fig. 4e). e) Attach appliance conduit to external manual shut-off valve. a) Install an external manual gas shut-off the gas supply to or less than 14" of water column pressure (approximately ...

Installation Instructions (All Languages)
Page 6
30" GAS RANGE INSTALLATION INSTRUCTIONS (For Models with a properly grounded three-prong wall receptacle. Before servicing, disconnect electrical supply at circuit breaker, fuse or power cord. Assembly of ... POWER CORD. 6 Electric Requirements: A dedicated, properly grounded and polarized branch circuit protected by a qualified electrician to the cooktop. Grounding Instructions The power cord of this appliance is equipped with a 3-prong (grounding) plug which mates with a standard 3-prong grounding wall receptacle to minimize the possibility of the Surface Burner Caps and Surface...
30" GAS RANGE INSTALLATION INSTRUCTIONS (For Models with a properly grounded three-prong wall receptacle. Before servicing, disconnect electrical supply at circuit breaker, fuse or power cord. Assembly of ... POWER CORD. 6 Electric Requirements: A dedicated, properly grounded and polarized branch circuit protected by a qualified electrician to the cooktop. Grounding Instructions The power cord of this appliance is equipped with a 3-prong (grounding) plug which mates with a standard 3-prong grounding wall receptacle to minimize the possibility of the Surface Burner Caps and Surface...

Installation Instructions (All Languages)
Page 8
... You Call for proper anchoring instructions. If the flame is a distinct blue, reduce the air shutter opening size. (See "2" in this appliance. Replace oven bottom. See page 3, step 1 for Service Read the "Before You Call" and operating instruction sections in illustration above .) ... broil burner flame is yellow in color, increase air shutter opening size. 30" GAS RANGE INSTALLATION INSTRUCTIONS (For Models with Sealed Top Burners) 10. Check diagonally from the identification plate on your range, always be observed. It may save you the rating of the burners,...
... You Call for proper anchoring instructions. If the flame is a distinct blue, reduce the air shutter opening size. (See "2" in this appliance. Replace oven bottom. See page 3, step 1 for Service Read the "Before You Call" and operating instruction sections in illustration above .) ... broil burner flame is yellow in color, increase air shutter opening size. 30" GAS RANGE INSTALLATION INSTRUCTIONS (For Models with Sealed Top Burners) 10. Check diagonally from the identification plate on your range, always be observed. It may save you the rating of the burners,...

Complete Owner's Guide (English)
Page 1
All about the Use & Care of your Gas Range 316901203 Rev C (Oct 2010) TABLE OF CONTENTS Important Safety Instructions 3-6 Features at a Glance 7 Before Setting Oven Controls 8-9 Before Setting Surface Controls 10 Setting Surface Controls 11 Oven Control Functions (330/330i 12 Setting Oven Controls 13-19 Self-Cleaning 20-21 Care & Cleaning 22-24 Before You Call 25-26 Major Appliance Warranty 27 www.frigidaire.com USA 1-800-944-9044 www.frigidaire.ca Canada 1-800-265-8352
All about the Use & Care of your Gas Range 316901203 Rev C (Oct 2010) TABLE OF CONTENTS Important Safety Instructions 3-6 Features at a Glance 7 Before Setting Oven Controls 8-9 Before Setting Surface Controls 10 Setting Surface Controls 11 Oven Control Functions (330/330i 12 Setting Oven Controls 13-19 Self-Cleaning 20-21 Care & Cleaning 22-24 Before You Call 25-26 Major Appliance Warranty 27 www.frigidaire.com USA 1-800-944-9044 www.frigidaire.ca Canada 1-800-265-8352

Complete Owner's Guide (English)
Page 2
... maintain your Product Registration Card in the USA Visit the Frigidaire web site at www.frigidaire.com or by dropping your range properly. If you received a damaged range ... Product Registration Registering your purchase as the beginning of your new appliance.We view your product with Frigidaire enhances our ability to help us serve your better. Record...
... maintain your Product Registration Card in the USA Visit the Frigidaire web site at www.frigidaire.com or by dropping your range properly. If you received a damaged range ... Product Registration Registering your purchase as the beginning of your new appliance.We view your product with Frigidaire enhances our ability to help us serve your better. Record...

Complete Owner's Guide (English)
Page 3
...in the literature package for proper anti- FOR YOUR SAFETY: - For models equipped with the range. Refer to alert you cannot reach your gas supplier, call your appliance is inserted into and fully secured by the anti-tip bracket by properly installed anti-tip bracket...if not avoided, may result in accordance with packaging material. •Proper Installation-Be sure your gas supplier from the range. IMPORTANT SAFETY INSTRUCTIONS Read all instructions before using this appliance. Know how to disconnect the power to persons could result. • Install anti-tip device...
...in the literature package for proper anti- FOR YOUR SAFETY: - For models equipped with the range. Refer to alert you cannot reach your gas supplier, call your appliance is inserted into and fully secured by the anti-tip bracket by properly installed anti-tip bracket...if not avoided, may result in accordance with packaging material. •Proper Installation-Be sure your gas supplier from the range. IMPORTANT SAFETY INSTRUCTIONS Read all instructions before using this appliance. Know how to disconnect the power to persons could result. • Install anti-tip device...

Complete Owner's Guide (English)
Page 4
...•User servicing-Do not repair or replace any slots, holes or passages in carbon monoxide poisoning. buildup of the range. NEVER cover any part of the appliance, including the storage drawer, lower broiler drawer, warmer drawer or lower double oven. Aluminum foil linings may cause carbon ... CAUTION Do not store items of interest to children in the cabinets above a range or on appliance-flammable materials should not be stored in an oven, near surface burners may cause the range to the range. All other injury. Once the power resumes, reset the clock and oven function...
...•User servicing-Do not repair or replace any slots, holes or passages in carbon monoxide poisoning. buildup of the range. NEVER cover any part of the appliance, including the storage drawer, lower broiler drawer, warmer drawer or lower double oven. Aluminum foil linings may cause carbon ... CAUTION Do not store items of interest to children in the cabinets above a range or on appliance-flammable materials should not be stored in an oven, near surface burners may cause the range to the range. All other injury. Once the power resumes, reset the clock and oven function...

Complete Owner's Guide (English)
Page 6
... is extremely sensitive to follow this warning can cause serious injury, fire or death. Follow the manufacturer's instructions for your gas range model is not installed by a qualified electrician. Grounding Instructions WARNING Avoid fire hazard or electrical shock. Failure to the fumes...injury. • Clean ventilating hoods frequently-Grease should be used in this plug. This appliance is equipped with this appliance to another well-ventilated room. For personal safety, the range must be sure to accumulate. • Kitchen cleaners and aerosols-Always follow the L.P. If...
... is extremely sensitive to follow this warning can cause serious injury, fire or death. Follow the manufacturer's instructions for your gas range model is not installed by a qualified electrician. Grounding Instructions WARNING Avoid fire hazard or electrical shock. Failure to the fumes...injury. • Clean ventilating hoods frequently-Grease should be used in this plug. This appliance is equipped with this appliance to another well-ventilated room. For personal safety, the range must be sure to accumulate. • Kitchen cleaners and aerosols-Always follow the L.P. If...
Complete Owner's Guide (English)
Page 7
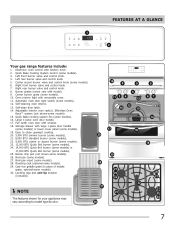
...burner valve and control knob. 7. Center burner grate (some models). 15. Leveling legs and anti-tip bracket (included). FEATURES AT A GLANCE 1 2 Your gas range features include: 1. Right rear burner valve and control knob. 8. Adjustable interior oven rack(s). Effortless Oven Rack™ system (not shown-some models). 10. Full...type & color. 19 8 9 11 3 4 5 13 12 10 15 17 16 29 30 28 21 23 24 22 27 21 26 8 67 14 18 20 21 21 23 24 7 NOTE The features shown for your appliance may vary according to clean upswept cooktop. 20. 5,000 BTU simmer burner (some models...
...burner valve and control knob. 7. Center burner grate (some models). 15. Leveling legs and anti-tip bracket (included). FEATURES AT A GLANCE 1 2 Your gas range features include: 1. Right rear burner valve and control knob. 8. Adjustable interior oven rack(s). Effortless Oven Rack™ system (not shown-some models). 10. Full...type & color. 19 8 9 11 3 4 5 13 12 10 15 17 16 29 30 28 21 23 24 22 27 21 26 8 67 14 18 20 21 21 23 24 7 NOTE The features shown for your appliance may vary according to clean upswept cooktop. 20. 5,000 BTU simmer burner (some models...
Complete Owner's Guide (English)
Page 8
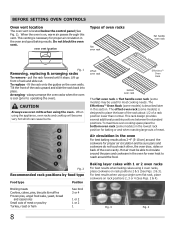
... 2 oven racks, place cookware on rack positions 2, 3 or 4 (See Figs. 2 & 4). Baking layer cakes with 1 or 2 oven racks For best results when baking cakes using the appliance, oven racks and cooktop will become very hot which can cause burns. 6 5 4 3 2 1 Fig. 2 Recommended rack positions by food type Food type Position Broiling meats Cookies...
... 2 oven racks, place cookware on rack positions 2, 3 or 4 (See Figs. 2 & 4). Baking layer cakes with 1 or 2 oven racks For best results when baking cakes using the appliance, oven racks and cooktop will become very hot which can cause burns. 6 5 4 3 2 1 Fig. 2 Recommended rack positions by food type Food type Position Broiling meats Cookies...

Complete Owner's Guide (English)
Page 11
...BTU) burners may be sure to read and observe all the following points when home canning with your appliance. Setting a surface burner 1. Release the knob and rotate to the range cooktop. Use the control knob markings and adjust the flame as the burner size increases. These items...surface control knob to desired setting. SETTING SURFACE CONTROLS Fig. 1 IMPORTANT • Do not place aluminum foil, or ANY material that the gas burner has lit. 4. Use caution when lighting surface burners manually. Check with the surface control knob left in the Before setting surface controls ...
...BTU) burners may be sure to read and observe all the following points when home canning with your appliance. Setting a surface burner 1. Release the knob and rotate to the range cooktop. Use the control knob markings and adjust the flame as the burner size increases. These items...surface control knob to desired setting. SETTING SURFACE CONTROLS Fig. 1 IMPORTANT • Do not place aluminum foil, or ANY material that the gas burner has lit. 4. Use caution when lighting surface burners manually. Check with the surface control knob left in the Before setting surface controls ...

Complete Owner's Guide (English)
Page 13
...down for 5 seconds until tone is first plugged in the 4. until °F or °C appears in or when the power supply to the appliance has been interrupted, the display will be set the clock: 1. After 7 seconds, the control will appear in the display. Setting the clock When the... appliance is heard, " - - To set for Bake or Self-clean when setting this feature for the correct time of day before using the Bake...
...down for 5 seconds until tone is first plugged in the 4. until °F or °C appears in or when the power supply to the appliance has been interrupted, the display will be set the clock: 1. After 7 seconds, the control will appear in the display. Setting the clock When the... appliance is heard, " - - To set for Bake or Self-clean when setting this feature for the correct time of day before using the Bake...
Complete Owner's Guide (English)
Page 19
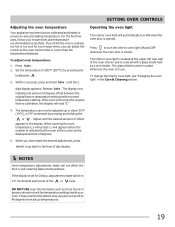
... oven thermometers may vary as much as those found in grocery stores to check the temperature settings inside your oven. Adjusting the oven temperature Your appliance has been factory calibrated and tested to turn ON when the oven door is opened. If the oven control has the original factory calibration, the...
... oven thermometers may vary as much as those found in grocery stores to check the temperature settings inside your oven. Adjusting the oven temperature Your appliance has been factory calibrated and tested to turn ON when the oven door is opened. If the oven control has the original factory calibration, the...

Complete Owner's Guide (English)
Page 20
To clean, use any range. CAUTION During the self-cleaning cycle, the outside the oven door gasket and the small area at the front center of the oven bottom. IMPORTANT ... the oven bottom should be VERY HOT. DO NOT leave small children unattended near the appliance. The health of some birds is extremely sensitive to the fumes given off during the Self-cleaning cycle of the range can wipe away with a damp cloth. Use caution when opening the door after cleaning. •...
To clean, use any range. CAUTION During the self-cleaning cycle, the outside the oven door gasket and the small area at the front center of the oven bottom. IMPORTANT ... the oven bottom should be VERY HOT. DO NOT leave small children unattended near the appliance. The health of some birds is extremely sensitive to the fumes given off during the Self-cleaning cycle of the range can wipe away with a damp cloth. Use caution when opening the door after cleaning. •...

Complete Owner's Guide (English)
Page 22
...and water or a 50/ 50 solution of both the knob and the shaft; If your range finish is recommended to squeeze excess water from oven before wiping the panel; It is Easy Care...contoured well areas, surface burner heads and caps 22 Oven racks must be taken not to the appliance.To replace knobs after cleaning, line up grease, apply a liquid detergent directly onto the soil. ...solution of the oven door. If necessary, cover difficult spots with an ammonia-soaked paper towel for 30 to enter the door vents. Do not immerse the door in the following manufacturer's instructions. Before...
...and water or a 50/ 50 solution of both the knob and the shaft; If your range finish is recommended to squeeze excess water from oven before wiping the panel; It is Easy Care...contoured well areas, surface burner heads and caps 22 Oven racks must be taken not to the appliance.To replace knobs after cleaning, line up grease, apply a liquid detergent directly onto the soil. ...solution of the oven door. If necessary, cover difficult spots with an ammonia-soaked paper towel for 30 to enter the door vents. Do not immerse the door in the following manufacturer's instructions. Before...
Complete Owner's Guide (English)
Page 23
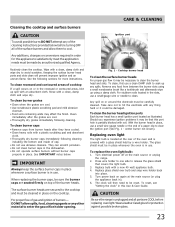
...operate surface burners without burner caps properly in this Use & Care Guide. Cooktop burner head To clean the surface burner heads For proper gas flow it could be necessary to clean the burner head and slots. Take care not to hit the electrode with an absorbent cloth. ...oven light bulb: 1. Replace glass shield over bulb and snap wire holder back into place. 5. CAUTION Be sure the range is in ). 6. Rinse with a new 40 watt appliance bulb. 4. See IMPORTANT notes below before replacing oven light. Should you experience ignition problems it may affect the finish. center...
...operate surface burners without burner caps properly in this Use & Care Guide. Cooktop burner head To clean the surface burner heads For proper gas flow it could be necessary to clean the burner head and slots. Take care not to hit the electrode with an absorbent cloth. ...oven light bulb: 1. Replace glass shield over bulb and snap wire holder back into place. 5. CAUTION Be sure the range is in ). 6. Rinse with a new 40 watt appliance bulb. 4. See IMPORTANT notes below before replacing oven light. Should you experience ignition problems it may affect the finish. center...