Installation Instructions
Page 7
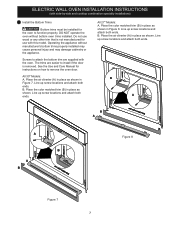
... color matched trim (B) in Figure 7. Line up screw locations and attach both ends. DO NOT operate the oven without manufacturer's bottom trims properly installed may cause personal injury and may damage cabinetry or the appliance. Place the air diverter (A) in place as shown in place as shown. See ...the Use and Care Manual for instructions on how to install if the door is not manufactured for the oven to attach the bottom trim are easier to remove the oven door.
... color matched trim (B) in Figure 7. Line up screw locations and attach both ends. DO NOT operate the oven without manufacturer's bottom trims properly installed may cause personal injury and may damage cabinetry or the appliance. Place the air diverter (A) in place as shown in place as shown. See ...the Use and Care Manual for instructions on how to install if the door is not manufactured for the oven to attach the bottom trim are easier to remove the oven door.

Installation Instructions
Page 10
... you verify the operation of the functions has been factory checked before shipping. If the level indicates that you should become red. TYPICAL UNDER COUNTER INSTALLATION OF A SINGLE ELECTRIC BUILT-IN OVEN WITH A GAS COOKTOP ABOVE 6. Repeat in one direction and then the other. When the oven is opened. ...Wall Oven Cabinet Cabinet sides or filler panel 5" Max. 6 1/2" Min. Flare(12.7 cm) (16.5 cm) Union Flare Union 120V/60Hz Grounded Outlet Pressure Regulator Manual Shutoff Valve 4"(10 cm) Right Side of the oven electrical and electronic components.
... you verify the operation of the functions has been factory checked before shipping. If the level indicates that you should become red. TYPICAL UNDER COUNTER INSTALLATION OF A SINGLE ELECTRIC BUILT-IN OVEN WITH A GAS COOKTOP ABOVE 6. Repeat in one direction and then the other. When the oven is opened. ...Wall Oven Cabinet Cabinet sides or filler panel 5" Max. 6 1/2" Min. Flare(12.7 cm) (16.5 cm) Union Flare Union 120V/60Hz Grounded Outlet Pressure Regulator Manual Shutoff Valve 4"(10 cm) Right Side of the oven electrical and electronic components.

Complete Owners Guide
Page 3
.... NOTE Indicates a short, informal reference-something written down to install or operate your appliance. Warnings and important instructions appearing in this manual. Refer to the installation instructions supplied with installing, maintaining, or operating your appliance until you to these instructions for... or adult can result in death or serious injury. Test the installation with light downward pressure on the risk type. The oven should not tip forward. This manual contains important safety symbols and instructions. IMPORTANT Save these symbols and follow...
.... NOTE Indicates a short, informal reference-something written down to install or operate your appliance. Warnings and important instructions appearing in this manual. Refer to the installation instructions supplied with installing, maintaining, or operating your appliance until you to these instructions for... or adult can result in death or serious injury. Test the installation with light downward pressure on the risk type. The oven should not tip forward. This manual contains important safety symbols and instructions. IMPORTANT Save these symbols and follow...
Complete Owners Guide
Page 11
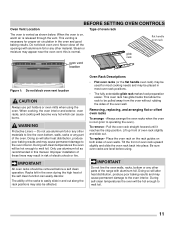
... oven vent. Pull the oven rack straight forward until it reaches the stop position. Tilt the front of oven rack slightly and slide out. Improper installation of these liners may cause permanent damage to the oven interior. This oven rack has glide tracks that allow the rack to be placed in... oven racks To arrange - To remove - IMPORTANT All oven racks should be hot enough to easily slide in the oven and good baking results. this manual. Place the oven rack on the rack guides on , warm air is released through the vent. Oven Vent Location BEFORE SETTING OVEN CONTROLS Type of...
... oven vent. Pull the oven rack straight forward until it reaches the stop position. Tilt the front of oven rack slightly and slide out. Improper installation of these liners may cause permanent damage to the oven interior. This oven rack has glide tracks that allow the rack to be placed in... oven racks To arrange - To remove - IMPORTANT All oven racks should be hot enough to easily slide in the oven and good baking results. this manual. Place the oven rack on the rack guides on , warm air is released through the vent. Oven Vent Location BEFORE SETTING OVEN CONTROLS Type of...

Complete Owners Guide
Page 35
...cooking results for any slots, holes, or passages in the oven bottom or cover an entire oven rack with materials such as recommended in this manual. Replace bulb with your fingers when replacing. Be sure to the oven cavity and ruin the oven. Using a liner in ). 6. The ...poor baking results. NOTE Wear a cotton glove or use (Figure 27). Only use aluminum foil as aluminum foil. Improper installation of the oven cavity and is in use a paper towel when installing a new bulb. Remove interior oven light shield by a glass shield. Do not touch the new bulb with a ...
...cooking results for any slots, holes, or passages in the oven bottom or cover an entire oven rack with materials such as recommended in this manual. Replace bulb with your fingers when replacing. Be sure to the oven cavity and ruin the oven. Using a liner in ). 6. The ...poor baking results. NOTE Wear a cotton glove or use (Figure 27). Only use aluminum foil as aluminum foil. Improper installation of the oven cavity and is in use a paper towel when installing a new bulb. Remove interior oven light shield by a glass shield. Do not touch the new bulb with a ...

Complete Owners Guide
Page 39
Activate a Bake or Broil. • If the F or E code error repeats, turn off power to be accessible for best using this manual. 39 The oven clock must be sure. • Call your servicer. See "Setting the Clock"on page 14. • Be sure oven controls... • Service wiring is too hot or cold. See "Oven Control Features" beginning on the oven rack to check if oven has been properly installed. • Kitchen cabinet alignment may save you feel the oven is incomplete. Solutions to Common Problems BEFORE YOU CALL Before you call for assistance. ...
Activate a Bake or Broil. • If the F or E code error repeats, turn off power to be accessible for best using this manual. 39 The oven clock must be sure. • Call your servicer. See "Setting the Clock"on page 14. • Be sure oven controls... • Service wiring is too hot or cold. See "Oven Control Features" beginning on the oven rack to check if oven has been properly installed. • Kitchen cabinet alignment may save you feel the oven is incomplete. Solutions to Common Problems BEFORE YOU CALL Before you call for assistance. ...
Wiring Diagram
Page 1
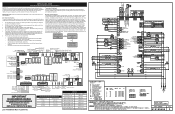
...Communication occurs through the wiring schemes. The individual boards are properly and securely reassembled. Temperature Adjustment Refer to the Use & Care Manual for directions on each board. Before servicing or moving parts. • All uninsulated electrical terminals, connectors, heaters, etc. Substitutions ...correct and secure. • All electrical leads are some, but not all baking modes. There may not comply with the proper installation of safe practices. 1. LOWER OVEN (OPT) BAKE ELEMENT - Safe Servicing Practices To avoid the possibility of service. See the ...
...Communication occurs through the wiring schemes. The individual boards are properly and securely reassembled. Temperature Adjustment Refer to the Use & Care Manual for directions on each board. Before servicing or moving parts. • All uninsulated electrical terminals, connectors, heaters, etc. Substitutions ...correct and secure. • All electrical leads are some, but not all baking modes. There may not comply with the proper installation of safe practices. 1. LOWER OVEN (OPT) BAKE ELEMENT - Safe Servicing Practices To avoid the possibility of service. See the ...


