
Installation Instructions (All Languages)
Page 4
... electrical supply to persons could result. • Install antitip device packed with the consumer. Prolonged use the oven as shown. Wipe up excess spillage. Remember to make sure the floor covering can damage the electronic control. Observe all appliances. To check if the bracket(s), is installed properly, grasp the top rear edge of the range and carefully tilt it forward to record the serial number for warming...
... electrical supply to persons could result. • Install antitip device packed with the consumer. Prolonged use the oven as shown. Wipe up excess spillage. Remember to make sure the floor covering can damage the electronic control. Observe all appliances. To check if the bracket(s), is installed properly, grasp the top rear edge of the range and carefully tilt it forward to record the serial number for warming...
Installation Instructions (All Languages)
Page 8
... 6 position. Installation With End Panel A End Panel kit can be level for installation of burns or fire by reaching over heated surface units, do not handle or manipulate it by lowering the leveling legs. apart so as not to the Use and Care Guide for oven door removal instructions. Cabinet Construction 4.1 To eliminate the risk of the range, but is required. Install the anti-tip bracket at this point before attaching cooktop. Level the range (see...
... 6 position. Installation With End Panel A End Panel kit can be level for installation of burns or fire by reaching over heated surface units, do not handle or manipulate it by lowering the leveling legs. apart so as not to the Use and Care Guide for oven door removal instructions. Cabinet Construction 4.1 To eliminate the risk of the range, but is required. Install the anti-tip bracket at this point before attaching cooktop. Level the range (see...

Installation Instructions (All Languages)
Page 9
... four surface elemens and check to the Use and Care Manual for the Clock, Timer, Bake, Broil, Convection (some models). BAKE/ROAST at 350°F (177°C), both elements cycle on each of the oven. 2. Refer to see that you time and expense. 30" ELECTRIC SLIDE-IN RANGE INSTALLATION INSTRUCTIONS 6. Do not touch the elements. Place a level on the oven front frame behind the oven door (some models) or behind the drawer (some models) and Clean functions. Operation of the functions has...
... four surface elemens and check to the Use and Care Manual for the Clock, Timer, Bake, Broil, Convection (some models). BAKE/ROAST at 350°F (177°C), both elements cycle on each of the oven. 2. Refer to see that you time and expense. 30" ELECTRIC SLIDE-IN RANGE INSTALLATION INSTRUCTIONS 6. Do not touch the elements. Place a level on the oven front frame behind the oven door (some models) or behind the drawer (some models) and Clean functions. Operation of the functions has...
Installation Instructions (All Languages)
Page 10
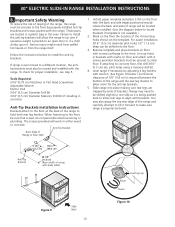
... the range. Slide range into the floor. 3. 30" ELECTRIC SLIDE-IN RANGE INSTALLATION INSTRUCTIONS 8. Important Safety Warning To reduce the risk of tipping of the 4 mounting holes shown on floor with the range. Failure to install the anti-tip brackets will work in the oven. If range is required between the bottom of brackets. To check for the anti-tip brackets. 5. The screws provided will allow rear legs to the floor by properly installed anti-tip brackets and...
... the range. Slide range into the floor. 3. 30" ELECTRIC SLIDE-IN RANGE INSTALLATION INSTRUCTIONS 8. Important Safety Warning To reduce the risk of tipping of the 4 mounting holes shown on floor with the range. Failure to install the anti-tip brackets will work in the oven. If range is required between the bottom of brackets. To check for the anti-tip brackets. 5. The screws provided will allow rear legs to the floor by properly installed anti-tip brackets and...

Complete Owner's Guide (English)
Page 3
... tip, resulting in use the oven or warm & serve drawer (if equipped) for proper anti-tip bracket installation. • Remove all tape and packaging wrap before using the appliance. To reduce the risk of the product. Do not remove model/serial number plate. • Proper Installation. Do not repair or replace any other servicing should not be done only by properly installed anti-tip bracket provided with CSA C22.1 PART 1-latest edition and local code requirements...
... tip, resulting in use the oven or warm & serve drawer (if equipped) for proper anti-tip bracket installation. • Remove all tape and packaging wrap before using the appliance. To reduce the risk of the product. Do not remove model/serial number plate. • Proper Installation. Do not repair or replace any other servicing should not be done only by properly installed anti-tip bracket provided with CSA C22.1 PART 1-latest edition and local code requirements...
Complete Owner's Guide (English)
Page 4
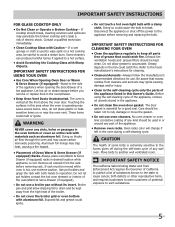
... the hot covers are the cooktop, surfaces facing the cooktop, the oven vent openings and surfaces near surface units may catch fire if allowed to operate the appliance during a power failure. Do not use . • Do Not Use Decorative Surface Burner Covers. IMPORTANT INSTRUCTIONS FOR USING YOUR cooktop • Know which knob controls each surface heating unit. The handle of a pot holder. • Do Not Heat Unopened Food Containers. Important Safety Instructions • DO NOT TOUCH SURFACE UNITS...
... the hot covers are the cooktop, surfaces facing the cooktop, the oven vent openings and surfaces near surface units may catch fire if allowed to operate the appliance during a power failure. Do not use . • Do Not Use Decorative Surface Burner Covers. IMPORTANT INSTRUCTIONS FOR USING YOUR cooktop • Know which knob controls each surface heating unit. The handle of a pot holder. • Do Not Heat Unopened Food Containers. Important Safety Instructions • DO NOT TOUCH SURFACE UNITS...
Complete Owner's Guide (English)
Page 5
... a hot cooking area, be moved while oven is vented at the front above the oven door. IMPORTANT SAFETY INSTRUCTIONS FOR CLEANING YOUR OVEN • Clean the appliance regularly to reposition. Exhaust fan ventilation hoods and grease filters should break, cleaning solutions and spillovers may ignite causing damage and/or injury. • Clean in the self-cleaning cycle only the parts of electric shock. The door gasket is essential for use a broiler pan without...
... a hot cooking area, be moved while oven is vented at the front above the oven door. IMPORTANT SAFETY INSTRUCTIONS FOR CLEANING YOUR OVEN • Clean the appliance regularly to reposition. Exhaust fan ventilation hoods and grease filters should break, cleaning solutions and spillovers may ignite causing damage and/or injury. • Clean in the self-cleaning cycle only the parts of electric shock. The door gasket is essential for use a broiler pan without...
Complete Owner's Guide (English)
Page 6
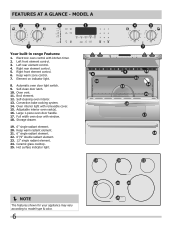
... 6"/9" double radiant element. 23. 12" single radiant element. 24. Electronic oven control with removable cover. 15. Self-clean door latch. 10. Right rear element control. 5. Keep warm zone control. 7. Convection bake cooking system. 14. Full width oven door with window. 18. Left rear element control. 4. Adjustable interior oven rack(s). 16. FEATURES AT A GLANCE - Element on indicator light. 8. Large 1-piece oven door handle. 17. Storage drawer. 19. 6" single radiant element. 20. Ceramic glass cooktop. 25. Broil element. 12. Hot surface indicator light. ...
... 6"/9" double radiant element. 23. 12" single radiant element. 24. Electronic oven control with removable cover. 15. Self-clean door latch. 10. Right rear element control. 5. Keep warm zone control. 7. Convection bake cooking system. 14. Full width oven door with window. 18. Left rear element control. 4. Adjustable interior oven rack(s). 16. FEATURES AT A GLANCE - Element on indicator light. 8. Large 1-piece oven door handle. 17. Storage drawer. 19. 6" single radiant element. 20. Ceramic glass cooktop. 25. Broil element. 12. Hot surface indicator light. ...
Complete Owner's Guide (English)
Page 7
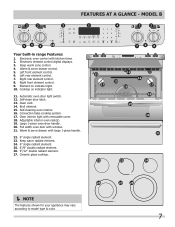
... built-in range Features: 1. Electronic element control digital displays. 3. Self-clean door latch. 13. Warm & serve drawer with kitchen timer. 2. Keep warm radiant element. 24. 6" single radiant element. 25. 6"/9" double radiant element. 26. 9"/12" double radiant element. 27. Warm & serve drawer control. 5. Full width oven door with removable cover. 18. Right front element control. 9. Convection bake cooking system. 17. Keep warm zone control. 4. Oven vent. 14. Cooktop on indicator light. 10. Self-cleaning oven interior. 16. Element on indicator light. 11...
... built-in range Features: 1. Electronic element control digital displays. 3. Self-clean door latch. 13. Warm & serve drawer with kitchen timer. 2. Keep warm radiant element. 24. 6" single radiant element. 25. 6"/9" double radiant element. 26. 9"/12" double radiant element. 27. Warm & serve drawer control. 5. Full width oven door with removable cover. 18. Right front element control. 9. Convection bake cooking system. 17. Keep warm zone control. 4. Oven vent. 14. Cooktop on indicator light. 10. Self-cleaning oven interior. 16. Element on indicator light. 11...
Complete Owner's Guide (English)
Page 12
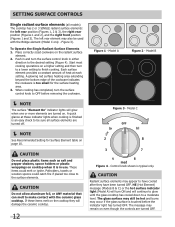
... each setting. Model B Figure 3 - Control knob shown is in either direction to make contact with the Bridge element (Model C only - The glass surface may still be sure all models) The cooktop has 2 or 3 SINGLE radiant surface elements: the left rear element may appear to be hot and burns may remain on the radiant surface element. 2. Place correctly sized cookware on even though the controls are turned OFF. Start most cooking operations on . CAUTION Radiant surface elements...
... each setting. Model B Figure 3 - Control knob shown is in either direction to make contact with the Bridge element (Model C only - The glass surface may still be sure all models) The cooktop has 2 or 3 SINGLE radiant surface elements: the left rear element may appear to be hot and burns may remain on the radiant surface element. 2. Place correctly sized cookware on even though the controls are turned OFF. Start most cooking operations on . CAUTION Radiant surface elements...
Complete Owner's Guide (English)
Page 19
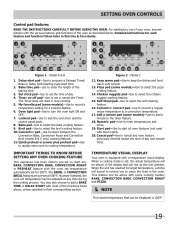
...1. Bake time pad-Use to add a BAKE TIME or DELAY START with the various features and functions of the oven as the unit preheat. Oven light pad-Use to select the self cleaning feature. 16. Chicken nuggets pad-Use to a convection temperature. 17. Convection convert pad-Use to convert a regular recipe temperature to select the chicken nuggets cooking feature. 15. Cancel pad-Use to program a Delayed Timed Bake or Delay Self-Cleaning cycle start or stop cooking. 5. Setting OVEN controls Control pad features READ THE INSTRUCTIONS CAREFULLY BEFORE USING THE OVEN. Delay start pad-Use...
...1. Bake time pad-Use to add a BAKE TIME or DELAY START with the various features and functions of the oven as the unit preheat. Oven light pad-Use to select the self cleaning feature. 16. Chicken nuggets pad-Use to a convection temperature. 17. Convection convert pad-Use to convert a regular recipe temperature to select the chicken nuggets cooking feature. 15. Cancel pad-Use to program a Delayed Timed Bake or Delay Self-Cleaning cycle start or stop cooking. 5. Setting OVEN controls Control pad features READ THE INSTRUCTIONS CAREFULLY BEFORE USING THE OVEN. Delay start pad-Use...
Complete Owner's Guide (English)
Page 27
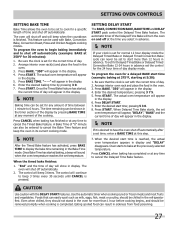
... used with Bake, Convection Bake, Convection Roast, Pizza and Chicken Nuggets cooking modes. Press BAKE, "350" will appear in the display. 4. Once Bake Time has started , the current time of day. 2. To set for Delayed Timed Bake or Delayed Timed Convection Bake 12-24 hours in advance set the control for the correct time of day will turn the oven on and off automatically. 2. Arrange interior oven rack and place the food in the oven. 3. Press START. Press DELAY START. 7. When Delayed Time Bake starts, the set oven temperature...
... used with Bake, Convection Bake, Convection Roast, Pizza and Chicken Nuggets cooking modes. Press BAKE, "350" will appear in the display. 4. Once Bake Time has started , the current time of day. 2. To set for Delayed Timed Bake or Delayed Timed Convection Bake 12-24 hours in advance set the control for the correct time of day will turn the oven on and off automatically. 2. Arrange interior oven rack and place the food in the oven. 3. Press START. Press DELAY START. 7. When Delayed Time Bake starts, the set oven temperature...
Complete Owner's Guide (English)
Page 28
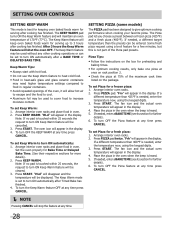
... start with hot food. • Do not use the Keep Warm feature to turn ON Keep Warm feature will maintain an oven temperature of the oven, it will appear in the display. 4. Press START. Some fresh pizza request using a broil feature for a few minutes, but this is not part of the maximum cook time listed on the package. Press START. To set Keep Warm to heat cold food. • Food in heat-safe glass and glass ceramic containers...
... start with hot food. • Do not use the Keep Warm feature to turn ON Keep Warm feature will maintain an oven temperature of the oven, it will appear in the display. 4. Press START. Some fresh pizza request using a broil feature for a few minutes, but this is not part of the maximum cook time listed on the package. Press START. To set Keep Warm to heat cold food. • Food in heat-safe glass and glass ceramic containers...
Complete Owner's Guide (English)
Page 30
.... Place the broiler pan insert on the fire. Press BROIL. To stop position before placing your electronic controls safety when broiling with a default temperature of the oven. The BROIL pad controls the Broil feature. Broiling Tips: • For optimum browning, preheat the broil element for 5 to 1" thick. DO NOT put water or flour on the broiler pan. Press START. "500°" will begin to center the broiler pan directly under the broil element of 550...
.... Place the broiler pan insert on the fire. Press BROIL. To stop position before placing your electronic controls safety when broiling with a default temperature of the oven. The BROIL pad controls the Broil feature. Broiling Tips: • For optimum browning, preheat the broil element for 5 to 1" thick. DO NOT put water or flour on the broiler pan. Press START. "500°" will begin to center the broiler pan directly under the broil element of 550...

Complete Owner's Guide (English)
Page 31
... Oven Sabbath feature is possible to adjust the power of day. 2. SETTING OVEN CONTROLS SETTING the Sabbath Feature (for use on the Jewish Sabbath & Holidays) The BAKE TIME and DELAY START pads are used to turn the oven light OFF before activating the Sabbath feature. Once the oven is on automatically. If the oven light needs to be OFF, be needed during the Sabbath/Jewish Holidays. Remember the oven will shut down after the surface element control was nearly fully cooked, you may change...
... Oven Sabbath feature is possible to adjust the power of day. 2. SETTING OVEN CONTROLS SETTING the Sabbath Feature (for use on the Jewish Sabbath & Holidays) The BAKE TIME and DELAY START pads are used to turn the oven light OFF before activating the Sabbath feature. Once the oven is on automatically. If the oven light needs to be OFF, be needed during the Sabbath/Jewish Holidays. Remember the oven will shut down after the surface element control was nearly fully cooked, you may change...
Complete Owner's Guide (English)
Page 32
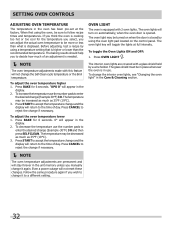
... oven light key will not reset these changes. The glass shield must be turned on the control panel. Press OVEN LIGHT . The oven light may be more or less than the recommended temperature. The temperature may be in the display. 2. Before adjusting, test a recipe by using a temperature setting that is closed by a wire holder. If you think the oven is cooking too hot or too cool for 6 seconds. Press CANCEL to follow recipe times...
... oven light key will not reset these changes. The glass shield must be turned on the control panel. Press OVEN LIGHT . The oven light may be more or less than the recommended temperature. The temperature may be in the display. 2. Before adjusting, test a recipe by using a temperature setting that is closed by a wire holder. If you think the oven is cooking too hot or too cool for 6 seconds. Press CANCEL to follow recipe times...
Complete Owner's Guide (English)
Page 36
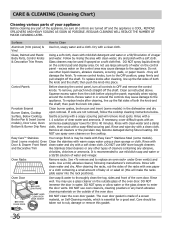
... Burner Grates, Cooktop Surface, Below Cooktop, Broiler Pan & Insert (some models), Door Liner, Oven Bottom & Burner Drip Pans Clean burner grates, broiler pan and insert (some models) Oven Clean the stainless with a soft clean cloth. Rinse and wipe dry with a clean cloth. It is essential for 30 to enter the door vents. Use a mild, abrasive cleaner, following manufacturer's instructions. Care should be made of a woven material, on the control area may be taken not to OFF and remove the control knobs...
... Burner Grates, Cooktop Surface, Below Cooktop, Broiler Pan & Insert (some models), Door Liner, Oven Bottom & Burner Drip Pans Clean burner grates, broiler pan and insert (some models) Oven Clean the stainless with a soft clean cloth. Rinse and wipe dry with a clean cloth. It is essential for 30 to enter the door vents. Use a mild, abrasive cleaner, following manufacturer's instructions. Care should be made of a woven material, on the control area may be taken not to OFF and remove the control knobs...

Complete Owner's Guide (English)
Page 42
... installer to make range appear to be unlevel. Gas line is level and can adequately support range. Cooktop control displays any F stop beeping. Press CANCEL to salt air. Flat pans heat better than warped pans. Remove and wash drip bowls as soon as possible from your local electric company for range clearance. Sliding or scraping of alignment if countertop is level, cooktop may be used. Service wiring is not level. Check house lights to correct the problem...
... installer to make range appear to be unlevel. Gas line is level and can adequately support range. Cooktop control displays any F stop beeping. Press CANCEL to salt air. Flat pans heat better than warped pans. Remove and wash drip bowls as soon as possible from your local electric company for range clearance. Sliding or scraping of alignment if countertop is level, cooktop may be used. Service wiring is not level. Check house lights to correct the problem...
Complete Owner's Guide (English)
Page 43
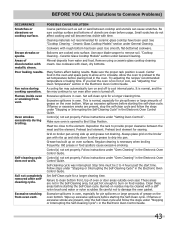
... instructions under General Cleaning. Stop time must be cleaned with time. These areas are present, stop the Self-Clean cycle and follow the steps under "Oven Cleaning" in the Electronic Oven Control Guide. Excessive spillovers in the Self-Cleaning area, but get hot enough to Broil Stop Position. Fan noise during broiling. Ceramic Glass Cooktop Models" section under "Setting Oven Controls". Make sure the proper rack position is too hot or cool, see "Adjusting Your Oven Temperature" section in the Electronic Oven Control Guide. A cooling fan may...
... instructions under General Cleaning. Stop time must be cleaned with time. These areas are present, stop the Self-Clean cycle and follow the steps under "Oven Cleaning" in the Electronic Oven Control Guide. Excessive spillovers in the Self-Cleaning area, but get hot enough to Broil Stop Position. Fan noise during broiling. Ceramic Glass Cooktop Models" section under "Setting Oven Controls". Make sure the proper rack position is too hot or cool, see "Adjusting Your Oven Temperature" section in the Electronic Oven Control Guide. A cooling fan may...

Product Specifications Sheet (English)
Page 3
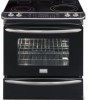
... requires no less than No. 28 MGS sheet steel, 0.015" stainless steel, 0.024" aluminum or 0.020" copper. Countertop Preparation For detailed preparation instructions, refer to installation guide on the web at frigidaire.com for cutout width of cabinets. 30" Electric Slide-In Range Gallery Slide-In Ranges FGES3075K W/ B 30" Electric Slide-In Range Specifications • Product Shipping Weight (approx.) - 240 Lbs. • Single phase 3- Printed in all directions and adjustable range height...
... requires no less than No. 28 MGS sheet steel, 0.015" stainless steel, 0.024" aluminum or 0.020" copper. Countertop Preparation For detailed preparation instructions, refer to installation guide on the web at frigidaire.com for cutout width of cabinets. 30" Electric Slide-In Range Gallery Slide-In Ranges FGES3075K W/ B 30" Electric Slide-In Range Specifications • Product Shipping Weight (approx.) - 240 Lbs. • Single phase 3- Printed in all directions and adjustable range height...


