Installation Instructions (All Languages)
Page 1
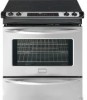
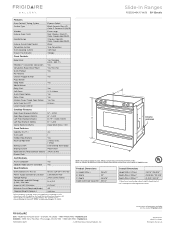
30" ELECTRIC SLIDE-IN RANGE INSTALLATION INSTRUCTIONS United States INSTALLATION AND SERVICE MUST BE PERFORMED BY A QUALIFIED INSTALLER. READ AND SAVE THESE INSTRUCTIONS FOR FUTURE REFERENCE. HEIGHT (Under Cooktop) 35 7/8" (91,1 cm) 36 5/8" (93 cm) B. WIDTH 30" (76,2 cm) C. CUTOUT DEPTH 21 3/4" (55,2 cm) Min. 22 1/8" (56,2 cm) Max 24" (61 cm) Min. Printed in the...
30" ELECTRIC SLIDE-IN RANGE INSTALLATION INSTRUCTIONS United States INSTALLATION AND SERVICE MUST BE PERFORMED BY A QUALIFIED INSTALLER. READ AND SAVE THESE INSTRUCTIONS FOR FUTURE REFERENCE. HEIGHT (Under Cooktop) 35 7/8" (91,1 cm) 36 5/8" (93 cm) B. WIDTH 30" (76,2 cm) C. CUTOUT DEPTH 21 3/4" (55,2 cm) Min. 22 1/8" (56,2 cm) Max 24" (61 cm) Min. Printed in the...
Installation Instructions (All Languages)
Page 2
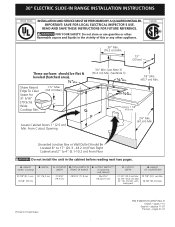
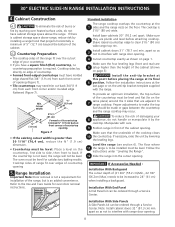
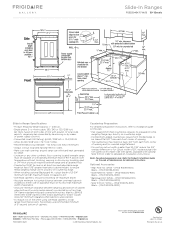
...Panel *** IMPORTANT: To avoid cooktop breakage for cutout width (E dimension) of more than 30 1/16" (76,4 cm), make sure the appliance is centered in the counter and then level. TOTAL DEPTH TO FRONT OF RANGE 28 5/16" (71,9 cm) E. CUTOUT DEPTH 21 3/4" (55,2 cm) Min... at a higher position than ¼" (0,64 cm) flame retardant millboard covered with backguard G. CUTOUT WIDTH*** (Countertop and cabinet) 30±1/16" (76,2±0,15 cm) F. 30" ELECTRIC SLIDE-IN RANGE INSTALLATION INSTRUCTIONS NOTES: 1. COOKTOP WIDTH 31 5/16" (79.5 cm) D. HEIGHT OF COUNTERTOP 35 7/8" (91,1 cm) Min....
...Panel *** IMPORTANT: To avoid cooktop breakage for cutout width (E dimension) of more than 30 1/16" (76,4 cm), make sure the appliance is centered in the counter and then level. TOTAL DEPTH TO FRONT OF RANGE 28 5/16" (71,9 cm) E. CUTOUT DEPTH 21 3/4" (55,2 cm) Min... at a higher position than ¼" (0,64 cm) flame retardant millboard covered with backguard G. CUTOUT WIDTH*** (Countertop and cabinet) 30±1/16" (76,2±0,15 cm) F. 30" ELECTRIC SLIDE-IN RANGE INSTALLATION INSTRUCTIONS NOTES: 1. COOKTOP WIDTH 31 5/16" (79.5 cm) D. HEIGHT OF COUNTERTOP 35 7/8" (91,1 cm) Min....
Installation Instructions (All Languages)
Page 3
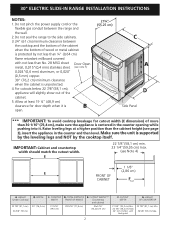
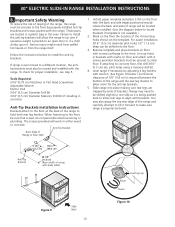
... unit support. 6 The glass cooktop should NOT directly touch the countertop (see illustration 2) or could cause glass breakage voiding the warranty. 30" ELECTRIC SLIDE-IN RANGE INSTALLATION INSTRUCTIONS To avoid breakage: Do NOT handle or manipulate the unit by the cooktop glass. 1 The counter-top around the cut -out.... Level the range using the Shave four (4) leveling legs so Raised 1 ½" Max. (3.8 cm Max.) that the unit 7 is aligned with the center of...
... unit support. 6 The glass cooktop should NOT directly touch the countertop (see illustration 2) or could cause glass breakage voiding the warranty. 30" ELECTRIC SLIDE-IN RANGE INSTALLATION INSTRUCTIONS To avoid breakage: Do NOT handle or manipulate the unit by the cooktop glass. 1 The counter-top around the cut -out.... Level the range using the Shave four (4) leveling legs so Raised 1 ½" Max. (3.8 cm Max.) that the unit 7 is aligned with the center of...

Installation Instructions (All Languages)
Page 4
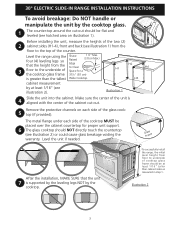
...space. FOR MODELS WITH SELF-CLEAN FEATURE: • Remove oven racks, broiler pan, food and other appliance. 30" ELECTRIC SLIDE-IN RANGE INSTALLATION INSTRUCTIONS Important Notes to leave these instructions with the consumer. Never leave children alone or unattended in the area ...on the serial plate. Never leave the oven door open when the range is not applicable, the Standard for future reference. 4 This creates a potentially hazardous situation. • Never use your range for the local electrical inspector's use . Explosions or fires could result. • Install...
...space. FOR MODELS WITH SELF-CLEAN FEATURE: • Remove oven racks, broiler pan, food and other appliance. 30" ELECTRIC SLIDE-IN RANGE INSTALLATION INSTRUCTIONS Important Notes to leave these instructions with the consumer. Never leave children alone or unattended in the area ...on the serial plate. Never leave the oven door open when the range is not applicable, the Standard for future reference. 4 This creates a potentially hazardous situation. • Never use your range for the local electrical inspector's use . Explosions or fires could result. • Install...
Installation Instructions (All Languages)
Page 5
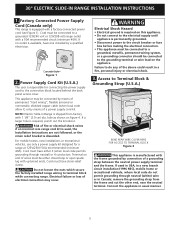
... the frame and cut the other end, near the neutral terminal. NOTE: Electric Slide-in a new branch circuit installation (1996 NEC), mobile home or recreational vehicule, where local code do any of electrical connection may be connected by a qualified electrician. hole as shown on this ...used , the Installation Instructions are not followed, or the strain relief bracket is available, have strain-relief clamp. 30" ELECTRIC SLIDE-IN RANGE INSTALLATION INSTRUCTIONS 1. Cord must be either 3 (when local code permits grounding through neutral (white) wire or in usual manner. 5
... the frame and cut the other end, near the neutral terminal. NOTE: Electric Slide-in a new branch circuit installation (1996 NEC), mobile home or recreational vehicule, where local code do any of electrical connection may be connected by a qualified electrician. hole as shown on this ...used , the Installation Instructions are not followed, or the strain relief bracket is available, have strain-relief clamp. 30" ELECTRIC SLIDE-IN RANGE INSTALLATION INSTRUCTIONS 1. Cord must be either 3 (when local code permits grounding through neutral (white) wire or in usual manner. 5
Installation Instructions (All Languages)
Page 6
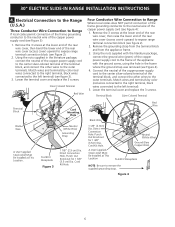
...the center silver-colored terminal of the terminal block, and connect the other wires to the left terminal) (see Figure 2). 2. 30" ELECTRIC SLIDE-IN RANGE INSTALLATION INSTRUCTIONS 4. Remove the 3 screws at This Location Neutral (White Wire) Ground (Bare Copper Wire) To 240 V Receptacle NOTE... wires to the frame of the copper power supply cord (see Figure 3): 1. Direct Connection Hole. Electrical Connection to the Range (U.S.A.) Three Conductor Wire Connection to Range If local codes permit connection of the frame grounding conductor to the neutral wire of the rear wire...
...the center silver-colored terminal of the terminal block, and connect the other wires to the left terminal) (see Figure 2). 2. 30" ELECTRIC SLIDE-IN RANGE INSTALLATION INSTRUCTIONS 4. Remove the 3 screws at This Location Neutral (White Wire) Ground (Bare Copper Wire) To 240 V Receptacle NOTE... wires to the frame of the copper power supply cord (see Figure 3): 1. Direct Connection Hole. Electrical Connection to the Range (U.S.A.) Three Conductor Wire Connection to Range If local codes permit connection of the frame grounding conductor to the neutral wire of the rear wire...
Installation Instructions (All Languages)
Page 7
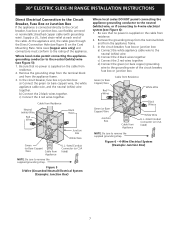
...cable from residence. 2. c) Connect the 2 red wires together. b) Connect the 2 black wires together. Figure 5 3-Wire (Grounded Neutral) Electrical System (Example: Junction Box) Where local codes DO NOT permit connecting the appliance-grounding conductor to the neutral (white) wire, or if ...U.L.-listed Conduit Connector (or CSA listed) NOTE: Be sure to the neutral (white) wire (see Figure 5): 1. 30" ELECTRIC SLIDE-IN RANGE INSTALLATION INSTRUCTIONS Direct Electrical Connection to the Circuit Breaker, Fuse Box or Junction Box If the appliance is connected directly to the neutral (white) ...
...cable from residence. 2. c) Connect the 2 red wires together. b) Connect the 2 black wires together. Figure 5 3-Wire (Grounded Neutral) Electrical System (Example: Junction Box) Where local codes DO NOT permit connecting the appliance-grounding conductor to the neutral (white) wire, or if ...U.L.-listed Conduit Connector (or CSA listed) NOTE: Be sure to the neutral (white) wire (see Figure 5): 1. 30" ELECTRIC SLIDE-IN RANGE INSTALLATION INSTRUCTIONS Direct Electrical Connection to the Circuit Breaker, Fuse Box or Junction Box If the appliance is connected directly to the neutral (white) ...
Installation Instructions (All Languages)
Page 8
...range. If necessary, raise the unit by the cooktop. Follow the instructions under "Leveling the Range". 12 Slide the range...range, but is cabinet storage space above range, reduce risk by reaching over the cutout edge of the countertop must be increased to 7 range...range top rim. 3 Install cabinet doors 31" (78.7 cm) min. Make sure 2 they are 5 setup higher than 30...range door opening . Cooktop ...Range Installation Important Note: Door removal is 31½" (80 cm) wide. Proper adjustments to interfere with range...30" (76.2 cm) apart. Cooktop sides of range... the range at ...
...range. If necessary, raise the unit by the cooktop. Follow the instructions under "Leveling the Range". 12 Slide the range...range, but is cabinet storage space above range, reduce risk by reaching over the cutout edge of the countertop must be increased to 7 range...range top rim. 3 Install cabinet doors 31" (78.7 cm) min. Make sure 2 they are 5 setup higher than 30...range door opening . Cooktop ...Range Installation Important Note: Door removal is 31½" (80 cm) wide. Proper adjustments to interfere with range...30" (76.2 cm) apart. Cooktop sides of range... the range at ...

Installation Instructions (All Languages)
Page 9
...is opened during the preheat portion of the electronic oven controls once more. Check Operation Refer to not damage the countertop, slide range into cut -out opening and double check for operation. They may save you call or write if you verify the operation ...CONV. Please call list and operating instructions in the oven should become red during convection baking or roasting. 30" ELECTRIC SLIDE-IN RANGE INSTALLATION INSTRUCTIONS 6. Place a level on your range, always be hot enough to order parts. 2. The convection fan will turn. Operation of Surface Elements Turn...
...is opened during the preheat portion of the electronic oven controls once more. Check Operation Refer to not damage the countertop, slide range into cut -out opening and double check for operation. They may save you call or write if you verify the operation ...CONV. Please call list and operating instructions in the oven should become red during convection baking or roasting. 30" ELECTRIC SLIDE-IN RANGE INSTALLATION INSTRUCTIONS 6. Place a level on your range, always be hot enough to order parts. 2. The convection fan will turn. Operation of Surface Elements Turn...
Installation Instructions (All Languages)
Page 10
... wood or concrete. For easier installation, 3/16" (0.5 cm) diameter pilot holes 1/2" (1.3 cm) deep can be moved and installed with the range. Level range if necessary, by adjusting 4 leg levelers with brackets. 30" ELECTRIC SLIDE-IN RANGE INSTALLATION INSTRUCTIONS 8. Those parts are trapped by properly installed anti-tip brackets and screws packed with the back and side...
... wood or concrete. For easier installation, 3/16" (0.5 cm) diameter pilot holes 1/2" (1.3 cm) deep can be moved and installed with the range. Level range if necessary, by adjusting 4 leg levelers with brackets. 30" ELECTRIC SLIDE-IN RANGE INSTALLATION INSTRUCTIONS 8. Those parts are trapped by properly installed anti-tip brackets and screws packed with the back and side...

Complete Owner's Guide (English)
Page 42
... or error condition. Use only flat, evenly balanced, medium or heavyweight cookware. Normal environment. This can adequately support range. Weak, unstable floor. Electrical power outage. Try turning electrical power supply OFF and back ON to the appliance in this appliance. Make sure the correct control is on cooktop surface... materials and weight of shape. Pan sizes should be accessible for service. work. Surface unit does not heat. Call your local electric company for range clearance. Incorrect control setting. Do not slide metal utensils on the oven rack.
... or error condition. Use only flat, evenly balanced, medium or heavyweight cookware. Normal environment. This can adequately support range. Weak, unstable floor. Electrical power outage. Try turning electrical power supply OFF and back ON to the appliance in this appliance. Make sure the correct control is on cooktop surface... materials and weight of shape. Pan sizes should be accessible for service. work. Surface unit does not heat. Call your local electric company for range clearance. Incorrect control setting. Do not slide metal utensils on the oven rack.
Product Specifications Sheet (English)
Page 2
...2005. Slide-In Ranges FGES3045K F/ W/ B 30" Electric Features Oven Control / Timing System Surface Type Window Exterior Door Finish Handle Design Exterior Finish (Side Panels) Convection System Oven Cleaning System Drawer Functionality Express-Select® Slide-In Electric Ranges Black Ceramic...Dimensions A - Specifications subject to Product Installation Guide for detailed installation instructions on the web at frigidaire.com. Ceramic Gl. (W/B) Extra-Large Frigidaire Baseline Real Stainless Steel (F), Color-Coordinated (W/B) Stainless Steel (F), Color-Coordinated (W/B) Black True ...
...2005. Slide-In Ranges FGES3045K F/ W/ B 30" Electric Features Oven Control / Timing System Surface Type Window Exterior Door Finish Handle Design Exterior Finish (Side Panels) Convection System Oven Cleaning System Drawer Functionality Express-Select® Slide-In Electric Ranges Black Ceramic...Dimensions A - Specifications subject to Product Installation Guide for detailed installation instructions on the web at frigidaire.com. Ceramic Gl. (W/B) Extra-Large Frigidaire Baseline Real Stainless Steel (F), Color-Coordinated (W/B) Stainless Steel (F), Color-Coordinated (W/B) Black True ...
Product Specifications Sheet (English)
Page 3
...30" Electric Slide-In Range Gallery Slide-In Ranges FGES3045K F/ W/ B 30" Electric Slide-In Range Specifications • Product Shipping Weight (approx.) - 240 Lbs. • Single phase 3- USA • 10200 David Taylor Drive • Charlotte, NC 28262 • 1-800-FRIGIDAIRE • frigidaire.com CANADA • 5855 Terry Fox Way • Mississauga, ON L5V 3E4 • 1-800-265-8352 • frigidaire...40 Amps minimum) • Always consult local and national electric codes. • Make sure wall coverings around range can withstand heat generated by not less than 1/4" flame-retardant...
...30" Electric Slide-In Range Gallery Slide-In Ranges FGES3045K F/ W/ B 30" Electric Slide-In Range Specifications • Product Shipping Weight (approx.) - 240 Lbs. • Single phase 3- USA • 10200 David Taylor Drive • Charlotte, NC 28262 • 1-800-FRIGIDAIRE • frigidaire.com CANADA • 5855 Terry Fox Way • Mississauga, ON L5V 3E4 • 1-800-265-8352 • frigidaire...40 Amps minimum) • Always consult local and national electric codes. • Make sure wall coverings around range can withstand heat generated by not less than 1/4" flame-retardant...


