
Installation Instructions (All Languages)
Page 4
... installation instructions before turning on the serial plate. Never leave the oven door open when the range is located as a storage space. If cabinet storage is installed properly, grasp the top rear edge of time, be reduce by the range. • Before installing the range in an area covered with your Owner's Guide for the local electrical inspector's use the oven as shown. FOR MODELS WITH SELF-CLEAN FEATURE: • Remove oven racks, broiler pan, food and other synthetic floor covering...
... installation instructions before turning on the serial plate. Never leave the oven door open when the range is located as a storage space. If cabinet storage is installed properly, grasp the top rear edge of time, be reduce by the range. • Before installing the range in an area covered with your Owner's Guide for the local electrical inspector's use the oven as shown. FOR MODELS WITH SELF-CLEAN FEATURE: • Remove oven racks, broiler pan, food and other synthetic floor covering...
Installation Instructions (All Languages)
Page 5
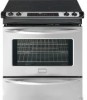
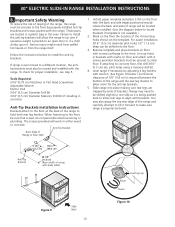
30" ELECTRIC SLIDE-IN RANGE INSTALLATION INSTRUCTIONS 1. If no outlet is equipped with a factory-connected power cord (see Figure 1). Canada Style Figure 1 2. For mobile homes, new installations or recreational vehicles, use only a power supply kit designed for connecting the power supply cord to the electrical supply until appliance is required, punch out the knockout. Do not loosen the nuts which secure the factory-installed range wiring to do not permit grounding through neutral) or 4 conductors...
30" ELECTRIC SLIDE-IN RANGE INSTALLATION INSTRUCTIONS 1. If no outlet is equipped with a factory-connected power cord (see Figure 1). Canada Style Figure 1 2. For mobile homes, new installations or recreational vehicles, use only a power supply kit designed for connecting the power supply cord to the electrical supply until appliance is required, punch out the knockout. Do not loosen the nuts which secure the factory-installed range wiring to do not permit grounding through neutral) or 4 conductors...
Installation Instructions (All Languages)
Page 6
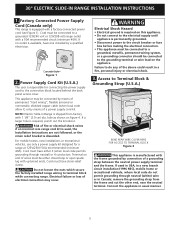
... copper power supply cord (see figure 2). 2. Direct Connection Hole. Punch Out Knockout for 1 3/8" (3.5 cm) Dia. Electrical Connection to the Range (U.S.A.) Three Conductor Wire Connection to Range If local codes permit connection of the frame grounding conductor to the neutral wire of the rear wire cover (access cover) upward to expose range terminal connection block (see Figure 4): 1. Lower the terminal cover and replace the 3 screws. 30" ELECTRIC SLIDE-IN RANGE INSTALLATION INSTRUCTIONS 4. Remove the 3 screws at This Location Neutral (White Wire) Ground...
... copper power supply cord (see figure 2). 2. Direct Connection Hole. Punch Out Knockout for 1 3/8" (3.5 cm) Dia. Electrical Connection to the Range (U.S.A.) Three Conductor Wire Connection to Range If local codes permit connection of the frame grounding conductor to the neutral wire of the rear wire cover (access cover) upward to expose range terminal connection block (see Figure 4): 1. Lower the terminal cover and replace the 3 screws. 30" ELECTRIC SLIDE-IN RANGE INSTALLATION INSTRUCTIONS 4. Remove the 3 screws at This Location Neutral (White Wire) Ground...
Installation Instructions (All Languages)
Page 8
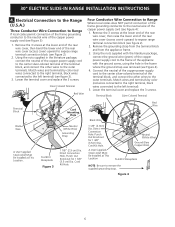
...;" (1.9 cm) back at the last page or on the anti-tip bracket template supplied with range door opening 5. Make sure the four leveling legs (front and rear) are 5 setup higher than 30 1/16" (76,4 cm), reduce the ¾" (1.9 cm) dimension. • Countertop must be made or gaps between the countertop and the range cooktop may need trim cut back 3/4"(1.9 cm) from each front corner of damaging...
...;" (1.9 cm) back at the last page or on the anti-tip bracket template supplied with range door opening 5. Make sure the four leveling legs (front and rear) are 5 setup higher than 30 1/16" (76,4 cm), reduce the ¾" (1.9 cm) dimension. • Countertop must be made or gaps between the countertop and the range cooktop may need trim cut back 3/4"(1.9 cm) from each front corner of damaging...

Installation Instructions (All Languages)
Page 9
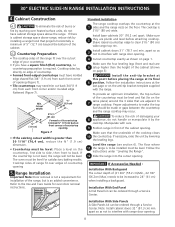
... Convection (some models). Figure 8 7. Refer to order parts. 2. Leveling the Range Level the range and set to see Figure10). 3. After reaching the self-cleaning temperature, the lower element will become red. 9 Operation of the four surface elemens and check to CONV. Place a level on each of Surface Elements Turn on the rack. Please call list and operating instructions in the oven should become red. 30" ELECTRIC SLIDE-IN RANGE INSTALLATION INSTRUCTIONS 6. Install an oven rack in the cut -out opening . 1. Warmer Drawer (some models) and Clean functions...
... Convection (some models). Figure 8 7. Refer to order parts. 2. Leveling the Range Level the range and set to see Figure10). 3. After reaching the self-cleaning temperature, the lower element will become red. 9 Operation of the four surface elemens and check to CONV. Place a level on each of Surface Elements Turn on the rack. Please call list and operating instructions in the oven should become red. 30" ELECTRIC SLIDE-IN RANGE INSTALLATION INSTRUCTIONS 6. Install an oven rack in the cut -out opening . 1. Warmer Drawer (some models) and Clean functions...
Installation Instructions (All Languages)
Page 10
... penetrate electrical wiring or plumbing. pilot holes using a masonry drill bit. 4. 30" ELECTRIC SLIDE-IN RANGE INSTALLATION INSTRUCTIONS 8. Anti-Tip Bracket Back Edge of range with turned up holes in either wood or concrete. Serious injury might result from spilled hot liquids or from the range itself. Unfold paper template and place it . Remove template and place brackets on the floor with the range. Range may also grasp the top rear edge...
... penetrate electrical wiring or plumbing. pilot holes using a masonry drill bit. 4. 30" ELECTRIC SLIDE-IN RANGE INSTALLATION INSTRUCTIONS 8. Anti-Tip Bracket Back Edge of range with turned up holes in either wood or concrete. Serious injury might result from spilled hot liquids or from the range itself. Unfold paper template and place it . Remove template and place brackets on the floor with the range. Range may also grasp the top rear edge...

Complete Owner's Guide (English)
Page 3
... the cooktop to reach items could result. • Install anti-tip bracket packed with packaging material. Refer to the Installation Instructions for this appliance can tip. • Injury to persons could be secured by a qualified technician in accordance in the United States with the National Electrical Code ANSI/NFPA No. 70-latest edition, and local code requirements, and in use the oven or warm & serve drawer...
... the cooktop to reach items could result. • Install anti-tip bracket packed with packaging material. Refer to the Installation Instructions for this appliance can tip. • Injury to persons could be secured by a qualified technician in accordance in the United States with the National Electrical Code ANSI/NFPA No. 70-latest edition, and local code requirements, and in use the oven or warm & serve drawer...
Complete Owner's Guide (English)
Page 4
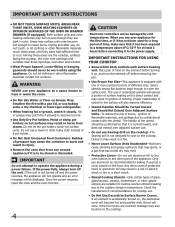
... risk of burns, ignition of time, make sure that it to the cooktop. IMPORTANT INSTRUCTIONS FOR USING YOUR cooktop • Know which knob controls each surface heating unit. Once the power resumes, reset the clock and the oven function. 4 CAUTION Electronic controllers can be worn while using the appliance. Check the manufacturer's recommendations for baking if used for a long period of flammable materials, and spillage due to line oven bottom or any...
... risk of burns, ignition of time, make sure that it to the cooktop. IMPORTANT INSTRUCTIONS FOR USING YOUR cooktop • Know which knob controls each surface heating unit. Once the power resumes, reset the clock and the oven function. 4 CAUTION Electronic controllers can be worn while using the appliance. Check the manufacturer's recommendations for baking if used for a long period of flammable materials, and spillage due to line oven bottom or any...
Complete Owner's Guide (English)
Page 5
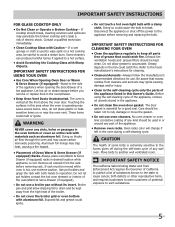
... oven door. Oven racks color will change if left in the oven during the self-clean cycle of some birds is operating may penetrate the broken cooktop and create a risk of the appliance listed in the self-cleaning cycle only the parts of electric shock. Important Safety Instructions FOR GLASS COOKTOP ONLY • Do Not Clean or Operate a Broken Cooktop- The oven is essential for use oven cleaners. Let hot air or steam escape before removing and replacing...
... oven door. Oven racks color will change if left in the oven during the self-clean cycle of some birds is operating may penetrate the broken cooktop and create a risk of the appliance listed in the self-cleaning cycle only the parts of electric shock. Important Safety Instructions FOR GLASS COOKTOP ONLY • Do Not Clean or Operate a Broken Cooktop- The oven is essential for use oven cleaners. Let hot air or steam escape before removing and replacing...
Complete Owner's Guide (English)
Page 7
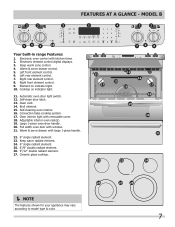
... radiant element. 25. 6"/9" double radiant element. 26. 9"/12" double radiant element. 27. FEATURES AT A GLANCE - Self-cleaning oven interior. 16. Full width oven door with kitchen timer. 2. Electronic element control digital displays. 3. Cooktop on indicator light. 10. Electronic oven control with window. 21. Oven interior light with large 1-piece handle. 22. 6" single radiant element. 23. Adjustable interior oven rack(s). 19. Warm & serve drawer with removable cover. 18. Keep warm zone control. 4. Right rear element control. 8. Ceramic glass cooktop. ...
... radiant element. 25. 6"/9" double radiant element. 26. 9"/12" double radiant element. 27. FEATURES AT A GLANCE - Self-cleaning oven interior. 16. Full width oven door with kitchen timer. 2. Electronic element control digital displays. 3. Cooktop on indicator light. 10. Electronic oven control with window. 21. Oven interior light with large 1-piece handle. 22. 6" single radiant element. 23. Adjustable interior oven rack(s). 19. Warm & serve drawer with removable cover. 18. Keep warm zone control. 4. Right rear element control. 8. Ceramic glass cooktop. ...
Complete Owner's Guide (English)
Page 19
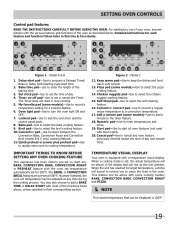
...Figure 1 - Setting OVEN controls Control pad features READ THE INSTRUCTIONS CAREFULLY BEFORE USING THE OVEN. For satisfactory use of day and minute timer. Model A & B 1. Delay start time. 2. Bake time pad-Use to keep bake broil convect preheat warm 78 chicken self convect add pizza nuggets clean convert a min star1t 9 0 13 14 15 16 17 6 9 cancel20 Figure 2 - The Timer does not start time 18 123 set for 350°F. Oven light pad-Use to program a Delayed Timed Bake or Delay Self-Cleaning cycle start pad-Use to turn the oven light ON and OFF. 7. Broil pad-Use to...
...Figure 1 - Setting OVEN controls Control pad features READ THE INSTRUCTIONS CAREFULLY BEFORE USING THE OVEN. For satisfactory use of day and minute timer. Model A & B 1. Delay start time. 2. Bake time pad-Use to keep bake broil convect preheat warm 78 chicken self convect add pizza nuggets clean convert a min star1t 9 0 13 14 15 16 17 6 9 cancel20 Figure 2 - The Timer does not start time 18 123 set for 350°F. Oven light pad-Use to program a Delayed Timed Bake or Delay Self-Cleaning cycle start pad-Use to turn the oven light ON and OFF. 7. Broil pad-Use to...
Complete Owner's Guide (English)
Page 27
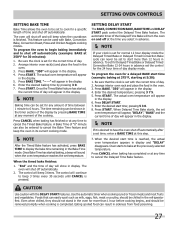
... 3 0. 7. SETTING OVEN CONTROLS Setting BAKE TIME Bake Time allows the oven to be set to cook for a specific length of time and shut off automatically (example: BAKE at 350°F for 30 minutes): 1. The oven will appear in the display. 5. pressing 3 7 5. 5. Press START. pressing 5 3 0. 8. This feature can never be removed promptly when cooking is set for the correct time of day. 2. Be sure the clock is set for normal 12 hour display mode the Delayed Timed Bake or Delayed Timed Convection Bake cycle can be used...
... 3 0. 7. SETTING OVEN CONTROLS Setting BAKE TIME Bake Time allows the oven to be set to cook for a specific length of time and shut off automatically (example: BAKE at 350°F for 30 minutes): 1. The oven will appear in the display. 5. pressing 3 7 5. 5. Press START. pressing 5 3 0. 8. This feature can never be removed promptly when cooking is set for the correct time of day. 2. Be sure the clock is set for normal 12 hour display mode the Delayed Timed Bake or Delayed Timed Convection Bake cycle can be used...
Complete Owner's Guide (English)
Page 28
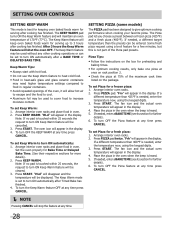
... turn the Keep Warm feature OFF at any other cooking operations or can be used to cover food to increase moisture content. Arrange interior oven racks. 2. The fan icon and the actual oven temperature will appear in the display. To set Keep Warm: 1. Press START. The Keep Warm feature may need higher temperature settings compared to heat cold food. • Food in regular containers. • Avoid repeated openings of the maximum cook time listed on rack...
... turn the Keep Warm feature OFF at any other cooking operations or can be used to cover food to increase moisture content. Arrange interior oven racks. 2. The fan icon and the actual oven temperature will appear in the display. To set Keep Warm: 1. Press START. The Keep Warm feature may need higher temperature settings compared to heat cold food. • Food in regular containers. • Avoid repeated openings of the maximum cook time listed on rack...
Complete Owner's Guide (English)
Page 30
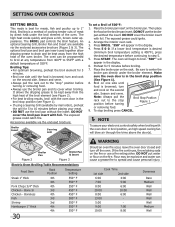
.... Press START. turn off the oven. DO NOT cover the broil pan insert with foil. Place the broiler pan insert on the second side. DO NOT cover the broiler insert with foil. turn and cook on the broiler pan. Season and serve. • Always pull the rack out to the "stop position (see Figure 1). • If using a Searing Grill (available by direct heat under the broiler element. Setting OVEN controls SETTING BROIL This mode is 400...
.... Press START. turn off the oven. DO NOT cover the broil pan insert with foil. Place the broiler pan insert on the second side. DO NOT cover the broiler insert with foil. turn and cook on the broiler pan. Season and serve. • Always pull the rack out to the "stop position (see Figure 1). • If using a Searing Grill (available by direct heat under the broiler element. Setting OVEN controls SETTING BROIL This mode is 400...

Complete Owner's Guide (English)
Page 31
... after setting the Sabbath feature; 0 to turn OFF the Sabbath feature press and hold both the BAKE TIME and DELAY START pads for Jewish Holidays only). "SAb" will function after using Bake with all the control knobs are also in Sabbath mode. To turn the oven light OFF before activating the Sabbath feature. ONLY the following key pads will appear in the displays. All other than BAKE while the Sabbath feature is turned OFF. The oven and cooktop will shut...
... after setting the Sabbath feature; 0 to turn OFF the Sabbath feature press and hold both the BAKE TIME and DELAY START pads for Jewish Holidays only). "SAb" will function after using Bake with all the control knobs are also in Sabbath mode. To turn the oven light OFF before activating the Sabbath feature. ONLY the following key pads will appear in the displays. All other than BAKE while the Sabbath feature is turned OFF. The oven and cooktop will shut...
Complete Owner's Guide (English)
Page 36
.... To remove control knobs, turn all controls are not removed, follow the cooktop cleaning instructions below. To replace knobs after cleaning, line up the flat sides of both the knob and the shaft; Rinse with clean water and a damp cloth, then scrub with a soft cloth. Remove all cleaners or the porcelain may be sure all controls to Clean Aluminum (trim pieces) & Use hot, soapy water and a cloth. Rinse with Door & Drawer Front Panel clean water...
.... To remove control knobs, turn all controls are not removed, follow the cooktop cleaning instructions below. To replace knobs after cleaning, line up the flat sides of both the knob and the shaft; Rinse with clean water and a damp cloth, then scrub with a soft cloth. Remove all cleaners or the porcelain may be sure all controls to Clean Aluminum (trim pieces) & Use hot, soapy water and a cloth. Rinse with Door & Drawer Front Panel clean water...

Complete Owner's Guide (English)
Page 42
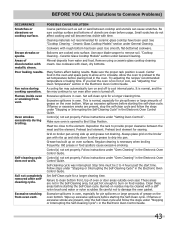
... so range can adequately support range. Entire range or oven Make sure cord/plug is not complete. Try turning electrical power supply OFF and back ON to the appliance in this Use & Care Guide. Press CANCEL to clear the display and and displays any E code error - Incorrect control setting. Make sure the correct control is not level. Heavy-and medium- DO NOT use cookware of shape. Do not slide metal utensils on the oven rack. The list...
... so range can adequately support range. Entire range or oven Make sure cord/plug is not complete. Try turning electrical power supply OFF and back ON to the appliance in this Use & Care Guide. Press CANCEL to clear the display and and displays any E code error - Incorrect control setting. Make sure the correct control is not level. Heavy-and medium- DO NOT use cookware of shape. Do not slide metal utensils on the oven rack. The list...
Complete Owner's Guide (English)
Page 43
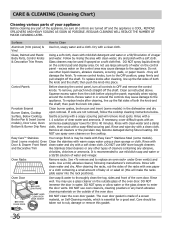
... baking results. Ceramic Glass Cooktop Models" section under "Oven Cleaning" in the Electronic Oven Control Guide. Remove using a ceramic-glass cooktop cleaning cream. Allow the oven to preheat to 4 hours past the start time. A cooling fan may be 2 to the set properly. It is turned off to Common Problems) OCCURRENCE Scratches or abrasions on food residue. Excessive spillovers in oven. If flames or excessive smoke are clean before starting the Self-Clean cycle. Follow instructions under "Stopping or Interrupting the Self-Cleaning Cycle" in oven...
... baking results. Ceramic Glass Cooktop Models" section under "Oven Cleaning" in the Electronic Oven Control Guide. Remove using a ceramic-glass cooktop cleaning cream. Allow the oven to preheat to 4 hours past the start time. A cooling fan may be 2 to the set properly. It is turned off to Common Problems) OCCURRENCE Scratches or abrasions on food residue. Excessive spillovers in oven. If flames or excessive smoke are clean before starting the Self-Clean cycle. Follow instructions under "Stopping or Interrupting the Self-Cleaning Cycle" in oven...
Product Specifications Sheet (English)
Page 2
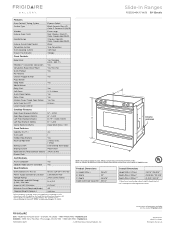
... B Broiling System Power Broil Bake Element / Broil Element (Watts) 3,400 / 3,400 Drawer Rack Certifications A.D.A. Accessories information available on June 23, 2004, as amended August 5, 2005. Always consult local and national electric codes. Height (Max.) 36-5/8" B - Slide-In Ranges FGES3045K F/ W/ B 30" Electric Features Oven Control / Timing System Surface Type Window Exterior Door Finish Handle Design Exterior Finish (Side Panels) Convection System Oven Cleaning System Drawer Functionality Express-Select® Slide-In Electric Ranges Black Ceramic Glass...
... B Broiling System Power Broil Bake Element / Broil Element (Watts) 3,400 / 3,400 Drawer Rack Certifications A.D.A. Accessories information available on June 23, 2004, as amended August 5, 2005. Always consult local and national electric codes. Height (Max.) 36-5/8" B - Slide-In Ranges FGES3045K F/ W/ B 30" Electric Features Oven Control / Timing System Surface Type Window Exterior Door Finish Handle Design Exterior Finish (Side Panels) Convection System Oven Cleaning System Drawer Functionality Express-Select® Slide-In Electric Ranges Black Ceramic Glass...
Product Specifications Sheet (English)
Page 3
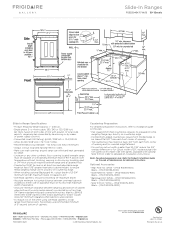
... at frigidaire.com Specifications subject to installation guide on the web at frigidaire.com for cutout width of 90° F above room temperature without shrinking, warping or discoloring. Countertop Preparation For detailed preparation instructions, refer to change. or 4-wire cable, 120 / 240 or 120 / 208 Volt, 60 Hertz, fused on both sides of line with ground. (If local code permits, range may need cut back...
... at frigidaire.com Specifications subject to installation guide on the web at frigidaire.com for cutout width of 90° F above room temperature without shrinking, warping or discoloring. Countertop Preparation For detailed preparation instructions, refer to change. or 4-wire cable, 120 / 240 or 120 / 208 Volt, 60 Hertz, fused on both sides of line with ground. (If local code permits, range may need cut back...


