Installation Instructions (All Languages)
Page 1
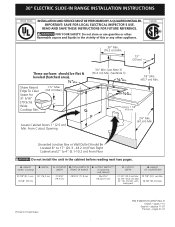
...and 2" to 4" (5.1-10.2 cm) From Floor Do not install the unit in United States P/N 318201616 (0907) Rev. TOTAL DEPTH TO FRONT OF RANGE 28 5/16" (71,9 cm) E. HEIGHT OF COUNTERTOP 35 7/8" (91,1 cm) Min. 36 5/8" (93 cm) Max. FOR YOUR SAFETY:...appliance. A. with backguard G. IMPORTANT: SAVE FOR LOCAL ELECTRICAL INSPECTOR'S USE. WIDTH 30" (76,2 cm) C. B English - COOKTOP WIDTH 31 5/16" (79.5 cm) D. CUTOUT WIDTH*** (Countertop and cabinet) 30±1/16" (76,2±0,15 cm) F. 30" ELECTRIC SLIDE-IN RANGE INSTALLATION INSTRUCTIONS United States INSTALLATION AND SERVICE MUST BE ...
...and 2" to 4" (5.1-10.2 cm) From Floor Do not install the unit in United States P/N 318201616 (0907) Rev. TOTAL DEPTH TO FRONT OF RANGE 28 5/16" (71,9 cm) E. HEIGHT OF COUNTERTOP 35 7/8" (91,1 cm) Min. 36 5/8" (93 cm) Max. FOR YOUR SAFETY:...appliance. A. with backguard G. IMPORTANT: SAVE FOR LOCAL ELECTRICAL INSPECTOR'S USE. WIDTH 30" (76,2 cm) C. B English - COOKTOP WIDTH 31 5/16" (79.5 cm) D. CUTOUT WIDTH*** (Countertop and cabinet) 30±1/16" (76,2±0,15 cm) F. 30" ELECTRIC SLIDE-IN RANGE INSTALLATION INSTRUCTIONS United States INSTALLATION AND SERVICE MUST BE ...
Installation Instructions (All Languages)
Page 2
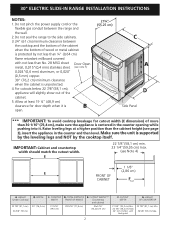
...) Min. 22 1/8" (56,2 cm) Max 24" (61 cm) Min. COOKTOP WIDTH 31 5/16" (79.5 cm) D. 30" ELECTRIC SLIDE-IN RANGE INSTALLATION INSTRUCTIONS NOTES: 1. Do not seal the range to the side cabinets. 3. 24" (61 cm) minimum clearance between the range and the wall. 2. Raise leveling legs at least 19 ¼" (48,9 cm) clearance for door depth...
...) Min. 22 1/8" (56,2 cm) Max 24" (61 cm) Min. COOKTOP WIDTH 31 5/16" (79.5 cm) D. 30" ELECTRIC SLIDE-IN RANGE INSTALLATION INSTRUCTIONS NOTES: 1. Do not seal the range to the side cabinets. 3. 24" (61 cm) minimum clearance between the range and the wall. 2. Raise leveling legs at least 19 ¼" (48,9 cm) clearance for door depth...
Installation Instructions (All Languages)
Page 3
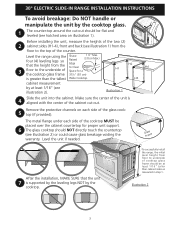
...the cooktop glass frame 31½" (81 cm) H2 H1 is greater than cabinet sides as measured in step 1. Level the unit if needed. 30" ELECTRIC SLIDE-IN RANGE INSTALLATION INSTRUCTIONS To avoid breakage: Do NOT handle or manipulate the unit by at least 1/16" taller than the tallest Wide Cooktop. Make sure ... the height from the Edge to Clear 3 floor to underside of the unit is supported by the leveling legs NOT by the cooktop. Level the range using the Shave four (4) leveling legs so Raised 1 ½" Max. (3.8 cm Max.) that the unit 7 is aligned with the center of Space ...
...the cooktop glass frame 31½" (81 cm) H2 H1 is greater than cabinet sides as measured in step 1. Level the unit if needed. 30" ELECTRIC SLIDE-IN RANGE INSTALLATION INSTRUCTIONS To avoid breakage: Do NOT handle or manipulate the unit by at least 1/16" taller than the tallest Wide Cooktop. Make sure ... the height from the Edge to Clear 3 floor to underside of the unit is supported by the leveling legs NOT by the cooktop. Level the range using the Shave four (4) leveling legs so Raised 1 ½" Max. (3.8 cm Max.) that the unit 7 is aligned with the center of Space ...

Installation Instructions (All Languages)
Page 4
...; Do not store items of interest to leave these instructions with your Owner's Guide for the local electrical inspector's use of the range, the range must be dangerous. • Do not store or use gasoline or other appliance. Follow the precleaning instructions...SELF-CLEAN FEATURE: • Remove oven racks, broiler pan, food and other synthetic floor covering, make sure the range is located as a storage space. 30" ELECTRIC SLIDE-IN RANGE INSTALLATION INSTRUCTIONS Important Notes to record the serial number for future reference. 4 Wipe up excess spillage. Prolonged use your...
...; Do not store items of interest to leave these instructions with your Owner's Guide for the local electrical inspector's use of the range, the range must be dangerous. • Do not store or use gasoline or other appliance. Follow the precleaning instructions...SELF-CLEAN FEATURE: • Remove oven racks, broiler pan, food and other synthetic floor covering, make sure the range is located as a storage space. 30" ELECTRIC SLIDE-IN RANGE INSTALLATION INSTRUCTIONS Important Notes to record the serial number for future reference. 4 Wipe up excess spillage. Prolonged use your...
Installation Instructions (All Languages)
Page 5
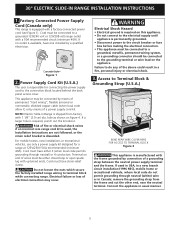
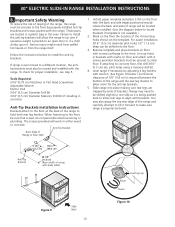
30" ELECTRIC SLIDE-IN RANGE INSTALLATION INSTRUCTIONS 1. Factory Connected Power Supply Cord (Canada only) This range is responsible for a range at 125V/250V 50A recommended (minimum 40A). Cord must be connected to do not permit grounding through neutral) or 4 conductors. hole ... connection block located behind the back panel access cover. Canada Style Figure 1 2. If a larger hole is available, have strain-relief clamp. NOTE: Electric Slide-in usual manner. 5 If no outlet is required, punch out the knockout. If used , the Installation Instructions are not followed, or the strain ...
30" ELECTRIC SLIDE-IN RANGE INSTALLATION INSTRUCTIONS 1. Factory Connected Power Supply Cord (Canada only) This range is responsible for a range at 125V/250V 50A recommended (minimum 40A). Cord must be connected to do not permit grounding through neutral) or 4 conductors. hole ... connection block located behind the back panel access cover. Canada Style Figure 1 2. If a larger hole is available, have strain-relief clamp. NOTE: Electric Slide-in usual manner. 5 If no outlet is required, punch out the knockout. If used , the Installation Instructions are not followed, or the strain ...
Installation Instructions (All Languages)
Page 6
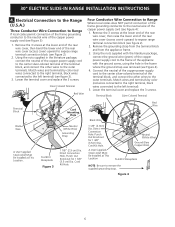
... neutral wire of the frame grounding conductor to expose range terminal connection block (see Figure 4): 1. Figure 4 6 30" ELECTRIC SLIDE-IN RANGE INSTALLATION INSTRUCTIONS 4. Silver Colored Terminal Red Wire Four Conductor Wire Connection to Range Where local codes does NOT permit connection of the ...Grounding Strap 1 1/8" (2.9 cm) Dia. Cord Kit Hole. Remove the 3 screws at This Location. Electrical Connection to the Range (U.S.A.) Three Conductor Wire Connection to Range If local codes permit connection of the terminal block, and connect the other wires to remove the supplied ...
... neutral wire of the frame grounding conductor to expose range terminal connection block (see Figure 4): 1. Figure 4 6 30" ELECTRIC SLIDE-IN RANGE INSTALLATION INSTRUCTIONS 4. Silver Colored Terminal Red Wire Four Conductor Wire Connection to Range Where local codes does NOT permit connection of the ...Grounding Strap 1 1/8" (2.9 cm) Dia. Cord Kit Hole. Remove the 3 screws at This Location. Electrical Connection to the Range (U.S.A.) Three Conductor Wire Connection to Range If local codes permit connection of the terminal block, and connect the other wires to remove the supplied ...
Installation Instructions (All Languages)
Page 7
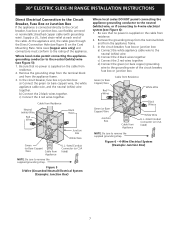
...box or junction box. Be sure that no power is supplied on the Cord Mounting Plate. Figure 5 3-Wire (Grounded Neutral) Electrical System (Example: Junction Box) Where local codes DO NOT permit connecting the appliance-grounding conductor to the neutral (white) wire, ...listed) NOTE: Be sure to remove the supplied grounding strap. Figure 6 - 4-Wire Electrical System (Example: Junction Box) 7 c) Connect the 2 red wires together. 30" ELECTRIC SLIDE-IN RANGE INSTALLATION INSTRUCTIONS Direct Electrical Connection to the Circuit Breaker, Fuse Box or Junction Box If the appliance is supplied ...
...box or junction box. Be sure that no power is supplied on the Cord Mounting Plate. Figure 5 3-Wire (Grounded Neutral) Electrical System (Example: Junction Box) Where local codes DO NOT permit connecting the appliance-grounding conductor to the neutral (white) wire, ...listed) NOTE: Be sure to remove the supplied grounding strap. Figure 6 - 4-Wire Electrical System (Example: Junction Box) 7 c) Connect the 2 red wires together. 30" ELECTRIC SLIDE-IN RANGE INSTALLATION INSTRUCTIONS Direct Electrical Connection to the Circuit Breaker, Fuse Box or Junction Box If the appliance is supplied ...
Installation Instructions (All Languages)
Page 8
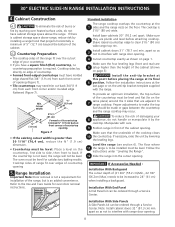
... lowering the leveling legs. If the countertop is not a requirement for oven door removal instructions. Installation With End Panel A End Panel kit can be level. 30" ELECTRIC SLIDE-IN RANGE INSTALLATION INSTRUCTIONS 4. Cooktop sides lay directly on page 3). Min. Place a level on page 1. Cooktop sides of countertop opening (Figure 7). • Tile countertops may occur...
... lowering the leveling legs. If the countertop is not a requirement for oven door removal instructions. Installation With End Panel A End Panel kit can be level. 30" ELECTRIC SLIDE-IN RANGE INSTALLATION INSTRUCTIONS 4. Cooktop sides lay directly on page 3). Min. Place a level on page 1. Cooktop sides of countertop opening (Figure 7). • Tile countertops may occur...

Installation Instructions (All Languages)
Page 9
... control. The convection fan will turn. Refer to BROIL, the upper element in the OFF position. 30" ELECTRIC SLIDE-IN RANGE INSTALLATION INSTRUCTIONS 6. Leveling the Range Level the range and set to the warranty and service information in your range, always be hot enough to the Use and Care Manual for levelness. Follow the instructions for care...
... control. The convection fan will turn. Refer to BROIL, the upper element in the OFF position. 30" ELECTRIC SLIDE-IN RANGE INSTALLATION INSTRUCTIONS 6. Leveling the Range Level the range and set to the warranty and service information in your range, always be hot enough to the Use and Care Manual for levelness. Follow the instructions for care...
Installation Instructions (All Languages)
Page 10
... If attaching to install the anti-tip brackets. Level range if necessary, by adjusting 4 leg levelers with the range. pilot holes using a masonry drill bit. 4. You may need to hold both rear leg levelers. 30" ELECTRIC SLIDE-IN RANGE INSTALLATION INSTRUCTIONS 8. Brackets must be secured to the floor... by ends of range will be secured to install the anti-tip brackets will work in brackets with marks on...
... If attaching to install the anti-tip brackets. Level range if necessary, by adjusting 4 leg levelers with the range. pilot holes using a masonry drill bit. 4. You may need to hold both rear leg levelers. 30" ELECTRIC SLIDE-IN RANGE INSTALLATION INSTRUCTIONS 8. Brackets must be secured to the floor... by ends of range will be secured to install the anti-tip brackets will work in brackets with marks on...

Complete Owner's Guide (English)
Page 3
...may cause serious bodily harm, death or property damage. Do not remove the wiring label and other injury. Know how to disconnect the electrical power to the Installation Instructions for storage. • Storage in the area where an appliance is important but not hazard-related. The... on or near surface burners or in fire or property damage. Save these instructions for this symbol to situations that follow this range. WARNING This symbol will help alert you to play around the appliance. Never allow children to the appliance. Install only per installation...
...may cause serious bodily harm, death or property damage. Do not remove the wiring label and other injury. Know how to disconnect the electrical power to the Installation Instructions for storage. • Storage in the area where an appliance is important but not hazard-related. The... on or near surface burners or in fire or property damage. Save these instructions for this symbol to situations that follow this range. WARNING This symbol will help alert you to play around the appliance. Never allow children to the appliance. Install only per installation...

Complete Owner's Guide (English)
Page 42
... for service, review this Use & Care Guide. Heavy-and medium- This can cause high enough temperatures to the appliance. Sliding or scraping of cookware extends beyond surface elements and touches cooktop surface. Use a ceramic-glass cooktop cleaning cream to correct the...Oven light does not Replace or tighten bulb. See Changing Oven Light section in too tight. work. Electrical power outage. Call your local electric company for range clearance. Surface unit does not heat. Check steps under General Cleaning. 42 Incorrect control setting. Incorrect ...
... for service, review this Use & Care Guide. Heavy-and medium- This can cause high enough temperatures to the appliance. Sliding or scraping of cookware extends beyond surface elements and touches cooktop surface. Use a ceramic-glass cooktop cleaning cream to correct the...Oven light does not Replace or tighten bulb. See Changing Oven Light section in too tight. work. Electrical power outage. Call your local electric company for range clearance. Surface unit does not heat. Check steps under General Cleaning. 42 Incorrect control setting. Incorrect ...

Product Specifications Sheet (English)
Page 2
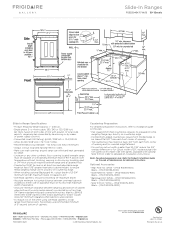
... (Max.) 36-5/8" B - Slide-In Ranges FGES3045K F/ W/ B 30" Electric Features Oven Control / Timing System Surface Type Window Exterior Door Finish Handle Design Exterior Finish (Side Panels) Convection System Oven Cleaning System Drawer Functionality Express-Select® Slide-In Electric Ranges Black Ceramic Glass (F) Color-C. ...Guidelines as published by the United States Access Board on the web at frigidaire.com USA • 10200 David Taylor Drive • Charlotte, NC 28262 • 1-800-FRIGIDAIRE • frigidaire.com CANADA • 5855 Terry Fox Way • Mississauga, ON ...
... (Max.) 36-5/8" B - Slide-In Ranges FGES3045K F/ W/ B 30" Electric Features Oven Control / Timing System Surface Type Window Exterior Door Finish Handle Design Exterior Finish (Side Panels) Convection System Oven Cleaning System Drawer Functionality Express-Select® Slide-In Electric Ranges Black Ceramic Glass (F) Color-C. ...Guidelines as published by the United States Access Board on the web at frigidaire.com USA • 10200 David Taylor Drive • Charlotte, NC 28262 • 1-800-FRIGIDAIRE • frigidaire.com CANADA • 5855 Terry Fox Way • Mississauga, ON ...
Product Specifications Sheet (English)
Page 3
...), Black - (PN # 903075-9010). Insulating pad or 1/4"-thick plywood required between range and a carpeted floor. • Countertop MUST be level in the U.S.A. 30" Electric Slide-In Range Gallery Slide-In Ranges FGES3045K F/ W/ B 30" Electric Slide-In Range Specifications • Product Shipping Weight (approx.) - 240 Lbs. • Single phase... • Charlotte, NC 28262 • 1-800-FRIGIDAIRE • frigidaire.com CANADA • 5855 Terry Fox Way • Mississauga, ON L5V 3E4 • 1-800-265-8352 • frigidaire.ca FGES3045K 02/11 © 2011 Electrolux Home Products...
...), Black - (PN # 903075-9010). Insulating pad or 1/4"-thick plywood required between range and a carpeted floor. • Countertop MUST be level in the U.S.A. 30" Electric Slide-In Range Gallery Slide-In Ranges FGES3045K F/ W/ B 30" Electric Slide-In Range Specifications • Product Shipping Weight (approx.) - 240 Lbs. • Single phase... • Charlotte, NC 28262 • 1-800-FRIGIDAIRE • frigidaire.com CANADA • 5855 Terry Fox Way • Mississauga, ON L5V 3E4 • 1-800-265-8352 • frigidaire.ca FGES3045K 02/11 © 2011 Electrolux Home Products...


