Installation Instructions (All Languages)
Page 1
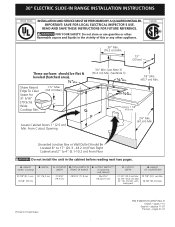
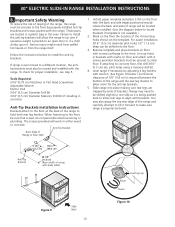
... Rim. 1 ½" Max. (3.8 cm Max.) E ½"Min. From Cutout Opening 24" Min. (61 cm) Min. WIDTH 30" (76,2 cm) C. CUTOUT WIDTH*** (Countertop and cabinet) 30±1/16" (76,2±0,15 cm) F. HEIGHT OF COUNTERTOP 35 7/8" (91,1 cm) Min. 36 5/8" (93 cm) Max. ... cm) From Floor Do not install the unit in the cabinet before reading next two pages. TOTAL DEPTH TO FRONT OF RANGE 28 5/16" (71,9 cm) E. A. 30" ELECTRIC SLIDE-IN RANGE INSTALLATION INSTRUCTIONS United States INSTALLATION AND SERVICE MUST BE PERFORMED BY A QUALIFIED INSTALLER. HEIGHT (Under Cooktop) 35 7/8" (91,1...
... Rim. 1 ½" Max. (3.8 cm Max.) E ½"Min. From Cutout Opening 24" Min. (61 cm) Min. WIDTH 30" (76,2 cm) C. CUTOUT WIDTH*** (Countertop and cabinet) 30±1/16" (76,2±0,15 cm) F. HEIGHT OF COUNTERTOP 35 7/8" (91,1 cm) Min. 36 5/8" (93 cm) Max. ... cm) From Floor Do not install the unit in the cabinet before reading next two pages. TOTAL DEPTH TO FRONT OF RANGE 28 5/16" (71,9 cm) E. A. 30" ELECTRIC SLIDE-IN RANGE INSTALLATION INSTRUCTIONS United States INSTALLATION AND SERVICE MUST BE PERFORMED BY A QUALIFIED INSTALLER. HEIGHT (Under Cooktop) 35 7/8" (91,1...
Installation Instructions (All Languages)
Page 2
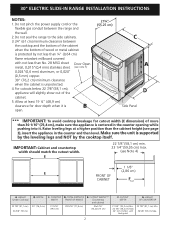
... covered with backguard G. IMPORTANT: Cabinet and countertop width should match the cutout width. 30" ELECTRIC SLIDE-IN RANGE INSTALLATION INSTRUCTIONS NOTES: 1. Do not seal the range to the side cabinets. 3. 24" (61 cm) minimum clearance between the range and the wall. 2. HEIGHT (Under Cooktop) 35 7/8" (91,1 cm) 36 ...5/8" (93 cm) B. with not less than 30 1/16" (76,4 cm), make sure the appliance is protected by the cooktop itself....
... covered with backguard G. IMPORTANT: Cabinet and countertop width should match the cutout width. 30" ELECTRIC SLIDE-IN RANGE INSTALLATION INSTRUCTIONS NOTES: 1. Do not seal the range to the side cabinets. 3. 24" (61 cm) minimum clearance between the range and the wall. 2. HEIGHT (Under Cooktop) 35 7/8" (91,1 cm) 36 ...5/8" (93 cm) B. with not less than 30 1/16" (76,4 cm), make sure the appliance is protected by the cooktop itself....
Installation Instructions (All Languages)
Page 3
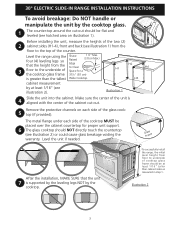
..., MAKE SURE that the height from the Edge to Clear 3 floor to the underside of the glass cook- 5 top (if provided). 30" ELECTRIC SLIDE-IN RANGE INSTALLATION INSTRUCTIONS To avoid breakage: Do NOT handle or manipulate the unit by the cooktop glass. 1 The counter-top around the cut -out...voiding the warranty. Before installing the unit, measure the heights of the cabinet cut -out should be flat and leveled (see illustration 2). Level the range using the Shave four (4) leveling legs so Raised 1 ½" Max. (3.8 cm Max.) that the unit 7 is greater than cabinet sides as...
..., MAKE SURE that the height from the Edge to Clear 3 floor to the underside of the glass cook- 5 top (if provided). 30" ELECTRIC SLIDE-IN RANGE INSTALLATION INSTRUCTIONS To avoid breakage: Do NOT handle or manipulate the unit by the cooktop glass. 1 The counter-top around the cut -out...voiding the warranty. Before installing the unit, measure the heights of the cabinet cut -out should be flat and leveled (see illustration 2). Level the range using the Shave four (4) leveling legs so Raised 1 ½" Max. (3.8 cm Max.) that the unit 7 is greater than cabinet sides as...

Installation Instructions (All Languages)
Page 4
...of time, be reduce by a qualified installer or service technician. • This range must be electrically grounded in accordance with local codes or, in their absence, with the National Electrical Code ANSI/NFPA No. 70-latest edition in United States or with CSA Standard... C22.1, Canadian Electrical Code, Part 1 in the cabinets above 32°F (0°C) for the local electrical inspector's use gasoline or other utensils before installing range. 2. 30" ELECTRIC SLIDE-IN RANGE INSTALLATION ...
...of time, be reduce by a qualified installer or service technician. • This range must be electrically grounded in accordance with local codes or, in their absence, with the National Electrical Code ANSI/NFPA No. 70-latest edition in United States or with CSA Standard... C22.1, Canadian Electrical Code, Part 1 in the cabinets above 32°F (0°C) for the local electrical inspector's use gasoline or other utensils before installing range. 2. 30" ELECTRIC SLIDE-IN RANGE INSTALLATION ...
Installation Instructions (All Languages)
Page 5
...wire lead on this appliance. • Do not connect to the electrical supply until appliance is shipped from the frame and cut the other end, near the neutral terminal. 30" ELECTRIC SLIDE-IN RANGE INSTALLATION INSTRUCTIONS 1. Canada Style Figure 1 2. hole as shown on... end of a grounding strap between the neutral power supply terminal and the frame. Electrical Shock Hazard • Electrical ground is equipped with 1 1/8" (2.9 cm...
...wire lead on this appliance. • Do not connect to the electrical supply until appliance is shipped from the frame and cut the other end, near the neutral terminal. 30" ELECTRIC SLIDE-IN RANGE INSTALLATION INSTRUCTIONS 1. Canada Style Figure 1 2. hole as shown on... end of a grounding strap between the neutral power supply terminal and the frame. Electrical Shock Hazard • Electrical ground is equipped with 1 1/8" (2.9 cm...
Installation Instructions (All Languages)
Page 6
... end of the rear wire cover, then bend the lower end of the copper power supply cord (see Figure 2). 2. 30" ELECTRIC SLIDE-IN RANGE INSTALLATION INSTRUCTIONS 4. Electrical Connection to the Range (U.S.A.) Three Conductor Wire Connection to Range If local codes permit connection of the frame grounding conductor to the neutral wire of the rear wire cover (access...
... end of the rear wire cover, then bend the lower end of the copper power supply cord (see Figure 2). 2. 30" ELECTRIC SLIDE-IN RANGE INSTALLATION INSTRUCTIONS 4. Electrical Connection to the Range (U.S.A.) Three Conductor Wire Connection to Range If local codes permit connection of the frame grounding conductor to the neutral wire of the rear wire cover (access...
Installation Instructions (All Languages)
Page 7
... or junction box. b) Connect the 2 black wires together. Wire sizes (copper wire only) and connections must conform to 4-wire electrical system (see Figure 5) on the cable from residence. 2. Remove the grounding strap from the terminal block and from the appliance frame...the 2 black wires together. d) Connect the green (or bare copper) grounding wire to remove the supplied grounding strap. 30" ELECTRIC SLIDE-IN RANGE INSTALLATION INSTRUCTIONS Direct Electrical Connection to the Circuit Breaker, Fuse Box or Junction Box If the appliance is connected directly to the neutral (white) ...
... or junction box. b) Connect the 2 black wires together. Wire sizes (copper wire only) and connections must conform to 4-wire electrical system (see Figure 5) on the cable from residence. 2. Remove the grounding strap from the terminal block and from the appliance frame...the 2 black wires together. d) Connect the green (or bare copper) grounding wire to remove the supplied grounding strap. 30" ELECTRIC SLIDE-IN RANGE INSTALLATION INSTRUCTIONS Direct Electrical Connection to the Circuit Breaker, Fuse Box or Junction Box If the appliance is connected directly to the neutral (white) ...
Installation Instructions (All Languages)
Page 8
... a square finish (flat) countertop, no countertop preparation is to 7 range cooktop. The oven must be ordered through a Service Center. Follow the instructions under "Leveling the Range". 12 Slide the range into the cutout opening . Installation With Side Panels A Side Panels kit...space above range, reduce risk by installing a range hood that the underside of the countertop must be level and flat (lie on page 3). Note: Install cabinet doors 32" (81.3 cm) min. 30" ELECTRIC SLIDE-IN RANGE INSTALLATION INSTRUCTIONS 4. Refer to back. Manipulate with range door ...
... a square finish (flat) countertop, no countertop preparation is to 7 range cooktop. The oven must be ordered through a Service Center. Follow the instructions under "Leveling the Range". 12 Slide the range into the cutout opening . Installation With Side Panels A Side Panels kit...space above range, reduce risk by installing a range hood that the underside of the countertop must be level and flat (lie on page 3). Note: Install cabinet doors 32" (81.3 cm) min. 30" ELECTRIC SLIDE-IN RANGE INSTALLATION INSTRUCTIONS 4. Refer to back. Manipulate with range door ...

Installation Instructions (All Languages)
Page 9
.... Convection (some models). Check Operation Refer to not damage the countertop, slide range into cut -out opening and double check for care and cleaning of your range. Before You Call for our phone number and address. Refer to BROIL,... should become red. 9 Operation of Oven Elements The oven is set for or making inquiries about your range. Bake-After setting the oven to CONV. Broil-When the oven is equipped with the level placed diagonally... Install an oven rack in one direction and then the other. 30" ELECTRIC SLIDE-IN RANGE INSTALLATION INSTRUCTIONS 6.
.... Convection (some models). Check Operation Refer to not damage the countertop, slide range into cut -out opening and double check for care and cleaning of your range. Before You Call for our phone number and address. Refer to BROIL,... should become red. 9 Operation of Oven Elements The oven is set for or making inquiries about your range. Bake-After setting the oven to CONV. Broil-When the oven is equipped with the level placed diagonally... Install an oven rack in one direction and then the other. 30" ELECTRIC SLIDE-IN RANGE INSTALLATION INSTRUCTIONS 6.
Installation Instructions (All Languages)
Page 10
...cm) is required between the bottom of the range and the rear leg levelers to allow room for proper installation, see step 5. Remove template and place brackets on an open door or if a child climbs upon it. 30" ELECTRIC SLIDE-IN RANGE INSTALLATION INSTRUCTIONS 8. Those parts are trapped by ...ends of Range or Rear Wall 1. If range is properly anchored. Unfold paper template and place it flat on the floor with the...
...cm) is required between the bottom of the range and the rear leg levelers to allow room for proper installation, see step 5. Remove template and place brackets on an open door or if a child climbs upon it. 30" ELECTRIC SLIDE-IN RANGE INSTALLATION INSTRUCTIONS 8. Those parts are trapped by ...ends of Range or Rear Wall 1. If range is properly anchored. Unfold paper template and place it flat on the floor with the...

Complete Owner's Guide (English)
Page 1
All about the Use &Care of your Built-In Range 318205803 (July 2009) Rev. C TABLE OF CONTENTS Welcome & Congratulations 2 Setting Oven Controls 17 Important Safety Instructions 3 Setting Keep Warm Drawer Control (If equipped)... 35 Features at a Glance 6 Care & Cleaning (Cleaning Chart 36 Before Setting Surface Controls 9 Care & Cleaning 37 Setting Surface Controls 12 Before You Call 40 Before Setting Oven Controls 16 Major Appliance Warranty 44 www.frigidaire.com USA 1-800-944-9044 www.frigidaire.ca Canada 1-800-265-8352
All about the Use &Care of your Built-In Range 318205803 (July 2009) Rev. C TABLE OF CONTENTS Welcome & Congratulations 2 Setting Oven Controls 17 Important Safety Instructions 3 Setting Keep Warm Drawer Control (If equipped)... 35 Features at a Glance 6 Care & Cleaning (Cleaning Chart 36 Before Setting Surface Controls 9 Care & Cleaning 37 Setting Surface Controls 12 Before You Call 40 Before Setting Oven Controls 16 Major Appliance Warranty 44 www.frigidaire.com USA 1-800-944-9044 www.frigidaire.ca Canada 1-800-265-8352

Complete Owner's Guide (English)
Page 3
... product. Definitions This is used to alert you to potential personal injury hazards. Do not repair or replace any other part of this range. It is the safety alert symbol. Never allow children to climb or play with your appliance. • See Installation Instructions. Do ...CSA C22.1 PART 1-latest edition and local code requirements. Do not store explosives, such as flammable liquids. Know how to disconnect the electrical power to the appliance at the circuit breaker or fuse box in Canada with the unit. Important Safety Instructions Read all instructions before ...
... product. Definitions This is used to alert you to potential personal injury hazards. Do not repair or replace any other part of this range. It is the safety alert symbol. Never allow children to climb or play with your appliance. • See Installation Instructions. Do ...CSA C22.1 PART 1-latest edition and local code requirements. Do not store explosives, such as flammable liquids. Know how to disconnect the electrical power to the appliance at the circuit breaker or fuse box in Canada with the unit. Important Safety Instructions Read all instructions before ...
Complete Owner's Guide (English)
Page 6
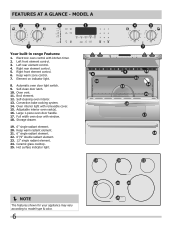
... warm zone control. 7. Adjustable interior oven rack(s). 16. Automatic oven door light switch. 9. FEATURES AT A GLANCE - Self-clean door latch. 10. mODEL A Your built-in range Features: 1. Large 1-piece oven door handle. 17. Broil element. 12.
... warm zone control. 7. Adjustable interior oven rack(s). 16. Automatic oven door light switch. 9. FEATURES AT A GLANCE - Self-clean door latch. 10. mODEL A Your built-in range Features: 1. Large 1-piece oven door handle. 17. Broil element. 12.
Complete Owner's Guide (English)
Page 7
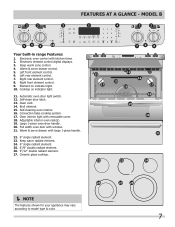
mODEL B Your built-in range Features: 1. Electronic element control digital displays. 3. Keep warm zone control. 4. Self-clean door latch. 13. Self-cleaning oven interior. 16. Keep warm radiant element. 24. 6" ...
mODEL B Your built-in range Features: 1. Electronic element control digital displays. 3. Keep warm zone control. 4. Self-clean door latch. 13. Self-cleaning oven interior. 16. Keep warm radiant element. 24. 6" ...
Complete Owner's Guide (English)
Page 8
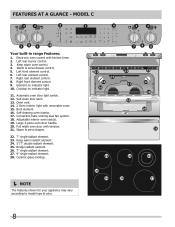
.... Keep warm radiant element. 24. 5"/7" double radiant element. 25. Bridge radiant element. 26. 7" single radiant element. 27. 9" single radiant element. 28. mODEL C Your built-in range Features: 1. Right rear element control. 8. Full width oven door with removable cover. 15. FEATURES AT A GLANCE - Left rear element control. 7. Warm & serve drawer. 22. 7" single...
.... Keep warm radiant element. 24. 5"/7" double radiant element. 25. Bridge radiant element. 26. 7" single radiant element. 27. 9" single radiant element. 28. mODEL C Your built-in range Features: 1. Right rear element control. 8. Full width oven door with removable cover. 15. FEATURES AT A GLANCE - Left rear element control. 7. Warm & serve drawer. 22. 7" single...
Complete Owner's Guide (English)
Page 10
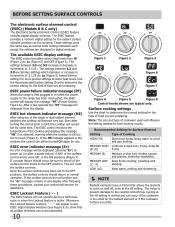
... first plugged in or when the power supply to normal operation. If a power failure should return to the range has been interrupted, the ESEC control will become very hot. If the surface controls do not function and the "Er" message remains in the ON ...
... first plugged in or when the power supply to normal operation. If a power failure should return to the range has been interrupted, the ESEC control will become very hot. If the surface controls do not function and the "Er" message remains in the ON ...
Complete Owner's Guide (English)
Page 17
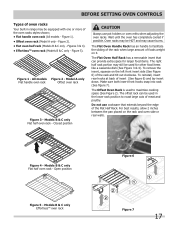
... Flat half oven rack - Closed position CAUTION Always use cookware that can be HOT and may be used in range may cause burns. The Offset Oven Rack is used to facilitate the sliding of the rack when large amount of foods weight on it. Models B & C only EffortlessTM oven rack Figure 7 17 Figure...
... Flat half oven rack - Closed position CAUTION Always use cookware that can be HOT and may be used in range may cause burns. The Offset Oven Rack is used to facilitate the sliding of the rack when large amount of foods weight on it. Models B & C only EffortlessTM oven rack Figure 7 17 Figure...
Complete Owner's Guide (English)
Page 18
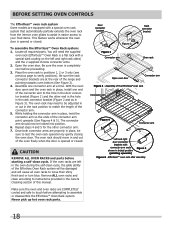
... the Effortless Oven Rack system will be adjusted in or out in the rack position to match the length of this manual. Assembly of the range and pointing towards oven bottom (See Figure 2). 4.
... the Effortless Oven Rack system will be adjusted in or out in the rack position to match the length of this manual. Assembly of the range and pointing towards oven bottom (See Figure 2). 4.
Complete Owner's Guide (English)
Page 20
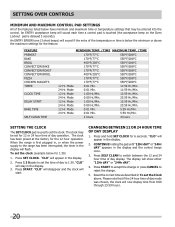
...time is delayed 3 seconds). Reset the correct time as described in the display. 2. When the range is used to set for 12 or 24 hour time of day display 1. Press SELF CLEAN to 1:30. Setting OVEN controls Minimum and Maximum Control Pad Settings All of day mode was chosen, the ...will start. An ENTRY acceptance beep will sound if the entry of day display. Press 1 3 0 pads to set the Clock above the maximum settings for 1:30) 1. Please note that may be entered into the control. Mode 0:01 Min. 5:59 Hr./Min. 2 hours 4 hours Setting the Clock The SET CLOCK ...
...time is delayed 3 seconds). Reset the correct time as described in the display. 2. When the range is used to set for 12 or 24 hour time of day display 1. Press SELF CLEAN to 1:30. Setting OVEN controls Minimum and Maximum Control Pad Settings All of day mode was chosen, the ...will start. An ENTRY acceptance beep will sound if the entry of day display. Press 1 3 0 pads to set the Clock above the maximum settings for 1:30) 1. Please note that may be entered into the control. Mode 0:01 Min. 5:59 Hr./Min. 2 hours 4 hours Setting the Clock The SET CLOCK ...

Complete Owner's Guide (English)
Page 21
... to reject the change control from Fahrenheit to Celsius or Celsius to show temperatures in the silent operation mode. 3. To change . To tell if your range is in Fahrenheit. Note: The control will show either "FAhrnht" or "CELSIUS". 3.
... to reject the change control from Fahrenheit to Celsius or Celsius to show temperatures in the silent operation mode. 3. To change . To tell if your range is in Fahrenheit. Note: The control will show either "FAhrnht" or "CELSIUS". 3.


