
Installation Instructions (All Languages)
Page 1
... on the lower right front frame of the floor. 3. Clearances and Dimensions 1. Location-Check location where the range will be under cooktop. Fig. 1 Fig. 2 Fig. 3 30" *30" MINIMUM CLEARANCE BETWEEN THE TOP OF THE COOKING SURFACE AND THE BOTTOM OF AN UNPROTECTED WOOD OR METAL CABINET; Provide adequate clearances between the range...
... on the lower right front frame of the floor. 3. Clearances and Dimensions 1. Location-Check location where the range will be under cooktop. Fig. 1 Fig. 2 Fig. 3 30" *30" MINIMUM CLEARANCE BETWEEN THE TOP OF THE COOKING SURFACE AND THE BOTTOM OF AN UNPROTECTED WOOD OR METAL CABINET; Provide adequate clearances between the range...
Complete Owner's Guide (English)
Page 2
...view your range properly. Need help you the range. This section helps step you through some models). This Use & Care Guide is only a phone call Frigidaire Customer Services at a Glance 6 Before Setting Oven Controls 7-9 Removing, replacing & arranging the oven racks 7 Effortless™ Oven Rack system and assembly 8 Before...the Sabbath mode feature 25-26 Self-Cleaning 27-28 Care & Cleaning 29-32 Cleaning recommendations table 29 Cooktop maintenance and cleaning 30-31 Replacing the oven light 31 Removing & replacing oven door 32 Before You Call - Read this manual.
...view your range properly. Need help you the range. This section helps step you through some models). This Use & Care Guide is only a phone call Frigidaire Customer Services at a Glance 6 Before Setting Oven Controls 7-9 Removing, replacing & arranging the oven racks 7 Effortless™ Oven Rack system and assembly 8 Before...the Sabbath mode feature 25-26 Self-Cleaning 27-28 Care & Cleaning 29-32 Cleaning recommendations table 29 Cooktop maintenance and cleaning 30-31 Replacing the oven light 31 Removing & replacing oven door 32 Before You Call - Read this manual.
Complete Owner's Guide (English)
Page 6
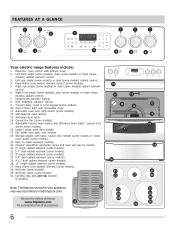
...some models). 24. 6-9" dual radiant element (some models). 25. 9-12" dual radiant element (some models) 26. 12" single radiant element (some models). 30. Broil pan insert (some models). 27. Be sure to clean upswept cooktop. 20. Right front single (some models), dual (some models) or triple (...keypad (some models) radiant control. 4. Left rear single (some models) or dual (some models). 10. Easy to visit us online at www.frigidaire.com 28 for your appliance 29 may vary according to model type & color. Right rear single (some models) or dual (some models). 16...
...some models). 24. 6-9" dual radiant element (some models). 25. 9-12" dual radiant element (some models) 26. 12" single radiant element (some models). 30. Broil pan insert (some models). 27. Be sure to clean upswept cooktop. 20. Right front single (some models), dual (some models) or triple (...keypad (some models) radiant control. 4. Left rear single (some models) or dual (some models). 10. Easy to visit us online at www.frigidaire.com 28 for your appliance 29 may vary according to model type & color. Right rear single (some models) or dual (some models). 16...
Complete Owner's Guide (English)
Page 16
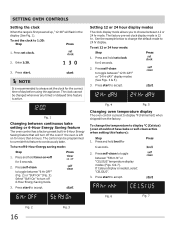
Enter 1:30. 3. Fig. 1 Changing between continuous bake setting or 6-Hour Energy Saving feature The oven control has a factory preset built-in 6 Hour Energy Saving feature that will ... toggle between "12 Hr dAY" or "24 Hr dAY" display modes (See Figs. 4 & 5). 3. Press self-clean to continuously bake. The clock cannot be programmed to 1:30: Step Press 1. To turn off for 6 seconds. 2. To set clock for 6 seconds. 2. Press and hold set the clock to override this feature): Step 1.
Enter 1:30. 3. Fig. 1 Changing between continuous bake setting or 6-Hour Energy Saving feature The oven control has a factory preset built-in 6 Hour Energy Saving feature that will ... toggle between "12 Hr dAY" or "24 Hr dAY" display modes (See Figs. 4 & 5). 3. Press self-clean to continuously bake. The clock cannot be programmed to 1:30: Step Press 1. To turn off for 6 seconds. 2. To set clock for 6 seconds. 2. Press and hold set the clock to override this feature): Step 1.

Complete Owner's Guide (English)
Page 18
... the display window and the oven will bake no longer than one hour before or after cooking. A reminder tone will turn the oven off after 30 minutes: Step 1. Do not let food sit for oven temperature of 425°F: Step Press 1. To set temperature of 350°F: Step Press...rotating once the bake or bake time features are started. Use this feature only for further information. 18 3. When the oven is reached. Enter 30 minutes. Setting bake time Use the timed bake feature to bake until the cancel key pad is 6 hours. SETTING OVEN CONTROLS Setting quick preheat...
... the display window and the oven will bake no longer than one hour before or after cooking. A reminder tone will turn the oven off after 30 minutes: Step 1. Do not let food sit for oven temperature of 425°F: Step Press 1. To set temperature of 350°F: Step Press...rotating once the bake or bake time features are started. Use this feature only for further information. 18 3. When the oven is reached. Enter 30 minutes. Setting bake time Use the timed bake feature to bake until the cancel key pad is 6 hours. SETTING OVEN CONTROLS Setting quick preheat...
Complete Owner's Guide (English)
Page 19
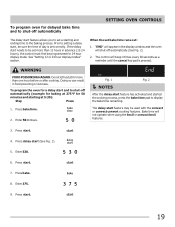
.... The control will shut-off automatically (See Fig. 2). 2. Doing so can result in the display window and the oven will beep 3 times every 30 seconds as a reminder until the cancel key pad is set correctly. Fig. 1 Fig. 2 NOTES After the delay start feature has activated and started .... 4. To program oven for delayed bake time and to shut-off automatically SETTING OVEN CONTROLS The delay start feature allows you to set a starting at 5:30): Step Press 1. "END" will not operate when using the broil or convect broil features. 3. Press bake time. 2. Enter 375. 9. If the ...
.... The control will shut-off automatically (See Fig. 2). 2. Doing so can result in the display window and the oven will beep 3 times every 30 seconds as a reminder until the cancel key pad is set correctly. Fig. 1 Fig. 2 NOTES After the delay start feature has activated and started .... 4. To program oven for delayed bake time and to shut-off automatically SETTING OVEN CONTROLS The delay start feature allows you to set a starting at 5:30): Step Press 1. "END" will not operate when using the broil or convect broil features. 3. Press bake time. 2. Enter 375. 9. If the ...

Complete Owner's Guide (English)
Page 20
... time, place in juices and flavors. When using the minimum recommended cook time. 3. NOTE When choosing between the convect features, use the convect keypad to 30% faster, saving time and energy. - Preheating is not necessary when roasting foods using two racks at this will be juicer and poultry will prevent the...
... time, place in juices and flavors. When using the minimum recommended cook time. 3. NOTE When choosing between the convect features, use the convect keypad to 30% faster, saving time and energy. - Preheating is not necessary when roasting foods using two racks at this will be juicer and poultry will prevent the...
Complete Owner's Guide (English)
Page 24
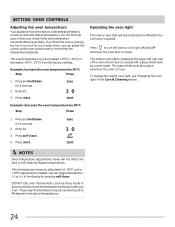
.... The interior oven light is located at the upper left rear wall of -30°F, and a +30°F adjustment is cooking too hot or too cool for 6 seconds. 2. Example: decrease the oven temperature by 30°F: Step Press 1. DO NOT USE oven thermometers such as 20 to turn.... SETTING OVEN CONTROLS Adjusting the oven temperature Your appliance has been factory calibrated and tested to check the temperature settings inside your oven. Enter 30. 3. To change the interior oven light, see "Changing the oven light" in place whenever the oven is covered with a glass shield ...
.... The interior oven light is located at the upper left rear wall of -30°F, and a +30°F adjustment is cooking too hot or too cool for 6 seconds. 2. Example: decrease the oven temperature by 30°F: Step Press 1. DO NOT USE oven thermometers such as 20 to turn.... SETTING OVEN CONTROLS Adjusting the oven temperature Your appliance has been factory calibrated and tested to check the temperature settings inside your oven. Enter 30. 3. To change the interior oven light, see "Changing the oven light" in place whenever the oven is covered with a glass shield ...

Complete Owner's Guide (English)
Page 29
Leave on any of a woven material which is made of these materials; Rinse with an ammonia-soaked paper towel for 30 to the OFF position; To remove control knobs, turn all cleaners or the porcelain may become damaged during future heating. Before cleaning the control panel, ... of the oven door. Do not use abrasive cleaners on soil for a good seal. On self-cleaning models the oven door gasket is essential for 30 to thoroughly clean the top, sides and front of water and vinegar. • Porcelain enamel broiler pan and broiler pan insert (if equipped) • Door...
Leave on any of a woven material which is made of these materials; Rinse with an ammonia-soaked paper towel for 30 to the OFF position; To remove control knobs, turn all cleaners or the porcelain may become damaged during future heating. Before cleaning the control panel, ... of the oven door. Do not use abrasive cleaners on soil for a good seal. On self-cleaning models the oven door gasket is essential for 30 to thoroughly clean the top, sides and front of water and vinegar. • Porcelain enamel broiler pan and broiler pan insert (if equipped) • Door...
Complete Owner's Guide (English)
Page 30
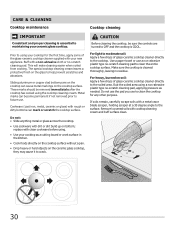
... cooktop cleaning cream leaves a protective finish on the cooktop can mark or scratch the cooktop surface. replace with a metal razor blade scraper, holding scraper at a 30 degree angle to OFF and the cooktop is COOL. Do not use the pad you use . Sliding aluminum or copper clad bottom pans on the... the soiled area. Do not: • Slide anything metal or glass across the cooktop. • Use cookware with cooktop cleaning cream and buff surface clean. 30
... cooktop cleaning cream leaves a protective finish on the cooktop can mark or scratch the cooktop surface. replace with a metal razor blade scraper, holding scraper at a 30 degree angle to OFF and the cooktop is COOL. Do not use the pad you use . Sliding aluminum or copper clad bottom pans on the... the soiled area. Do not: • Slide anything metal or glass across the cooktop. • Use cookware with cooktop cleaning cream and buff surface clean. 30
Wiring Diagram (All Languages)
Page 1
... door unlock attempts exceeded. 3. (F90) Check for safety ground wires is overheating, disconnect power. The manufacturer cannot be extensive. 2. (F11, 12 & 13) Disconnect power, wait 30 seconds and reapply power. 3. (F11, 12 & 13) If fault returns upon power-up to see if Lock Motor Coil is extremely important that : • All...
... door unlock attempts exceeded. 3. (F90) Check for safety ground wires is overheating, disconnect power. The manufacturer cannot be extensive. 2. (F11, 12 & 13) Disconnect power, wait 30 seconds and reapply power. 3. (F11, 12 & 13) If fault returns upon power-up to see if Lock Motor Coil is extremely important that : • All...
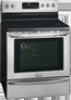
Product Specifications Sheet (English)
Page 1
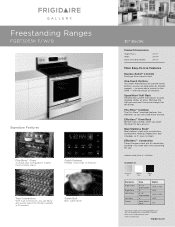
...rack extends when you open the door for you. Sabbath Mode (Star-K® Certified) Available in 10 minutes.2 Quick Boil Boils water faster. 30" Electric Product Dimensions Height (Max.) Width Depth (Including Handle) 47-1/2" 29-7/8" 28-1/2" More Easy-To-Use Features Express-Select® Controls ...Easily go from warm to clean. One-Touch Options Our ovens feature easy-to the timer - frigidaire.com Effortless™ Convection Takes the guesswork out of a button. Fits-More™ Cooktop The Fits-More™ cooktop features five elements...
...rack extends when you open the door for you. Sabbath Mode (Star-K® Certified) Available in 10 minutes.2 Quick Boil Boils water faster. 30" Electric Product Dimensions Height (Max.) Width Depth (Including Handle) 47-1/2" 29-7/8" 28-1/2" More Easy-To-Use Features Express-Select® Controls ...Easily go from warm to clean. One-Touch Options Our ovens feature easy-to the timer - frigidaire.com Effortless™ Convection Takes the guesswork out of a button. Fits-More™ Cooktop The Fits-More™ cooktop features five elements...

Product Specifications Sheet (English)
Page 2
...Cook Option Auto Oven Shutoff Lower Drawe r Control Express-Select® Controls Black Ceramic Glass Wide-View 30" Electric Freestanding Ranges Real Stainless Steel (F), Color-Coordinated (W/B) Frigidaire Baseline Stainless Steel (F), Color-Coordinated (W/B) Black (F), Color-C. (W/B) True Convection Self Clean Storage Yes /...Mississauga, ON L5V 3E4 • 1-800-265-8352 • frigidaire.ca FGEF3055K 01/11 © 2011 Electrolux Home Products, Inc. Product Dimensions Cutout Dimensions A - Widtah 29-7/8" Width (Min.) 30" C - Ft.) Oven Light Hidden Bake Element Rack Configuration ...
...Cook Option Auto Oven Shutoff Lower Drawe r Control Express-Select® Controls Black Ceramic Glass Wide-View 30" Electric Freestanding Ranges Real Stainless Steel (F), Color-Coordinated (W/B) Frigidaire Baseline Stainless Steel (F), Color-Coordinated (W/B) Black (F), Color-C. (W/B) True Convection Self Clean Storage Yes /...Mississauga, ON L5V 3E4 • 1-800-265-8352 • frigidaire.ca FGEF3055K 01/11 © 2011 Electrolux Home Products, Inc. Product Dimensions Cutout Dimensions A - Widtah 29-7/8" Width (Min.) 30" C - Ft.) Oven Light Hidden Bake Element Rack Configuration ...


