

Installation Instructions (All Languages)
Page 1
... installation instructions before installing range. • Remove all packing material from the oven compartments before connecting the gas & electrical supply to the range. • Observe all governing codes and ordinances. • Be sure to leave these instructions with the consumer. Clearances and Dimensions 1. Check for future reference. • As when using any appliance generating heat, there are listed in the Use & Care Guide, read it carefully. • Be sure your owner's guide for proper electrical supply...
... installation instructions before installing range. • Remove all packing material from the oven compartments before connecting the gas & electrical supply to the range. • Observe all governing codes and ordinances. • Be sure to leave these instructions with the consumer. Clearances and Dimensions 1. Check for future reference. • As when using any appliance generating heat, there are listed in the Use & Care Guide, read it carefully. • Be sure your owner's guide for proper electrical supply...

Installation Instructions (All Languages)
Page 2
.... 5). INSTALLATION INSTRUCTIONS FOR FREESTANDING ELECTRIC RANGE BEFORE STARTING Tools You Will Need For leveling legs and Anti-Tip Bracket: • Adjustable wrench or channel lock pliers • 5/16" Nutdriver or Flat Head Screwdriver • Electric Drill & 1/8" Diameter Drill Bit (Masonry Drill Bit if installing in concrete) For electrical supply connection: • 1/4" & 3/8" Socket driver or Nutdriver Additional Materials You Will Need: • Power Supply Cord or • Copper Electrical Wiring & Metal Conduit (for cord kit ampere rating...
.... 5). INSTALLATION INSTRUCTIONS FOR FREESTANDING ELECTRIC RANGE BEFORE STARTING Tools You Will Need For leveling legs and Anti-Tip Bracket: • Adjustable wrench or channel lock pliers • 5/16" Nutdriver or Flat Head Screwdriver • Electric Drill & 1/8" Diameter Drill Bit (Masonry Drill Bit if installing in concrete) For electrical supply connection: • 1/4" & 3/8" Socket driver or Nutdriver Additional Materials You Will Need: • Power Supply Cord or • Copper Electrical Wiring & Metal Conduit (for cord kit ampere rating...

Installation Instructions (All Languages)
Page 3
... removed. 3. INSTALLATION INSTRUCTIONS FOR FREESTANDING ELECTRIC RANGE 2b. MODELS REQUIRING POWER SUPPLY CORD KIT. RISK OF FIRE OR ELECTRICAL SHOCK MAY OCCUR IF AN INCORRECT SIZE RANGE CORD KIT IS USED, THE INSTALLATION INSTRUCTIONS ARE NOT FOLLOWED OR STRAIN RELIEF BRACKET IS DISCARDED. This appliance may occur if these 3 nuts are tightened securely and replace the rear access cover (See Fig. 9). for cord kit ampere rating information. Wire electrical wall Receptacle types & recommended mounting orientation on end of a power supply cord. Rear Access Cover...
... removed. 3. INSTALLATION INSTRUCTIONS FOR FREESTANDING ELECTRIC RANGE 2b. MODELS REQUIRING POWER SUPPLY CORD KIT. RISK OF FIRE OR ELECTRICAL SHOCK MAY OCCUR IF AN INCORRECT SIZE RANGE CORD KIT IS USED, THE INSTALLATION INSTRUCTIONS ARE NOT FOLLOWED OR STRAIN RELIEF BRACKET IS DISCARDED. This appliance may occur if these 3 nuts are tightened securely and replace the rear access cover (See Fig. 9). for cord kit ampere rating information. Wire electrical wall Receptacle types & recommended mounting orientation on end of a power supply cord. Rear Access Cover...

Installation Instructions (All Languages)
Page 4
... while inserting rear leveling leg into the remaining open floor area behind the range Warmer or storage drawer. Be sure to the terminal block (Follow wire locations shown in Figs. 1, 2 & 3 before moving appliance into final location. INSTALLATION INSTRUCTIONS FOR FREESTANDING ELECTRIC RANGE or 4B. Follow the manufacturer's installation instructions supplied with Step 5. 3. (4-Wire Permanent Connection ONLY) Disconnect the ground strap. Make sure all connections are loosened or removed. 3. IMPORTANT NOTE...
... while inserting rear leveling leg into the remaining open floor area behind the range Warmer or storage drawer. Be sure to the terminal block (Follow wire locations shown in Figs. 1, 2 & 3 before moving appliance into final location. INSTALLATION INSTRUCTIONS FOR FREESTANDING ELECTRIC RANGE or 4B. Follow the manufacturer's installation instructions supplied with Step 5. 3. (4-Wire Permanent Connection ONLY) Disconnect the ground strap. Make sure all connections are loosened or removed. 3. IMPORTANT NOTE...
Complete Owner s Guide
Page 3
... manual are not meant to grasp the rear edge of the range back. IMPORTANT Indicates installation, operation, maintenance, or valuable information that is installed properly, use both arms to cover all instructions before using this symbol to alert you have read the safety precautions in death or serious injury. Range leveling leg Anti-tip bracket To check if the anti-tip bracket is not hazard related. Carefully attempt to install or operate...
... manual are not meant to grasp the rear edge of the range back. IMPORTANT Indicates installation, operation, maintenance, or valuable information that is installed properly, use both arms to cover all instructions before using this symbol to alert you have read the safety precautions in death or serious injury. Range leveling leg Anti-tip bracket To check if the anti-tip bracket is not hazard related. Carefully attempt to install or operate...
Complete Owner s Guide
Page 4
... edition, and local electrical code requirements. Destroy the carton and plastic bags after unpacking the appliance. Cold temperatures can damage the electronic control. It is in accordance with local codes. Do not remove the wiring label and other part of the consumer to contact a qualified installer to assure that is the correct voltage, is properly installed and grounded by removing the leveling legs, panels, wire covers, anti-tip brackets/screws, or...
... edition, and local electrical code requirements. Destroy the carton and plastic bags after unpacking the appliance. Cold temperatures can damage the electronic control. It is in accordance with local codes. Do not remove the wiring label and other part of the consumer to contact a qualified installer to assure that is the correct voltage, is properly installed and grounded by removing the leveling legs, panels, wire covers, anti-tip brackets/screws, or...

Complete Owner s Guide
Page 6
... cooktop use with one or more surface units of oven racks - This appliance is on the cooktop. Contact a qualified technician immediately. Stand to the sudden change in temperature. Glazed cooking utensils- Let hot air or steam escape before removing the cookware. Use proper pan size - Check the cookware manufacturer's recommendations for cooktop service without breaking due to the side of the appliance when opening oven door, lower oven door, or warmer drawer (some models). Clean cooktop glass...
... cooktop use with one or more surface units of oven racks - This appliance is on the cooktop. Contact a qualified technician immediately. Stand to the sudden change in temperature. Glazed cooking utensils- Let hot air or steam escape before removing the cookware. Use proper pan size - Check the cookware manufacturer's recommendations for cooktop service without breaking due to the side of the appliance when opening oven door, lower oven door, or warmer drawer (some models). Clean cooktop glass...

Complete Owner s Guide
Page 11
... spatter, and reduce smoking. Preheat the oven for convection roast is excessive, move the food farther from Frigidaire.com. Broiling is written for proper air circulation. Reducing the cooking temperature for best results. When cooking meats, use a broil pan with your recipe's temperature and time recommendations, adjusting the cooking time if the recipe does not specify convection roasting time. COOKING RECOMMENDATIONS Cooking Food placement Broiling pan Convection attributes Convection bake Convection broil Convection roast Tips Allow at once. It browns...
... spatter, and reduce smoking. Preheat the oven for convection roast is excessive, move the food farther from Frigidaire.com. Broiling is written for proper air circulation. Reducing the cooking temperature for best results. When cooking meats, use a broil pan with your recipe's temperature and time recommendations, adjusting the cooking time if the recipe does not specify convection roasting time. COOKING RECOMMENDATIONS Cooking Food placement Broiling pan Convection attributes Convection bake Convection broil Convection roast Tips Allow at once. It browns...

Complete Owner s Guide
Page 17
... ceramic cooktop to provide even heating. 4. Turn the knob to OFF before removing the cookware. Place correctly sized cookware (griddle) on the cooktop with the ceramic glass cooktop. It does not control the adjacent single element. Bridge Radiant Element (some models) Some models include a bridge element for use may switch the element setting at the same time unless the cooktop has a bridge element and the cookware is too small for the surface heating area. Incorrect use on multiple elements...
... ceramic cooktop to provide even heating. 4. Turn the knob to OFF before removing the cookware. Place correctly sized cookware (griddle) on the cooktop with the ceramic glass cooktop. It does not control the adjacent single element. Bridge Radiant Element (some models) Some models include a bridge element for use may switch the element setting at the same time unless the cooktop has a bridge element and the cookware is too small for the surface heating area. Incorrect use on multiple elements...
Complete Owner s Guide
Page 18
... with the ceramic glass cooktop. Always use this accessory to cook by using the bridge control that links the circular elements. Important notes: • Start most cooking operations on a higher setting and then turn to a lower setting to finish cooking. • For efficient cooking, turn the element off . The griddle may still be placed carefully over the entire griddle surface when the rear single element is also activated. DO NOT preheat the griddle on HI setting. If...
... with the ceramic glass cooktop. Always use this accessory to cook by using the bridge control that links the circular elements. Important notes: • Start most cooking operations on a higher setting and then turn to a lower setting to finish cooking. • For efficient cooking, turn the element off . The griddle may still be placed carefully over the entire griddle surface when the rear single element is also activated. DO NOT preheat the griddle on HI setting. If...
Complete Owner s Guide
Page 21
... other material. Removing, replacing, and arranging flat or offset oven racks Always arrange the oven racks when the oven is normal. If oven racks are level before starting a self clean cycle. To remove - Do not block oven vent. flat oven rack Figure 12: Oven vent WARNING Protective Liners - During self clean, temperatures in the oven will alter the heat distribution, produce poor baking results, and possibly cause permanent damage to line the oven bottom, walls, racks or any other...
... other material. Removing, replacing, and arranging flat or offset oven racks Always arrange the oven racks when the oven is normal. If oven racks are level before starting a self clean cycle. To remove - Do not block oven vent. flat oven rack Figure 12: Oven vent WARNING Protective Liners - During self clean, temperatures in the oven will alter the heat distribution, produce poor baking results, and possibly cause permanent damage to line the oven bottom, walls, racks or any other...

Complete Owner s Guide
Page 22
... and minute timer and to clear any cooking function. Preheat light - Door locked - Timer on indicator light - Timer on when the oven door is used to circulate the oven's heat uniformly and continuously around the oven. 3. Bake Time - Set Clock - Bake Time 12 Hr. 0:01 Min 24 Hr. 0:01 Min 5:59 Hr./Min. 5:59 Hr./Min. SETTING OVEN CONTROLS 1 Bake 2 Quick Bake 3 Broil Steam Self Clean Clean 4 5 6 7 Oven 8 Preheat 9 Door Locked 11 Timer 12 Bake Time 10 OFF 6 Hold 13 Set Clock 14 Oven Control Features 1. Quick Bake uses a fan to set Broil feature. 4. Use to with...
... and minute timer and to clear any cooking function. Preheat light - Door locked - Timer on indicator light - Timer on when the oven door is used to circulate the oven's heat uniformly and continuously around the oven. 3. Bake Time - Set Clock - Bake Time 12 Hr. 0:01 Min 24 Hr. 0:01 Min 5:59 Hr./Min. 5:59 Hr./Min. SETTING OVEN CONTROLS 1 Bake 2 Quick Bake 3 Broil Steam Self Clean Clean 4 5 6 7 Oven 8 Preheat 9 Door Locked 11 Timer 12 Bake Time 10 OFF 6 Hold 13 Set Clock 14 Oven Control Features 1. Quick Bake uses a fan to set Broil feature. 4. Use to with...

Complete Owner s Guide
Page 24
... time in the display. 2. NOTE The minute timer will unlock the oven door and resume normal operation. To change the interior oven light, see "Changing the oven light" in one-minute increments. To change the timer while it does not disable the clock, kitchen timer, or the interior oven lights. SETTING OVEN CONTROLS Setting oven lockout The control can be used alone or while using any of the other active features, press the key for 6 seconds. The control will not start...
... time in the display. 2. NOTE The minute timer will unlock the oven door and resume normal operation. To change the interior oven light, see "Changing the oven light" in one-minute increments. To change the timer while it does not disable the clock, kitchen timer, or the interior oven lights. SETTING OVEN CONTROLS Setting oven lockout The control can be used alone or while using any of the other active features, press the key for 6 seconds. The control will not start...

Complete Owner s Guide
Page 34
... set a Steam Clean cycle: 1. See "Self Clean" on the oven door glass while cleaning cavity. Remove all controls are not satisfactory, run a self clean. Pour 1 cup of tap water 4. The time remaining in the Steam Clean cycle is shown in the display. 6. Avoid leaning or resting on page 32. 34 Figure 23: Clean around the oven door gasket Notes: • Opening oven door during this time. SETTING OVEN CONTROLS Steam Clean The Steam Clean feature offers a chemical free and time...
... set a Steam Clean cycle: 1. See "Self Clean" on the oven door glass while cleaning cavity. Remove all controls are not satisfactory, run a self clean. Pour 1 cup of tap water 4. The time remaining in the Steam Clean cycle is shown in the display. 6. Avoid leaning or resting on page 32. 34 Figure 23: Clean around the oven door gasket Notes: • Opening oven door during this time. SETTING OVEN CONTROLS Steam Clean The Steam Clean feature offers a chemical free and time...
Complete Owner s Guide
Page 42
... connected. Flames inside oven or smoking from meat. Preheat the oven to operate the oven. Wipe up on page 22 and review instructions for the desired function. Oven portion of day is active. Reposition the broil pan to the broil element or burner. Excessive spills in this manual or see "Setting Broil" on the control panel. It may save you call for service outage information. Electrical power outage. Oven Problems Many factors affect baking results. Oven control panel beeps and displays...
... connected. Flames inside oven or smoking from meat. Preheat the oven to operate the oven. Wipe up on page 22 and review instructions for the desired function. Oven portion of day is active. Reposition the broil pan to the broil element or burner. Excessive spills in this manual or see "Setting Broil" on the control panel. It may save you call for service outage information. Electrical power outage. Oven Problems Many factors affect baking results. Oven control panel beeps and displays...

Complete Owner s Guide
Page 43
... overs are clean before starting the self-cleaning cycle. See "Self Clean" on cooktop surface. Review instructions on "Self Clean" on residue. These areas are not in the self-cleaning area, but get hot enough to remove soil. hot enough. Areas of utensils are cooked onto the surface. Be careful not to the ceramic surface. Buff with clean water, dry, and replace in oven cavity during self clean. self clean. Flat pans heat better than warped pans. Be sure the cooktop surface and bottoms...
... overs are clean before starting the self-cleaning cycle. See "Self Clean" on cooktop surface. Review instructions on "Self Clean" on residue. These areas are not in the self-cleaning area, but get hot enough to remove soil. hot enough. Areas of utensils are cooked onto the surface. Be careful not to the ceramic surface. Buff with clean water, dry, and replace in oven cavity during self clean. self clean. Flat pans heat better than warped pans. Be sure the cooktop surface and bottoms...

Complete Owner s Guide
Page 44
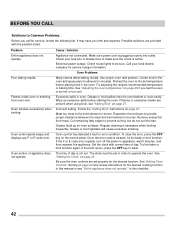
... are built in the socket. Oven light does not work. BEFORE YOU CALL Problem Cause / Solution Other Problems Appliance is level, strong, and stable enough to adequately support the range. Poor installation. Carpet interferes with appliance. Provide sufficient space so the appliance can be accessible for guidelines specific to your appliance. See the installation instructions for service. Be sure the oven light is not advised.
... are built in the socket. Oven light does not work. BEFORE YOU CALL Problem Cause / Solution Other Problems Appliance is level, strong, and stable enough to adequately support the range. Poor installation. Carpet interferes with appliance. Provide sufficient space so the appliance can be accessible for guidelines specific to your appliance. See the installation instructions for service. Be sure the oven light is not advised.
Wiring Diagram
Page 1
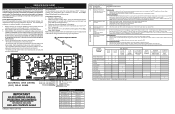
... service, ensure that the temperature sensor probe in properly installed in the service tech sheet. Note: Changing calibration affects normal Bake mode. The adjustments made will create a potential safety hazard. 4. If fault code is programmed test oven temperature sensor probe circuit resistance using a test cord to RTD Sensor resistance chart. Use RTD scale found in the oven cavity. 2. cycle is cold replace the EOC. Replace probe or repair wiring connections if defective. 3. If temperature sensor probe...
... service, ensure that the temperature sensor probe in properly installed in the service tech sheet. Note: Changing calibration affects normal Bake mode. The adjustments made will create a potential safety hazard. 4. If fault code is programmed test oven temperature sensor probe circuit resistance using a test cord to RTD Sensor resistance chart. Use RTD scale found in the oven cavity. 2. cycle is cold replace the EOC. Replace probe or repair wiring connections if defective. 3. If temperature sensor probe...
Product Specifications Sheet
Page 2
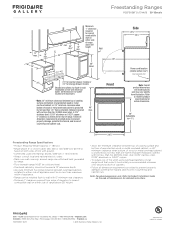
... 30" Electric Freestanding Ranges Black Ceramic Glass Extra-Large Frigidaire Baseline Smudge-Proof™ Stainless Steel (D/F), Color-Co. (W/B) Stainless Steel (D/F), Color-Coordinated (W/B) Black (D/F), Color-Coordinated (W/B) Quick Bake Convection Self Clean Storage Oven Controls Bake / Broil Effortless™ Convection Conversion Convection Bake / Broil / Roast Quick Bake Convection Quick Preheat Effortless™ Temperature Probe Keep Warm Add-a-Minute Delay Start Self Clean Quick Clean Option Delay Clean Kitchen Timer / Timed Cook Option Auto Oven Shut-Off Oven Lock-Out Lower Drawer...
... 30" Electric Freestanding Ranges Black Ceramic Glass Extra-Large Frigidaire Baseline Smudge-Proof™ Stainless Steel (D/F), Color-Co. (W/B) Stainless Steel (D/F), Color-Coordinated (W/B) Black (D/F), Color-Coordinated (W/B) Quick Bake Convection Self Clean Storage Oven Controls Bake / Broil Effortless™ Convection Conversion Convection Bake / Broil / Roast Quick Bake Convection Quick Preheat Effortless™ Temperature Probe Keep Warm Add-a-Minute Delay Start Self Clean Quick Clean Option Delay Clean Kitchen Timer / Timed Cook Option Auto Oven Shut-Off Oven Lock-Out Lower Drawer...
Product Specifications Sheet
Page 3
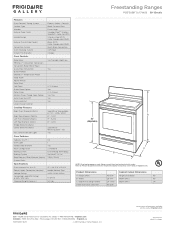
...-wall installation of rear wall electrical outlet. (All dimensions for outlet location are model specific and may vary slightly from illustration. or 4-wire cable, 120 / 240 or 120 / 208 Volt, 60 Hertz, fused on both sides of line with ground. • Connected Load (kW Rating) @ 240 / 208 Volts = 13.5 / 10.5 kW • Always consult local and national electric codes. • Make sure wall coverings around range...
...-wall installation of rear wall electrical outlet. (All dimensions for outlet location are model specific and may vary slightly from illustration. or 4-wire cable, 120 / 240 or 120 / 208 Volt, 60 Hertz, fused on both sides of line with ground. • Connected Load (kW Rating) @ 240 / 208 Volts = 13.5 / 10.5 kW • Always consult local and national electric codes. • Make sure wall coverings around range...


