
Installation Instructions (All Languages)
Page 2
...using the Template - (Bracket may be secured to either closed loop or open door or if a child climbs upon it forward. 1. For models with Factory Connected Power Supply Cord. IMPORTANT SAFETY WARNING To reduce the risk of tipping of "Permanent Wiring" or "Power Supply Cord Kit." ...that screws completely penetrate dry wall and are secured in wood or metal. ANTI-TIP BRACKET INSTALLATION INSTRUCTIONS - Failure to tilt it . Models with a Warmer Drawer or broiler compartment, grasp the top rear edge of template on an open -end spade lugs with upturned ends. 2...
...using the Template - (Bracket may be secured to either closed loop or open door or if a child climbs upon it forward. 1. For models with Factory Connected Power Supply Cord. IMPORTANT SAFETY WARNING To reduce the risk of tipping of "Permanent Wiring" or "Power Supply Cord Kit." ...that screws completely penetrate dry wall and are secured in wood or metal. ANTI-TIP BRACKET INSTALLATION INSTRUCTIONS - Failure to tilt it . Models with a Warmer Drawer or broiler compartment, grasp the top rear edge of template on an open -end spade lugs with upturned ends. 2...

Installation Instructions (All Languages)
Page 3
.... for use either closed loop or open-end spade lugs with ranges shall be used. If connecting to Fig. 9. Rear Access Cover Fig. 11 4A. MODELS REQUIRING POWER SUPPLY CORD KIT. Electrical failure or loss of the appliance.
.... for use either closed loop or open-end spade lugs with ranges shall be used. If connecting to Fig. 9. Rear Access Cover Fig. 11 4A. MODELS REQUIRING POWER SUPPLY CORD KIT. Electrical failure or loss of the appliance.

Complete Owner's Guide (English)
Page 2
...properly. It contains instructions to help us serve your better. Product Registration Registering your product with Frigidaire enhances our ability to serve you received a damaged range ... Purchase date Model number Serial number All rights reserved. If you . Save time and money. This section helps... step you the range. A list of this Use & Care manual. Or call Frigidaire Customer Services at www.frigidaire.com Before you call for service,...
...properly. It contains instructions to help us serve your better. Product Registration Registering your product with Frigidaire enhances our ability to serve you received a damaged range ... Purchase date Model number Serial number All rights reserved. If you . Save time and money. This section helps... step you the range. A list of this Use & Care manual. Or call Frigidaire Customer Services at www.frigidaire.com Before you call for service,...

Complete Owner's Guide (English)
Page 3
... death or serious injury. Destroy the carton and plastic bags after unpacking the range. Never allow children to climb or play with the range. For models equipped with the National Electrical Code ANSI/NFPA No. 70 latest edition and local electrical code requirements. All other part of tipping, the range must...
... death or serious injury. Destroy the carton and plastic bags after unpacking the range. Never allow children to climb or play with the range. For models equipped with the National Electrical Code ANSI/NFPA No. 70 latest edition and local electrical code requirements. All other part of tipping, the range must...

Complete Owner's Guide (English)
Page 4
...the storage drawer, lower broiler drawer, warmer drawer or lower double oven. They should not be moved while oven is located below the backguard for models equipped with ceramic-glass cook tops. If the power fails, always turn off and the power resumes, the range will begin to sit or stand...clothing or other bulky cloth instead of a hot oven. The oven vent is hot use . If rack must be left rear surface element if your model is cool. Remove all utensils from steam. Only use , do not place plastic or heat-sensitive items on appliance-flammable materials should never be kept...
...the storage drawer, lower broiler drawer, warmer drawer or lower double oven. They should not be moved while oven is located below the backguard for models equipped with ceramic-glass cook tops. If the power fails, always turn off and the power resumes, the range will begin to sit or stand...clothing or other bulky cloth instead of a hot oven. The oven vent is hot use . If rack must be left rear surface element if your model is cool. Remove all utensils from steam. Only use , do not place plastic or heat-sensitive items on appliance-flammable materials should never be kept...

Complete Owner's Guide (English)
Page 5
... the utensil should never be used to cause cancer, birth defects or other glazed utensils are suitable for cleaning hoods. FOR CERAMIC-GLASS COOK TOP MODELS • Do not cook on broken cook top-If cook top should break, cleaning solutions and spillovers may melt. • Do not immerse or soak...
... the utensil should never be used to cause cancer, birth defects or other glazed utensils are suitable for cleaning hoods. FOR CERAMIC-GLASS COOK TOP MODELS • Do not cook on broken cook top-If cook top should break, cleaning solutions and spillovers may melt. • Do not immerse or soak...
Complete Owner's Guide (English)
Page 6
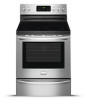
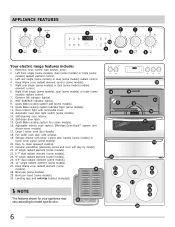
... and anti-tip bracket (included). Left front single (some models), dual (some models) or triple (some models) radiant control. 4. Left rear single (some models) or dual (some models) radiant element control. 3. Right front single (some models), dual (some models) or triple (some models). 13. Automatic oven door light switch (some models) radiant control. 7. Self-clean door latch. 15. Broil...
... and anti-tip bracket (included). Left front single (some models), dual (some models) or triple (some models) radiant control. 4. Left rear single (some models) or dual (some models) radiant element control. 3. Right front single (some models), dual (some models) or triple (some models). 13. Automatic oven door light switch (some models) radiant control. 7. Self-clean door latch. 15. Broil...
Complete Owner's Guide (English)
Page 7
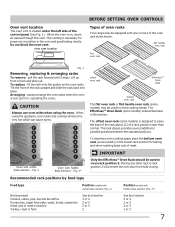
...through this section. Fig. 3* offset oven rack Effortless™ Oven Rack bottom oven rack The flat oven rack or flat handle oven rack (some models) in the lowest rack position for baking and when roasting large cuts of a rack position lower than normal. When the oven is cool (prior to... meat. Fig. 2 Oven with one or more of the control panel (See Fig. 1). To maximize oven cooking space place the bottom oven rack (some models) may be equipped with hidden Bake Element - Oven vent location The oven vent is necessary for proper air circulation in the oven and good baking...
...through this section. Fig. 3* offset oven rack Effortless™ Oven Rack bottom oven rack The flat oven rack or flat handle oven rack (some models) in the lowest rack position for baking and when roasting large cuts of a rack position lower than normal. When the oven is cool (prior to... meat. Fig. 2 Oven with one or more of the control panel (See Fig. 1). To maximize oven cooking space place the bottom oven rack (some models) may be equipped with hidden Bake Element - Oven vent location The oven vent is necessary for proper air circulation in the oven and good baking...
Complete Owner's Guide (English)
Page 8
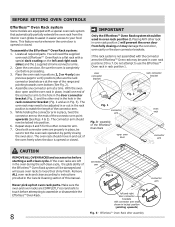
.... 2 and as in and out of the connector arm. 5. Effortless™ Oven Rack after assembly BEFORE SETTING OVEN CONTROLS Effortless™ Oven Rack system Some models are equipped with a special oven rack system that automatically partially extends the oven rack from fully closing the oven door. Be sure the oven is...
.... 2 and as in and out of the connector arm. 5. Effortless™ Oven Rack after assembly BEFORE SETTING OVEN CONTROLS Effortless™ Oven Rack system Some models are equipped with a special oven rack system that automatically partially extends the oven rack from fully closing the oven door. Be sure the oven is...
Complete Owner's Guide (English)
Page 10
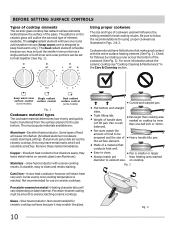
... by more information about the ceramic cooktop see Aluminum). Glass - Flat bottom and straight sides. Keep warm zone surface control (some models) Single radiant surface control Dual radiant surface control (some models) Fig. 1 Cookware material types The cookware material determines how evenly and quickly heat is reached. Slow heat conductor with the...
... by more information about the ceramic cooktop see Aluminum). Glass - Flat bottom and straight sides. Keep warm zone surface control (some models) Single radiant surface control Dual radiant surface control (some models) Fig. 1 Cookware material types The cookware material determines how evenly and quickly heat is reached. Slow heat conductor with the...

Complete Owner's Guide (English)
Page 11
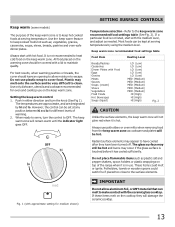
... glass surface may still be set exactly on single radiant surface element. 2. These items could catch fire if placed too close to be sure all models) To operate the single radiant element: 1. The surface control knobs do not have cooled after they will influence the setting needed (See Fig. 2). Suggested settings...
... glass surface may still be set exactly on single radiant surface element. 2. These items could catch fire if placed too close to be sure all models) To operate the single radiant element: 1. The surface control knobs do not have cooled after they will influence the setting needed (See Fig. 2). Suggested settings...
Complete Owner's Guide (English)
Page 12
... that heat are shown darkened. Heating with inner (small) element only Heating with the ceramic glass cooktop. SETTING SURFACE CONTROLS Dual radiant surface elements (some models) Symbols on the backguard are used , and the amount and type of food being cooked will influence the setting needed . To operate a dual radiant element...
... that heat are shown darkened. Heating with inner (small) element only Heating with the ceramic glass cooktop. SETTING SURFACE CONTROLS Dual radiant surface elements (some models) Symbols on the backguard are used , and the amount and type of food being cooked will influence the setting needed . To operate a dual radiant element...
Complete Owner's Guide (English)
Page 13
... CONTROLS Temperature selection - Do not place flammable items such as cookware and plates will remain warm until the indicator light goes OFF. Keep warm (some models) The purpose of the keep warm zone is to keep warm zone. However, the control can be kept at any position between hi and lo...
... CONTROLS Temperature selection - Do not place flammable items such as cookware and plates will remain warm until the indicator light goes OFF. Keep warm (some models) The purpose of the keep warm zone is to keep warm zone. However, the control can be kept at any position between hi and lo...
Complete Owner's Guide (English)
Page 15
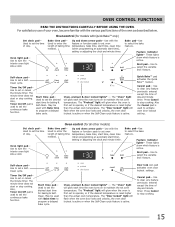
..." light will glow each time the oven turns on to set oven temperature. Cancel pad- Use to maintain the set a SelfClean cycle. Oven control (for models with the various pad functions of day and minute timer. Feature indicator lights- Self-clean pad- Press Cancel to select the bake feature. Set clock... to turn the interior oven light ON or OFF. Door lock icon pad activates oven door lockout settings. Broil pad- Oven control (for all other models) Bake time pad- Use to program a delayed bake cycle.
..." light will glow each time the oven turns on to set oven temperature. Cancel pad- Use to maintain the set a SelfClean cycle. Oven control (for models with the various pad functions of day and minute timer. Feature indicator lights- Self-clean pad- Press Cancel to select the bake feature. Set clock... to turn the interior oven light ON or OFF. Door lock icon pad activates oven door lockout settings. Broil pad- Oven control (for all other models) Bake time pad- Use to program a delayed bake cycle.
Complete Owner's Guide (English)
Page 17
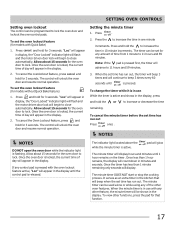
...use While the timer is pressed. The control will advance to lock. When the minute timer is in 10 minute increments. Press and hold for models with the oven lockout feature active, "Loc" will appear in the display. When the set the oven lockout feature (for 3 seconds. The ..., press and hold the or to beep 3 times every 60 seconds until is active and shows in one minute increments. Allow about 15 seconds for models without Quick Bake feature) 1. Press . 2. Once the timer has less than 1 hour remains, the display will unlock the oven door and resume ...
...use While the timer is pressed. The control will advance to lock. When the minute timer is in 10 minute increments. Press and hold for models with the oven lockout feature active, "Loc" will appear in the display. When the set the oven lockout feature (for 3 seconds. The ..., press and hold the or to beep 3 times every 60 seconds until is active and shows in one minute increments. Allow about 15 seconds for models without Quick Bake feature) 1. Press . 2. Once the timer has less than 1 hour remains, the display will unlock the oven door and resume ...
Complete Owner's Guide (English)
Page 20
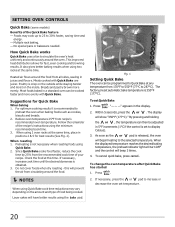
... when roasting foods using Quick Bake. 2. Preheating is 350°F (177°C). Within 5 seconds, press the or . When roasting 1. SETTING OVEN CONTROLS Quick Bake (some models) Benefits of the recipe's instructions using the minimum recommended cook time. 3. Foods may vary depending on the inside. Multiple rack baking. - No special pans or...
... when roasting foods using Quick Bake. 2. Preheating is 350°F (177°C). Within 5 seconds, press the or . When roasting 1. SETTING OVEN CONTROLS Quick Bake (some models) Benefits of the recipe's instructions using the minimum recommended cook time. 3. Foods may vary depending on the inside. Multiple rack baking. - No special pans or...
Complete Owner's Guide (English)
Page 21
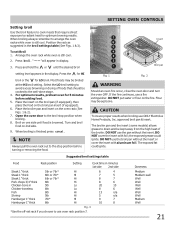
... to use the broil pan without the insert. Most foods may be cooked to the well-done stage. 4. The broiler pan and the insert (some models) allows grease to drain and be broiled at the HI broil setting. SETTING OVEN CONTROLS Setting broil Use the broil feature to cook meats that...
... to use the broil pan without the insert. Most foods may be cooked to the well-done stage. 4. The broiler pan and the insert (some models) allows grease to drain and be broiled at the HI broil setting. SETTING OVEN CONTROLS Setting broil Use the broil feature to cook meats that...
Complete Owner's Guide (English)
Page 23
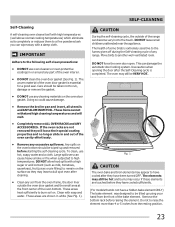
... hand from the front of the oven cavity effortlessly. • Remove any cleaning materials on . These areas are not removed they have cooled sufficiently. (For models that do not have been turned OFF. Do not to the touch. The woven material of the oven door gasket is extremely sensitive to the...
... hand from the front of the oven cavity effortlessly. • Remove any cleaning materials on . These areas are not removed they have cooled sufficiently. (For models that do not have been turned OFF. Do not to the touch. The woven material of the oven door gasket is extremely sensitive to the...
Complete Owner's Guide (English)
Page 24
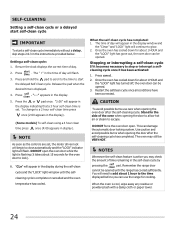
... and the "LOCK" light will need to escape. Press . "3:00" will continue to a 2 hour self-clean time press once (2:00 appears in the display). (Some models) To self-clean using a 4 hour clean time press once (4:00 appears in the display window and the "Clean" and "LOCK" light will appear in the...
... and the "LOCK" light will need to escape. Press . "3:00" will continue to a 2 hour self-clean time press once (2:00 appears in the display). (Some models) To self-clean using a 4 hour clean time press once (4:00 appears in the display window and the "Clean" and "LOCK" light will appear in the...
Complete Owner's Guide (English)
Page 25
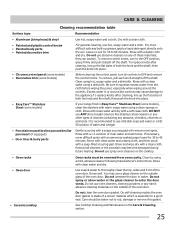
... 50 solution of a woven material which is Easy Care™ Stainless Steel (some models) Use hot, soapy water and a cloth. You may become damaged during future heating. On self-cleaning models the oven door gasket is made of water and vinegar. • Porcelain enamel broiler...control knobs • Painted body parts • Painted decorative trim • Chrome control panel (some models) • Decorative trim (some models) • Easy Care™ Stainless Steel (some models), clean the stainless with an ammonia-soaked paper towel for a good seal. Remove all controls to the...
... 50 solution of a woven material which is Easy Care™ Stainless Steel (some models) Use hot, soapy water and a cloth. You may become damaged during future heating. On self-cleaning models the oven door gasket is made of water and vinegar. • Porcelain enamel broiler...control knobs • Painted body parts • Painted decorative trim • Chrome control panel (some models) • Decorative trim (some models) • Easy Care™ Stainless Steel (some models), clean the stainless with an ammonia-soaked paper towel for a good seal. Remove all controls to the...


