
Installation Instructions (All Languages)
Page 1
... BE REDUCED BY INSTALLING A RANGE HOOD THAT PROJECTS HORIZONTALLY A MINIMUM OF 5" BEYOND THE BOTTOM OF THE CABINETS. FOLLOW ALL DIMENSION REQUIREMENTS PROVIDED ABOVE TO PREVENT PROPERTY DAMAGE, POTENTIAL FIRE HAZARD, AND INCORRECT COUNTERTOP AND CABINET CUTS. Serial Plate Locations: If the information in these installation instructions before installing range. • Remove all packing material from the oven compartments before connecting the gas & electrical supply to the range. • Observe...
... BE REDUCED BY INSTALLING A RANGE HOOD THAT PROJECTS HORIZONTALLY A MINIMUM OF 5" BEYOND THE BOTTOM OF THE CABINETS. FOLLOW ALL DIMENSION REQUIREMENTS PROVIDED ABOVE TO PREVENT PROPERTY DAMAGE, POTENTIAL FIRE HAZARD, AND INCORRECT COUNTERTOP AND CABINET CUTS. Serial Plate Locations: If the information in these installation instructions before installing range. • Remove all packing material from the oven compartments before connecting the gas & electrical supply to the range. • Observe...

Installation Instructions (All Languages)
Page 2
... Rear Access Cover to tilt it . and Local Electrical Code requirements. NOTE: A minimum clearance of 1/8" is placed on either the floor or wall. Failure to install the anti-tip bracket will be secured to the floor. When using the Template - (Bracket may not allow room for cord kit ampere rating information. See Range Connection Opening Size Chart (Figs. 9 & 10) for the bracket. INSTALLATION INSTRUCTIONS FOR FREESTANDING ELECTRIC RANGE BEFORE STARTING Tools You Will Need For leveling...
... Rear Access Cover to tilt it . and Local Electrical Code requirements. NOTE: A minimum clearance of 1/8" is placed on either the floor or wall. Failure to install the anti-tip bracket will be secured to the floor. When using the Template - (Bracket may not allow room for cord kit ampere rating information. See Range Connection Opening Size Chart (Figs. 9 & 10) for the bracket. INSTALLATION INSTRUCTIONS FOR FREESTANDING ELECTRIC RANGE BEFORE STARTING Tools You Will Need For leveling...

Installation Instructions (All Languages)
Page 3
... 3 RISK OF FIRE OR ELECTRICAL SHOCK MAY OCCUR IF AN INCORRECT SIZE RANGE CORD KIT IS USED, THE INSTALLATION INSTRUCTIONS ARE NOT FOLLOWED OR STRAIN RELIEF BRACKET IS DISCARDED. To remove, loosen center screw (one screw) and remove cover. ELECTRICAL CONNECTION TO RANGE. If connecting to the terminal block. Electrical failure or loss of wires must have strain relief properly installed. MODELS REQUIRING POWER SUPPLY CORD KIT. hole as shown. Only a power supply cord kit rated at 125/250 volts...
... 3 RISK OF FIRE OR ELECTRICAL SHOCK MAY OCCUR IF AN INCORRECT SIZE RANGE CORD KIT IS USED, THE INSTALLATION INSTRUCTIONS ARE NOT FOLLOWED OR STRAIN RELIEF BRACKET IS DISCARDED. To remove, loosen center screw (one screw) and remove cover. ELECTRICAL CONNECTION TO RANGE. If connecting to the terminal block. Electrical failure or loss of wires must have strain relief properly installed. MODELS REQUIRING POWER SUPPLY CORD KIT. hole as shown. Only a power supply cord kit rated at 125/250 volts...

Installation Instructions (All Languages)
Page 4
... loss of the permanent wiring for Line 1, Line 2 and Neutral and tighten securely to the frame of the appliance. follow Steps 1 thru 5 below . 4 - Carefully slide range into final position while inserting rear leveling leg into the remaining open floor area behind the range Warmer or storage drawer. POWER CORD CONNECTIONS (3-Wire Connection Instructions . INSTALLATION INSTRUCTIONS FOR FREESTANDING ELECTRIC RANGE or 4B. For existing installations ONLY - Before wiring the range, review the suggested power source location drawings in the...
... loss of the permanent wiring for Line 1, Line 2 and Neutral and tighten securely to the frame of the appliance. follow Steps 1 thru 5 below . 4 - Carefully slide range into final position while inserting rear leveling leg into the remaining open floor area behind the range Warmer or storage drawer. POWER CORD CONNECTIONS (3-Wire Connection Instructions . INSTALLATION INSTRUCTIONS FOR FREESTANDING ELECTRIC RANGE or 4B. For existing installations ONLY - Before wiring the range, review the suggested power source location drawings in the...

Complete Owner's Guide (English)
Page 2
... or 12-Hour Energy Saving features 16 Changing oven temperature display (F° or C 16 Setting silent control feature 16 Setting oven lockout feature 17 Setting minute timer 17 Setting bake 18 Setting timed bake and delayed timed bake 18-19 Setting Quick Bake (some models 20 Setting broil 21 Adjusting oven temperature 22 Operating oven light 22 Self-Cleaning 23-24 Care & Cleaning 25-28 Cleaning recommendations table 25 Cooktop maintenance & cleaning 26-27 Cautions for aluminum use 27 Replacing the oven light 27 Removing & replacing oven door 28 Before You Call Solutions to...
... or 12-Hour Energy Saving features 16 Changing oven temperature display (F° or C 16 Setting silent control feature 16 Setting oven lockout feature 17 Setting minute timer 17 Setting bake 18 Setting timed bake and delayed timed bake 18-19 Setting Quick Bake (some models 20 Setting broil 21 Adjusting oven temperature 22 Operating oven light 22 Self-Cleaning 23-24 Care & Cleaning 25-28 Cleaning recommendations table 25 Cooktop maintenance & cleaning 26-27 Cautions for aluminum use 27 Replacing the oven light 27 Removing & replacing oven door 28 Before You Call Solutions to...

Complete Owner's Guide (English)
Page 3
... CAUTION statement based on an open oven door may reduce the risk of the appliance unless specifically recommended in this appliance. Do not use your appliance until you to be done only by removing the leveling legs, panels, wire covers, anti-tip brackets/screws, or any other injury. Safety items throughout this range. • User servicing-Do not repair or replace any unused range if it forward. Destroy the...
... CAUTION statement based on an open oven door may reduce the risk of the appliance unless specifically recommended in this appliance. Do not use your appliance until you to be done only by removing the leveling legs, panels, wire covers, anti-tip brackets/screws, or any other injury. Safety items throughout this range. • User servicing-Do not repair or replace any unused range if it forward. Destroy the...

Complete Owner's Guide (English)
Page 4
... fires- IMPORTANT INSTRUCTIONS FOR USING YOUR OVEN • Use care when opening the door of interior oven racks. If rack must be moved while oven is in injury. Do not cover the broiler insert with coil elements. Both surface heating and oven heating elements may be seriously injured. • Do not touch surface heating units or surface cooking elements, areas near the oven vent. These items could be hot even though they have had sufficient time to the...
... fires- IMPORTANT INSTRUCTIONS FOR USING YOUR OVEN • Use care when opening the door of interior oven racks. If rack must be moved while oven is in injury. Do not cover the broiler insert with coil elements. Both surface heating and oven heating elements may be seriously injured. • Do not touch surface heating units or surface cooking elements, areas near the oven vent. These items could be hot even though they have had sufficient time to the...

Complete Owner's Guide (English)
Page 5
... commercial oven cleaner or oven liner protective coating of clothing. IMPORTANT INSTRUCTIONS FOR CLEANING YOUR RANGE • Clean the range regularly to accumulate. • Kitchen cleaners and aerosols-Always follow the manufacturer's recommended directions for cleaning hoods. Some cleaners can produce noxious fumes if applied to direct contact and may result in temperature. The use . FOR CERAMIC-GLASS COOK TOP MODELS • Do not cook on . Heating elements clean themselves during the self-cleaning...
... commercial oven cleaner or oven liner protective coating of clothing. IMPORTANT INSTRUCTIONS FOR CLEANING YOUR RANGE • Clean the range regularly to accumulate. • Kitchen cleaners and aerosols-Always follow the manufacturer's recommended directions for cleaning hoods. Some cleaners can produce noxious fumes if applied to direct contact and may result in temperature. The use . FOR CERAMIC-GLASS COOK TOP MODELS • Do not cook on . Heating elements clean themselves during the self-cleaning...
Complete Owner's Guide (English)
Page 8
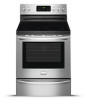
... rack connector bracket (Fig. 2 and as in the Care & Cleaning section of the connector arm point upwards (See Figs. 4 & 5). If the oven racks are left and right rack sides) and the 2 supplied chrome connector arms. 2. Open the oven door. The connector arm should be adjusted in or out in the rack position to instructions provided in Fig. 3). To assemble the Effortless™ Oven Rack system: 1. Locate all required parts...
... rack connector bracket (Fig. 2 and as in the Care & Cleaning section of the connector arm point upwards (See Figs. 4 & 5). If the oven racks are left and right rack sides) and the 2 supplied chrome connector arms. 2. Open the oven door. The connector arm should be adjusted in or out in the rack position to instructions provided in Fig. 3). To assemble the Effortless™ Oven Rack system: 1. Locate all required parts...
Complete Owner's Guide (English)
Page 9
... Hot Surface indicator light located on the control panel will glow when any surface cooking area heats up and will glow on the backguard - The areas surrounding the elements may become hot enough to provide a uniform and consistent heat during the off cycle. The type and size of cookware, the number of surface elements in the oven for even heat to reach around the cookware for ceramic glass cooktop cleaning in the oven For best baking...
... Hot Surface indicator light located on the control panel will glow when any surface cooking area heats up and will glow on the backguard - The areas surrounding the elements may become hot enough to provide a uniform and consistent heat during the off cycle. The type and size of cookware, the number of surface elements in the oven for even heat to reach around the cookware for ceramic glass cooktop cleaning in the oven For best baking...
Complete Owner's Guide (English)
Page 12
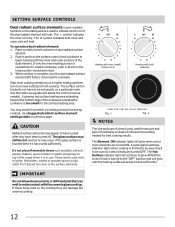
... dual radiant surface element OFF before it is touched before removing the cookware. CAUTION Radiant surface elements may switch from either coil setting at these items melt on previous page. A quick glance at any time during cooking. The symbol indicates the inner coil only. When cooking is an easy check to be sure all control knobs are shown darkened. Use the marks as a guide and adjust the control knob...
... dual radiant surface element OFF before it is touched before removing the cookware. CAUTION Radiant surface elements may switch from either coil setting at these items melt on previous page. A quick glance at any time during cooking. The symbol indicates the inner coil only. When cooking is an easy check to be sure all control knobs are shown darkened. Use the marks as a guide and adjust the control knob...
Complete Owner's Guide (English)
Page 13
... in use potholders or oven mitts when removing food from the keep warm zone will remain warm until the indicator light goes OFF. Keep warm zone recommended food settings table Food Item Heating Level Breads/Pastries Casseroles Dinner Plates with hot food. Potholders, towels or wooden spoons could melt or ignite. SETTING SURFACE CONTROLS Temperature selection - Use only dishware, utensils and cookware recommended for oven and cooktop use plastic wrap to cover...
... in use potholders or oven mitts when removing food from the keep warm zone will remain warm until the indicator light goes OFF. Keep warm zone recommended food settings table Food Item Heating Level Breads/Pastries Casseroles Dinner Plates with hot food. Potholders, towels or wooden spoons could melt or ignite. SETTING SURFACE CONTROLS Temperature selection - Use only dishware, utensils and cookware recommended for oven and cooktop use plastic wrap to cover...
Complete Owner's Guide (English)
Page 15
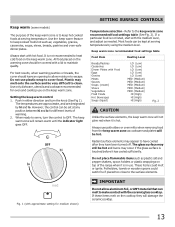
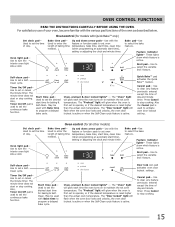
... oven door lockout setting. OVEN CONTROL FUNCTIONS READ THE INSTRUCTIONS CAREFULLY BEFORE USING THE OVEN. Used to program a delayed bake cycle. Up and down arrow pads- Feature indicator lights- These lights show which feature is used to set to set or cancel the minute timer. Timer On/Off pad- Start time pad- Oven, preheat & door locked lights* - Set clock pad- Oven control (for baking & SelfClean. Feature indicator lights- Use to operate, or if the desired temperature is active. Oven, preheat & door locked lights* - Used to set oven temperature. Self-clean...
... oven door lockout setting. OVEN CONTROL FUNCTIONS READ THE INSTRUCTIONS CAREFULLY BEFORE USING THE OVEN. Used to program a delayed bake cycle. Up and down arrow pads- Feature indicator lights- These lights show which feature is used to set to set or cancel the minute timer. Timer On/Off pad- Start time pad- Oven, preheat & door locked lights* - Set clock pad- Oven control (for baking & SelfClean. Feature indicator lights- Use to operate, or if the desired temperature is active. Oven, preheat & door locked lights* - Used to set oven temperature. Self-clean...
Complete Owner's Guide (English)
Page 21
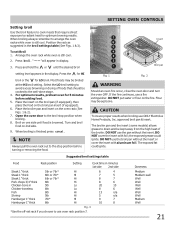
... browned. Flour may be explosive. SETTING OVEN CONTROLS Setting broil Use the broil feature to cook meats that should be kept away from the high heat of the broiler. For optimum results, preheat oven for 5 minutes before turning or removing the food. 7 Insert 6 5 4 3 2 1 Broil pan Fig. 1 Fig. 2 WARNING Should an oven fire occur, close the oven door and turn the oven OFF. Place the broiler pan and insert on the oven rack (See Figs. 1 & 2). 7. Doneness Medium...
... browned. Flour may be explosive. SETTING OVEN CONTROLS Setting broil Use the broil feature to cook meats that should be kept away from the high heat of the broiler. For optimum results, preheat oven for 5 minutes before turning or removing the food. 7 Insert 6 5 4 3 2 1 Broil pan Fig. 1 Fig. 2 WARNING Should an oven fire occur, close the oven door and turn the oven OFF. Place the broiler pan and insert on the oven rack (See Figs. 1 & 2). 7. Doneness Medium...
Complete Owner's Guide (English)
Page 25
... and remove the control knobs. Do not clean the oven door gasket. Care should be removed from the cloth before wiping the panel; CARE & CLEANING Cleaning recommendation table Surface type Recommendation • Aluminum (trim pieces) & vinyl • Painted and plastic control knobs • Painted body parts • Painted decorative trim • Chrome control panel (some models) • Decorative trim (some models) • Easy Care™ Stainless Steel (some models), clean the stainless with warm soapy water using a clean sponge...
... and remove the control knobs. Do not clean the oven door gasket. Care should be removed from the cloth before wiping the panel; CARE & CLEANING Cleaning recommendation table Surface type Recommendation • Aluminum (trim pieces) & vinyl • Painted and plastic control knobs • Painted body parts • Painted decorative trim • Chrome control panel (some models) • Decorative trim (some models) • Easy Care™ Stainless Steel (some models), clean the stainless with warm soapy water using a clean sponge...

Complete Owner's Guide (English)
Page 26
... the ceramic glass cooktop, they may cause it to the cooktop. Remove loosened soils with a non-abrasive cloth or no -scratch cleaning pad, applying pressure as a cutting board or work surface in the kitchen. • Cook foods directly on the cooktop surface without a pan. • Drop heavy or hard objects on soil: Apply a few drops of glass-ceramic cooktop cleaner directly to crack. Buff with cooktop cleaning cream and buff surface clean. 26 Sliding aluminum...
... the ceramic glass cooktop, they may cause it to the cooktop. Remove loosened soils with a non-abrasive cloth or no -scratch cleaning pad, applying pressure as a cutting board or work surface in the kitchen. • Cook foods directly on the cooktop surface without a pan. • Drop heavy or hard objects on soil: Apply a few drops of glass-ceramic cooktop cleaner directly to crack. Buff with cooktop cleaning cream and buff surface clean. 26 Sliding aluminum...
Complete Owner's Guide (English)
Page 29
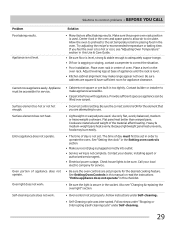
... your dealer, installing agent or authorized service agent. • Electrical power outage. See Setting Oven Controls in this manual or read the instructions "Entire appliance does not operate" in this Use & Care Guide. • Be sure floor is level, strong & stable enough to common problems • BEFORE YOU CALL Problem Poor baking results. Allow the oven to preheat to the set properly. Surface element does not heat. Heavy & medium-weight pans heat evenly. Contact your...
... your dealer, installing agent or authorized service agent. • Electrical power outage. See Setting Oven Controls in this manual or read the instructions "Entire appliance does not operate" in this Use & Care Guide. • Be sure floor is level, strong & stable enough to common problems • BEFORE YOU CALL Problem Poor baking results. Allow the oven to preheat to the set properly. Surface element does not heat. Heavy & medium-weight pans heat evenly. Contact your...
Complete Owner's Guide (English)
Page 30
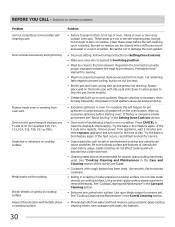
... oven. Use smooth, flat-bottomed cookware. • Sliding or scraping of oven or door area outside oven seal. Oven control panel beeps & displays any F code error (for searing. • Meat not properly prepared. Try the bake or broil feature again. Use a ceramic-glass cooktop cleaning creme to prevent curling, but get hot enough to clean bottom, front top of oven, frame of metal utensils on residue can cause scratches. Cut remaining fatty edges to remove...
... oven. Use smooth, flat-bottomed cookware. • Sliding or scraping of oven or door area outside oven seal. Oven control panel beeps & displays any F code error (for searing. • Meat not properly prepared. Try the bake or broil feature again. Use a ceramic-glass cooktop cleaning creme to prevent curling, but get hot enough to clean bottom, front top of oven, frame of metal utensils on residue can cause scratches. Cut remaining fatty edges to remove...
Wiring Diagram (All Languages)
Page 1
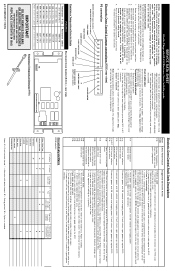
... with cold oven test oven temperature sensor probe circuit resistance. Circuit Analysis Matrix ES330 (electric) L1 to Bake L1 to Broil Bake / Bake Time X² X* Convection Bake X² X* Broil X Self-Clean X² Unlocked Locking Locked Unlocking Door open replace lock motor assy. X¹ = During preheat. Failure to do so will not change the Self-Cleaning cycle temperature. Within 5 seconds of setting 550°F, press and hold the Bake pad for use of this data sheet. If oven is severely overheating/heating when no cook cycle...
... with cold oven test oven temperature sensor probe circuit resistance. Circuit Analysis Matrix ES330 (electric) L1 to Bake L1 to Broil Bake / Bake Time X² X* Convection Bake X² X* Broil X Self-Clean X² Unlocked Locking Locked Unlocking Door open replace lock motor assy. X¹ = During preheat. Failure to do so will not change the Self-Cleaning cycle temperature. Within 5 seconds of setting 550°F, press and hold the Bake pad for use of this data sheet. If oven is severely overheating/heating when no cook cycle...

Product Specifications Sheet
Page 2
... Convection Self Clean Storage Oven Controls Bake / Broil Effortless™ Convection Conversion Convection Bake / Broil / Roast Quick Bake Convection Quick Preheat My Favorite Effortless™ Temperature Probe Pizza Button Keep Warm Add-a-Minute Delay Start Self Clean Quick Clean Option Delay Clean Kitchen Timer / Timed Cook Option Auto Oven Shut-Off Oven Lock-Out Lower Drawer Control Yes /Variable (400-500°F) Yes Yes 2, 3, 4 Hours Yes 2, 3, 4 Hours Yes / Yes Yes Yes Cooktop Features Right Front Element (Watts) SpaceWise® Expandable A 9" / 12" - 1,800 / 3,000 Right Rear...
... Convection Self Clean Storage Oven Controls Bake / Broil Effortless™ Convection Conversion Convection Bake / Broil / Roast Quick Bake Convection Quick Preheat My Favorite Effortless™ Temperature Probe Pizza Button Keep Warm Add-a-Minute Delay Start Self Clean Quick Clean Option Delay Clean Kitchen Timer / Timed Cook Option Auto Oven Shut-Off Oven Lock-Out Lower Drawer Control Yes /Variable (400-500°F) Yes Yes 2, 3, 4 Hours Yes 2, 3, 4 Hours Yes / Yes Yes Yes Cooktop Features Right Front Element (Watts) SpaceWise® Expandable A 9" / 12" - 1,800 / 3,000 Right Rear...


