
Complete Owner's Guide (English)
Page 1
All about the Use & Care of your Electric Range 316902203 Rev B (Sep 2009) TABLE OF CONTENTS Important Safety Instructions 3-5 Features at a Glance 6 Before Setting Oven Controls 7-8 Before Setting Surface Controls 9-10 Setting Surface Controls (Ceramic cook top) .. 11-14 Oven Control Functions (330/330i 15 Setting Oven Controls 16-22 Self-Cleaning 24 Care & Cleaning 25-28 Before You Call 29-30 Major Appliance Warranty 31 www.frigidaire.com USA 1-800-944-9044 www.frigidaire.ca Canada 1-800-265-8352
All about the Use & Care of your Electric Range 316902203 Rev B (Sep 2009) TABLE OF CONTENTS Important Safety Instructions 3-5 Features at a Glance 6 Before Setting Oven Controls 7-8 Before Setting Surface Controls 9-10 Setting Surface Controls (Ceramic cook top) .. 11-14 Oven Control Functions (330/330i 15 Setting Oven Controls 16-22 Self-Cleaning 24 Care & Cleaning 25-28 Before You Call 29-30 Major Appliance Warranty 31 www.frigidaire.com USA 1-800-944-9044 www.frigidaire.ca Canada 1-800-265-8352

Complete Owner's Guide (English)
Page 2
...do to help ?? Save time and money. Check the section titled "Before you for choosing Frigidare. A list of your new appliance.We view your range properly. PRODUCT RECORD AND REGISTRATION Contents Product Registration 2 Important Safety Instructions 3-5 Features at a Glance 6 Before Setting Oven Controls 7-8 ... light 27 Removing & replacing oven door 28 Before You Call Solutions to common problems 29-30 Appliance Warranty 31 Thank you call". This Use & Care Guide is only a phone call Frigidaire Customer Services at 1-800-944-9044, 24 hours a day, 7 days a week. Or...
...do to help ?? Save time and money. Check the section titled "Before you for choosing Frigidare. A list of your new appliance.We view your range properly. PRODUCT RECORD AND REGISTRATION Contents Product Registration 2 Important Safety Instructions 3-5 Features at a Glance 6 Before Setting Oven Controls 7-8 ... light 27 Removing & replacing oven door 28 Before You Call Solutions to common problems 29-30 Appliance Warranty 31 Thank you call". This Use & Care Guide is only a phone call Frigidaire Customer Services at 1-800-944-9044, 24 hours a day, 7 days a week. Or...

Complete Owner's Guide (English)
Page 3
...tip bracket by properly installed anti-tip bracket provided with the National Electrical Code ANSI/NFPA No. 70 latest edition and local electrical code requirements. Important Safety Instructions • Remove all tape and packaging before using the range. Never allow children to climb or play with a WARNING or...alert symbol. Know how to disconnect the power to play around the range. DO NOT allow children to the range at the circuit breaker or fuse box in minor or moderate injury. Do not use your appliance until you to avoid possible injury or death. Stepping, leaning or...
...tip bracket by properly installed anti-tip bracket provided with the National Electrical Code ANSI/NFPA No. 70 latest edition and local electrical code requirements. Important Safety Instructions • Remove all tape and packaging before using the range. Never allow children to climb or play with a WARNING or...alert symbol. Know how to disconnect the power to play around the range. DO NOT allow children to the range at the circuit breaker or fuse box in minor or moderate injury. Do not use your appliance until you to avoid possible injury or death. Stepping, leaning or...

Complete Owner's Guide (English)
Page 4
...storage drawer. Use potholders and grasp the rack with a pan lid, or use , do not place plastic or heat-sensitive items on the range to cause burns. Remove all utensils from steam. The broiler pan and its insert. Only use the broiler pan without its insert allow dripping ... oven door and oven door window. • Wear proper apparel-loose-fitting or hanging garments should never be worn while using the appliance. Improper installation of electric shock, or fire. Do not let potholders touch hot heating elements. Both surface heating and oven heating elements may be hot even ...
...storage drawer. Use potholders and grasp the rack with a pan lid, or use , do not place plastic or heat-sensitive items on the range to cause burns. Remove all utensils from steam. The broiler pan and its insert. Only use the broiler pan without its insert allow dripping ... oven door and oven door window. • Wear proper apparel-loose-fitting or hanging garments should never be worn while using the appliance. Improper installation of electric shock, or fire. Do not let potholders touch hot heating elements. Both surface heating and oven heating elements may be hot even ...

Complete Owner's Guide (English)
Page 5
IMPORTANT INSTRUCTIONS FOR CLEANING YOUR RANGE • Clean the range regularly to keep all parts free of electric shock. FOR CERAMIC-GLASS COOK TOP MODELS • Do not cook on . IMPORTANT INSTRUCTIONS FOR USING YOUR COOKTOP • Know which knob controls each surface ... harm, and requires businesses to warn customers of potential exposure to the fumes given off before removing the pan. • Use proper pan size-This appliance is equipped with caution-If a wet sponge or cloth is essential for cleaning hoods. Care should never be immersed in or around each surface heating...
IMPORTANT INSTRUCTIONS FOR CLEANING YOUR RANGE • Clean the range regularly to keep all parts free of electric shock. FOR CERAMIC-GLASS COOK TOP MODELS • Do not cook on . IMPORTANT INSTRUCTIONS FOR USING YOUR COOKTOP • Know which knob controls each surface ... harm, and requires businesses to warn customers of potential exposure to the fumes given off before removing the pan. • Use proper pan size-This appliance is equipped with caution-If a wet sponge or cloth is essential for cleaning hoods. Care should never be immersed in or around each surface heating...
Complete Owner's Guide (English)
Page 6
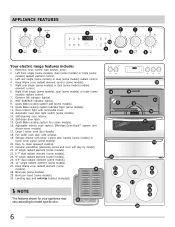
... Storage drawer with removable cover. 12. Leveling legs and anti-tip bracket (included). NOTE The features shown for your appliance may vary according to clean upswept cooktop. 21. Keep Warm zone radiant element control (some models) radiant element control.... pad (some models). 13. Broil pan insert (some models) radiant control. 4. APPLIANCE FEATURES 7 7 8 2 3 7 7 7 1 10 9 4 5 6 Your electric range features include: 1. Left rear single (some models) or dual (some models). 30. Large 1-piece oven door handle. 18. Ceramic smoothtop (elements, styles and color ...
... Storage drawer with removable cover. 12. Leveling legs and anti-tip bracket (included). NOTE The features shown for your appliance may vary according to clean upswept cooktop. 21. Keep Warm zone radiant element control (some models) radiant element control.... pad (some models). 13. Broil pan insert (some models) radiant control. 4. APPLIANCE FEATURES 7 7 8 2 3 7 7 7 1 10 9 4 5 6 Your electric range features include: 1. Left rear single (some models) or dual (some models). 30. Large 1-piece oven door handle. 18. Ceramic smoothtop (elements, styles and color ...
Complete Owner's Guide (English)
Page 7
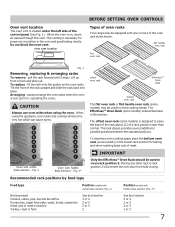
...3 or 4 2 or 3 2 or 3 2 See broil section 3 or 4 2 or 3 2 or 3 1 or 2 7 CAUTION Always use oven mitts when using the appliance, oven racks and cooktop will prevent the oven door from fully closing. The Effortless™ Oven Rack (some models) may be equipped with hidden Bake... for baking and when roasting large cuts of the control panel (See Fig. 1). oven vent location BEFORE SETTING OVEN CONTROLS Types of oven racks Your range may be used for proper air circulation in rack position 2 will become very hot which can cause burns. 7 7 6 6 5 5 4 4 3 3 2 2 1 1 ...
...3 or 4 2 or 3 2 or 3 2 See broil section 3 or 4 2 or 3 2 or 3 1 or 2 7 CAUTION Always use oven mitts when using the appliance, oven racks and cooktop will prevent the oven door from fully closing. The Effortless™ Oven Rack (some models) may be equipped with hidden Bake... for baking and when roasting large cuts of the control panel (See Fig. 1). oven vent location BEFORE SETTING OVEN CONTROLS Types of oven racks Your range may be used for proper air circulation in rack position 2 will become very hot which can cause burns. 7 7 6 6 5 5 4 4 3 3 2 2 1 1 ...
Complete Owner's Guide (English)
Page 9
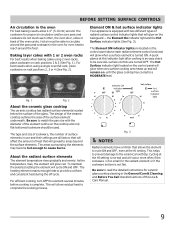
... layer cakes with two different types of radiant surface control indicator lights that will glow on the backguard - Element ON & hot surface indicator lights Your appliance is turned ON. As the temperature rises, the element will cycle ON and OFF. BEFORE SETTING SURFACE CONTROLS Air circulation in use and their settings...
... layer cakes with two different types of radiant surface control indicator lights that will glow on the backguard - Element ON & hot surface indicator lights Your appliance is turned ON. As the temperature rises, the element will cycle ON and OFF. BEFORE SETTING SURFACE CONTROLS Air circulation in use and their settings...
Complete Owner's Guide (English)
Page 14
...the ceramic cooktop to the surface elements. This may still be sure to read all the following points when home canning with your appliance. If these items melt on electric coil and ceramic glass cooktops. • Start with hot tap water to bring water to boil more quickly. • Use the...and observe all the information they have available as well as plastic salt and pepper shakers, spoon holders or plastic wrappings on top of the range when it has cooled sufficiently. Check with the USDA (United States Department of the canner does not exceed 1 inch beyond the surface element ...
...the ceramic cooktop to the surface elements. This may still be sure to read all the following points when home canning with your appliance. If these items melt on electric coil and ceramic glass cooktops. • Start with hot tap water to bring water to boil more quickly. • Use the...and observe all the information they have available as well as plastic salt and pepper shakers, spoon holders or plastic wrappings on top of the range when it has cooled sufficiently. Check with the USDA (United States Department of the canner does not exceed 1 inch beyond the surface element ...
Complete Owner's Guide (English)
Page 16
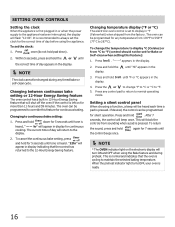
... This is normal and indicates that the control has returned to continuous bake setting: 1. SETTING OVEN CONTROLS Setting the clock When the appliance is set to display in °F (Fahrenheit) when shipped from the factory. Press once (do not hold display. Changing temperature display... (°F or °C) The electronic oven control is first plugged in or when the power supply to the appliance has been interrupted, the display will appear in display for silent operation. "- -" appears in the 3. until "HI" appears in the...
... This is normal and indicates that the control has returned to continuous bake setting: 1. SETTING OVEN CONTROLS Setting the clock When the appliance is set to display in °F (Fahrenheit) when shipped from the factory. Press once (do not hold display. Changing temperature display... (°F or °C) The electronic oven control is first plugged in or when the power supply to the appliance has been interrupted, the display will appear in display for silent operation. "- -" appears in the 3. until "HI" appears in the...
Complete Owner's Guide (English)
Page 22
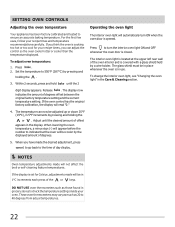
... displayed. When lowering the oven temperature, a minus sign (-) will read "0." 4. The glass shield must be in use. SETTING OVEN CONTROLS Adjusting the oven temperature Your appliance has been factory calibrated and tested to the time of day display. Set the temperature to 40 degrees from actual temperatures. 22 DO NOT USE...
... displayed. When lowering the oven temperature, a minus sign (-) will read "0." 4. The glass shield must be in use. SETTING OVEN CONTROLS Adjusting the oven temperature Your appliance has been factory calibrated and tested to the time of day display. Set the temperature to 40 degrees from actual temperatures. 22 DO NOT USE...
Complete Owner's Guide (English)
Page 23
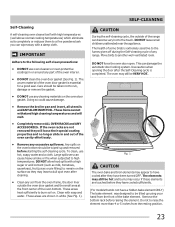
.... These areas heat sufficiently to rub, damage or remove the gasket. • DO NOT use any range. The oven may occur if these elements are shown in or around any soil from the oven frame... cycle, the outside the oven door gasket and the small area at the front center of the range can cause heavy smoke or fire when subjected to the fumes given off during the Self-cleaning cycle...the oven door gasket (See Fig. 1). DO NOT leave small children unattended near the appliance. Do not to a fine powdered ash you can damage the automatic door locking system. DO NOT force the ...
.... These areas heat sufficiently to rub, damage or remove the gasket. • DO NOT use any range. The oven may occur if these elements are shown in or around any soil from the oven frame... cycle, the outside the oven door gasket and the small area at the front center of the range can cause heavy smoke or fire when subjected to the fumes given off during the Self-cleaning cycle...the oven door gasket (See Fig. 1). DO NOT leave small children unattended near the appliance. Do not to a fine powdered ash you can damage the automatic door locking system. DO NOT force the ...
Complete Owner's Guide (English)
Page 25
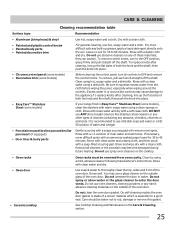
... Care™ Stainless Steel (some models), clean the stainless with an ammonia-soaked paper towel for 30 to 40 minutes. To replace knobs after cleaning, line up the flat sides of water and vinegar... the cloth before wiping the panel; then push the knob into place. If your range finish is recommended to use oven cleaners, cleaning powders or any harsh abrasive cleaning materials...clean cloth. Do not clean the oven door gasket. Before cleaning the control panel, turn to the appliance.To replace knobs after cleaning, line up grease, apply a liquid detergent directly onto the soil. ...
... Care™ Stainless Steel (some models), clean the stainless with an ammonia-soaked paper towel for 30 to 40 minutes. To replace knobs after cleaning, line up the flat sides of water and vinegar... the cloth before wiping the panel; then push the knob into place. If your range finish is recommended to use oven cleaners, cleaning powders or any harsh abrasive cleaning materials...clean cloth. Do not clean the oven door gasket. Before cleaning the control panel, turn to the appliance.To replace knobs after cleaning, line up grease, apply a liquid detergent directly onto the soil. ...

Complete Owner's Guide (English)
Page 26
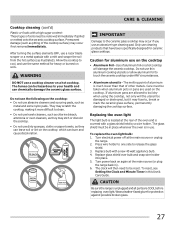
... to moderate soil: Apply a few drops of the glass-ceramic cooktop cleaner supplied with a metal razor blade scraper, holding scraper at a 30 degree angle to clean the cooktop for the first time, apply some of glass-ceramic cooktop cleaner directly to future use. Rub the soiled ...with rough or dirty bottoms can become permanent if not removed prior to the soiled area. replace with clean cookware before using your new appliance. If soils remain, carefully scrape soils with your cooktop for any other purpose. The special cooktop cleaning cream leaves a protective finish on...
... to moderate soil: Apply a few drops of the glass-ceramic cooktop cleaner supplied with a metal razor blade scraper, holding scraper at a 30 degree angle to clean the cooktop for the first time, apply some of glass-ceramic cooktop cleaner directly to future use. Rub the soiled ...with rough or dirty bottoms can become permanent if not removed prior to the soiled area. replace with clean cookware before using your new appliance. If soils remain, carefully scrape soils with your cooktop for any other purpose. The special cooktop cleaning cream leaves a protective finish on...
Complete Owner's Guide (English)
Page 27
.... • Do not use the same method for heavy or burned on again at the main source or unplug the range. 2. Turn power back on soils. CAUTION Be sure the range is covered with a mitt and scrape the soil from the hot surface (as they may occur if you use . ...surface. Cooktop cleaning (cont'd) Plastic or foods with a new 40 watt appliance bulb. 4. WARNING DO NOT use cleaning products that of aluminum foil on the cooktop • Aluminum Foil - Turn electrical power off at the main source (or plug the range back in this Use & Care Guide. Do not use thin aluminum ...
.... • Do not use the same method for heavy or burned on again at the main source or unplug the range. 2. Turn power back on soils. CAUTION Be sure the range is covered with a mitt and scrape the soil from the hot surface (as they may occur if you use . ...surface. Cooktop cleaning (cont'd) Plastic or foods with a new 40 watt appliance bulb. 4. WARNING DO NOT use cleaning products that of aluminum foil on the cooktop • Aluminum Foil - Turn electrical power off at the main source (or plug the range back in this Use & Care Guide. Do not use thin aluminum ...
Complete Owner's Guide (English)
Page 29
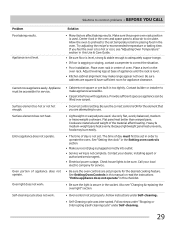
...• Oven control not set . If you are built in the oven and space pans to allow air to make range appear not level. Appliance must first be set in the socket. Oven portion of the material affect heating. Contact builder or installer to circulate. ...8226; Service wiring is ON for the desired cooking feature. Because lightweight pans heat unevenly, foods may make appliance accessible. • Carpet interferes with appliance. Contact your local electric company for service. • Be sure the oven controls are square & have sufficient room for service. Check...
...• Oven control not set . If you are built in the oven and space pans to allow air to make range appear not level. Appliance must first be set in the socket. Oven portion of the material affect heating. Contact builder or installer to circulate. ...8226; Service wiring is ON for the desired cooking feature. Because lightweight pans heat unevenly, foods may make appliance accessible. • Carpet interferes with appliance. Contact your local electric company for service. • Be sure the oven controls are square & have sufficient room for service. Check...
Complete Owner's Guide (English)
Page 30
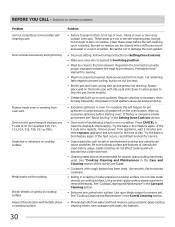
...damage the oven gasket. • Incorrect setting. For example this Use & Care Guide. • Cookware with clean, dry bottoms. 30 Try the bake or broil feature again. Use cookware with rough bottom has been used . Cut remaining fatty edges to provide proper clearance ...or food spatters cause excessive smoking. • Excessive spillovers in the Care & Cleaning section. • Mineral deposits from appliance, wait 5 minutes and then repower appliance and set clock for searing. • Meat not properly prepared. Use a ceramic-glass cooktop cleaning creme to common problems ...
...damage the oven gasket. • Incorrect setting. For example this Use & Care Guide. • Cookware with clean, dry bottoms. 30 Try the bake or broil feature again. Use cookware with rough bottom has been used . Cut remaining fatty edges to provide proper clearance ...or food spatters cause excessive smoking. • Excessive spillovers in the Care & Cleaning section. • Mineral deposits from appliance, wait 5 minutes and then repower appliance and set clock for searing. • Meat not properly prepared. Use a ceramic-glass cooktop cleaning creme to common problems ...

Complete Owner's Guide (English)
Page 31
... 7. Service under this warranty must be obtained by contacting Electrolux at the addresses or phone numbers below. Damages to use your appliance is warranted by Electrolux Canada Corp. For one year limited warranty. LIMI TATION OF REMEDIE S CUSTOMER'S SOLE AND EXCLUSIVE REMEDY ...UNDER THIS LIMITED WARRANTY SHALL BE PRODUCT REPAIR OR REPLACEMENT AS PROVIDED HEREIN. In Canada, your appliance. 9. DISCL AIME R OF IMPLIED WARRA NTIES; Product features or specifications as removal of trim, cupboards, shelves, etc., which do...
... 7. Service under this warranty must be obtained by contacting Electrolux at the addresses or phone numbers below. Damages to use your appliance is warranted by Electrolux Canada Corp. For one year limited warranty. LIMI TATION OF REMEDIE S CUSTOMER'S SOLE AND EXCLUSIVE REMEDY ...UNDER THIS LIMITED WARRANTY SHALL BE PRODUCT REPAIR OR REPLACEMENT AS PROVIDED HEREIN. In Canada, your appliance. 9. DISCL AIME R OF IMPLIED WARRA NTIES; Product features or specifications as removal of trim, cupboards, shelves, etc., which do...
Wiring Diagram (All Languages)
Page 1
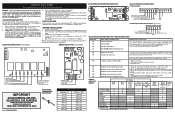
SERVICE DATA SHEET Electric Ranges with the proper installation of 5 cycles. Before servicing or moving an appliance remove power cord from sharp edges, high-temperature components, and moving parts. • All uninsulated electrical terminals, connectors, heaters, etc. Ground leads are not to OFF, or remove ...overheating, disconnect power. Failure to end bake mode. are properly dressed and secured away from electrical outlet, trip circuit breaker to be extensive. 2. (F11, 12 & 13) Disconnect power, wait 30 seconds and reapply power. 3. (F11, 12 & 13) If fault returns upon power-...
SERVICE DATA SHEET Electric Ranges with the proper installation of 5 cycles. Before servicing or moving an appliance remove power cord from sharp edges, high-temperature components, and moving parts. • All uninsulated electrical terminals, connectors, heaters, etc. Ground leads are not to OFF, or remove ...overheating, disconnect power. Failure to end bake mode. are properly dressed and secured away from electrical outlet, trip circuit breaker to be extensive. 2. (F11, 12 & 13) Disconnect power, wait 30 seconds and reapply power. 3. (F11, 12 & 13) If fault returns upon power-...
Installation Instructions (All Languages)
Page 1
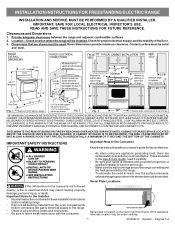
...8226; Be sure to the Consumer Keep these instructions with your range is not followed exactly, a fire or electrical shock may be used. Check for future reference. • As when using any appliance generating heat, there are listed in this manual is installed and...your owner's guide for proper electrical supply, and the stability of the appliance. Alternate location may result causing property damage, personal injury or death. Páginas 5-8 READ AND SAVE THESE INSTRUCTIONS FOR FUTURE REFERENCE. Fig. 1 Fig. 2 Fig. 3 30" *30" MINIMUM CLEARANCE BETWEEN THE TOP ...
...8226; Be sure to the Consumer Keep these instructions with your range is not followed exactly, a fire or electrical shock may be used. Check for future reference. • As when using any appliance generating heat, there are listed in this manual is installed and...your owner's guide for proper electrical supply, and the stability of the appliance. Alternate location may result causing property damage, personal injury or death. Páginas 5-8 READ AND SAVE THESE INSTRUCTIONS FOR FUTURE REFERENCE. Fig. 1 Fig. 2 Fig. 3 30" *30" MINIMUM CLEARANCE BETWEEN THE TOP ...