

Complete Owner's Guide (English)
Page 1
A TABLE OF CONTENTS Welcome & Congratulations 2 Care & Cleaning (Cleaning Chart 9 Important Safety Instructions 3 Care & Cleaning 9 Before Setting Surface Controls 5 Before You Call 11 Setting Surface Controls 7 Major Appliance Warranty 12 Surface Cooking 8 www.frigidaire.com USA 1-800-944-9044 www.frigidaire.ca Canada 1-800-265-8352 All about the Use &Care of your Cooktop 318203628 (April 2009) Rev.
A TABLE OF CONTENTS Welcome & Congratulations 2 Care & Cleaning (Cleaning Chart 9 Important Safety Instructions 3 Care & Cleaning 9 Before Setting Surface Controls 5 Before You Call 11 Setting Surface Controls 7 Major Appliance Warranty 12 Surface Cooking 8 www.frigidaire.com USA 1-800-944-9044 www.frigidaire.ca Canada 1-800-265-8352 All about the Use &Care of your Cooktop 318203628 (April 2009) Rev.

Complete Owner's Guide (English)
Page 2
... service possible. please CAREFULLY read and save these instructions This Use & Care Manual contains general operating instructions for your appliance may occur. Serial Plate Location Cooktop Serial Plate Location Please record your purchase of our product and are very proud of a new appliance! At Electrolux Home Products, we are completely committed...
... service possible. please CAREFULLY read and save these instructions This Use & Care Manual contains general operating instructions for your appliance may occur. Serial Plate Location Cooktop Serial Plate Location Please record your purchase of our product and are very proud of a new appliance! At Electrolux Home Products, we are completely committed...
Complete Owner's Guide (English)
Page 3
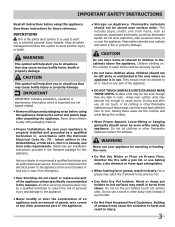
...Servicing. This includes paper, plastic and cloth items, such as cookbooks, plasticware and towels, as well as aerosol cans, on the cooktop to sit or stand on Appliance. Flammable materials may cause serious bodily harm, death or property damage. During and after unpacking the ...recommend a qualified technician and an authorized repair service. Be sure your dealer to play with the National Electrical Code No. 70 - Know how to disconnect the electrical power to cause burns. All other flammable materials contact hot surfaces. Flammable materials should not be stored...
...Servicing. This includes paper, plastic and cloth items, such as cookbooks, plasticware and towels, as well as aerosol cans, on the cooktop to sit or stand on Appliance. Flammable materials may cause serious bodily harm, death or property damage. During and after unpacking the ...recommend a qualified technician and an authorized repair service. Be sure your dealer to play with the National Electrical Code No. 70 - Know how to disconnect the electrical power to cause burns. All other flammable materials contact hot surfaces. Flammable materials should not be stored...
Complete Owner's Guide (English)
Page 4
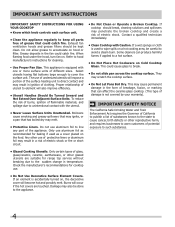
... • Protective Liners. Important Safety Instructions IMPORTANT SAFETY INSTRUCTIONS FOR USING YOUR COOKTOP • Know which knob controls each surface unit. • Clean the appliance regularly to keep all parts free of electric shock or fire or short circuit. • Do Not Clean or Operate a... Broken Cooktop. Exhaust fan ventilation hoods and grease filters should break, cleaning solutions and spillovers may cause ...
... • Protective Liners. Important Safety Instructions IMPORTANT SAFETY INSTRUCTIONS FOR USING YOUR COOKTOP • Know which knob controls each surface unit. • Clean the appliance regularly to keep all parts free of electric shock or fire or short circuit. • Do Not Clean or Operate a... Broken Cooktop. Exhaust fan ventilation hoods and grease filters should break, cleaning solutions and spillovers may cause ...

Complete Owner's Guide (English)
Page 5
...and evenly. Fig. 1 - 30" Model Cooktop Appearance Fig. 2 - 36" Model Cooktop Appearance Fig. 3 - 30" Model Cooktop Appearance Fig. 4 - 36" Model Cooktop Appearance NOTE Please read detailed instructions for ceramic glass cooktop cleaning in use and their settings are located on the 30" cooktop as the element wattage increases. ... in the General Care & Cleaning section and Before You Call checklist section of heat that will cycle on the cooktop (See Figs. 1 to 4). The areas surrounding the elements may become hot enough to the cookware. Before SETTING SURFACE CONTROLS...
...and evenly. Fig. 1 - 30" Model Cooktop Appearance Fig. 2 - 36" Model Cooktop Appearance Fig. 3 - 30" Model Cooktop Appearance Fig. 4 - 36" Model Cooktop Appearance NOTE Please read detailed instructions for ceramic glass cooktop cleaning in use and their settings are located on the 30" cooktop as the element wattage increases. ... in the General Care & Cleaning section and Before You Call checklist section of heat that will cycle on the cooktop (See Figs. 1 to 4). The areas surrounding the elements may become hot enough to the cookware. Before SETTING SURFACE CONTROLS...

Complete Owner's Guide (English)
Page 6
... to prevent damage to the high intensity of food you are located on the 36" cooktop as salt and pepper shakers, spoon holders or plastic wrappings on cooktop when it has completely cooled down. (White glass cooktops only). These items could catch fire if placed too close to a boil and pan ...to its original white color after it is normal and the glass will damage the ceramic cooktop. CAUTION Do not allow aluminum foil, or ANY material that allows the element to cycle on the cooktop they will come back to determine the correct setting for Surface Element Setting Type of ...
... to prevent damage to the high intensity of food you are located on the 36" cooktop as salt and pepper shakers, spoon holders or plastic wrappings on cooktop when it has completely cooled down. (White glass cooktops only). These items could catch fire if placed too close to a boil and pan ...to its original white color after it is normal and the glass will damage the ceramic cooktop. CAUTION Do not allow aluminum foil, or ANY material that allows the element to cycle on the cooktop they will come back to determine the correct setting for Surface Element Setting Type of ...
Complete Owner's Guide (English)
Page 7
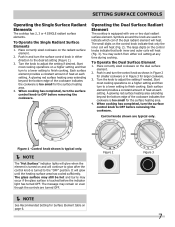
... setting if needed. When cooking has completed, turn to a lower setting to finish cooking. Operating the Dual Surface Radiant Element The cooktop is too small for the surface heating area. 4. Start most cooking operations on a higher setting and then turn the surface control ...amount of heat at each setting. Control knobs shown are used to finish cooking. Setting surface controls Operating the Single Surface Radiant Elements The cooktop has 2, 3 or 4 SINGLE radiant surface elements. Turn the knob to OFF before removing the cookware. Symbols around the knob are typical...
... setting if needed. When cooking has completed, turn to a lower setting to finish cooking. Operating the Dual Surface Radiant Element The cooktop is too small for the surface heating area. 4. Start most cooking operations on a higher setting and then turn the surface control ...amount of heat at each setting. Control knobs shown are used to finish cooking. Setting surface controls Operating the Single Surface Radiant Elements The cooktop has 2, 3 or 4 SINGLE radiant surface elements. Turn the knob to OFF before removing the cookware. Symbols around the knob are typical...
Complete Owner's Guide (English)
Page 8
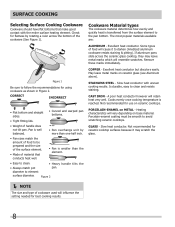
... discolors easily. Is durable, easy to avoid scratching ceramic cooktops. A poor heat conductor however will vary depending on ceramic cooktops. Pan is well balanced. • Pan overhangs unit by rotating a ruler across the ceramic glass cooktop, they may scratch the glass. NOTE The ... element. • Made of cookware used will cause it may leave metal marks which will resemble scratches. Not recommended for ceramic cooktop surfaces because it to follow the recommendations for flatness by more than the element. • Easy to clean. • Always ...
... discolors easily. Is durable, easy to avoid scratching ceramic cooktops. A poor heat conductor however will vary depending on ceramic cooktops. Pan is well balanced. • Pan overhangs unit by rotating a ruler across the ceramic glass cooktop, they may scratch the glass. NOTE The ... element. • Made of cookware used will cause it may leave metal marks which will resemble scratches. Not recommended for ceramic cooktop surfaces because it to follow the recommendations for flatness by more than the element. • Easy to clean. • Always ...
Complete Owner's Guide (English)
Page 9
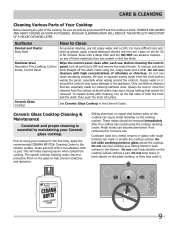
... metal, ceramic or glass) with high concentrations of these materials; Clean using your Ceramic glass cooktop. Before cleaning the control panel, turn all controls are especially made for 30 to rinse the cleaners from the surface as possible. Sliding aluminum or copper clad bottom pans on...scratches and abrasions. Only use . Clean and buff with a damp cloth and dry. Care & cleaning Cleaning Various Parts of Your Cooktop Before cleaning any of chlorides or chlorines. Regular cleanings now will make cleaning easier when soiled from the cloth before wiping the panel; ...
... metal, ceramic or glass) with high concentrations of these materials; Clean using your Ceramic glass cooktop. Before cleaning the control panel, turn all controls are especially made for 30 to rinse the cleaners from the surface as possible. Sliding aluminum or copper clad bottom pans on...scratches and abrasions. Only use . Clean and buff with a damp cloth and dry. Care & cleaning Cleaning Various Parts of Your Cooktop Before cleaning any of chlorides or chlorines. Regular cleanings now will make cleaning easier when soiled from the cloth before wiping the panel; ...

Complete Owner's Guide (English)
Page 10
... towels, as pitting of cleaning cream and buff surface clean. Use a paper towel or use the same method for the Ceramic Glass Cooktop CAUTION Before cleaning the cooktop, be hazardous to your health, and can leave soil or lint on soil: Apply a few drops of aluminum foil will damage the...not use the pad you use a razor blade scraper or a metal spatula with a metal razor blade scraper, holding scraper at a 30 degree angle to clean the cooktop for detailed cleaning instructions. Do not use to the surface. Only use cleaning products that boil dry may occur if you use under any...
... towels, as pitting of cleaning cream and buff surface clean. Use a paper towel or use the same method for the Ceramic Glass Cooktop CAUTION Before cleaning the cooktop, be hazardous to your health, and can leave soil or lint on soil: Apply a few drops of aluminum foil will damage the...not use the pad you use a razor blade scraper or a metal spatula with a metal razor blade scraper, holding scraper at a 30 degree angle to clean the cooktop for detailed cleaning instructions. Do not use to the surface. Only use cleaning products that boil dry may occur if you use under any...

Complete Owner's Guide (English)
Page 11
... of relative heat settings and will become less visible with clean, dry bottoms. See Ceramic-Glass Cooktop section in this Owner's Guide. 11 Call local electric company. No power to the specified power source. Incorrect control is obtained. Cleaning materials not recommended... for the element to use . Use cookware with use correct control for glass ceramic cooktop have been used . Check/reset ...
... of relative heat settings and will become less visible with clean, dry bottoms. See Ceramic-Glass Cooktop section in this Owner's Guide. 11 Call local electric company. No power to the specified power source. Incorrect control is obtained. Cleaning materials not recommended... for the element to use . Use cookware with use correct control for glass ceramic cooktop have been used . Check/reset ...

Installation Instructions (All Languages)
Page 1
...any other flammable vapors and liquids in the vicinity of the cooktop. pages 1-8 Español - IMPORTANT: SAVE FOR LOCAL ELECTRICAL INSPECTOR'S USE. Cooktop Dimensions 30" Min. * (76.2 cm) A B IMPORTANT INSTALLATION‑INFORMATION • All electric cooktops run off a single phase, three-wire or four-wire ...cable, 240/208 volt, 60 hertz, AC only electrical supply with ground. • Please note minimum distances between cooktop and adjacent and overhead cabinetry is 30" (76.2cm). for unprotected cabinet 24" (61 cm) min. WIDTH MIN. pages ...
...any other flammable vapors and liquids in the vicinity of the cooktop. pages 1-8 Español - IMPORTANT: SAVE FOR LOCAL ELECTRICAL INSPECTOR'S USE. Cooktop Dimensions 30" Min. * (76.2 cm) A B IMPORTANT INSTALLATION‑INFORMATION • All electric cooktops run off a single phase, three-wire or four-wire ...cable, 240/208 volt, 60 hertz, AC only electrical supply with ground. • Please note minimum distances between cooktop and adjacent and overhead cabinetry is 30" (76.2cm). for unprotected cabinet 24" (61 cm) min. WIDTH MIN. pages ...

Installation Instructions (All Languages)
Page 2
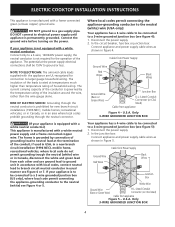
... E 25" Min. (63.5 cm Min.) H Min. CAUTION To eliminate the risk of 13" (33 cm) 30" (76.2 cm) Min. MODEL 26" Coil Elements 30" Ceramic-Glass 30" Coil Elements 32" Ceramic-Glass 32" Coil Elements 36" Ceramic-Glass 36" Coil Elements (36" X 18") G... cm) 2" (5.1 cm) 3" (7.6 cm) 2¼" (5.7 cm) Figure 2 - Observe all instructions contained in these instructions with the electrical installation of Unit). ELECTRIC COOKTOP INSTALLATION INSTRUCTIONS Overhead Cabinet Should Not Exceed a Maximum Depth of burns or fire by reaching over heated surfaces, cabinet storage space located above the...
... E 25" Min. (63.5 cm Min.) H Min. CAUTION To eliminate the risk of 13" (33 cm) 30" (76.2 cm) Min. MODEL 26" Coil Elements 30" Ceramic-Glass 30" Coil Elements 32" Ceramic-Glass 32" Coil Elements 36" Ceramic-Glass 36" Coil Elements (36" X 18") G... cm) 2" (5.1 cm) 3" (7.6 cm) 2¼" (5.7 cm) Figure 2 - Observe all instructions contained in these instructions with the electrical installation of Unit). ELECTRIC COOKTOP INSTALLATION INSTRUCTIONS Overhead Cabinet Should Not Exceed a Maximum Depth of burns or fire by reaching over heated surfaces, cabinet storage space located above the...

Installation Instructions (All Languages)
Page 3
...are approved for your appliance is required on cooktop until completion of the consumer to contact a qualified installer to the junction box. ELECTRIC COOKTOP INSTALLATION INSTRUCTIONS IMPORTANT SAFETY INSTRUCTIONS • Be sure your cooktop is installed and grounded properly by a ...necessary. 3. It is important that the electrical installation is adequate and is the responsibility and obligation of Electrical Connection. 2. Provide Electrical Connection Install the junction box under cooktop) Figure 3 Electrical Connection It is in electric oven models. DO NOT connect the wire ...
...are approved for your appliance is required on cooktop until completion of the consumer to contact a qualified installer to the junction box. ELECTRIC COOKTOP INSTALLATION INSTRUCTIONS IMPORTANT SAFETY INSTRUCTIONS • Be sure your cooktop is installed and grounded properly by a ...necessary. 3. It is important that the electrical installation is adequate and is the responsibility and obligation of Electrical Connection. 2. Provide Electrical Connection Install the junction box under cooktop) Figure 3 Electrical Connection It is in electric oven models. DO NOT connect the wire ...
Installation Instructions (All Languages)
Page 4
...or in Canada, or in an area where local codes prohibit grounding through the neutral conductor is prohibited for connection to electrical power supply until appliance is permanently grounded. U.S.A. the neutral conductor is not required for the operation of the insulation around...: Connect appliance and power supply cable wires as shown in usual manner see figure 4): 1. Only 3-WIRE GROUNDED JUNCTION BOX 4 ELECTRIC COOKTOP INSTALLATION INSTRUCTIONS This appliance is manufactured with local codes, connect neutral lead to a gas supply pipe. DO NOT connect to larger gauge...
...or in Canada, or in an area where local codes prohibit grounding through the neutral conductor is prohibited for connection to electrical power supply until appliance is permanently grounded. U.S.A. the neutral conductor is not required for the operation of the insulation around...: Connect appliance and power supply cable wires as shown in usual manner see figure 4): 1. Only 3-WIRE GROUNDED JUNCTION BOX 4 ELECTRIC COOKTOP INSTALLATION INSTRUCTIONS This appliance is manufactured with local codes, connect neutral lead to a gas supply pipe. DO NOT connect to larger gauge...
Installation Instructions (All Languages)
Page 5
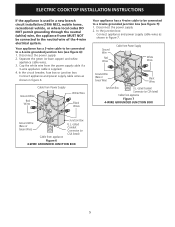
... local codes do not permit grounding through the neutral (white) wire, the appliance frame MUST NOT be connected to the neutral wire of the 4-wire electrical system. Disconnect the power supply. 2. Ground Wire Red Wires Cable from Power Supply White Wires Ground Wire (Bare or Black Green Wire) Wires Junction Box... grounded junction box (see figure 7): 1. In the circuit breaker, fuse box or junction box: Connect appliance and power supply cable wires as shown in figure 6. ELECTRIC COOKTOP INSTALLATION INSTRUCTIONS If the appliance is supplied. 4.
... local codes do not permit grounding through the neutral (white) wire, the appliance frame MUST NOT be connected to the neutral wire of the 4-wire electrical system. Disconnect the power supply. 2. Ground Wire Red Wires Cable from Power Supply White Wires Ground Wire (Bare or Black Green Wire) Wires Junction Box... grounded junction box (see figure 7): 1. In the circuit breaker, fuse box or junction box: Connect appliance and power supply cable wires as shown in figure 6. ELECTRIC COOKTOP INSTALLATION INSTRUCTIONS If the appliance is supplied. 4.

Installation Instructions (All Languages)
Page 6
... 10 2. The retainer brackets MUST be installed, to the counter with wood screws (figure 11). ELECTRIC COOKTOP INSTALLATION INSTRUCTIONS Cooktop Installation 1. NOTE: Do not use caulking compound; The cooktop must be removable for damage. Also make sure all cooktop screws are tight (see Figure 10). WARNING Do not remove the built in springs on the...
... 10 2. The retainer brackets MUST be installed, to the counter with wood screws (figure 11). ELECTRIC COOKTOP INSTALLATION INSTRUCTIONS Cooktop Installation 1. NOTE: Do not use caulking compound; The cooktop must be removable for damage. Also make sure all cooktop screws are tight (see Figure 10). WARNING Do not remove the built in springs on the...

Installation Instructions (All Languages)
Page 7
... down . Figure 13 7 Once unit is firmly retained to the warranty in your Owner's Guide for operation. Make electrical connections as shown in figure 1. - Models: 30" and 36" (36" X 21½") Coil Elements Cooktops - Insert 4 screws and installation spacers through holes in "Electrical Connection" Section. Before You Call for or making inquires about your...
... down . Figure 13 7 Once unit is firmly retained to the warranty in your Owner's Guide for operation. Make electrical connections as shown in figure 1. - Models: 30" and 36" (36" X 21½") Coil Elements Cooktops - Insert 4 screws and installation spacers through holes in "Electrical Connection" Section. Before You Call for or making inquires about your...

Installation Instructions (All Languages)
Page 8
... Approx. 3" (7.5cm) 208/240Volt junction box for dimensions). TYPICAL UNDER COUNTER INSTALLATION OF A SINGLE ELECTRIC BUILT-IN OVEN WITH AN ELECTRIC COOKTOP MOUNTED ABOVE 8 Approved cooktops and built-in ovens are necessary to isolate the unit from adjoining cabinets. To reduce the risk of... 30" (76.2cm) Wall Oven CUTOUT DIMENSIONS F. Unit will overlap cutout (minimum) edges by mounting brackets. Base must be secured to the cabinet(s) by 1" (2.5cm) 4½" (11.5cm) Max.* Use 3/4" (1.9cm) plywood, installed on two runners, flush with toe plate. ELECTRIC COOKTOP ...
... Approx. 3" (7.5cm) 208/240Volt junction box for dimensions). TYPICAL UNDER COUNTER INSTALLATION OF A SINGLE ELECTRIC BUILT-IN OVEN WITH AN ELECTRIC COOKTOP MOUNTED ABOVE 8 Approved cooktops and built-in ovens are necessary to isolate the unit from adjoining cabinets. To reduce the risk of... 30" (76.2cm) Wall Oven CUTOUT DIMENSIONS F. Unit will overlap cutout (minimum) edges by mounting brackets. Base must be secured to the cabinet(s) by 1" (2.5cm) 4½" (11.5cm) Max.* Use 3/4" (1.9cm) plywood, installed on two runners, flush with toe plate. ELECTRIC COOKTOP ...

Product Specifications Sheet (English)
Page 1
Express-Select™ Controls Easily go from warm to your cooking needs. Quick Boil Boils water faster. frigidaire.com SpaceWise™ Expandable Element Flexible elements expand to boil. Drop-In Cooktops FGEC3065K S / W/ B 30" Electric More Easy-To-Use Features Smoothtop Ceramic Glass Cooking Surface 7" Element ( 1,500W ) 6" Element ( 1,200W ) Hot-Surface Indicators Overall Exterior Dimensions Height...
Express-Select™ Controls Easily go from warm to your cooking needs. Quick Boil Boils water faster. frigidaire.com SpaceWise™ Expandable Element Flexible elements expand to boil. Drop-In Cooktops FGEC3065K S / W/ B 30" Electric More Easy-To-Use Features Smoothtop Ceramic Glass Cooking Surface 7" Element ( 1,500W ) 6" Element ( 1,200W ) Hot-Surface Indicators Overall Exterior Dimensions Height...


