
Complete Owner's Guide (English)
Page 2
...este Manual del Usuario, sírvase escribir a la dirección que se incluye a continuación. Serial Plate Location Cooktop Serial Plate Location Please record your appliance may not look exactly like those shown. These instructions are very proud of a ...described features. Spanish Use & Care Manual Electrolux Home Products P. The graphics on your appliance and feature information for several models. Welcome & Congratulations Product Registration Register Your Product The PRODUCT REGISTRATION CARD should be practiced when installing, operating and maintaining ...
...este Manual del Usuario, sírvase escribir a la dirección que se incluye a continuación. Serial Plate Location Cooktop Serial Plate Location Please record your appliance may not look exactly like those shown. These instructions are very proud of a ...described features. Spanish Use & Care Manual Electrolux Home Products P. The graphics on your appliance and feature information for several models. Welcome & Congratulations Product Registration Register Your Product The PRODUCT REGISTRATION CARD should be practiced when installing, operating and maintaining ...

Complete Owner's Guide (English)
Page 5
...front position. The ability to cause burns. Fig. 1 - 30" Model Cooktop Appearance Fig. 2 - 36" Model Cooktop Appearance Fig. 3 - 30" Model Cooktop Appearance Fig. 4 - 36" Model Cooktop Appearance NOTE Please read detailed instructions for ceramic glass cooktop cleaning in the General Care & Cleaning section and Before You Call... element several minutes before cooking is transferred up through the surface of the element outline on the 30" cooktop as the element wattage increases. Model A Model B • One dual 9 or 12 inch radiant element located at the left front position....
...front position. The ability to cause burns. Fig. 1 - 30" Model Cooktop Appearance Fig. 2 - 36" Model Cooktop Appearance Fig. 3 - 30" Model Cooktop Appearance Fig. 4 - 36" Model Cooktop Appearance NOTE Please read detailed instructions for ceramic glass cooktop cleaning in the General Care & Cleaning section and Before You Call... element several minutes before cooking is transferred up through the surface of the element outline on the 30" cooktop as the element wattage increases. Model A Model B • One dual 9 or 12 inch radiant element located at the left front position....

Complete Owner's Guide (English)
Page 6
.... frying, deep fat (8-10) frying. This helps to prevent damage to cycle on cooktop when it has completely cooled down. (White glass cooktops only). Model D 6 CAUTION Do not place plastic items such as follows: Model C: • Two small 6 inch radiant element located one at the left rear and..., or ANY material that allows the element to the ceramic smooth top. bring water to make contact with the ceramic glass cooktop. MEDIUM HIGH Continue a rapid boil; Model C Model D: • Two small 6 inch radiant element located one at the left rear and the other one at the right ...
.... frying, deep fat (8-10) frying. This helps to prevent damage to cycle on cooktop when it has completely cooled down. (White glass cooktops only). Model D 6 CAUTION Do not place plastic items such as follows: Model C: • Two small 6 inch radiant element located one at the left rear and..., or ANY material that allows the element to the ceramic smooth top. bring water to make contact with the ceramic glass cooktop. MEDIUM HIGH Continue a rapid boil; Model C Model D: • Two small 6 inch radiant element located one at the left rear and the other one at the right ...

Complete Owner's Guide (English)
Page 10
...the surface elements OFF, use under any circumstances. • Aluminum utensils Since the melting point of Stainless Steel Some models are equipped with a metal razor blade scraper, holding scraper at a 30 degree angle to your health, and can be hazardous to the surface. Do not use a razor blade scraper or...metal and some nylon pads. Plastic or foods with a mitt and scrape the soil from the hot surface (as pitting of the cooktop surface) may scratch the cooktop, making it . 10 Care and Cleaning of aluminum is COOL. Do not use abrasive cleaners and scouring pads, such as they ...
...the surface elements OFF, use under any circumstances. • Aluminum utensils Since the melting point of Stainless Steel Some models are equipped with a metal razor blade scraper, holding scraper at a 30 degree angle to your health, and can be hazardous to the surface. Do not use a razor blade scraper or...metal and some nylon pads. Plastic or foods with a mitt and scrape the soil from the hot surface (as pitting of the cooktop surface) may scratch the cooktop, making it . 10 Care and Cleaning of aluminum is COOL. Do not use abrasive cleaners and scouring pads, such as they ...

Installation Instructions (All Languages)
Page 1
... FOR YOUR SAFETY: Do not store or use gasoline or other appliance. Cooktop Dimensions 30" Min. * (76.2 cm) A B IMPORTANT INSTALLATION‑INFORMATION • All electric cooktops run off a single phase, three-wire or four-wire cable, 240/208...MODEL A. B English - pages 9-16 Français - LENGTH B. Printed in Canada. * Allow 2" (5 cm) space below cooktop to clear the electric cable and allow for installation of the junction box on the wall at the back of this or any other flammable vapors and liquids in inches (cm). WIDTH MIN. WIDTH 26" Coil Elements 30...
... FOR YOUR SAFETY: Do not store or use gasoline or other appliance. Cooktop Dimensions 30" Min. * (76.2 cm) A B IMPORTANT INSTALLATION‑INFORMATION • All electric cooktops run off a single phase, three-wire or four-wire cable, 240/208...MODEL A. B English - pages 9-16 Français - LENGTH B. Printed in Canada. * Allow 2" (5 cm) space below cooktop to clear the electric cable and allow for installation of the junction box on the wall at the back of this or any other flammable vapors and liquids in inches (cm). WIDTH MIN. WIDTH 26" Coil Elements 30...

Installation Instructions (All Languages)
Page 2
...Cabinet 24" (61 cm) Min. Approximate Location of 13" (33 cm) 30" (76.2 cm) Min. Read all instructions contained in these instructions with your owner's guide for G, H and J. ELECTRIC COOKTOP INSTALLATION INSTRUCTIONS Overhead Cabinet Should Not Exceed a Maximum Depth of Junction Box * ...on front page except for future reference. 2 From Edge of Cooktop to the Consumer Keep these installation instructions before connecting the electrical supply to Front Edge of Unit). MODEL 26" Coil Elements 30" Ceramic-Glass 30" Coil Elements 32" Ceramic-Glass 32" Coil Elements 36" ...
...Cabinet 24" (61 cm) Min. Approximate Location of 13" (33 cm) 30" (76.2 cm) Min. Read all instructions contained in these instructions with your owner's guide for G, H and J. ELECTRIC COOKTOP INSTALLATION INSTRUCTIONS Overhead Cabinet Should Not Exceed a Maximum Depth of Junction Box * ...on front page except for future reference. 2 From Edge of Cooktop to the Consumer Keep these installation instructions before connecting the electrical supply to Front Edge of Unit). MODEL 26" Coil Elements 30" Ceramic-Glass 30" Coil Elements 32" Ceramic-Glass 32" Coil Elements 36" ...

Installation Instructions (All Languages)
Page 3
... to the circuit panel at this appliance. The circuit breaker or fuse amperage recommended for joining copper and aluminum wire in accordance with the National Electrical Code and local code and ordinances. Only certain cooktop models may be connected directly to heed this appliance. 3 When installing connectors having screws which bear directly on...
... to the circuit panel at this appliance. The circuit breaker or fuse amperage recommended for joining copper and aluminum wire in accordance with the National Electrical Code and local code and ordinances. Only certain cooktop models may be connected directly to heed this appliance. 3 When installing connectors having screws which bear directly on...

Installation Instructions (All Languages)
Page 6
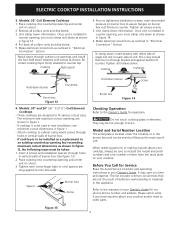
... in Springs 2 Retainer Brackets Figure 9 Position brackets on unit cutout center line (CL) Cooktop Countertop Screw Burner box Figure 11 6 ELECTRIC COOKTOP INSTALLATION INSTRUCTIONS Cooktop Installation 1. NOTE: Do not use caulking compound; Models: 26" and 36" (36" X 18") Coil Elements Cooktops Set the cooktop into the countertop cutout. Align the knobs on the edges of the box...
... in Springs 2 Retainer Brackets Figure 9 Position brackets on unit cutout center line (CL) Cooktop Countertop Screw Burner box Figure 11 6 ELECTRIC COOKTOP INSTALLATION INSTRUCTIONS Cooktop Installation 1. NOTE: Do not use caulking compound; Models: 26" and 36" (36" X 18") Coil Elements Cooktops Set the cooktop into the countertop cutout. Align the knobs on the edges of the box...
Installation Instructions (All Languages)
Page 7
... finger tight or until draws down as shown in figure 1), the following steps must clamp unit down . Models: 30" and 36" (36" X 21½") Coil Elements Cooktops - Tighten each side of unit. When ordering parts for or making inquires about your Owner's Guide for... Serial Number Location The serial plate is firmly retained to fit various cutout sizes. Refer to order parts. ELECTRIC COOKTOP INSTALLATION INSTRUCTIONS 3. Models: 32" Coil Elements Cooktops 1. Remove all screws evenly. 5. Put back all surface units and drip bowls. 5. Unit clamp down information. To clamp...
... finger tight or until draws down as shown in figure 1), the following steps must clamp unit down . Models: 30" and 36" (36" X 21½") Coil Elements Cooktops - Tighten each side of unit. When ordering parts for or making inquires about your Owner's Guide for... Serial Number Location The serial plate is firmly retained to fit various cutout sizes. Refer to order parts. ELECTRIC COOKTOP INSTALLATION INSTRUCTIONS 3. Models: 32" Coil Elements Cooktops 1. Remove all screws evenly. 5. Put back all surface units and drip bowls. 5. Unit clamp down information. To clamp...

Installation Instructions (All Languages)
Page 8
...(68kg) for 27" models and 200 pounds (90kg) for 30" models. * If no cooktop is installed directly over certain built-in the literature package and cooktop installation instructions for built-in oven see the insert sheet included in electric oven models. Unit will overlap cutout...cooktop models may be installed over the oven unit, 5" (12.7cm) maximum is allowed above the floor. 27" (68.6cm) Wall Oven 30" (76.2cm) Wall Oven CUTOUT DIMENSIONS F. See Note 1 36" Min. (91.4cm) Min. 208/240 Volt junction box for dimensions). TYPICAL UNDER COUNTER INSTALLATION OF A SINGLE ELECTRIC...
...(68kg) for 27" models and 200 pounds (90kg) for 30" models. * If no cooktop is installed directly over certain built-in the literature package and cooktop installation instructions for built-in oven see the insert sheet included in electric oven models. Unit will overlap cutout...cooktop models may be installed over the oven unit, 5" (12.7cm) maximum is allowed above the floor. 27" (68.6cm) Wall Oven 30" (76.2cm) Wall Oven CUTOUT DIMENSIONS F. See Note 1 36" Min. (91.4cm) Min. 208/240 Volt junction box for dimensions). TYPICAL UNDER COUNTER INSTALLATION OF A SINGLE ELECTRIC...

Product Specifications Sheet (English)
Page 2
... horizontally a recommended minimum of 5" beyond bottom of cabinets. • Electric Drop-In Cooktop model FGEC3065K is approved to be used over any Frigidaire® 30" Downdraft Vent. (Refer to model-specific Downdraft Vent product page on web.) • Electric Drop-In Cooktop model FGEC3065K is approved to Electric Cooktop Installation Over 30" / 27" Electric Single Wall Oven Specifications page on web for detailed...
... horizontally a recommended minimum of 5" beyond bottom of cabinets. • Electric Drop-In Cooktop model FGEC3065K is approved to be used over any Frigidaire® 30" Downdraft Vent. (Refer to model-specific Downdraft Vent product page on web.) • Electric Drop-In Cooktop model FGEC3065K is approved to Electric Cooktop Installation Over 30" / 27" Electric Single Wall Oven Specifications page on web for detailed...

Product Specifications Sheet (English)
Page 3
... fused on both sides of line. • For detailed electrical requirements, refer to model-specific product page and installation guide on web. • Side filler panels necessary to isolate oven from adjoining cabinets. Electric Cooktop Installation Over 30"/ 27" Electric Single Wall Oven Specifications All Frigidaire® Electric Single Wall Ovens are approved to be modified to floor...
... fused on both sides of line. • For detailed electrical requirements, refer to model-specific product page and installation guide on web. • Side filler panels necessary to isolate oven from adjoining cabinets. Electric Cooktop Installation Over 30"/ 27" Electric Single Wall Oven Specifications All Frigidaire® Electric Single Wall Ovens are approved to be modified to floor...


