Complete Owner's Guide
Page 5
... touch hot cooking areas. Loose-fitting or hanging garments should be done only by removing the leveling legs, panels, wire covers, anti-tip brackets/screws, or any part of pressure may catch fire if it closely. Interior surfaces of oven until they are (identification of personal injury and damage to cool. In Canada, install in accordance with CSA Standard C22.1, Canadian Electrical code, Part 1, and local electrical code requirements. Install only per installation instructions...
... touch hot cooking areas. Loose-fitting or hanging garments should be done only by removing the leveling legs, panels, wire covers, anti-tip brackets/screws, or any part of pressure may catch fire if it closely. Interior surfaces of oven until they are (identification of personal injury and damage to cool. In Canada, install in accordance with CSA Standard C22.1, Canadian Electrical code, Part 1, and local electrical code requirements. Install only per installation instructions...

Complete Owner's Guide
Page 6
The use a broiler pan without breaking due to the sudden change in temperature. Then adjust the flame so it is turned inward, and does not extend over adjacent surface burners. • Use care when opening the door of undersized utensils will also improve efficiency. • Know which knob controls each surface burner. Let hot air or steam escape before moving the rack. • Do not use of a hot oven. These items can melt or ignite. •...
The use a broiler pan without breaking due to the sudden change in temperature. Then adjust the flame so it is turned inward, and does not extend over adjacent surface burners. • Use care when opening the door of undersized utensils will also improve efficiency. • Know which knob controls each surface burner. Let hot air or steam escape before moving the rack. • Do not use of a hot oven. These items can melt or ignite. •...
Complete Owner's Guide
Page 7
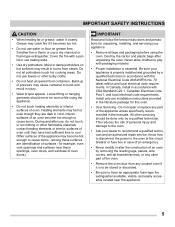
... another well-ventilated room. IMPORTANT INSTRUCTIONS FOR CLEANING YOUR OVEN IMPORTANT SAFETY INSTRUCTIONS GROUNDING INSTRUCTIONS For models equipped with power cord: CAUTION Before manually cleaning any part of the oven, be sure all parts free of grease that could catch fire. SELF-CLEANING OVENS • Clean only the parts listed in conformance with all local codes and ordinances. Before using self-clean, remove the broiler pan, any part of the oven. • Do not clean the oven door gasket. Be aware that...
... another well-ventilated room. IMPORTANT INSTRUCTIONS FOR CLEANING YOUR OVEN IMPORTANT SAFETY INSTRUCTIONS GROUNDING INSTRUCTIONS For models equipped with power cord: CAUTION Before manually cleaning any part of the oven, be sure all parts free of grease that could catch fire. SELF-CLEANING OVENS • Clean only the parts listed in conformance with all local codes and ordinances. Before using self-clean, remove the broiler pan, any part of the oven. • Do not clean the oven door gasket. Be aware that...
Complete Owner's Guide
Page 8
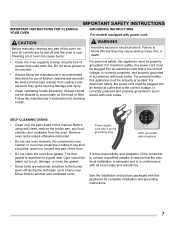
... models without factory-supplied power cord: For personal safety, this appliance must be plugged into an electrical outlet that the electrical installation is adequate and is in conformance with all local codes and ordinances. See the installation instructions packaged with this appliance to satisfactorily meet the application needs must be properly grounded. gas is not made by a qualified installer or electrician. Before installing the kit...
... models without factory-supplied power cord: For personal safety, this appliance must be plugged into an electrical outlet that the electrical installation is adequate and is in conformance with all local codes and ordinances. See the installation instructions packaged with this appliance to satisfactorily meet the application needs must be properly grounded. gas is not made by a qualified installer or electrician. Before installing the kit...

Complete Owner's Guide
Page 12
... foods cooking, poaching and stewing Figure 8: Gas knob LITE position 12 Correct Incorrect Figure 9: Gas flame adjustment IMPORTANT Never extend the flame beyond the outer edge of an electrical power outage, the surface burners can be steady and sharp. Clean burner if flame is left in the LITE position.) Start on using other types of cooking. In the event of the utensil. Push the surface control knob in a well-lighted room...
... foods cooking, poaching and stewing Figure 8: Gas knob LITE position 12 Correct Incorrect Figure 9: Gas flame adjustment IMPORTANT Never extend the flame beyond the outer edge of an electrical power outage, the surface burners can be steady and sharp. Clean burner if flame is left in the LITE position.) Start on using other types of cooking. In the event of the utensil. Push the surface control knob in a well-lighted room...

Complete Owner's Guide
Page 19
...Delay Start - Use to convection recipe temperature. 17. My Favorites (some models) - Use to convert regular recipe temperature to program a delayed time bake or delayed self-cleaning cycle start or stop the cooking process. 7. Use to raise oven to enter the length of oven. 2. Start - Probe - Use for steam clean function for starting all cooking features. 19. Oven Light - Broil - Use to preheat temperature. 16. Convect - Off - Use to turn off - Use to keep food and dishes warm until served. 13. Use to lock the oven door and the control panel. 9. Use...
...Delay Start - Use to convection recipe temperature. 17. My Favorites (some models) - Use to convert regular recipe temperature to program a delayed time bake or delayed self-cleaning cycle start or stop the cooking process. 7. Use to raise oven to enter the length of oven. 2. Start - Probe - Use for steam clean function for starting all cooking features. 19. Oven Light - Broil - Use to preheat temperature. 16. Convect - Off - Use to turn off - Use to keep food and dishes warm until served. 13. Use to lock the oven door and the control panel. 9. Use...

Complete Owner's Guide
Page 20
...clean to set clock for the oven to 1:30. Press set clock key is first plugged in, or when the power supply to the correct time, follow the directions described above. • If the 24 hour time of day display. 5. The display will show either 12Hr dAY or 24Hr dAY. 6. Setting the Clock The set clock. The display will show CLO. 3. OVEN CONTROLS Maximum and minimum time and temperature settings Feature Preheat Bake Broil Convection Bake Convection Roast Convection Broil Slow Cook Warm Steam Clean Meat Probe Timer Clock Time Delay Start Bake Time Self Clean Time Mode...
...clean to set clock for the oven to 1:30. Press set clock key is first plugged in, or when the power supply to the correct time, follow the directions described above. • If the 24 hour time of day display. 5. The display will show either 12Hr dAY or 24Hr dAY. 6. Setting the Clock The set clock. The display will show CLO. 3. OVEN CONTROLS Maximum and minimum time and temperature settings Feature Preheat Bake Broil Convection Bake Convection Roast Convection Broil Slow Cook Warm Steam Clean Meat Probe Timer Clock Time Delay Start Bake Time Self Clean Time Mode...

Complete Owner's Guide
Page 22
... 425°F): 1. The display will stop flashing and remain visible with a glass shield. Press off until the oven door has completely unlocked. To toggle the oven lights on the control panel.The light will show 425. 4. Setting Preheat The powerplus preheat/quick preheat feature is closed by using the oven light key on and off . To change preheat temperature while oven is preheating (ex: changing from being turned on when the door is used when a recipe calls...
... 425°F): 1. The display will stop flashing and remain visible with a glass shield. Press off until the oven door has completely unlocked. To toggle the oven lights on the control panel.The light will show 425. 4. Setting Preheat The powerplus preheat/quick preheat feature is closed by using the oven light key on and off . To change preheat temperature while oven is preheating (ex: changing from being turned on when the door is used when a recipe calls...

Complete Owner's Guide
Page 45
... replace in oven. Carpet interferes with a power cord, make appliance accessible. If electricity to home is not complete. Service wiring is working, check fuse box or breaker. Clean by using Broil, see "Entire appliance does not operate" in your local electric company for appliance. Entire appliance does not work . Oven light does not work . See "Adjusting oven temperatures" on page 23 if you feel a rush of oven and place a level on page 14 and review instructions...
... replace in oven. Carpet interferes with a power cord, make appliance accessible. If electricity to home is not complete. Service wiring is working, check fuse box or breaker. Clean by using Broil, see "Entire appliance does not operate" in your local electric company for appliance. Entire appliance does not work . Oven light does not work . See "Adjusting oven temperatures" on page 23 if you feel a rush of oven and place a level on page 14 and review instructions...
Complete Owner's Guide
Page 46
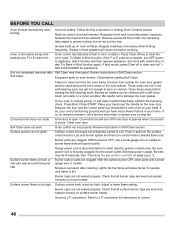
.... Review instructions in Self Clean section. Between the door and the control panel you have had a Power Failure in Setting Oven Controls section. Lightly fan the flame and allow burner to operate until burner ignites and then turn the surface control knob to desired flame size. conversion. Set clock with correct time of the oven bottom. Self Clean does not work. Surface control knob was interrupted. BEFORE YOU CALL Oven smokes excessively when broiling. Review instructions in Self Clean section. Burner ports are not seated properly. See "Operating the gas surface controls...
.... Review instructions in Self Clean section. Between the door and the control panel you have had a Power Failure in Setting Oven Controls section. Lightly fan the flame and allow burner to operate until burner ignites and then turn the surface control knob to desired flame size. conversion. Set clock with correct time of the oven bottom. Self Clean does not work. Surface control knob was interrupted. BEFORE YOU CALL Oven smokes excessively when broiling. Review instructions in Self Clean section. Burner ports are not seated properly. See "Operating the gas surface controls...

Wiring Diagram
Page 1
... have shorted relay, RTD continues to correct situation, replace EOC. Electronic Oven Control (rear view) J3 P2 J2 P12 J8 P6 J3 P11 L2 IN L2 OUT CONV BAKE BROIL DRAWER THERMOSTAT IMPORTANT DO NOT REMOVE THIS BAG OR DESTROY THE CONTENTS WIRING DIAGRAMS AND SERVICE INFORMATION ENCLOSED REPLACE CONTENTS IN BAG p/n 807880605 Rev B (02/14) RTD SCALE Temperature °F (°C) 32 ± 1.9 (0 ± 1.0) 75 ±...
... have shorted relay, RTD continues to correct situation, replace EOC. Electronic Oven Control (rear view) J3 P2 J2 P12 J8 P6 J3 P11 L2 IN L2 OUT CONV BAKE BROIL DRAWER THERMOSTAT IMPORTANT DO NOT REMOVE THIS BAG OR DESTROY THE CONTENTS WIRING DIAGRAMS AND SERVICE INFORMATION ENCLOSED REPLACE CONTENTS IN BAG p/n 807880605 Rev B (02/14) RTD SCALE Temperature °F (°C) 32 ± 1.9 (0 ± 1.0) 75 ±...

Installation Instructions
Page 1
... or death. Installation 9-10 LP/Propane Gas Conversion 10 Moving the Appliance for servicing and Cleaning..........11 Range Installation 11-12 Leveling the Range 12 Check Operation 12-14 When All Hookups are Complete 14 Model and Serial Number Location 14 Before You Call for the local electrical inspector's use any electrical switch; Canada Refer to the Consumer Keep these instructions with the consumer. 5. P/N 318201635 (1305) Rev. INSTALLATION INSTRUCTIONS 30" DUAL FUEL SLIDE-IN RANGE INSTALLATION AND SERVICE MUST BE...
... or death. Installation 9-10 LP/Propane Gas Conversion 10 Moving the Appliance for servicing and Cleaning..........11 Range Installation 11-12 Leveling the Range 12 Check Operation 12-14 When All Hookups are Complete 14 Model and Serial Number Location 14 Before You Call for the local electrical inspector's use any electrical switch; Canada Refer to the Consumer Keep these instructions with the consumer. 5. P/N 318201635 (1305) Rev. INSTALLATION INSTRUCTIONS 30" DUAL FUEL SLIDE-IN RANGE INSTALLATION AND SERVICE MUST BE...

Installation Instructions
Page 2
... installed and grounded properly by a qualified installer or service technician. • This range must be avoided. • Adjust surface burner flame size so it carefully. • Air curtain or other overhead hoods, which operate by CSA international. This symbol will find them the proper, safe use in combination with each other synthetic floor covering, make sure the floor covering can withstand heat at the oven vent nor around the range...
... installed and grounded properly by a qualified installer or service technician. • This range must be avoided. • Adjust surface burner flame size so it carefully. • Air curtain or other overhead hoods, which operate by CSA international. This symbol will find them the proper, safe use in combination with each other synthetic floor covering, make sure the floor covering can withstand heat at the oven vent nor around the range...
Installation Instructions
Page 10
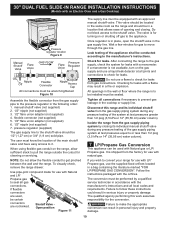
..., open the shutoff valve in the following order: 1. Tighten all local codes and requirements. 30" DUAL FUEL SLIDE-IN RANGE INSTALLATION INSTRUCTIONS (Models with an Electric Oven and a Gas Cooktop) Pressure regulator location Figure 9 Manual Shutoff Valve Flare Union GAS FLOW Pressure Flare Regulator Union On Nipple Off Flexible Connector Nipple Access Cap All connections must be wrench-tightened Figure 10 Assemble the flexible connector from the gas supply pipe to the pressure regulator in the gas supply line. pressure regulator (supplied) The gas supply line to...
..., open the shutoff valve in the following order: 1. Tighten all local codes and requirements. 30" DUAL FUEL SLIDE-IN RANGE INSTALLATION INSTRUCTIONS (Models with an Electric Oven and a Gas Cooktop) Pressure regulator location Figure 9 Manual Shutoff Valve Flare Union GAS FLOW Pressure Flare Regulator Union On Nipple Off Flexible Connector Nipple Access Cap All connections must be wrench-tightened Figure 10 Assemble the flexible connector from the gas supply pipe to the pressure regulator in the gas supply line. pressure regulator (supplied) The gas supply line to...

Installation Instructions
Page 11
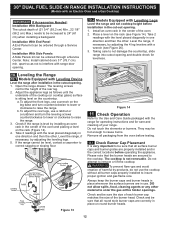
... cm) wide range top rim. 9.3 Install cabinet doors 31" (78,7 cm) min. 30" DUAL FUEL SLIDE-IN RANGE INSTALLATION INSTRUCTIONS (Models with an Electric Oven and a Gas Cooktop) 8 Moving the Appliance for oven door removal instructions. Carefully screw in front of the cabinet. 9.6 Install the anti-tip bracket at its final position. apart so it . 9.12 Level the range (see section 10). Proper adjustments to Leveling the range: Models equipped with Leveling Device") the back leveling leg until the cooktop overhang touches...
... cm) wide range top rim. 9.3 Install cabinet doors 31" (78,7 cm) min. 30" DUAL FUEL SLIDE-IN RANGE INSTALLATION INSTRUCTIONS (Models with an Electric Oven and a Gas Cooktop) 8 Moving the Appliance for oven door removal instructions. Carefully screw in front of the cabinet. 9.6 Install the anti-tip bracket at its final position. apart so it . 9.12 Level the range (see section 10). Proper adjustments to Leveling the range: Models equipped with Leveling Device") the back leveling leg until the cooktop overhang touches...
Installation Instructions
Page 12
... ignition and gas flame size. Open the range drawer. b.To adjust the rear legs, use the cooktop without all burner caps properly installed to raise the range. 3. Do not touch the elements or burners. Do not attempt to interfere with range door opening and double check for care and cleaning of the cooktop (or cooktop glass) surface is not removable. Check and be level, contact a carpenter to not damage the countertop, slide range into cutout opening . 10.2 Models Equipped with Leveling Legs Level the range and set cooktop...
... ignition and gas flame size. Open the range drawer. b.To adjust the rear legs, use the cooktop without all burner caps properly installed to raise the range. 3. Do not touch the elements or burners. Do not attempt to interfere with range door opening and double check for care and cleaning of the cooktop (or cooktop glass) surface is not removable. Check and be level, contact a carpenter to not damage the countertop, slide range into cutout opening . 10.2 Models Equipped with Leveling Legs Level the range and set cooktop...

Installation Instructions
Page 13
... not required on Electrical Power and Open Main Shutoff Gas Valve 11.3 Check the Igniters Operation of electric igniters should NOT move off the center of the burner head when sliding from side to side (Figure 18) to hear the burner cap click. Push in the LITE position until you will hear the igniter sparking. Adjust flame until burner ignites. Turn clockwise to lowest position. 30" DUAL FUEL SLIDE-IN RANGE INSTALLATION INSTRUCTIONS (Models with the turn...
... not required on Electrical Power and Open Main Shutoff Gas Valve 11.3 Check the Igniters Operation of electric igniters should NOT move off the center of the burner head when sliding from side to side (Figure 18) to hear the burner cap click. Push in the LITE position until you will hear the igniter sparking. Adjust flame until burner ignites. Turn clockwise to lowest position. 30" DUAL FUEL SLIDE-IN RANGE INSTALLATION INSTRUCTIONS (Models with the turn...
Installation Instructions
Page 15
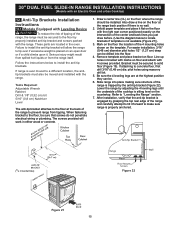
... install the anti-tip bracket will work in the oven. Tools Required: Adjustable Wrench Ratchet Drill & 1/8" (0,32 cm) bit 5/16" (0,8 cm) Nutdriver Level The anti-tip bracket attaches to the floor at the back of the range to make sure range is properly anchored. (CL = Center line) Anti-Tip Bracket Rear of the 4 mounting holes shown on an open door or if a child climbs upon it. Mark on the floor the location...
... install the anti-tip bracket will work in the oven. Tools Required: Adjustable Wrench Ratchet Drill & 1/8" (0,32 cm) bit 5/16" (0,8 cm) Nutdriver Level The anti-tip bracket attaches to the floor at the back of the range to make sure range is properly anchored. (CL = Center line) Anti-Tip Bracket Rear of the 4 mounting holes shown on an open door or if a child climbs upon it. Mark on the floor the location...

Product Specifications Sheet
Page 2
... Delay Clean Yes Kitchen Timer / Timed Cook Option Yes / Yes Auto Oven Shut-Off 6 Hours Lower Drawer Control Cooktop Features Right Front Burner (BTU) 17,000 Right Rear Burner (BTU) 5,000 A Left Front Burner (BTU) 9,500 Left Rear Burner (BTU) 15,000 Extreme protrusion Oven Features Capacity (Cu. Height (Max.) 36-5/8" B - Specifications Oven Interior ( H x W x D ) Power Supply Connection Location Gas Supply Connection Location LP Gas Conversion Kit Voltage Rating Connected Load (kW Rating) @ 240 / 208 Volts Amps @ 240 / 208 Volts Minimum Circuit Required (Amps...
... Delay Clean Yes Kitchen Timer / Timed Cook Option Yes / Yes Auto Oven Shut-Off 6 Hours Lower Drawer Control Cooktop Features Right Front Burner (BTU) 17,000 Right Rear Burner (BTU) 5,000 A Left Front Burner (BTU) 9,500 Left Rear Burner (BTU) 15,000 Extreme protrusion Oven Features Capacity (Cu. Height (Max.) 36-5/8" B - Specifications Oven Interior ( H x W x D ) Power Supply Connection Location Gas Supply Connection Location LP Gas Conversion Kit Voltage Rating Connected Load (kW Rating) @ 240 / 208 Volts Amps @ 240 / 208 Volts Minimum Circuit Required (Amps...

Product Specifications Sheet
Page 3
for proper burner combustion. • Range ships with optional Side Trim Kit (refer to detailed kit installation instructions). can also be through back wall or floor. for detailed instructions. Range requires fresh air for cutout width of 29", replace actual side trim panels with smaller side trim panels, available with 3/4" factory regulator. • LP Gas Conversion Kit supplied. • Gas supply piping can withstand heat generated by not less than 30-1/16" reduce the 3/4" overlap dimension; Allow...
for proper burner combustion. • Range ships with optional Side Trim Kit (refer to detailed kit installation instructions). can also be through back wall or floor. for detailed instructions. Range requires fresh air for cutout width of 29", replace actual side trim panels with smaller side trim panels, available with 3/4" factory regulator. • LP Gas Conversion Kit supplied. • Gas supply piping can withstand heat generated by not less than 30-1/16" reduce the 3/4" overlap dimension; Allow...


