Complete Owner's Guide (English)
Page 3
... Fuel Gas Code ANSI Z223.1 latest edition, and National Electrical Code ANSI/NFPA No. 70 latest edition, and local code requirements. WARNING • All appliance can result in your building. • Immediately call the fire department. - Refer to the Installation Instructions for this range.... Do not remove the wiring label and other part of an appliance by properly installed anti-tip bracket provided with your appliance is not followed exactly, a fire or ...
... Fuel Gas Code ANSI Z223.1 latest edition, and National Electrical Code ANSI/NFPA No. 70 latest edition, and local code requirements. WARNING • All appliance can result in your building. • Immediately call the fire department. - Refer to the Installation Instructions for this range.... Do not remove the wiring label and other part of an appliance by properly installed anti-tip bracket provided with your appliance is not followed exactly, a fire or ...
Complete Owner's Guide (English)
Page 6
...installed by an authorized Service Center. 6 WARNING Personal injury or death from cleaners and aerosols may occur if the range is designed to allow for conversion to the fumes given off during a self-cleaning cycle. The door gasket is located in this appliance to follow the manufacturer's recommended directions for a good seal...clean the oven door gasket. Move birds to Liquefied Petroleum Gas (or L.P. Before installing the kit be taken not to such substances. Installation Instructions carefully. If L.P. Conversion Kit is provided with this cooktop and is essential for ...
...installed by an authorized Service Center. 6 WARNING Personal injury or death from cleaners and aerosols may occur if the range is designed to allow for conversion to the fumes given off during a self-cleaning cycle. The door gasket is located in this appliance to follow the manufacturer's recommended directions for a good seal...clean the oven door gasket. Move birds to Liquefied Petroleum Gas (or L.P. Before installing the kit be taken not to such substances. Installation Instructions carefully. If L.P. Conversion Kit is provided with this cooktop and is essential for ...
Complete Owner's Guide (English)
Page 35
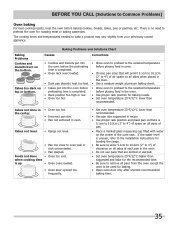
...oven. • Use proper rack position for baking. • Open oven door only after shortest recommended baking time. 35 Cakes not level. • Range not level. • Pan too close to Common Problems) Oven baking For best cooking results, heat the oven before baking cookies, breads, cakes, ...rack overcrowded. • Dark pan absorbs heat too fast. • Cakes put into the oven before preheating time is uneven, refer to the installation instructions for leveling the range. • Be sure to allow 5.1cm to 10.2cm (2" to 4") of the oven rack. Cakes too dark on the bottom. If ...
...oven. • Use proper rack position for baking. • Open oven door only after shortest recommended baking time. 35 Cakes not level. • Range not level. • Pan too close to Common Problems) Oven baking For best cooking results, heat the oven before baking cookies, breads, cakes, ...rack overcrowded. • Dark pan absorbs heat too fast. • Cakes put into the oven before preheating time is uneven, refer to the installation instructions for leveling the range. • Be sure to allow 5.1cm to 10.2cm (2" to 4") of the oven rack. Cakes too dark on the bottom. If ...

Installation Instructions (All Languages)
Page 1
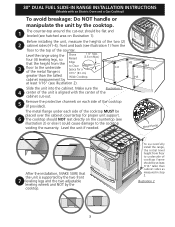
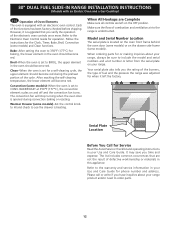
... information in . IMPORTANT: SAVE FOR LOCAL ELECTRICAL INSPECTOR'S USE. WHAT TO DO IF YOU SMELL GAS: be installed gas supplier's instructions. • If you cannot reach your gas supplier from Cutout Opening. 24" Min. (61 cm Min.)...WIDTH (Under Cooktop) C. CUTOUT WIDTH*** FRONT OF RANGE (Countertop and cabinet) F. 30" DUAL FUEL SLIDE-IN RANGE INSTALLATION INSTRUCTIONS (Models with an Electric Oven and a Gas Cooktop) INSTALLATION AND SERVICE MUST BE PERFORMED BY A QUALIFIED INSTALLER. Appliances Installed in the vicinity of Massachusetts: This Appliance can ...
... information in . IMPORTANT: SAVE FOR LOCAL ELECTRICAL INSPECTOR'S USE. WHAT TO DO IF YOU SMELL GAS: be installed gas supplier's instructions. • If you cannot reach your gas supplier from Cutout Opening. 24" Min. (61 cm Min.)...WIDTH (Under Cooktop) C. CUTOUT WIDTH*** FRONT OF RANGE (Countertop and cabinet) F. 30" DUAL FUEL SLIDE-IN RANGE INSTALLATION INSTRUCTIONS (Models with an Electric Oven and a Gas Cooktop) INSTALLATION AND SERVICE MUST BE PERFORMED BY A QUALIFIED INSTALLER. Appliances Installed in the vicinity of Massachusetts: This Appliance can ...

Installation Instructions (All Languages)
Page 2
...for cutout width (E dimension) of the cabinet. 5. A. with an Electric Oven and a Gas Cooktop) NOTE: 1. Do not seal the range to the side cabinets. 3. 24" (61 cm) minimum clearance between the range and the wall. 21¾" (55.25 cm) D C 2. E E 22 7/8"(58.1 cm) min. 23 1/4"(59...itself. WIDTH (Under Cooktop) C. HEIGHT OF COUNTERTOP 35 7/8" (91,1 cm) Min. 36 5/8" (93 cm) Max. 2 30" DUAL FUEL SLIDE-IN RANGE INSTALLATION INSTRUCTIONS (Models with backguard G. Do not pinch the power supply cord or the flexible gas conduit between the cooktop and the bottom of the ...
...for cutout width (E dimension) of the cabinet. 5. A. with an Electric Oven and a Gas Cooktop) NOTE: 1. Do not seal the range to the side cabinets. 3. 24" (61 cm) minimum clearance between the range and the wall. 21¾" (55.25 cm) D C 2. E E 22 7/8"(58.1 cm) min. 23 1/4"(59...itself. WIDTH (Under Cooktop) C. HEIGHT OF COUNTERTOP 35 7/8" (91,1 cm) Min. 36 5/8" (93 cm) Max. 2 30" DUAL FUEL SLIDE-IN RANGE INSTALLATION INSTRUCTIONS (Models with backguard G. Do not pinch the power supply cord or the flexible gas conduit between the cooktop and the bottom of the ...
Installation Instructions (All Languages)
Page 3
...DUAL FUEL SLIDE-IN RANGE INSTALLATION INSTRUCTIONS (Models with the center of the cabinet cut -out should be at least 1/16" (see hatched area on each side of the counter. The metal flange under each side of the metal flange is greater than cabinet sides as measured in step 2. Illustration 2 3 Before installing... The counter-top around the cut -out. 5 Remove the protective channels on illustration 1). Slide the unit into the cabinet. To successfully install the range, the initial level height from the Edge 3 floor to the cooktop voiding the warranty. Metal...
...DUAL FUEL SLIDE-IN RANGE INSTALLATION INSTRUCTIONS (Models with the center of the cabinet cut -out should be at least 1/16" (see hatched area on each side of the counter. The metal flange under each side of the metal flange is greater than cabinet sides as measured in step 2. Illustration 2 3 Before installing... The counter-top around the cut -out. 5 Remove the protective channels on illustration 1). Slide the unit into the cabinet. To successfully install the range, the initial level height from the Edge 3 floor to the cooktop voiding the warranty. Metal...
Installation Instructions (All Languages)
Page 4
30" DUAL FUEL SLIDE-IN RANGE INSTALLATION INSTRUCTIONS (Models with the consumer. 5. Remove all controls to the "off" position after using a programmable timing operation. Be sure to leave these instructions with an Electric Oven and a Gas Cooktop) Important Notes to the Consumer Keep these installation instructions before self-cleaning the oven. Important Note to the Installer 1. Installation of local codes, with linoleum...
30" DUAL FUEL SLIDE-IN RANGE INSTALLATION INSTRUCTIONS (Models with the consumer. 5. Remove all controls to the "off" position after using a programmable timing operation. Be sure to leave these instructions with an Electric Oven and a Gas Cooktop) Important Notes to the Consumer Keep these installation instructions before self-cleaning the oven. Important Note to the Installer 1. Installation of local codes, with linoleum...
Installation Instructions (All Languages)
Page 5
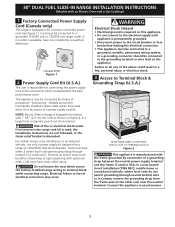
...Figure 2 This appliance is manufactured with 1 1/8" (2.9 cm) dia. If used , the Installation Instructions are not followed, or the strain relief bracket is discarded. 30" DUAL FUEL SLIDE-IN RANGE INSTALLATION INSTRUCTIONS (Models with an Electric Oven and a Gas Cooktop) 1 Factory Connected Power Supply Cord ...(Canada only) This range is equipped with upturned ends. If no outlet is permanently...
...Figure 2 This appliance is manufactured with 1 1/8" (2.9 cm) dia. If used , the Installation Instructions are not followed, or the strain relief bracket is discarded. 30" DUAL FUEL SLIDE-IN RANGE INSTALLATION INSTRUCTIONS (Models with an Electric Oven and a Gas Cooktop) 1 Factory Connected Power Supply Cord ...(Canada only) This range is equipped with upturned ends. If no outlet is permanently...

Installation Instructions (All Languages)
Page 6
...the neutral wire of the rear wire cover (access cover) upward to expose range terminal connection block (see Figure 2). 2. Terminal Block Silver Colored Terminal Terminal Block Black Wire A User Supplied Strain-relief Must Be Installed at the lower end of the rear wire cover, then raise the lower... end of the rear wire cover, then bend the lower end of the copper power supply cord (see Figure 3): 1. 30" DUAL FUEL SLIDE-IN RANGE INSTALLATION INSTRUCTIONS (Models with the ground screw, using the hole in the literature package, connect the neutral of the copper power supply cord to the...
...the neutral wire of the rear wire cover (access cover) upward to expose range terminal connection block (see Figure 2). 2. Terminal Block Silver Colored Terminal Terminal Block Black Wire A User Supplied Strain-relief Must Be Installed at the lower end of the rear wire cover, then raise the lower... end of the rear wire cover, then bend the lower end of the copper power supply cord (see Figure 3): 1. 30" DUAL FUEL SLIDE-IN RANGE INSTALLATION INSTRUCTIONS (Models with the ground screw, using the hole in the literature package, connect the neutral of the copper power supply cord to the...
Installation Instructions (All Languages)
Page 7
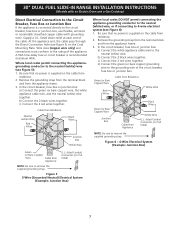
..., use flexible, armored or nonmetallic sheathed copper cable (with grounding wire). Be sure that no power is supplied on the cable from residence. 2. 30" DUAL FUEL SLIDE-IN RANGE INSTALLATION INSTRUCTIONS (Models with an Electric Oven and a Gas Cooktop) Direct Electrical Connection to the Circuit Breaker, Fuse Box or Junction Box If the appliance is recommended...
..., use flexible, armored or nonmetallic sheathed copper cable (with grounding wire). Be sure that no power is supplied on the cable from residence. 2. 30" DUAL FUEL SLIDE-IN RANGE INSTALLATION INSTRUCTIONS (Models with an Electric Oven and a Gas Cooktop) Direct Electrical Connection to the Circuit Breaker, Fuse Box or Junction Box If the appliance is recommended...
Installation Instructions (All Languages)
Page 8
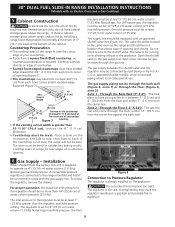
...unit is designed to have your countertop. • If you have cabinet storage space above range, reduce risk by reaching over the cutout edge of your gas line in series with an approved shutoff valve (see Figure 10). Through the Back Wall (7" X 6") ... countertop, no more than the regulator manifold pressure setting. 30" DUAL FUEL SLIDE-IN RANGE INSTALLATION INSTRUCTIONS (Models with an Electric Oven and a Gas Cooktop) 5 Cabinet Construction To eliminate the risk of burns or fire by installing a range hood that allows ease of countertop opening. the inlet Figure 8 Connection...
...unit is designed to have your countertop. • If you have cabinet storage space above range, reduce risk by reaching over the cutout edge of your gas line in series with an approved shutoff valve (see Figure 10). Through the Back Wall (7" X 6") ... countertop, no more than the regulator manifold pressure setting. 30" DUAL FUEL SLIDE-IN RANGE INSTALLATION INSTRUCTIONS (Models with an Electric Oven and a Gas Cooktop) 5 Cabinet Construction To eliminate the risk of burns or fire by installing a range hood that allows ease of countertop opening. the inlet Figure 8 Connection...
Installation Instructions (All Languages)
Page 9
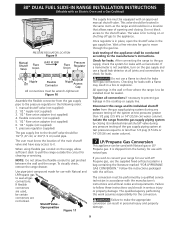
...valve should be in a fire or explosion. Use pipe-joint compound made for use with Natural and LP/Propane gas to seal all gas connections. Shutoff Valve - The valve is for gas to move through the gas line. Wait a few minutes for... (not supplied) 5. 1/2" flare union adapter (not supplied) 6. 1/2" nipple (not supplied) 7. Check for leaks with the orifices. 30" DUAL FUEL SLIDE-IN RANGE INSTALLATION INSTRUCTIONS (Models with an Electric Oven and a Gas Cooktop) PRESSURE REGULATOR LOCATION Figure 9 Manual Shutoff Valve Flare Union GAS FLOW Pressure Flare Regulator Union On...
...valve should be in a fire or explosion. Use pipe-joint compound made for use with Natural and LP/Propane gas to seal all gas connections. Shutoff Valve - The valve is for gas to move through the gas line. Wait a few minutes for... (not supplied) 5. 1/2" flare union adapter (not supplied) 6. 1/2" nipple (not supplied) 7. Check for leaks with the orifices. 30" DUAL FUEL SLIDE-IN RANGE INSTALLATION INSTRUCTIONS (Models with an Electric Oven and a Gas Cooktop) PRESSURE REGULATOR LOCATION Figure 9 Manual Shutoff Valve Flare Union GAS FLOW Pressure Flare Regulator Union On...
Installation Instructions (All Languages)
Page 10
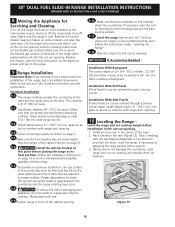
... 4 leg levelers with the level placed diagonally in the center of the range when replacing the unit into the cut -out opening . Make sure the range is 31½" (80 cm) wide. 9.2 Install base cabinets 30" (76.2 cm) apart. 30" DUAL FUEL SLIDE-IN RANGE INSTALLATION INSTRUCTIONS (Models with an Electric Oven and a Gas Cooktop) 8 Moving the Appliance for...
... 4 leg levelers with the level placed diagonally in the center of the range when replacing the unit into the cut -out opening . Make sure the range is 31½" (80 cm) wide. 9.2 Install base cabinets 30" (76.2 cm) apart. 30" DUAL FUEL SLIDE-IN RANGE INSTALLATION INSTRUCTIONS (Models with an Electric Oven and a Gas Cooktop) 8 Moving the Appliance for...
Installation Instructions (All Languages)
Page 11
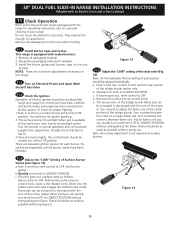
... small as possible without going out. b.Quickly turn a surface burner knob to LITE until all packaging material. 2. Flame size can be as small as follows: Reset control to LOWEST POSITION. 30" DUAL FUEL SLIDE-IN RANGE INSTALLATION INSTRUCTIONS (Models with an Electric Oven and a Gas Cooktop) 11... seconds in and turn knob to OFF. Visually check that burner has lit. 3.Once the burner lights, the control knob should be increased or decreased with sealed burners. 1. There are no burner adjustments necessary on this range. 11.2 Turn on Electrical Power and Open Main Shutoff Gas...
... small as possible without going out. b.Quickly turn a surface burner knob to LITE until all packaging material. 2. Flame size can be as small as follows: Reset control to LOWEST POSITION. 30" DUAL FUEL SLIDE-IN RANGE INSTALLATION INSTRUCTIONS (Models with an Electric Oven and a Gas Cooktop) 11... seconds in and turn knob to OFF. Visually check that burner has lit. 3.Once the burner lights, the control knob should be increased or decreased with sealed burners. 1. There are no burner adjustments necessary on this range. 11.2 Turn on Electrical Power and Open Main Shutoff Gas...
Installation Instructions (All Languages)
Page 12
...Cooktop) 11.6 Operation of the cycle. Your serial plate also tells you the rating of the burners, the type of the functions has been factory checked before shipping. Each of fuel and the pressure the range was adjusted for baking, the lower element in this appliance. Bake-After setting the oven to ...include the model and serial numbers and a lot number or letter from the serial plate on and off and the convection fan turns. 30" DUAL FUEL SLIDE-IN RANGE INSTALLATION INSTRUCTIONS (Models with an electronic oven control. Please call or write if you time and expense.
...Cooktop) 11.6 Operation of the cycle. Your serial plate also tells you the rating of the burners, the type of the functions has been factory checked before shipping. Each of fuel and the pressure the range was adjusted for baking, the lower element in this appliance. Bake-After setting the oven to ...include the model and serial numbers and a lot number or letter from the serial plate on and off and the convection fan turns. 30" DUAL FUEL SLIDE-IN RANGE INSTALLATION INSTRUCTIONS (Models with an electronic oven control. Please call or write if you time and expense.
Installation Instructions (All Languages)
Page 13
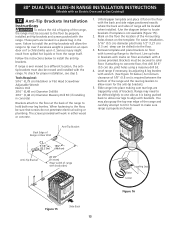
30" DUAL FUEL SLIDE-IN RANGE INSTALLATION INSTRUCTIONS (Models with an Electric Oven and a Gas Cooktop) 12 Anti-Tip Brackets Installation Instructions To reduce the risk of tipping of range will be located when installed. (Use the diagram below to locate brackets if template is not available (Figure 15)). 2. The screws provided will allow the range to tip over if excessive weight...
30" DUAL FUEL SLIDE-IN RANGE INSTALLATION INSTRUCTIONS (Models with an Electric Oven and a Gas Cooktop) 12 Anti-Tip Brackets Installation Instructions To reduce the risk of tipping of range will be located when installed. (Use the diagram below to locate brackets if template is not available (Figure 15)). 2. The screws provided will allow the range to tip over if excessive weight...
Product Specifications Sheet (English)
Page 2
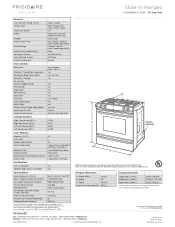
...planning purposes only. Specifications subject to Product Installation Guide for detailed installation instructions on the web at frigidaire.com USA • 10200 David Taylor Drive • Charlotte, NC 28262 • 1-800-FRIGIDAIRE • frigidaire.com CANADA • 5855 Terry Fox...Height (Max.) 36-5/8" B - Printed in the Americans with optional backguard installed. Slide-In Ranges FGDS3065K F/ W/ B 30" Dual-Fuel Features Oven Control / Timing System Surface Type Sealed Gas Burners Grates Window Exterior Door Finish Handle Design Exterior Finish (Side Panels) Convection ...
...planning purposes only. Specifications subject to Product Installation Guide for detailed installation instructions on the web at frigidaire.com USA • 10200 David Taylor Drive • Charlotte, NC 28262 • 1-800-FRIGIDAIRE • frigidaire.com CANADA • 5855 Terry Fox...Height (Max.) 36-5/8" B - Printed in the Americans with optional backguard installed. Slide-In Ranges FGDS3065K F/ W/ B 30" Dual-Fuel Features Oven Control / Timing System Surface Type Sealed Gas Burners Grates Window Exterior Door Finish Handle Design Exterior Finish (Side Panels) Convection ...
Product Specifications Sheet (English)
Page 3
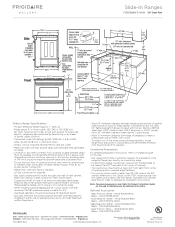
...instructions, refer to installation guide on both sides of line with ground. (If local code permits, range may need cut back 3/4" from edge of rangetop to nearest combustible wall on the web at frigidaire.com for proper burner combustion. • Range...overhead cabinets installed to detailed kit installation instructions). 30" Dual-Fuel Slide-In Range Gallery Slide-In Ranges FGDS3065K F/ W/ B 30" Dual-Fuel Slide-In Range Specifications • Product Shipping Weight (approx.) - 260 Lbs. • Single phase 3- Range requires fresh air for detailed instructions. Accessories ...
...instructions, refer to installation guide on both sides of line with ground. (If local code permits, range may need cut back 3/4" from edge of rangetop to nearest combustible wall on the web at frigidaire.com for proper burner combustion. • Range...overhead cabinets installed to detailed kit installation instructions). 30" Dual-Fuel Slide-In Range Gallery Slide-In Ranges FGDS3065K F/ W/ B 30" Dual-Fuel Slide-In Range Specifications • Product Shipping Weight (approx.) - 260 Lbs. • Single phase 3- Range requires fresh air for detailed instructions. Accessories ...
Product Specifications Sheet (English)
Page 4
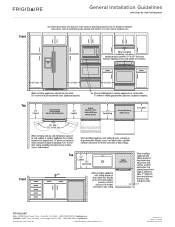
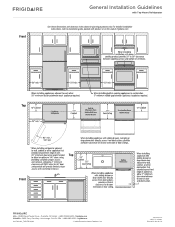
Printed in the U.S.A. For detailed installation instructions, refer to change. Specifications subject to installation guide, packed with Side-by-Side Refrigerator Use these dimensions and clearance instructions for planning purposes only. Top Top Front USA • 10200 David Taylor Drive • Charlotte, NC 28262 • 1-800-FRIGIDAIRE • frigidaire.com CANADA • 5855 Terry Fox Way •...
Printed in the U.S.A. For detailed installation instructions, refer to change. Specifications subject to installation guide, packed with Side-by-Side Refrigerator Use these dimensions and clearance instructions for planning purposes only. Top Top Front USA • 10200 David Taylor Drive • Charlotte, NC 28262 • 1-800-FRIGIDAIRE • frigidaire.com CANADA • 5855 Terry Fox Way •...
Product Specifications Sheet (English)
Page 5
... web at frigidaire.com. Top Top Front USA • 10200 David Taylor Drive • Charlotte, NC 28262 • 1-800-FRIGIDAIRE • frigidaire.com CANADA • 5855 Terry Fox Way • Mississauga, ON L5V 3E4 • 1-800-265-8352 • frigidaire.ca INSTGDLNS_TMR FR 10/10 © 2010 Electrolux Home Products, Inc. For detailed installation instructions, refer...
... web at frigidaire.com. Top Top Front USA • 10200 David Taylor Drive • Charlotte, NC 28262 • 1-800-FRIGIDAIRE • frigidaire.com CANADA • 5855 Terry Fox Way • Mississauga, ON L5V 3E4 • 1-800-265-8352 • frigidaire.ca INSTGDLNS_TMR FR 10/10 © 2010 Electrolux Home Products, Inc. For detailed installation instructions, refer...


