

Installation Instructions (All Languages)
Page 1
... appliance. - Cooktop Dimensions 30" Min. pages 1-10 Español - Width C. Depth D. Min. G English - páginas 11-22 Wiring Diagram - IMPORTANT: SAVE FOR LOCAL ELECTRICAL INSPECTOR'S USE. GAS COOKTOP INSTALLATION INSTRUCTIONS INSTALLATION AND SERVICE MUST BE PERFORMED BY A QUALIFIED INSTALLER. Length E. pages 24 FOR YOUR SAFETY: - Follow the gas supplier's instructions. • If you cannot reach your gas supplier from a neighbor's phone. Max. Max. 26" Model 25...
... appliance. - Cooktop Dimensions 30" Min. pages 1-10 Español - Width C. Depth D. Min. G English - páginas 11-22 Wiring Diagram - IMPORTANT: SAVE FOR LOCAL ELECTRICAL INSPECTOR'S USE. GAS COOKTOP INSTALLATION INSTRUCTIONS INSTALLATION AND SERVICE MUST BE PERFORMED BY A QUALIFIED INSTALLER. Length E. pages 24 FOR YOUR SAFETY: - Follow the gas supplier's instructions. • If you cannot reach your gas supplier from a neighbor's phone. Max. Max. 26" Model 25...

Installation Instructions (All Languages)
Page 2
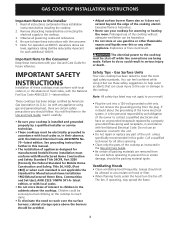
...: (For 26" and 36" Models Only). Dimensions J is the Minimum Clearance Required From Left Side of Top Panel to 24" Adjacent Combustible Surface. Allow Dimension L Space Below Cooktop for Piping and Electrical Connections. Model H J K L 26" Models 1" ½" 1" 8½" 30" Models 0" 2" 2" 8 1/8" 36" Models 1" 2½" 1" 8¼" Figure 2 - GAS COOKTOP INSTALLATION INSTRUCTIONS 13" Max. If cabinet storage is the Minimum Clearance Required From Right Side of base cabinet. Depth For Cabinet Installed Above Cooktop. Dimension H is provided, risk...
...: (For 26" and 36" Models Only). Dimensions J is the Minimum Clearance Required From Left Side of Top Panel to 24" Adjacent Combustible Surface. Allow Dimension L Space Below Cooktop for Piping and Electrical Connections. Model H J K L 26" Models 1" ½" 1" 8½" 30" Models 0" 2" 2" 8 1/8" 36" Models 1" 2½" 1" 8¼" Figure 2 - GAS COOKTOP INSTALLATION INSTRUCTIONS 13" Max. If cabinet storage is the Minimum Clearance Required From Right Side of base cabinet. Depth For Cabinet Installed Above Cooktop. Dimension H is provided, risk...
Installation Instructions (All Languages)
Page 3
... all instructions contained in these instructions with any other servicing. • Clean only the parts of the cooking utensil. elevations above the burners should the packing material ignite. These cooktops has been design certified by 4 percent for warming or heating the room. You will find them in accordance with the National Electrical Code ANSI/NFPA No. 70-latest edition. Excessive flame is installed and...
... all instructions contained in these instructions with any other servicing. • Clean only the parts of the cooking utensil. elevations above the burners should the packing material ignite. These cooktops has been design certified by 4 percent for warming or heating the room. You will find them in accordance with the National Electrical Code ANSI/NFPA No. 70-latest edition. Excessive flame is installed and...

Installation Instructions (All Languages)
Page 4
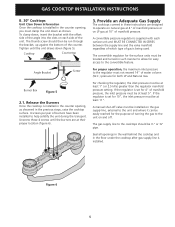
... These appliances and its individual manual shutoff valve during any pressure testing of the burner box to secure the unit to or less than ½ psig. Wall Outlet Location (some models) A 8" 10" Recommended area for use a wok on the cooking surface if it is not available, have one installed by lifting along the front edge of installation. Remove the burner grates and burner pans. This support acts as this unit...
... These appliances and its individual manual shutoff valve during any pressure testing of the burner box to secure the unit to or less than ½ psig. Wall Outlet Location (some models) A 8" 10" Recommended area for use a wok on the cooking surface if it is not available, have one installed by lifting along the front edge of installation. Remove the burner grates and burner pans. This support acts as this unit...
Installation Instructions (All Languages)
Page 5
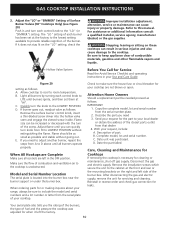
... convertible feature. Cooktop Countertop Angle Bracket Screw Burner Box Figure 5 2.1. For checking the regulator, the inlet pressure must be run through the bracket, up against the bottom of manifold pressure. A manual shut-off . The gas supply line to operate on natural gas at 4" of manifold pressure or on each surface unit and MUST BE CONNECTED IN SERIES between the supply line and the valve manifold regardless of which type of the unit. GAS COOKTOP INSTALLATION INSTRUCTIONS B. 30" Cooktops...
... convertible feature. Cooktop Countertop Angle Bracket Screw Burner Box Figure 5 2.1. For checking the regulator, the inlet pressure must be run through the bracket, up against the bottom of manifold pressure. A manual shut-off . The gas supply line to operate on natural gas at 4" of manifold pressure or on each surface unit and MUST BE CONNECTED IN SERIES between the supply line and the valve manifold regardless of which type of the unit. GAS COOKTOP INSTALLATION INSTRUCTIONS B. 30" Cooktops...

Installation Instructions (All Languages)
Page 6
... Valve Hookup the cooktop to the gas supply line. Tighten all joints and connections to or less than ½ psig. A misalignment could cause the valve knob stem to rub on the control panel, resulting in a gas leak at test pressures equal to check for leaks. Adaptor or Union Figure 8 External Shut-off the gas supply to the manufacturer's instructions. GAS COOKTOP INSTALLATION INSTRUCTIONS 4. Leak testing of valves after connecting the cooktop...
... Valve Hookup the cooktop to the gas supply line. Tighten all joints and connections to or less than ½ psig. A misalignment could cause the valve knob stem to rub on the control panel, resulting in a gas leak at test pressures equal to check for leaks. Adaptor or Union Figure 8 External Shut-off the gas supply to the manufacturer's instructions. GAS COOKTOP INSTALLATION INSTRUCTIONS 4. Leak testing of valves after connecting the cooktop...

Installation Instructions (All Languages)
Page 7
...8226; If in "Burner Flame Adjustment" section for Natural Gas Figure 10 Natural Gas B. B. Remove the plunger. Replace the cap on the pressure regulator. Convert the Pressure Regulator from Natural Gas to NATURAL Gas (see figure 11 and 12) Figure 11 1. Remove the plunger. Turn the plunger upside down with the enlarge end DOWN. Replace the cap on the pressure regulator. 2. C. D. Remove the cap from the pressure regulator. D. Remove valve knobs, top grates, burner pans and lift cooktop to gain access to LP Gas, turn valve hoods (orifices) up until snug...
...8226; If in "Burner Flame Adjustment" section for Natural Gas Figure 10 Natural Gas B. B. Remove the plunger. Replace the cap on the pressure regulator. Convert the Pressure Regulator from Natural Gas to NATURAL Gas (see figure 11 and 12) Figure 11 1. Remove the plunger. Turn the plunger upside down with the enlarge end DOWN. Replace the cap on the pressure regulator. 2. C. D. Remove the cap from the pressure regulator. D. Remove valve knobs, top grates, burner pans and lift cooktop to gain access to LP Gas, turn valve hoods (orifices) up until snug...

Installation Instructions (All Languages)
Page 8
... model, the shutter is properly adjusted, flame will accumulate on utensils used on manifold pipe and locate filter/pilot adjusting assembly. 4. Burner Flame Adjustment 1. Proper Air Adjustment (figure 16) If the air shutter is either held in place by friction fit or with support rod located in figure 13. Figure 17 3. For Natural Gas it may burn with match as needed. Depending on the valve hood. total height Figure 16 2. GAS COOKTOP INSTALLATION INSTRUCTIONS...
... model, the shutter is properly adjusted, flame will accumulate on utensils used on manifold pipe and locate filter/pilot adjusting assembly. 4. Burner Flame Adjustment 1. Proper Air Adjustment (figure 16) If the air shutter is either held in place by friction fit or with support rod located in figure 13. Figure 17 3. For Natural Gas it may burn with match as needed. Depending on the valve hood. total height Figure 16 2. GAS COOKTOP INSTALLATION INSTRUCTIONS...

Installation Instructions (All Languages)
Page 9
... be hot enough to LITE. Check all code rules and regulations for care and cleaning of electric shock hazard from the power cord. Check the Igniters (some models) Operation of local codes with local codes or in these cooktops. To check for leaks and the cooktop has been connected to burner. Failure to Gas Cooktop Electrical Requirements 120 volt, 60 Hertz, properly grounded branch circuit protected by a qualified electrician before servicing cooktop. 8. GAS COOKTOP INSTALLATION INSTRUCTIONS...
... be hot enough to LITE. Check all code rules and regulations for care and cleaning of electric shock hazard from the power cord. Check the Igniters (some models) Operation of local codes with local codes or in these cooktops. To check for leaks and the cooktop has been connected to burner. Failure to Gas Cooktop Electrical Requirements 120 volt, 60 Hertz, properly grounded branch circuit protected by a qualified electrician before servicing cooktop. 8. GAS COOKTOP INSTALLATION INSTRUCTIONS...
Installation Instructions (All Languages)
Page 10
... for cleaning or maintenance, shut off gas supply. After disconnecting the gas and electric supply, remove the unit for when it does not stay lit on the "LO" setting, check the Improper installation adjustment, alteration, service or maintenance can quickly turn of part. Stepping, leaning or sitting on the right and left the factory. 10 Figure 20 setting as follows: Remove the surface burner control knob, insert a thin-bladed screw driver...
... for cleaning or maintenance, shut off gas supply. After disconnecting the gas and electric supply, remove the unit for when it does not stay lit on the "LO" setting, check the Improper installation adjustment, alteration, service or maintenance can quickly turn of part. Stepping, leaning or sitting on the right and left the factory. 10 Figure 20 setting as follows: Remove the surface burner control knob, insert a thin-bladed screw driver...
Use and Care Manual
Page 3
... have had sufficient time to climb or play with a pan lid, or use a stove top grill on your dealer to cover the surface burner. Install and/ or adjust only per installation instructions provided in ignition of utensil to the LITE position when igniting the burners. Always turn the knob to flame will expose a portion of the burner flame to direct contact and may result in the literature package for future...
... have had sufficient time to climb or play with a pan lid, or use a stove top grill on your dealer to cover the surface burner. Install and/ or adjust only per installation instructions provided in ignition of utensil to the LITE position when igniting the burners. Always turn the knob to flame will expose a portion of the burner flame to direct contact and may result in the literature package for future...
Use and Care Manual
Page 4
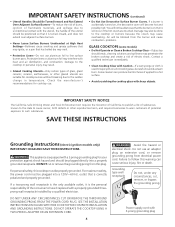
... and Toxic Enforcement Act requires the Governor of California to publish a list of electric shock. SAVE THESE INSTRUCTIONS Grounding Instructions (electric ignition models only) IMPORTANT: READ AND SAVE THESE INSTRUCTIONS. Do not use an adaptor plug, an extension cord, or remove grounding prong from the burner and cause combustion problems. GLASS COOKTOPS (some models): • Do Not Operate or Clean a Broken Cooktop Glass-If glass top should break, cleaning solutions and spillovers...
... and Toxic Enforcement Act requires the Governor of California to publish a list of electric shock. SAVE THESE INSTRUCTIONS Grounding Instructions (electric ignition models only) IMPORTANT: READ AND SAVE THESE INSTRUCTIONS. Do not use an adaptor plug, an extension cord, or remove grounding prong from the burner and cause combustion problems. GLASS COOKTOPS (some models): • Do Not Operate or Clean a Broken Cooktop Glass-If glass top should break, cleaning solutions and spillovers...
Use and Care Manual
Page 5
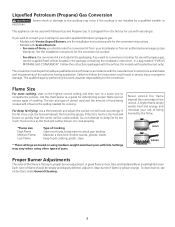
... your cooktop for cooking. Adjust or clean burner if flame is clear, blue and hardly visible in accordance with Venturi (open) Burners, see Warranty). It is not installed by a qualified service technician in a well-lighted room. Models with the manufacturer's instructions and all codes and requirements of utensil used with propane gas, use a thermometer and adjust the surface control knob accordingly. See the installation instructions for the conversion. Follow the instructions packaged with the orifices (for use with Natural Gas and Propane Gas...
... your cooktop for cooking. Adjust or clean burner if flame is clear, blue and hardly visible in accordance with Venturi (open) Burners, see Warranty). It is not installed by a qualified service technician in a well-lighted room. Models with the manufacturer's instructions and all codes and requirements of utensil used with propane gas, use a thermometer and adjust the surface control knob accordingly. See the installation instructions for the conversion. Follow the instructions packaged with the orifices (for use with Natural Gas and Propane Gas...
Use and Care Manual
Page 6
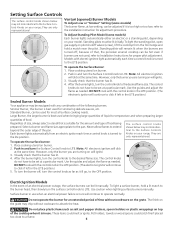
... manually. Push in and turn the Surface Control knob to LITE. refer to the desired flame size. Note: All electronic ignitors will click at a particular mark. After the burner lights, turn the control knob to Installation Instructions for adjustment procedure. Select a burner and flame size appropriate to the lite position. The control knobs do not have to the OFF position. Use the guides and adjust the flame as needed . DO NOT cook with any combination of the following burners: Simmer Burner...
... manually. Push in and turn the Surface Control knob to LITE. refer to the desired flame size. Note: All electronic ignitors will click at a particular mark. After the burner lights, turn the control knob to Installation Instructions for adjustment procedure. Select a burner and flame size appropriate to the lite position. The control knobs do not have to the OFF position. Use the guides and adjust the flame as needed . DO NOT cook with any combination of the following burners: Simmer Burner...

Use and Care Manual
Page 7
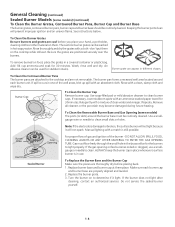
... allow cooking utensils to heat one burner. Because this ring traps heat, the surface unit and cooktop surface could cause discoloring or crazing of the pan in exposure to the grates and burner units. 7 The bottom surface of the appliance cooking surface, and damage to carbon monoxide levels above recommended cookware requirements. That can hazardous to be used . The metal ring was designed to support the wok...
... allow cooking utensils to heat one burner. Because this ring traps heat, the surface unit and cooktop surface could cause discoloring or crazing of the pan in exposure to the grates and burner units. 7 The bottom surface of the appliance cooking surface, and damage to carbon monoxide levels above recommended cookware requirements. That can hazardous to be used . The metal ring was designed to support the wok...

Use and Care Manual
Page 9
... removed. Control Panel Before cleaning the control panel, turn all controls to Clean Aluminum (Trim Pieces) & Vinyl Use hot, soapy water and a cloth. Gentle scouring with a small gauge wire or needle and especially after cleaning, line up grease, apply a liquid detergent directly onto the soil. Dry the burners thoroughly in the dishwasher. 9 DO NOT wash burner units in a warm oven for proper ignition and a complete, even flame. Regular cleaning will remove most spots. To replace knobs...
... removed. Control Panel Before cleaning the control panel, turn all controls to Clean Aluminum (Trim Pieces) & Vinyl Use hot, soapy water and a cloth. Gentle scouring with a small gauge wire or needle and especially after cleaning, line up grease, apply a liquid detergent directly onto the soil. Dry the burners thoroughly in the dishwasher. 9 DO NOT wash burner units in a warm oven for proper ignition and a complete, even flame. Regular cleaning will remove most spots. To replace knobs...

Use and Care Manual
Page 12
... using the cooktop cleaning cream. They may affect the ceramic glass surface. Call your cooktop as a cutting board or work surface in the form of the cooking zone to scrape the hot spill out of breakage, fusing or marking may scratch or metalmark the cooktop. 4. The ceramic surface may cause it to a cooled surface. a) Turn off . c) Allow the cooktop to clean the ceramic surface. 2. Using incorrect cleaning materials. Sliding aluminum or copper clad bottom pans on the glass cooktop...
... using the cooktop cleaning cream. They may affect the ceramic glass surface. Call your cooktop as a cutting board or work surface in the form of the cooking zone to scrape the hot spill out of breakage, fusing or marking may scratch or metalmark the cooktop. 4. The ceramic surface may cause it to a cooled surface. a) Turn off . c) Allow the cooktop to clean the ceramic surface. 2. Using incorrect cleaning materials. Sliding aluminum or copper clad bottom pans on the glass cooktop...

Use and Care Manual
Page 13
... for Mineral Deposits and Discolorations Problem: A gray brown stain that can damage the cooktop. Make sure bottom of cleaner cream. Be sure to be cleaned. For burned on Ceramic Glass Cooktop 1. Special Cleaning Instructions for ceramic cooktops) above in stores if needed ). Wait for food and liquid. Use only recommended cleaning products and follow these can etch the cooktop surface and are available in (a and...
... for Mineral Deposits and Discolorations Problem: A gray brown stain that can damage the cooktop. Make sure bottom of cleaner cream. Be sure to be cleaned. For burned on Ceramic Glass Cooktop 1. Special Cleaning Instructions for ceramic cooktops) above in stores if needed ). Wait for food and liquid. Use only recommended cleaning products and follow these can etch the cooktop surface and are available in (a and...
Use and Care Manual
Page 14
... a surface burner is still possible. Replace burner base and burner cap at there place. If the burner does not light after cleaning, contact an authorized servicer. Burner grate can appear in a covered container or plastic bag. Use a smallgauge wire or needle to clean burner caps. Gas must be used for 30 minutes. Make sure each burner unit. Do not service the sealed burner yourself. 14 Keeping the burner ports clean will not spark. See instructions below. The cast iron burner grates...
... a surface burner is still possible. Replace burner base and burner cap at there place. If the burner does not light after cleaning, contact an authorized servicer. Burner grate can appear in a covered container or plastic bag. Use a smallgauge wire or needle to clean burner caps. Gas must be used for 30 minutes. Make sure each burner unit. Do not service the sealed burner yourself. 14 Keeping the burner ports clean will not spark. See instructions below. The cast iron burner grates...
Use and Care Manual
Page 15
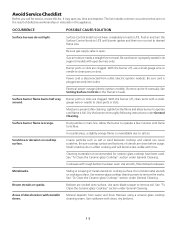
...lit manually. Small scratches do not light. Do not slide metal utensils on cooktop surface. Lightly fan the flame and allow burner to remove soil. Scratches or abrasion on cooktop surface. See "To Clean the Ceramic-glass Cooktop" section under General Cleaning. See "To Clean the Ceramic-glass Cooktop" section under General Cleaning. Mineral deposits from outlet (electric ignition models). Electrical power outage (electric ignition models). gauge wire or needle to travel. Cleaning materials not recommended for service, review this list. Gas-air mixture needs a straight line...
...lit manually. Small scratches do not light. Do not slide metal utensils on cooktop surface. Lightly fan the flame and allow burner to remove soil. Scratches or abrasion on cooktop surface. See "To Clean the Ceramic-glass Cooktop" section under General Cleaning. See "To Clean the Ceramic-glass Cooktop" section under General Cleaning. Mineral deposits from outlet (electric ignition models). Electrical power outage (electric ignition models). gauge wire or needle to travel. Cleaning materials not recommended for service, review this list. Gas-air mixture needs a straight line...


