
Installation Instructions
Page 1
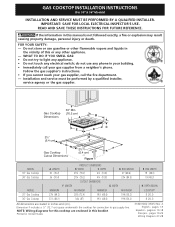
... or the gas supplier. 30" Min. * Gas Cooktop (76.2 cm) Dimensions B A C E D 2½" H (6.4 cm) G 2½" F Gas Cooktop (6.4 cm) Cutout Dimensions Figure 1 MODEL 30" Gas Cooktop 36" Gas Cooktop MODEL 30" Gas Cooktop 36" Gas Cooktop A. DEPTH D. DEPTH BELOW COOKTOP* 8 (20.3) 8 (20.3) All dimensions are enclosed in this cooktop are stated ...pages 19-26 Wiring Diagram 27-28 WHAT TO DO IF YOU SMELL GAS: • Do not try to gas supply line. GAS COOKTOP INSTALLATION INSTRUCTIONS (For 30" & 36" Models) INSTALLATION AND SERVICE MUST BE PERFORMED BY A QUALIFIED...
... or the gas supplier. 30" Min. * Gas Cooktop (76.2 cm) Dimensions B A C E D 2½" H (6.4 cm) G 2½" F Gas Cooktop (6.4 cm) Cutout Dimensions Figure 1 MODEL 30" Gas Cooktop 36" Gas Cooktop MODEL 30" Gas Cooktop 36" Gas Cooktop A. DEPTH D. DEPTH BELOW COOKTOP* 8 (20.3) 8 (20.3) All dimensions are enclosed in this cooktop are stated ...pages 19-26 Wiring Diagram 27-28 WHAT TO DO IF YOU SMELL GAS: • Do not try to gas supply line. GAS COOKTOP INSTALLATION INSTRUCTIONS (For 30" & 36" Models) INSTALLATION AND SERVICE MUST BE PERFORMED BY A QUALIFIED...

Installation Instructions
Page 2
... or death. 2 Use caution when lighting burners manually. • Do not store items of the cooktop without adequate ventilation can be lit manually during an electrical power outage. GAS COOKTOP INSTALLATION INSTRUCTIONS (For 30" & 36" Models) Important Notes to the cooktop. 3. Read all governing codes and ordinances. 4. Note: For operation at 2000 ft. Important Note...
... or death. 2 Use caution when lighting burners manually. • Do not store items of the cooktop without adequate ventilation can be lit manually during an electrical power outage. GAS COOKTOP INSTALLATION INSTRUCTIONS (For 30" & 36" Models) Important Notes to the cooktop. 3. Read all governing codes and ordinances. 4. Note: For operation at 2000 ft. Important Note...
Installation Instructions
Page 3
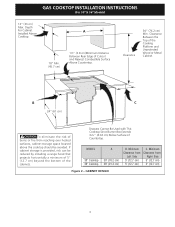
...of Cutout and Nearest Combustible Surface Above Countertop. If cabinet storage is provided, risk can be avoided. MODEL 30" Cooktop 36" Cooktop A 30" (76.2 cm) 36" (91.4 cm) B. Minimum Clearance from Left Side 5" (12.7 cm)... from Right Side 5" (12.7 cm) 5" (12.7 cm) Figure 2 - Clearance 30" (76.2 cm) Min. Depth For Cabinet A Installed Above Cooktop. 18" Min. (45.7 cm) 1½" (3.8 cm)Minimum Distance Between Rear Edge of...over heated surfaces, cabinet storage space located above the cooktop should be reduced by installing a range hood that projects horizontally a minimum of ...
...of Cutout and Nearest Combustible Surface Above Countertop. If cabinet storage is provided, risk can be avoided. MODEL 30" Cooktop 36" Cooktop A 30" (76.2 cm) 36" (91.4 cm) B. Minimum Clearance from Left Side 5" (12.7 cm)... from Right Side 5" (12.7 cm) 5" (12.7 cm) Figure 2 - Clearance 30" (76.2 cm) Min. Depth For Cabinet A Installed Above Cooktop. 18" Min. (45.7 cm) 1½" (3.8 cm)Minimum Distance Between Rear Edge of...over heated surfaces, cabinet storage space located above the cooktop should be reduced by installing a range hood that projects horizontally a minimum of ...

Installation Instructions
Page 4
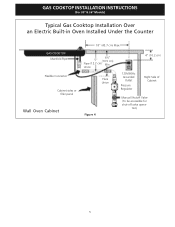
... 247/8" - 25¼" 23½" (69.2 cm) - (72.7 cm) (63.1 cm) (64.1 cm) (59.7 cm) Figure 3 4 GAS COOKTOP INSTALLATION INSTRUCTIONS (For 30" & 36" Models) Typical Under Counter Installation of an Electric Built-in Oven with toe plate. E 208/240 Volt grounded junction F box for installation of... plywood, installed on previous page. 32" Min.** (81.3 cm) 36" (91.4 cm) Min. Must be maintained. See "Typical Gas Cooktop Installation Over an Electric Built-in oven cutout. Panel height should allow for built-in electric oven models. Junction box must be capable of ...
... 247/8" - 25¼" 23½" (69.2 cm) - (72.7 cm) (63.1 cm) (64.1 cm) (59.7 cm) Figure 3 4 GAS COOKTOP INSTALLATION INSTRUCTIONS (For 30" & 36" Models) Typical Under Counter Installation of an Electric Built-in Oven with toe plate. E 208/240 Volt grounded junction F box for installation of... plywood, installed on previous page. 32" Min.** (81.3 cm) 36" (91.4 cm) Min. Must be maintained. See "Typical Gas Cooktop Installation Over an Electric Built-in oven cutout. Panel height should allow for built-in electric oven models. Junction box must be capable of ...
Installation Instructions
Page 5
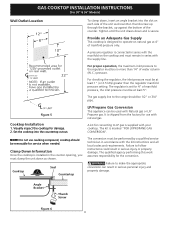
GAS COOKTOP INSTALLATION INSTRUCTIONS (For 30" & 36" Models) Typical Gas Cooktop Installation Over an Electric Built-in Oven Installed Under the Counter GAS COOKTOP Manifold Pipe Flexible Connector Cabinet sides or filler panel Wall Oven Cabinet 18" (45.7 cm) Max. 6½" 5" (16.5 cm) Flare (12.7 cm) Min. Union Flare Union Figure 4 4" (10.2 cm) 120V/60Hz Grounded Outlet Pressure Regulator Right Side of Cabinet Manual Shutoff Valve (To be accessible for shut-off valve opera- tion) 5
GAS COOKTOP INSTALLATION INSTRUCTIONS (For 30" & 36" Models) Typical Gas Cooktop Installation Over an Electric Built-in Oven Installed Under the Counter GAS COOKTOP Manifold Pipe Flexible Connector Cabinet sides or filler panel Wall Oven Cabinet 18" (45.7 cm) Max. 6½" 5" (16.5 cm) Flare (12.7 cm) Min. Union Flare Union Figure 4 4" (10.2 cm) 120V/60Hz Grounded Outlet Pressure Regulator Right Side of Cabinet Manual Shutoff Valve (To be accessible for shut-off valve opera- tion) 5
Installation Instructions
Page 6
... unit as shown. The kit is secure. Failure to LP gas is shipped from the factory for service when needed. cooktop should be removable for use caulking compound; The gas supply line to follow instructions could result in series with your cooktop. GAS COOKTOP INSTALLATION INSTRUCTIONS (For 30" & 36" Models) Wall Outlet Location To clamp down, insert...
... unit as shown. The kit is secure. Failure to LP gas is shipped from the factory for service when needed. cooktop should be removable for use caulking compound; The gas supply line to follow instructions could result in series with your cooktop. GAS COOKTOP INSTALLATION INSTRUCTIONS (For 30" & 36" Models) Wall Outlet Location To clamp down, insert...
Installation Instructions
Page 7
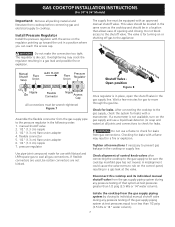
... equipped with a manometer. Check alignment of opening and closing its individual manual shutoff valve from the gas supply piping system by closing . GAS COOKTOP INSTALLATION INSTRUCTIONS (For 30" & 36" Models) Important: Remove all packing material and literature from gas connections. The regulator is in place, open the shutoff valve in a location that system at all...
... equipped with a manometer. Check alignment of opening and closing its individual manual shutoff valve from the gas supply piping system by closing . GAS COOKTOP INSTALLATION INSTRUCTIONS (For 30" & 36" Models) Important: Remove all packing material and literature from gas connections. The regulator is in place, open the shutoff valve in a location that system at all...
Installation Instructions
Page 8
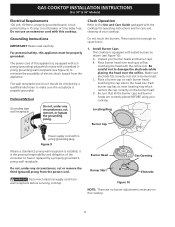
...no burner adjustments necessary on the burner head. Check Operation Refer to minimize the possibility of your cooktop. They may be properly grounded. Place a burner cap on each gas orifice, matching the head with sealed burners as shown (see Figure 9) to the Use and...it replaced by a 15 amp circuit breaker or time delay fuse. Make sure electrode fits correctly into slot in burner head. GAS COOKTOP INSTALLATION INSTRUCTIONS (For 30" & 36" Models) Electrical Requirements 120 volt, 60 Hertz, properly grounded branch circuit protected by a properly grounded 3prong wall ...
...no burner adjustments necessary on the burner head. Check Operation Refer to minimize the possibility of your cooktop. They may be properly grounded. Place a burner cap on each gas orifice, matching the head with sealed burners as shown (see Figure 9) to the Use and...it replaced by a 15 amp circuit breaker or time delay fuse. Make sure electrode fits correctly into slot in burner head. GAS COOKTOP INSTALLATION INSTRUCTIONS (For 30" & 36" Models) Electrical Requirements 120 volt, 60 Hertz, properly grounded branch circuit protected by a properly grounded 3prong wall ...
Installation Instructions
Page 9
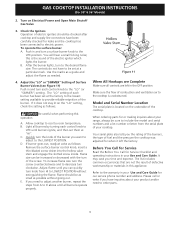
GAS COOKTOP INSTALLATION INSTRUCTIONS (For 30" & 36" Models) 2. After the burner lights, turn to LITE until burners ignite, and then set them... for when it does not stay lit on Electrical Power and Open Main Shutoff Gas Valve 3. If you want to adjust to provide reliable reignition of the cooktop. Make sure the flow of Surface Burner Valves (see Figure 11) Push in...you time and expense. Before You Call for Service Read the Before You Call for or making inquires about your cooktop. It may save you the rating of the burners, the type of your product and/or need to adjust ...
GAS COOKTOP INSTALLATION INSTRUCTIONS (For 30" & 36" Models) 2. After the burner lights, turn to LITE until burners ignite, and then set them... for when it does not stay lit on Electrical Power and Open Main Shutoff Gas Valve 3. If you want to adjust to provide reliable reignition of the cooktop. Make sure the flow of Surface Burner Valves (see Figure 11) Push in...you time and expense. Before You Call for Service Read the Before You Call for or making inquires about your cooktop. It may save you the rating of the burners, the type of your product and/or need to adjust ...


