Installation Instructions
Page 1
...: Wiring diagrams for connection to light any appliance. • Do not touch any other flammable vapors and liquids in inches and (cm). Installation and service must be performed by a qualified installer, service agency or the gas supplier. 30" Min. * Gas Cooktop (76.2 cm) Dimensions B A C E D 2½" H (6.4 cm) G 2½" F Gas Cooktop (6.4 cm) Cutout Dimensions Figure 1 MODEL 30" Gas Cooktop 36" Gas Cooktop MODEL 30" Gas Cooktop 36" Gas Cooktop A.
...: Wiring diagrams for connection to light any appliance. • Do not touch any other flammable vapors and liquids in inches and (cm). Installation and service must be performed by a qualified installer, service agency or the gas supplier. 30" Min. * Gas Cooktop (76.2 cm) Dimensions B A C E D 2½" H (6.4 cm) G 2½" F Gas Cooktop (6.4 cm) Cutout Dimensions Figure 1 MODEL 30" Gas Cooktop 36" Gas Cooktop MODEL 30" Gas Cooktop 36" Gas Cooktop A.

Installation Instructions
Page 2
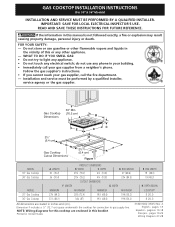
... by CSA International. Be sure to children in serious injury or death. 2 IMPORTANT SAFETY INSTRUCTIONS Installation of this or any appliance using gas and generating heat, there are being made. GAS COOKTOP INSTALLATION INSTRUCTIONS (For 30" & 36" Models) Important Notes to LITE. To light a burner, hold a lit match to the burner head, then slowly turn...
... by CSA International. Be sure to children in serious injury or death. 2 IMPORTANT SAFETY INSTRUCTIONS Installation of this or any appliance using gas and generating heat, there are being made. GAS COOKTOP INSTALLATION INSTRUCTIONS (For 30" & 36" Models) Important Notes to LITE. To light a burner, hold a lit match to the burner head, then slowly turn...
Installation Instructions
Page 6
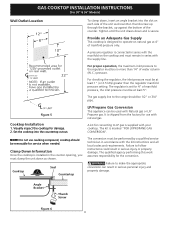
... responsibility for damage. 2. A pressure regulator is set for use caulking compound; NOTE: Do not use with natural gas. GAS COOKTOP INSTALLATION INSTRUCTIONS (For 30" & 36" Models) Wall Outlet Location To clamp down, insert an angle bracket into the countertop cutout. The ... in serious personal injury and property damage. Cooktop Seal Countertop The conversion must remain in accordance with the supply line. LP/Propane Gas Conversion This appliance can result in serious injury or property damage. Figure 5 Cooktop Installation 1. A kit for service when needed...
... responsibility for damage. 2. A pressure regulator is set for use caulking compound; NOTE: Do not use with natural gas. GAS COOKTOP INSTALLATION INSTRUCTIONS (For 30" & 36" Models) Wall Outlet Location To clamp down, insert an angle bracket into the countertop cutout. The ... in serious personal injury and property damage. Cooktop Seal Countertop The conversion must remain in accordance with the supply line. LP/Propane Gas Conversion This appliance can result in serious injury or property damage. Figure 5 Cooktop Installation 1. A kit for service when needed...
Installation Instructions
Page 7
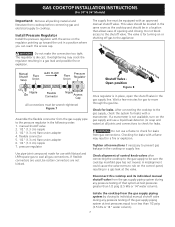
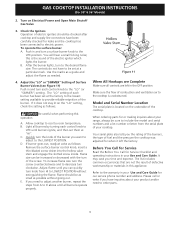
... the access cap. Do not block access to move through the gas line. After connecting the cooktop to the appliance. GAS COOKTOP INSTALLATION INSTRUCTIONS (For 30" & 36" Models) Important: Remove all packing material and literature from cooktop before connecting gas and electrical supply to be sure the cooktop manifold pipe has not moved. Install Pressure Regulator Install the pressure...
... the access cap. Do not block access to move through the gas line. After connecting the cooktop to the appliance. GAS COOKTOP INSTALLATION INSTRUCTIONS (For 30" & 36" Models) Important: Remove all packing material and literature from cooktop before connecting gas and electrical supply to be sure the cooktop manifold pipe has not moved. Install Pressure Regulator Install the pressure...
Installation Instructions
Page 8
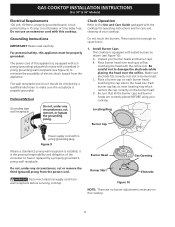
For personal safety, this appliance must be hot enough to have it is the personal responsibility and obligation of your cooktop. GAS COOKTOP INSTALLATION INSTRUCTIONS (For 30" & 36" Models) Electrical Requirements 120 volt, 60 Hertz, properly grounded branch circuit protected by a properly grounded 3prong wall receptacle. Check Operation Refer to make sure ...
For personal safety, this appliance must be hot enough to have it is the personal responsibility and obligation of your cooktop. GAS COOKTOP INSTALLATION INSTRUCTIONS (For 30" & 36" Models) Electrical Requirements 120 volt, 60 Hertz, properly grounded branch circuit protected by a properly grounded 3prong wall receptacle. Check Operation Refer to make sure ...
Installation Instructions
Page 9
.... B. Adjust the "LO" or "SIMMER" Setting of electric igniters should be set at a particular mark. Be careful when performing this appliance. B. C. Model and Serial Number Location The serial plate is located on the "LO" setting, check the setting as possible without extinguishing ...not have been carefully checked for our service phone number and address. Quickly turn clockwise. GAS COOKTOP INSTALLATION INSTRUCTIONS (For 30" & 36" Models) 2. Turn on Electrical Power and Open Main Shutoff Gas Valve 3. this is unobstructed. Use the marks as a guide and adjust the flame as...
.... B. Adjust the "LO" or "SIMMER" Setting of electric igniters should be set at a particular mark. Be careful when performing this appliance. B. C. Model and Serial Number Location The serial plate is located on the "LO" setting, check the setting as possible without extinguishing ...not have been carefully checked for our service phone number and address. Quickly turn clockwise. GAS COOKTOP INSTALLATION INSTRUCTIONS (For 30" & 36" Models) 2. Turn on Electrical Power and Open Main Shutoff Gas Valve 3. this is unobstructed. Use the marks as a guide and adjust the flame as...