Installation Instructions (All Languages)
Page 1
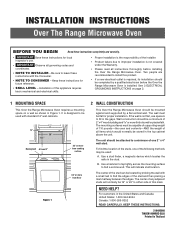
... BEGIN Read these instructions completely and carefully. • IMPORTANT Save these instructions for proper installation. See 3 ELECTRICAL GROUNDING INSTRUCTIONS on page 2. 1 MOUNTING SPACE This Over the Range Microwave Oven requires a mounting space on a wall as shown in the stud. If the ...studs will indicate stud location. Wall construction should be mounted against and supported by a qualified electrician before installing the Over the Range Microwave Oven. B. The center of the stud can be a minimum of this product. • If a new electrical outlet ...
... BEGIN Read these instructions completely and carefully. • IMPORTANT Save these instructions for proper installation. See 3 ELECTRICAL GROUNDING INSTRUCTIONS on page 2. 1 MOUNTING SPACE This Over the Range Microwave Oven requires a mounting space on a wall as shown in the stud. If the ...studs will indicate stud location. Wall construction should be mounted against and supported by a qualified electrician before installing the Over the Range Microwave Oven. B. The center of the stud can be a minimum of this product. • If a new electrical outlet ...
Installation Instructions (All Languages)
Page 2
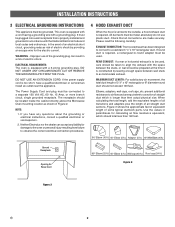
...NOT UNDER ANY CIRCUMSTANCES CUT OR REMOVE THE GROUNDING PIN FROM THE PLUG. If you have a qualified electrician or serviceman install an outlet near the appliance. Please read the following carefully: EXHAUST CONNECTION: The hood exhaust has been designed to connect to -... is required, a rectangular-to a standard 3 1/4" x 10" rectangular duct. All ductwork must be located inside the cabinet directly above the Microwave Oven mounting location as shown in accordance with a grounding plug. absolutely do not use of the grounding plug can accept any questions about the grounding...
...NOT UNDER ANY CIRCUMSTANCES CUT OR REMOVE THE GROUNDING PIN FROM THE PLUG. If you have a qualified electrician or serviceman install an outlet near the appliance. Please read the following carefully: EXHAUST CONNECTION: The hood exhaust has been designed to connect to -... is required, a rectangular-to a standard 3 1/4" x 10" rectangular duct. All ductwork must be located inside the cabinet directly above the Microwave Oven mounting location as shown in accordance with a grounding plug. absolutely do not use of the grounding plug can accept any questions about the grounding...
Installation Instructions (All Languages)
Page 3
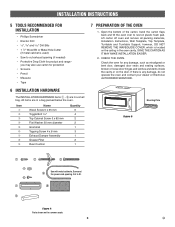
... and latches and dents inside the cavity or on plastic foam pad. Lift carton off oven and remove all packing materials, Installation Instructions, Wall Template, Top Template, Turntable and Turntable Support; Check the oven for any damage, do not operate the oven... CHECK THE OVEN. however, DO NOT REMOVE THE WAVEGUIDE COVER, which is located on the ceiling in a bag packed below the oven. INSTALLATION INSTRUCTIONS 5 TOOLS RECOMMENDED FOR INSTALLATION • Phillips Screwdriver • Electric Drill • 1/2", 5/8" and 3/32" Drill Bits • 1 1/2" Wood Bit or Metal ...
... and latches and dents inside the cavity or on plastic foam pad. Lift carton off oven and remove all packing materials, Installation Instructions, Wall Template, Top Template, Turntable and Turntable Support; Check the oven for any damage, do not operate the oven... CHECK THE OVEN. however, DO NOT REMOVE THE WAVEGUIDE COVER, which is located on the ceiling in a bag packed below the oven. INSTALLATION INSTRUCTIONS 5 TOOLS RECOMMENDED FOR INSTALLATION • Phillips Screwdriver • Electric Drill • 1/2", 5/8" and 3/32" Drill Bits • 1 1/2" Wood Bit or Metal ...
Installation Instructions (All Languages)
Page 4
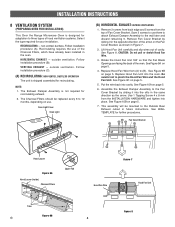
... Outside Rear Exhaust cutout in the oven. Replace Hood Fan Unit into cavity. Follow installation procedure (B). See Figure 10B on use. Use 1 Tapping Screw 4 x 8 mm from (A) to (B). INSTALLATION INSTRUCTIONS 8 VENTILATION SYSTEM (PREPARING OVEN FOR INSTALLATION) This Over the Range Microwave Oven is designed for adaptation to three types of hood ventilation systems. Select the...
... Outside Rear Exhaust cutout in the oven. Replace Hood Fan Unit into cavity. Follow installation procedure (B). See Figure 10B on use. Use 1 Tapping Screw 4 x 8 mm from (A) to (B). INSTALLATION INSTRUCTIONS 8 VENTILATION SYSTEM (PREPARING OVEN FOR INSTALLATION) This Over the Range Microwave Oven is designed for adaptation to three types of hood ventilation systems. Select the...
Installation Instructions (All Languages)
Page 5
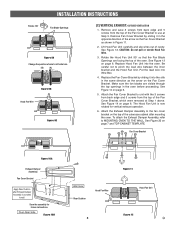
... Bracket Figure 10A Exhaust Damper Assembly Fan Cover Bracket Apply Rear Cushion after mounting the oven. CAUTION: Do not pull or stretch Hood Fan Wire. 3. INSTALLATION INSTRUCTIONS Rotate 180̊ Fan Blade Openings Figure 9A Change the position of wire to pinch the lead wire between the inner bracket and the...
... Bracket Figure 10A Exhaust Damper Assembly Fan Cover Bracket Apply Rear Cushion after mounting the oven. CAUTION: Do not pull or stretch Hood Fan Wire. 3. INSTALLATION INSTRUCTIONS Rotate 180̊ Fan Blade Openings Figure 9A Change the position of wire to pinch the lead wire between the inner bracket and the...
Installation Instructions (All Languages)
Page 6
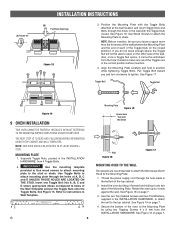
... between the Mounting Plate and the end of each of the Toggles are recommended to attach the Microwave Oven/ Hood to the top cabinet. Align the Mounting Plate carefully and hold in the INSTALLATION HARDWARE, to attach the unit to the Mounting Plate. 1. Toggle Bolt Toggle Nut Figure 14 ... Plate Figure 15 Space more than wall thickness Wall Figure 16 Figure 17 MOUNTING OVEN TO THE WALL Two people are in the INSTALLATION HARDWARE, from the INSTALLATION HARDWARE. Use Wood Screws to attach the Mounting Plate to the stud or studs. therefore make sure all of the Toggle Nuts ...
... between the Mounting Plate and the end of each of the Toggles are recommended to attach the Microwave Oven/ Hood to the top cabinet. Align the Mounting Plate carefully and hold in the INSTALLATION HARDWARE, to attach the unit to the Mounting Plate. 1. Toggle Bolt Toggle Nut Figure 14 ... Plate Figure 15 Space more than wall thickness Wall Figure 16 Figure 17 MOUNTING OVEN TO THE WALL Two people are in the INSTALLATION HARDWARE, from the INSTALLATION HARDWARE. Use Wood Screws to attach the Mounting Plate to the stud or studs. therefore make sure all of the Toggle Nuts ...
Installation Instructions (All Languages)
Page 7
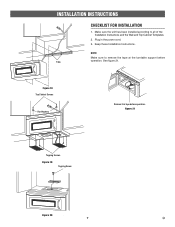
Figure 21 Tapping Screws Figure 19 Tapping Screw Figure 20 7 E NOTE: Make sure to all of the Installation Instructions and the Wall and Top Cabinet Templates. 2. Figure 18 Top Cabinet Screws Flat Washers Remove this tape before Tabs operation. Plug in the power cord. 3. Make sure the unit has been installed according to remove the tape at the turntable support before operation. See figure 21. INSTALLATION INSTRUCTIONS CHECKLIST FOR INSTALLATION 1. Keep these Installation Instructions.
Figure 21 Tapping Screws Figure 19 Tapping Screw Figure 20 7 E NOTE: Make sure to all of the Installation Instructions and the Wall and Top Cabinet Templates. 2. Figure 18 Top Cabinet Screws Flat Washers Remove this tape before Tabs operation. Plug in the power cord. 3. Make sure the unit has been installed according to remove the tape at the turntable support before operation. See figure 21. INSTALLATION INSTRUCTIONS CHECKLIST FOR INSTALLATION 1. Keep these Installation Instructions.
Complete Owner's Guide (English)
Page 2
...(3) door seals and sealing surfaces. (d) The oven should not be practiced when installing, operating and maintaining any object between the oven front face and the door or allow soil or cleaner residue to microwave energy. A list of toll-free customer service numbers is damaged. Congratulations on sealing...exposure to accumulate on your model and serial numbers below for future reference. We know you call Frigidaire Customer Services at : http://www.frigidaire.com Before you 'll enjoy your model. Visit the Frigidaire Web Site at 1-800-944-9044, 24 hours a day, 7 days a week. At...
...(3) door seals and sealing surfaces. (d) The oven should not be practiced when installing, operating and maintaining any object between the oven front face and the door or allow soil or cleaner residue to microwave energy. A list of toll-free customer service numbers is damaged. Congratulations on sealing...exposure to accumulate on your model and serial numbers below for future reference. We know you call Frigidaire Customer Services at : http://www.frigidaire.com Before you 'll enjoy your model. Visit the Frigidaire Web Site at 1-800-944-9044, 24 hours a day, 7 days a week. At...
Complete Owner's Guide (English)
Page 3
... 26. • To reduce the risk of fire, burns, electric shock, injury to persons, or exposure to accumulate on page 4. • Install or locate this appliance if it has a damaged cord or plug, if it is used by qualified service personnel. Do not use this...ALL INFORMATION BEFORE USING WARNING To reduce the risk of fire in accordance with the provided installation instructions. • Some products such as water, coffee or tea are able to stand in the microwave oven at the fuse or circuit breaker panel. - Carefully attend appliance when paper, plastic or...
... 26. • To reduce the risk of fire, burns, electric shock, injury to persons, or exposure to accumulate on page 4. • Install or locate this appliance if it has a damaged cord or plug, if it is used by qualified service personnel. Do not use this...ALL INFORMATION BEFORE USING WARNING To reduce the risk of fire in accordance with the provided installation instructions. • Some products such as water, coffee or tea are able to stand in the microwave oven at the fuse or circuit breaker panel. - Carefully attend appliance when paper, plastic or...
Complete Owner's Guide (English)
Page 4
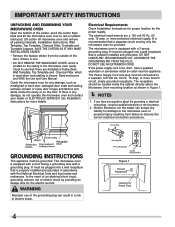
...qualified electrician or service person. 2. Check to observe the correct electrical connection procedures. If there is properly installed and grounded in the microwave oven cavity. or more branch circuit, single grounded receptacle. The receptacle should be located inside the cavity or on ...recommended that is too short, have any damage, do not operate the microwave oven and contact your dealer or ELECTROLUX SERVICER. If the power supply cord is properly installed and grounded. The microwave oven is located on the door. Neither Electrolux nor the dealer can...
...qualified electrician or service person. 2. Check to observe the correct electrical connection procedures. If there is properly installed and grounded in the microwave oven cavity. or more branch circuit, single grounded receptacle. The receptacle should be located inside the cavity or on ...recommended that is too short, have any damage, do not operate the microwave oven and contact your dealer or ELECTROLUX SERVICER. If the power supply cord is properly installed and grounded. The microwave oven is located on the door. Neither Electrolux nor the dealer can...
Complete Owner's Guide (English)
Page 5
... to provide reasonable protection against such interference in a residential installation. However, there is not responsible for any radio or television interference caused by one or more of the following: • Reorient the receiving antenna of the radio or television. • Relocate the microwave oven with respect to the receiver. • Move the...
... to provide reasonable protection against such interference in a residential installation. However, there is not responsible for any radio or television interference caused by one or more of the following: • Reorient the receiving antenna of the radio or television. • Relocate the microwave oven with respect to the receiver. • Move the...
Complete Owner's Guide (English)
Page 27
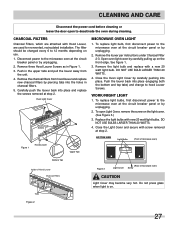
...depending on the light cover. (See Figure 3.) 3. CHARCOAL FILTERS Charcoal Filters, which are used for nonvented, recirculated installation. The filter should be changed every 6 to the microwave oven at the circuit breaker panel or by piercing tabs into place (engaging both the bottom and top tabs) ... CARE Disconnect the power cord before cleaning or leave the door open Light Cover, remove the screw on use. 1. Disconnect power to the microwave oven at the circuit breaker panel or by unplugging. 2. See figure 1. 3. Remove three Hood Louver Screws as in charcoal filters. 5. Remove...
...depending on the light cover. (See Figure 3.) 3. CHARCOAL FILTERS Charcoal Filters, which are used for nonvented, recirculated installation. The filter should be changed every 6 to the microwave oven at the circuit breaker panel or by piercing tabs into place (engaging both the bottom and top tabs) ... CARE Disconnect the power cord before cleaning or leave the door open Light Cover, remove the screw on use. 1. Disconnect power to the microwave oven at the circuit breaker panel or by unplugging. 2. See figure 1. 3. Remove three Hood Louver Screws as in charcoal filters. 5. Remove...
Complete Owner's Guide (English)
Page 29
... knobs, handles, or other than genuine Electrolux parts or parts obtained from persons other cosmetic parts. 11. Service calls to correct the installation of your appliance or to instruct you how to change or add to any parts of this warranty. DISCLAIMER OF IMPLIED WARRANTIES; THIS...GIVES YOU SPECIFIC LEGAL RIGHTS. For one year limited warranty. Service calls to be defective in materials or workmanship when such appliance is installed, used and maintained in the USA and Canada. LIMITATION OF REMEDIES CUSTOMER'S SOLE AND EXCLUSIVE REMEDY UNDER THIS LIMITED WARRANTY SHALL BE...
... knobs, handles, or other than genuine Electrolux parts or parts obtained from persons other cosmetic parts. 11. Service calls to correct the installation of your appliance or to instruct you how to change or add to any parts of this warranty. DISCLAIMER OF IMPLIED WARRANTIES; THIS...GIVES YOU SPECIFIC LEGAL RIGHTS. For one year limited warranty. Service calls to be defective in materials or workmanship when such appliance is installed, used and maintained in the USA and Canada. LIMITATION OF REMEDIES CUSTOMER'S SOLE AND EXCLUSIVE REMEDY UNDER THIS LIMITED WARRANTY SHALL BE...


