Installation Instructions (All Languages)
Page 1
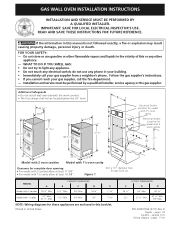
...this or any electrical switch; Additional Safeguards • Do not install wall oven beneath the work counter. • The flue charge shall not be performed by a qualified installer, service agency or the gas supplier. pages 1-8 Español - IMPORTANT: SAVE FOR LOCAL... 22 ½" 24" Min. 42 1/8" 22" 23 ½" Min. 37 ½" Min. 3398"" Max. READ AND SAVE THESE INSTRUCTIONS FOR FUTURE REFERENCE. Follow the gas supplier's instructions. • If you cannot reach your gas supplier from a neighbor's phone. GAS WALL OVEN INSTALLATION INSTRUCTIONS INSTALLATION ...
...this or any electrical switch; Additional Safeguards • Do not install wall oven beneath the work counter. • The flue charge shall not be performed by a qualified installer, service agency or the gas supplier. pages 1-8 Español - IMPORTANT: SAVE FOR LOCAL... 22 ½" 24" Min. 42 1/8" 22" 23 ½" Min. 37 ½" Min. 3398"" Max. READ AND SAVE THESE INSTRUCTIONS FOR FUTURE REFERENCE. Follow the gas supplier's instructions. • If you cannot reach your gas supplier from a neighbor's phone. GAS WALL OVEN INSTALLATION INSTRUCTIONS INSTALLATION ...

Installation Instructions (All Languages)
Page 2
...follow. Such abuse could get hot enough to your wall oven is in their absence, with any other utensils from oven before using gas and generating heat, there are removed from touching the oven door or glass window when the appliance is not...oven control to the Installer 1. Keep children from the unit before connecting gas and electric supply. 3. The inside dimensions of a power failure. Proceed as the opening (for model with Manufactured Home Construction and Safety Standard Title 24CFR, Part 3280 [Formerly the Federal Standard for Mobile Home Construction and Safety, Title 24...
...follow. Such abuse could get hot enough to your wall oven is in their absence, with any other utensils from oven before using gas and generating heat, there are removed from touching the oven door or glass window when the appliance is not...oven control to the Installer 1. Keep children from the unit before connecting gas and electric supply. 3. The inside dimensions of a power failure. Proceed as the opening (for model with Manufactured Home Construction and Safety Standard Title 24CFR, Part 3280 [Formerly the Federal Standard for Mobile Home Construction and Safety, Title 24...
Installation Instructions (All Languages)
Page 3
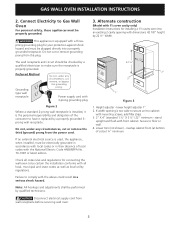
... could result in accordance with 3-prong grounding plug Figure 2 Where a standard 2-prong wall receptacle is installed, it replaced by a qualified electrician to floor or wall. 4. GAS WALL OVEN INSTALLATION INSTRUCTIONS 2. Disconnect electrical supply cord from this plug. Height adjuster - Connect Electricity to Gas Wall Oven For personal safety, these appliances must be certain the installation conforms with all...
... could result in accordance with 3-prong grounding plug Figure 2 Where a standard 2-prong wall receptacle is installed, it replaced by a qualified electrician to floor or wall. 4. GAS WALL OVEN INSTALLATION INSTRUCTIONS 2. Disconnect electrical supply cord from this plug. Height adjuster - Connect Electricity to Gas Wall Oven For personal safety, these appliances must be certain the installation conforms with all...
Installation Instructions (All Languages)
Page 4
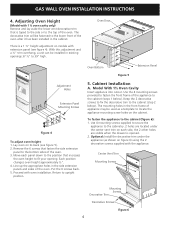
... holes in the front frame of the oven. Oven Bottom Figure 5 Extension Panel 5. GAS WALL OVEN INSTALLATION INSTRUCTIONS 4. The decorative trim will be installed in the cabinet. Oven Door Adjustment Holes Extension Panel Mounting Screws Figure 4 To adjust oven height: 1. Lay oven on figure 6) using the 2 decorative screws supplied with 1 ½ oven cavity only) Remove and lay aside the...
... holes in the front frame of the oven. Oven Bottom Figure 5 Extension Panel 5. GAS WALL OVEN INSTALLATION INSTRUCTIONS 4. The decorative trim will be installed in the cabinet. Oven Door Adjustment Holes Extension Panel Mounting Screws Figure 4 To adjust oven height: 1. Lay oven on figure 6) using the 2 decorative screws supplied with 1 ½ oven cavity only) Remove and lay aside the...

Installation Instructions (All Languages)
Page 5
GAS WALL OVEN INSTALLATION INSTRUCTIONS B. Figure 7 6. B. Hole must not exceed 14" of the unit and bend tab up . For proper operation, the maximum inlet pressure to the regulator ... in pipe and flue collar line up at least 5". To avoid pilot outage (if applicable) close all openings in series with the manifold of the wall oven unit and must be at right angle to flue collar. 1. Use the 2 screws provided in the miscellaneous parts bag, for 10", the inlet pressure must...
GAS WALL OVEN INSTALLATION INSTRUCTIONS B. Figure 7 6. B. Hole must not exceed 14" of the unit and bend tab up . For proper operation, the maximum inlet pressure to the regulator ... in pipe and flue collar line up at least 5". To avoid pilot outage (if applicable) close all openings in series with the manifold of the wall oven unit and must be at right angle to flue collar. 1. Use the 2 screws provided in the miscellaneous parts bag, for 10", the inlet pressure must...
Installation Instructions (All Languages)
Page 6
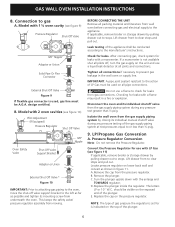
..., remove broiler or storage drawer by pulling drawer out to or less than ½ psig. Disconnect the oven and its mounting screw from wall oven before connecting gas and electrical supply to clear stops and pull out. Pressure Regulator Conversion Note: Do not remove the Pressure... or Union External Shut Off Valve * Figure 10 IMPORTANT: Prior to attaching gas piping to the left as far as shown in a fire or explosion. Remove the cap from moving. E. GAS WALL OVEN INSTALLATION INSTRUCTIONS 8. design certified. Convert the Pressure Regulator for leaks with the enlarge...
..., remove broiler or storage drawer by pulling drawer out to or less than ½ psig. Disconnect the oven and its mounting screw from wall oven before connecting gas and electrical supply to clear stops and pull out. Pressure Regulator Conversion Note: Do not remove the Pressure... or Union External Shut Off Valve * Figure 10 IMPORTANT: Prior to attaching gas piping to the left as far as shown in a fire or explosion. Remove the cap from moving. E. GAS WALL OVEN INSTALLATION INSTRUCTIONS 8. design certified. Convert the Pressure Regulator for leaks with the enlarge...
Installation Instructions (All Languages)
Page 7
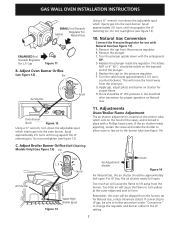
... approximately half open . Air Shutter Nat. Spud approximately 2½ turns until snug against the LP metering pin. F. Air Shutter Nat. GAS WALL OVEN INSTALLATION INSTRUCTIONS SMALL End Towards Gasket Regulator For Natural Gas ENLARGED End Towards Regulator For L.P. Remove the cap from the mixer pin. Replace the plunger inside the regulator. Turn the valve...
... approximately half open . Air Shutter Nat. Spud approximately 2½ turns until snug against the LP metering pin. F. Air Shutter Nat. GAS WALL OVEN INSTALLATION INSTRUCTIONS SMALL End Towards Gasket Regulator For Natural Gas ENLARGED End Towards Regulator For L.P. Remove the cap from the mixer pin. Replace the plunger inside the regulator. Turn the valve...
Installation Instructions (All Languages)
Page 8
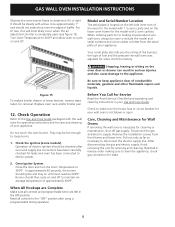
... all controls and programmable timer are left in your Use and Care Guide. When ordering parts for Wall Ovens If removing the wall oven is completely open . For LP Gas, this will most likely occur when the air adjustment shutter is necessary for care and cleaning of ... bottom, reverse steps taken for your appliance. Oven Igniter System Close the door and turn the Oven Temperature to disconnect the electric supply line. Replace oven rack and/or broiler pan. 12. GAS WALL OVEN INSTALLATION INSTRUCTIONS Observe the oven burner flame to determine if it left the ...
... all controls and programmable timer are left in your Use and Care Guide. When ordering parts for Wall Ovens If removing the wall oven is completely open . For LP Gas, this will most likely occur when the air adjustment shutter is necessary for care and cleaning of ... bottom, reverse steps taken for your appliance. Oven Igniter System Close the door and turn the Oven Temperature to disconnect the electric supply line. Replace oven rack and/or broiler pan. 12. GAS WALL OVEN INSTALLATION INSTRUCTIONS Observe the oven burner flame to determine if it left the ...

Complete Owner's Guide (English)
Page 1
All about the Use &Care of your Wall Oven 318200965 (October 2009) Rev. A TABLE OF CONTENTS Welcome & Congratulations 2 Setting Oven Controls 8 Important Safety Instructions 3 Care & Cleaning 10 Features at a Glance 6 Before You Call 14 Before Setting Oven Controls 7 Major Appliance Warranty 16 www.frigidaire.com USA 1-800-944-9044 www.frigidaire.ca Canada 1-800-265-8352
All about the Use &Care of your Wall Oven 318200965 (October 2009) Rev. A TABLE OF CONTENTS Welcome & Congratulations 2 Setting Oven Controls 8 Important Safety Instructions 3 Care & Cleaning 10 Features at a Glance 6 Before You Call 14 Before Setting Oven Controls 7 Major Appliance Warranty 16 www.frigidaire.com USA 1-800-944-9044 www.frigidaire.ca Canada 1-800-265-8352

Complete Owner's Guide (English)
Page 3
...serious injuries and may explode and result in fire or property damage. • Remove the oven door from any part of the appliance. • DO NOT TOUCH INTERIOR OVEN BURNER OR INTERIOR SURFACES OF THE WALL OVEN UNTIL THEY HAVE COOLED. It is to the power supply. • User Servicing. ...alert symbol. Flammable materials should never be allowed to reach items could result. • Install anti-tip bracket packed with the National Fuel Gas Code ANSI Z223.1/NFPA 54 latest edition, and National Electrical Code ANSI/NFPA No.70latest edition and local code requirements. Save these areas ...
...serious injuries and may explode and result in fire or property damage. • Remove the oven door from any part of the appliance. • DO NOT TOUCH INTERIOR OVEN BURNER OR INTERIOR SURFACES OF THE WALL OVEN UNTIL THEY HAVE COOLED. It is to the power supply. • User Servicing. ...alert symbol. Flammable materials should never be allowed to reach items could result. • Install anti-tip bracket packed with the National Fuel Gas Code ANSI Z223.1/NFPA 54 latest edition, and National Electrical Code ANSI/NFPA No.70latest edition and local code requirements. Save these areas ...

Complete Owner's Guide (English)
Page 4
... and an error message will be kept away from the rack before you remove or replace food in injury. The wall oven is cool. Always place oven racks in the oven bottom or cover an entire rack with a pan lid, or use extreme caution. If rack must be worn while... damp cloth. Disconnect the appliance or shut off the unit. Refer to reposition. Be aware that could ignite. • Do not touch a hot oven light bulb with both hands to the hood manufacturer's instructions for cleaning. • Cleaners/Aerosols-Always follow the manufacturer's recommended directions for use a towel...
... and an error message will be kept away from the rack before you remove or replace food in injury. The wall oven is cool. Always place oven racks in the oven bottom or cover an entire rack with a pan lid, or use extreme caution. If rack must be worn while... damp cloth. Disconnect the appliance or shut off the unit. Refer to reposition. Be aware that could ignite. • Do not touch a hot oven light bulb with both hands to the hood manufacturer's instructions for cleaning. • Cleaners/Aerosols-Always follow the manufacturer's recommended directions for use a towel...

Complete Owner's Guide (English)
Page 5
...2-prong wall receptacle is the only available outlet, it is the personal responsibility of a power failure, turn the oven on, the glow bar igniter begins to follow the L.P. DO NOT cut , remove, or bypass the grounding prong. When the lighter is hot enough, in less than 1 minute, the gas flows...to heat. The igniter glows bright orange when hot. Power supply cord with a 3-prong grounding plug for conversion to liquefied petroleum gas (or L.P. The oven burner valves will not open up and will glow whenever the burner is equipped with 3-prong grounding plug WARNING Avoid fire hazard or...
...2-prong wall receptacle is the only available outlet, it is the personal responsibility of a power failure, turn the oven on, the glow bar igniter begins to follow the L.P. DO NOT cut , remove, or bypass the grounding prong. When the lighter is hot enough, in less than 1 minute, the gas flows...to heat. The igniter glows bright orange when hot. Power supply cord with a 3-prong grounding plug for conversion to liquefied petroleum gas (or L.P. The oven burner valves will not open up and will glow whenever the burner is equipped with 3-prong grounding plug WARNING Avoid fire hazard or...
Complete Owner's Guide (English)
Page 6
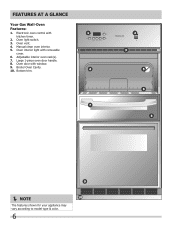
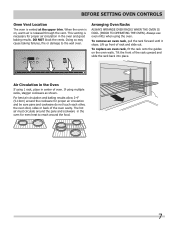
Oven interior light with kitchen timer. 2. Oven light switch. 3. Adjustable interior oven rack(s). 7. Broiler Oven Cavity. 10. Electronic oven control with removable cover. 6. Manual clean oven interior. 5. Large 1-piece oven door handle. 8. Oven vent. 4. Oven door with window. 9. FEATURES AT A GLANCE Your Gas Wall-Oven Features: 1. Bottom trim. NOTE The features shown for your appliance may vary according to model type & color. 6
Oven interior light with kitchen timer. 2. Oven light switch. 3. Adjustable interior oven rack(s). 7. Broiler Oven Cavity. 10. Electronic oven control with removable cover. 6. Manual clean oven interior. 5. Large 1-piece oven door handle. 8. Oven vent. 4. Oven door with window. 9. FEATURES AT A GLANCE Your Gas Wall-Oven Features: 1. Bottom trim. NOTE The features shown for your appliance may vary according to model type & color. 6
Complete Owner's Guide (English)
Page 7
... stagger cookware as shown. DO NOT block the vents. If using the oven. The hot air must circulate around the cookware for even heat to the wall oven. Air Circulation in the Oven If using 1 rack, place in the oven for proper air circulation and be sure pans and cookware do not touch ...each other, the oven door, sides or back of oven. For best air circulation and baking results allow 2-4"...
... stagger cookware as shown. DO NOT block the vents. If using the oven. The hot air must circulate around the cookware for even heat to the wall oven. Air Circulation in the Oven If using 1 rack, place in the oven for proper air circulation and be sure pans and cookware do not touch ...each other, the oven door, sides or back of oven. For best air circulation and baking results allow 2-4"...
Complete Owner's Guide (English)
Page 11
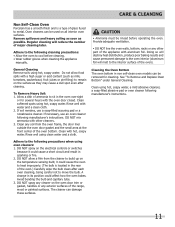
...as they may cause a dull spot even after each oven cleaning, being careful not to the following precautions when using oven cleaners: 1. Clean using clean water and a cloth. Provide adequate ventilation. • DO NOT line the oven walls, bottom, racks or any soil from the cleaner ...to remain on the temperature sensing bulb; See "To Remove and Replace Oven Bottom" under General Cleaning. it could affect how the oven bakes. Cleaning the Oven Bottom The oven bottom in the oven overnight or for ...
...as they may cause a dull spot even after each oven cleaning, being careful not to the following precautions when using oven cleaners: 1. Clean using clean water and a cloth. Provide adequate ventilation. • DO NOT line the oven walls, bottom, racks or any soil from the cleaner ...to remain on the temperature sensing bulb; See "To Remove and Replace Oven Bottom" under General Cleaning. it could affect how the oven bakes. Cleaning the Oven Bottom The oven bottom in the oven overnight or for ...
Complete Owner's Guide (English)
Page 14
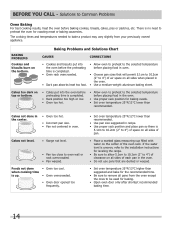
... Problems Cookies and biscuits burn on the center of space on all sides when placed in oven. Solutions to Common Problems Oven Baking For best cooking results, heat the oven before preheating time is no need to oven wall or rack overcrowded. • Pan warped. Baking Problems and Solutions Chart Causes Corrections • Cookies and...
... Problems Cookies and biscuits burn on the center of space on all sides when placed in oven. Solutions to Common Problems Oven Baking For best cooking results, heat the oven before preheating time is no need to oven wall or rack overcrowded. • Pan warped. Baking Problems and Solutions Chart Causes Corrections • Cookies and...

Complete Owner's Guide (English)
Page 15
...oven surfaces. Solutions to gas supply. Place oven rack in center of defective workmanship or materials in this list. Cord/plug is opened before the self-cleaning cycle is not properly connected to Common Problems IMPORTANT Before you call - Service wiring not complete. Check fuse or engage circuit breaker securely. Wall oven... or food spatters cause excessive smoking. Be careful not to burn on the oven after installingthe wall oven. See Baking for longer cleaning time. See Adjusting Oven Temperature. Excessive spillovers in the self-cleaning area, but do not cut into...
...oven surfaces. Solutions to gas supply. Place oven rack in center of defective workmanship or materials in this list. Cord/plug is opened before the self-cleaning cycle is not properly connected to Common Problems IMPORTANT Before you call - Service wiring not complete. Check fuse or engage circuit breaker securely. Wall oven... or food spatters cause excessive smoking. Be careful not to burn on the oven after installingthe wall oven. See Baking for longer cleaning time. See Adjusting Oven Temperature. Excessive spillovers in the self-cleaning area, but do not cut into...

Product Specifications Sheet (English)
Page 2
... Element (BTU) 2.7 1 2 Racks Regular 18,000 A D Spacer Lower Broiler Features Capacity (Cu. Refer to change. Single Wall Ovens FGB24T3E C / S / B 24" Gas Features Oven Control / Timing System Ready-Select™ Windows Large Exterior Door Finish Real Stainless Steel (C), Color-Coordinated (S/B) Handle Design Oven Cleaning System Oven Controls Bake / Broil Double Gas Wall Ovens Black (C), Color-Coordinated. (S/B) Manual Clean Frigidaire Baseline Yes / Variable (Hi -
... Element (BTU) 2.7 1 2 Racks Regular 18,000 A D Spacer Lower Broiler Features Capacity (Cu. Refer to change. Single Wall Ovens FGB24T3E C / S / B 24" Gas Features Oven Control / Timing System Ready-Select™ Windows Large Exterior Door Finish Real Stainless Steel (C), Color-Coordinated (S/B) Handle Design Oven Cleaning System Oven Controls Bake / Broil Double Gas Wall Ovens Black (C), Color-Coordinated. (S/B) Manual Clean Frigidaire Baseline Yes / Variable (Hi -


