Installation Instructions (All Languages)
Page 1
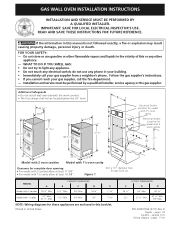
... level. P/N 318201554 (0711) Rev. IMPORTANT: SAVE FOR LOCAL ELECTRICAL INSPECTOR'S USE. pages 1-8 Español - GAS WALL OVEN INSTALLATION INSTRUCTIONS INSTALLATION AND SERVICE MUST BE PERFORMED BY A QUALIFIED INSTALLER. pages 17-20 READ AND SAVE THESE INSTRUCTIONS FOR ...performed by a qualified installer, service agency or the gas supplier. Printed in this booklet. Figure 1 Drill a 1½" diameter hole for gas hook up CABINET DIMENSIONS MODEL A B C D E Model with 2 cavities 19 ½" Min. 2 ½" Min. 24" Min. 16 ¾" 7 1/8" Model with...
... level. P/N 318201554 (0711) Rev. IMPORTANT: SAVE FOR LOCAL ELECTRICAL INSPECTOR'S USE. pages 1-8 Español - GAS WALL OVEN INSTALLATION INSTRUCTIONS INSTALLATION AND SERVICE MUST BE PERFORMED BY A QUALIFIED INSTALLER. pages 17-20 READ AND SAVE THESE INSTRUCTIONS FOR ...performed by a qualified installer, service agency or the gas supplier. Printed in this booklet. Figure 1 Drill a 1½" diameter hole for gas hook up CABINET DIMENSIONS MODEL A B C D E Model with 2 cavities 19 ½" Min. 2 ½" Min. 24" Min. 16 ¾" 7 1/8" Model with...

Installation Instructions (All Languages)
Page 2
GAS WALL OVEN INSTALLATION INSTRUCTIONS Important Notes to brick. Read all packing materials are certain safety precautions you should the packing material ignite. • Do not leave children alone in the kitchen when the appliance is installed and grounded properly by a qualified installer or service technician. • These wall ovens... Federal Standard for Mobile Home Construction and Safety, Title 24, HUD, (Part 280)] or when such standard is not designed to reach these appliances must conform with the National Fuel Gas Code ANSI Z223.1-latest edition. latest edition, or with...
GAS WALL OVEN INSTALLATION INSTRUCTIONS Important Notes to brick. Read all packing materials are certain safety precautions you should the packing material ignite. • Do not leave children alone in the kitchen when the appliance is installed and grounded properly by a qualified installer or service technician. • These wall ovens... Federal Standard for Mobile Home Construction and Safety, Title 24, HUD, (Part 280)] or when such standard is not designed to reach these appliances must conform with the National Fuel Gas Code ANSI Z223.1-latest edition. latest edition, or with...
Installation Instructions (All Languages)
Page 3
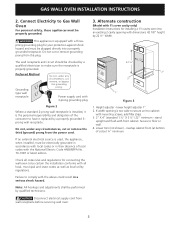
... by a qualified electrician to make sure the receptacle is too wide to secure unit to have it replaced by a properly grounded 3prong wall receptacle. lower height adjuster 1". 2. Secure to Gas Wall Oven For personal safety, these appliances must be properly grounded. If an external electrical source is the personal responsibility and obligation of the...
... by a qualified electrician to make sure the receptacle is too wide to secure unit to have it replaced by a properly grounded 3prong wall receptacle. lower height adjuster 1". 2. Secure to Gas Wall Oven For personal safety, these appliances must be properly grounded. If an external electrical source is the personal responsibility and obligation of the...
Installation Instructions (All Languages)
Page 4
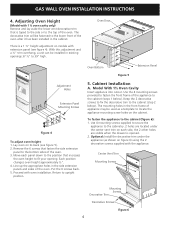
... ½". 4. Put the 6 screws back. 5. Use 4 mounting screws supplied to secure the appliance to the bottom sides of the oven after it has been installed in existing openings 37 ½" to the cabinet (step 2 below ). Remove the 6 screws that is ... the appliance to upright position. Center Vent Trim Mounting Screws Mounting Screws Decorative Trim Decorative Screws Figure 6 4 GAS WALL OVEN INSTALLATION INSTRUCTIONS 4. Adjusting Oven Height (Model with 1 ½ oven cavity only) Remove and lay aside the lower vent decorative trim that fasten the side extension panel to the ...
... ½". 4. Put the 6 screws back. 5. Use 4 mounting screws supplied to secure the appliance to the bottom sides of the oven after it has been installed in existing openings 37 ½" to the cabinet (step 2 below ). Remove the 6 screws that is ... the appliance to upright position. Center Vent Trim Mounting Screws Mounting Screws Decorative Trim Decorative Screws Figure 6 4 GAS WALL OVEN INSTALLATION INSTRUCTIONS 4. Adjusting Oven Height (Model with 1 ½ oven cavity only) Remove and lay aside the lower vent decorative trim that fasten the side extension panel to the ...

Installation Instructions (All Languages)
Page 5
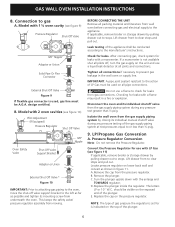
... surfaces as stated on LP gas at 10" of installation. 5 A manual shut-off valve must be installed on type of venting, if marked vented, see specification sheet), use the following instructions for proper installation of the wall oven unit and must be necessary ...kPa) greater than the regulator manifold pressure setting. Figure 8 7. If the regulator is required or preferred. Provide an Adequate Gas Supply Important: Read these instructions are designed to drive screw. GAS WALL OVEN INSTALLATION INSTRUCTIONS B. Remove the cap that holes in to operate on natural...
... surfaces as stated on LP gas at 10" of installation. 5 A manual shut-off valve must be installed on type of venting, if marked vented, see specification sheet), use the following instructions for proper installation of the wall oven unit and must be necessary ...kPa) greater than the regulator manifold pressure setting. Figure 8 7. If the regulator is required or preferred. Provide an Adequate Gas Supply Important: Read these instructions are designed to drive screw. GAS WALL OVEN INSTALLATION INSTRUCTIONS B. Remove the cap that holes in to operate on natural...
Installation Instructions (All Languages)
Page 6
.... BEFORE CONNECTING THE UNIT Remove all connections if necessary to the manufacturer's instructions. The letters LP or 10" W.C. NOTE: The type of gas pressure the regulator is set for leaks with the enlarge end TOWARDS regulator. GAS WALL OVEN INSTALLATION INSTRUCTIONS 8. Model with a flame may result in a fire or explosion. Leak testing of the...
.... BEFORE CONNECTING THE UNIT Remove all connections if necessary to the manufacturer's instructions. The letters LP or 10" W.C. NOTE: The type of gas pressure the regulator is set for leaks with the enlarge end TOWARDS regulator. GAS WALL OVEN INSTALLATION INSTRUCTIONS 8. Model with a flame may result in a fire or explosion. Leak testing of the...
Installation Instructions (All Languages)
Page 7
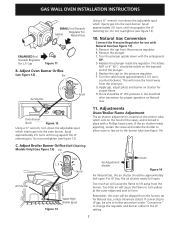
...) Pin L.P. Remove the plunger. C. Replace the plunger inside the regulator. Replace the cap on Natural Gas. 11. There should be approximately half open . Adjustments Oven/Broiler Flame Adjustment The air shutter adjustment is located on the venturi tube, which sets on the hood... much air will be 4" WC pressure in place with a Phillips head screw. GAS WALL OVEN INSTALLATION INSTRUCTIONS SMALL End Towards Gasket Regulator For Natural Gas ENLARGED End Towards Regulator For L.P. Gas Figure 11 B. Adjust Oven Burner Orifice (see figure 13). 10. Do not overtighten (see figure 11) ...
...) Pin L.P. Remove the plunger. C. Replace the plunger inside the regulator. Replace the cap on Natural Gas. 11. There should be approximately half open . Adjustments Oven/Broiler Flame Adjustment The air shutter adjustment is located on the venturi tube, which sets on the hood... much air will be 4" WC pressure in place with a Phillips head screw. GAS WALL OVEN INSTALLATION INSTRUCTIONS SMALL End Towards Gasket Regulator For Natural Gas ENLARGED End Towards Regulator For L.P. Gas Figure 11 B. Adjust Oven Burner Orifice (see figure 13). 10. Do not overtighten (see figure 11) ...
Installation Instructions (All Languages)
Page 8
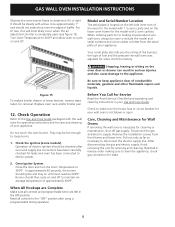
... Service Read the Avoid Service Checklist and operating and cleaning instructions in reverse order making inquires about your appliance. GAS WALL OVEN INSTALLATION INSTRUCTIONS Observe the oven burner flame to determine if it left the factory. It should be sure to include the model and serial ...blue cone approximately 1" and should ignite and stay on and off to electric power. Care, Cleaning and Maintenance for Wall Ovens If removing the wall oven is completely open . Disconnect the gas and electric supply. Pull out only as far as necessary to 300°F. After disconnecting the...
... Service Read the Avoid Service Checklist and operating and cleaning instructions in reverse order making inquires about your appliance. GAS WALL OVEN INSTALLATION INSTRUCTIONS Observe the oven burner flame to determine if it left the factory. It should be sure to include the model and serial ...blue cone approximately 1" and should ignite and stay on and off to electric power. Care, Cleaning and Maintenance for Wall Ovens If removing the wall oven is completely open . Disconnect the gas and electric supply. Pull out only as far as necessary to 300°F. After disconnecting the...
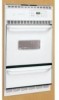
Product Specifications Sheet (English)
Page 2
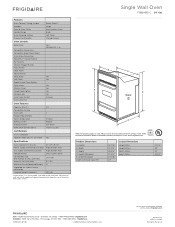
...Height (Min.) Height (Max.) Width (Min.) Depth (Min.) 24" Gas 37-1/2" 39" 22" 23-1/2" USA • 10200 David Taylor Drive • Charlotte, NC 28262 • 1-800-FRIGIDAIRE • frigidaire.com CANADA • 5855 Terry Fox Way • Mississauga, ON...Height B - Always consult local and national electric and gas codes. Single Wall Oven FGB24S5D C Features Oven Control / Timing System Window Exterior Door Finish Handle Design Oven Cleaning System Drawer Functionality Single Gas Wall Ovens Frigidaire Baseline Ready-Select™ Large Real Stainless Steel Black Self...
...Height (Min.) Height (Max.) Width (Min.) Depth (Min.) 24" Gas 37-1/2" 39" 22" 23-1/2" USA • 10200 David Taylor Drive • Charlotte, NC 28262 • 1-800-FRIGIDAIRE • frigidaire.com CANADA • 5855 Terry Fox Way • Mississauga, ON...Height B - Always consult local and national electric and gas codes. Single Wall Oven FGB24S5D C Features Oven Control / Timing System Window Exterior Door Finish Handle Design Oven Cleaning System Drawer Functionality Single Gas Wall Ovens Frigidaire Baseline Ready-Select™ Large Real Stainless Steel Black Self...


