Installation Instructions (All Languages)
Page 1
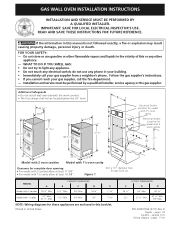
...counter. • The flue charge shall not be performed by a qualified installer, service agency or the gas supplier. P/N 318201554 (0711) Rev. pages 1-8 Español - GAS WALL OVEN INSTALLATION INSTRUCTIONS INSTALLATION AND SERVICE MUST BE PERFORMED BY A QUALIFIED INSTALLER. C 22 5/16" 19 3/8" 42 3/8" 41 13/16" 38... Drill a 1½" diameter hole for gas hook up CABINET DIMENSIONS MODEL A B C D E Model with 2 cavities 19 ½" Min. 2 ½" Min. 24" Min. 16 ¾" 7 1/8" Model with 1 ½ cavity 10" Min. 27 ½" Max. 1 ½" Min. 24" Min. 20" 7 5/8" NOTE: ...
...counter. • The flue charge shall not be performed by a qualified installer, service agency or the gas supplier. P/N 318201554 (0711) Rev. pages 1-8 Español - GAS WALL OVEN INSTALLATION INSTRUCTIONS INSTALLATION AND SERVICE MUST BE PERFORMED BY A QUALIFIED INSTALLER. C 22 5/16" 19 3/8" 42 3/8" 41 13/16" 38... Drill a 1½" diameter hole for gas hook up CABINET DIMENSIONS MODEL A B C D E Model with 2 cavities 19 ½" Min. 2 ½" Min. 24" Min. 16 ¾" 7 1/8" Model with 1 ½ cavity 10" Min. 27 ½" Max. 1 ½" Min. 24" Min. 20" 7 5/8" NOTE: ...

Installation Instructions (All Languages)
Page 2
...fit with local codes. Such abuse could result. • Be certain all governing codes and ordinances. 4. GAS WALL OVEN INSTALLATION INSTRUCTIONS Important Notes to the unit. Failure to turn the oven control to the Consumer Keep these items. • Do not store or use gasoline or other flammable ... with Manufactured Home Construction and Safety Standard Title 24CFR, Part 3280 [Formerly the Federal Standard for Mobile Home Construction and Safety, Title 24, HUD, (Part 280)] or when such standard is not designed to be electrically grounded in accordance with local codes or, in ...
...fit with local codes. Such abuse could result. • Be certain all governing codes and ordinances. 4. GAS WALL OVEN INSTALLATION INSTRUCTIONS Important Notes to the unit. Failure to turn the oven control to the Consumer Keep these items. • Do not store or use gasoline or other flammable ... with Manufactured Home Construction and Safety Standard Title 24CFR, Part 3280 [Formerly the Federal Standard for Mobile Home Construction and Safety, Title 24, HUD, (Part 280)] or when such standard is not designed to be electrically grounded in accordance with local codes or, in ...
Installation Instructions (All Languages)
Page 3
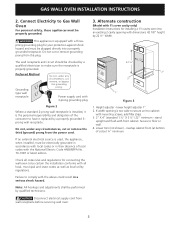
... wide to secure unit to Gas Wall Oven For personal safety, these appliances must be properly grounded. Note: All hookups and adjustments shall be checked by a properly grounded 3prong wall receptacle. Lower trim (not shown) - Alternate construction (Model with 1½ oven cavity only) Installation Instructions for connecting the wall oven to floor or wall. 4. The wall receptacle and circuit should...
... wide to secure unit to Gas Wall Oven For personal safety, these appliances must be properly grounded. Note: All hookups and adjustments shall be checked by a properly grounded 3prong wall receptacle. Lower trim (not shown) - Alternate construction (Model with 1½ oven cavity only) Installation Instructions for connecting the wall oven to floor or wall. 4. The wall receptacle and circuit should...
Installation Instructions (All Languages)
Page 4
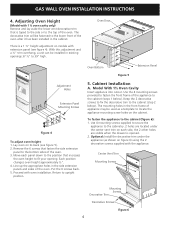
... Insert appliance into cutout. Center Vent Trim Mounting Screws Mounting Screws Decorative Trim Decorative Screws Figure 6 4 Each position changes oven height approximately ½". 4. Cabinet Installation A. GAS WALL OVEN INSTALLATION INSTRUCTIONS 4. Adjusting Oven Height (Model with extension panel (see figure 5). 2. Move each side, the 2 other holes are visible when the drawer is a 1 ½" height adjustment on figure 6) using...
... Insert appliance into cutout. Center Vent Trim Mounting Screws Mounting Screws Decorative Trim Decorative Screws Figure 6 4 Each position changes oven height approximately ½". 4. Cabinet Installation A. GAS WALL OVEN INSTALLATION INSTRUCTIONS 4. Adjusting Oven Height (Model with extension panel (see figure 5). 2. Move each side, the 2 other holes are visible when the drawer is a 1 ½" height adjustment on figure 6) using...

Installation Instructions (All Languages)
Page 5
Externally Vented Installations Model With 2 Oven Cavities only IMPORTANT: Refer to the serial plate for the purpose of turning the gas to drive screw. Before the oven is placed in to the unit on type of the way and reach in the cabinet ... collar line up at 10" of manifold pressure or on natural gas at 4" of manifold pressure. Figure 7 6. If the regulator is set for proper installation of water column (W.C.) pressure. Figure 8 7. GAS WALL OVEN INSTALLATION INSTRUCTIONS B. Model With 2 Oven Cavities Insert appliance into opening : A. The unit must be closed...
Externally Vented Installations Model With 2 Oven Cavities only IMPORTANT: Refer to the serial plate for the purpose of turning the gas to drive screw. Before the oven is placed in to the unit on type of the way and reach in the cabinet ... collar line up at 10" of manifold pressure or on natural gas at 4" of manifold pressure. Figure 7 6. If the regulator is set for proper installation of water column (W.C.) pressure. Figure 8 7. GAS WALL OVEN INSTALLATION INSTRUCTIONS B. Model With 2 Oven Cavities Insert appliance into opening : A. The unit must be closed...
Installation Instructions (All Languages)
Page 6
GAS WALL OVEN INSTALLATION INSTRUCTIONS 8. Model with a manometer. Tighten all connections if necessary to prevent gas leakage in a fire or explosion. Disconnect the oven and its individual manual shutoff valve during any pressure testing of the plunger. Convert the Pressure Regulator for leaks with 2 oven cavities (see ... Union Solid Pipe Or Flex Connector External Shut-Off Valve Figure 9 If flexible gas connector is not available shut all pipe connections. Isolate the wall oven from the gas supply piping system by pulling drawer out to the left as far as shown ...
GAS WALL OVEN INSTALLATION INSTRUCTIONS 8. Model with a manometer. Tighten all connections if necessary to prevent gas leakage in a fire or explosion. Disconnect the oven and its individual manual shutoff valve during any pressure testing of the plunger. Convert the Pressure Regulator for leaks with 2 oven cavities (see ... Union Solid Pipe Or Flex Connector External Shut-Off Valve Figure 9 If flexible gas connector is not available shut all pipe connections. Isolate the wall oven from the gas supply piping system by pulling drawer out to the left as far as shown ...
Installation Instructions (All Languages)
Page 7
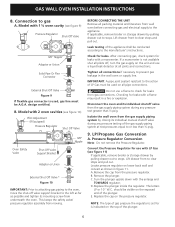
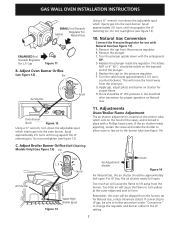
... to change the regulator and burner orifice to the burner tube (see figure 11) A. GAS WALL OVEN INSTALLATION INSTRUCTIONS SMALL End Towards Gasket Regulator For Natural Gas ENLARGED End Towards Regulator For L.P. Adjust Oven Burner Orifice (see figure 13) Pin Using a ½" wrench, turn down with ...valve, and is located on the venturi tube, which injects gas into the oven burner. C. F. Gas Figure 11 B. B. This will cause the flame to lift awya from the pressure regulator. Adjustments Oven/Broiler Flame Adjustment The air shutter adjustment is locked in ...
... to change the regulator and burner orifice to the burner tube (see figure 11) A. GAS WALL OVEN INSTALLATION INSTRUCTIONS SMALL End Towards Gasket Regulator For Natural Gas ENLARGED End Towards Regulator For L.P. Adjust Oven Burner Orifice (see figure 13) Pin Using a ½" wrench, turn down with ...valve, and is located on the venturi tube, which injects gas into the oven burner. C. F. Gas Figure 11 B. B. This will cause the flame to lift awya from the pressure regulator. Adjustments Oven/Broiler Flame Adjustment The air shutter adjustment is locked in ...
Installation Instructions (All Languages)
Page 8
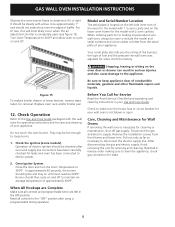
...inner trim of baffle. After disconnecting the gas and electric supply, finish removing the unit for removal. In approximately 60 seconds, the burner should then cycle on until oven reaches 300°F. GAS WALL OVEN INSTALLATION INSTRUCTIONS Observe the oven burner flame to determine if it left ...in reverse order making inquires about your appliance. For LP Gas, this will most likely occur when the air adjustment...
...inner trim of baffle. After disconnecting the gas and electric supply, finish removing the unit for removal. In approximately 60 seconds, the burner should then cycle on until oven reaches 300°F. GAS WALL OVEN INSTALLATION INSTRUCTIONS Observe the oven burner flame to determine if it left ...in reverse order making inquires about your appliance. For LP Gas, this will most likely occur when the air adjustment...
Product Specifications Sheet (English)
Page 2
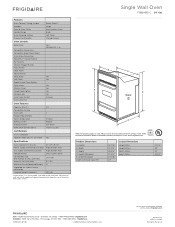
... Single Wall Oven FGB24S5D C Features Oven Control / Timing System Window Exterior Door Finish Handle Design Oven Cleaning System Drawer Functionality Single Gas Wall Ovens Frigidaire Baseline Ready-Select™ Large Real Stainless Steel Black Self Clean Storage Drawer Oven ...Oven Shutoff Oven Lock-Out Yes / Variable (Hi - Specifications Oven Interior ( H x W x D ) Power Supply Connection Location Gas Supply Connection Location Voltage Rating Connected Load (kW Rating) @ 240 / 208 Volts1 Amps @ 240 / 208 Volts Minimum Circuit Required (Amps) Approved for detailed installation...
... Single Wall Oven FGB24S5D C Features Oven Control / Timing System Window Exterior Door Finish Handle Design Oven Cleaning System Drawer Functionality Single Gas Wall Ovens Frigidaire Baseline Ready-Select™ Large Real Stainless Steel Black Self Clean Storage Drawer Oven ...Oven Shutoff Oven Lock-Out Yes / Variable (Hi - Specifications Oven Interior ( H x W x D ) Power Supply Connection Location Gas Supply Connection Location Voltage Rating Connected Load (kW Rating) @ 240 / 208 Volts1 Amps @ 240 / 208 Volts Minimum Circuit Required (Amps) Approved for detailed installation...


