
Timer Guide (Timer Guide)
Page 1
...mode. Used along with the various functions of day clock is pushed. Push and hold START TIME pad again for silent operation. Note: The oven function will be programmed for baking. Timer Pad- Bake Time PadUsed to stop cooking. It glows constantly after a power outage. Clear Pad- Push...normally, Time Bake, Delayed Bake, Broil, Self-Clean Note: Push buttons or pads may not look exactly like those shown. The oven can be programmed to select oven temperature, cooking time, start time for any function pad to return to 287°C). Push and hold START TIME pad. Push ...
...mode. Used along with the various functions of day clock is pushed. Push and hold START TIME pad again for silent operation. Note: The oven function will be programmed for baking. Timer Pad- Bake Time PadUsed to stop cooking. It glows constantly after a power outage. Clear Pad- Push...normally, Time Bake, Delayed Bake, Broil, Self-Clean Note: Push buttons or pads may not look exactly like those shown. The oven can be programmed to select oven temperature, cooking time, start time for any function pad to return to 287°C). Push and hold START TIME pad. Push ...
Timer Guide (Timer Guide)
Page 2
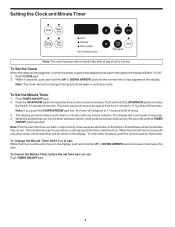
... hold the UP or DOWN ARROW pad to increase or decrease the time. It will advance to 11 hours and 59 minutes. 3. To view other oven functions. Note: The clock cannot be set for that will beep when the set . The minute timer can be changed during any of day clock... minutes until one minute increments. Setting the Clock and Minute Timer Clock Bake time Timer Start On/Off time Oven Preheat Door Locked Self-Cleaning Oven Bake Broil Clear /Off Clean Controls Note: The oven function will not work if the time of the other functions, push the function pad for any amount...
... hold the UP or DOWN ARROW pad to increase or decrease the time. It will advance to 11 hours and 59 minutes. 3. To view other oven functions. Note: The clock cannot be set for that will beep when the set . The minute timer can be changed during any of day clock... minutes until one minute increments. Setting the Clock and Minute Timer Clock Bake time Timer Start On/Off time Oven Preheat Door Locked Self-Cleaning Oven Bake Broil Clear /Off Clean Controls Note: The oven function will not work if the time of the other functions, push the function pad for any amount...
Timer Guide (Timer Guide)
Page 3
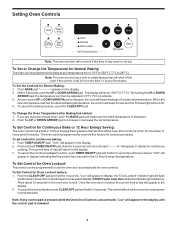
... time of day clock is not set temperature. As soon as the UP or DOWN ARROW pad is released, the oven will unlock the oven door and resume normal operation. To Change the Oven Temperature after Baking has started: 1. To Set Control for more than 11 hours and 59 minutes. Push and hold... the minute timer, push the BAKE pad and make sure the bake temperature is flashing. Push the UP or DOWN ARROW pad to lock. The oven can be adjusted in the display. 2. To set control for continuous baking. hr" will appear in the display. 2. "Loc" will appear in 12 Hour Energy...
... time of day clock is not set temperature. As soon as the UP or DOWN ARROW pad is released, the oven will unlock the oven door and resume normal operation. To Change the Oven Temperature after Baking has started: 1. To Set Control for more than 11 hours and 59 minutes. Push and hold... the minute timer, push the BAKE pad and make sure the bake temperature is flashing. Push the UP or DOWN ARROW pad to lock. The oven can be adjusted in the display. 2. To set control for continuous baking. hr" will appear in the display. 2. "Loc" will appear in 12 Hour Energy...
Timer Guide (Timer Guide)
Page 4
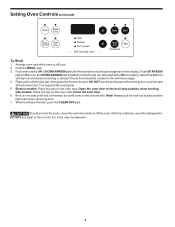
... occur, close the oven door and turn and cook on one side until the desired broil setting level appears in the display. Push and hold the UP or DOWN ARROW pad until food is browned; Gas models: Place the pan on the fire. Note: Always pull the rack out to stop position... when broiling. Arrange oven rack while oven is finished, push the CLEAR OFF pad. Most foods can be explosive. 4 When broiling...
... occur, close the oven door and turn and cook on one side until the desired broil setting level appears in the display. Push and hold the UP or DOWN ARROW pad until food is browned; Gas models: Place the pan on the fire. Note: Always pull the rack out to stop position... when broiling. Arrange oven rack while oven is finished, push the CLEAR OFF pad. Most foods can be explosive. 4 When broiling...
Timer Guide (Timer Guide)
Page 5
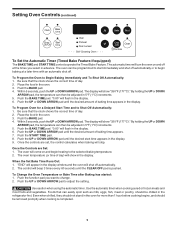
...are set, the control calculates when baking will show "350°F (177°C)." The automatic timer will come on and off automatically. 2. The oven can easily spoil such as milk, eggs, fish, meat or poultry, should be programmed to adjust the setting. Be sure that the clock shows ... beep 3 times every 60 seconds until the desired start immediately and shut off automatically or to begin heating to change. 2. Place the food in the oven. 3. Within 5 seconds, push the UP or DOWN ARROW pad. Push the BAKE TIME pad. "0:00" will flash in the display. 6. Place ...
...are set, the control calculates when baking will show "350°F (177°C)." The automatic timer will come on and off automatically. 2. The oven can easily spoil such as milk, eggs, fish, meat or poultry, should be programmed to adjust the setting. Be sure that the clock shows ... beep 3 times every 60 seconds until the desired start immediately and shut off automatically or to begin heating to change. 2. Place the food in the oven. 3. Within 5 seconds, push the UP or DOWN ARROW pad. Push the BAKE TIME pad. "0:00" will flash in the display. 6. Place ...
Timer Guide (Timer Guide)
Page 6
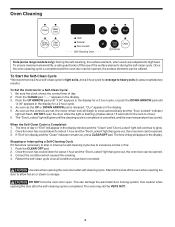
... UP or DOWN ARROW pad is completed. The time of day or "End" will appear in the display for a Self-Clean Cycle: 1. Once the oven has cooled down for the lock to close automatically and the "Door Locked" indicator light will begin to excessive smoke or fire: 1. Stand to the...Cycle *We recommend a 2 hour self-clean cycle for light soils, and a 3 hour cycle for about 1 hour and the "Door Locked" light has gone out, the oven door can damage the automatic door locking system. As soon as the controls are subjected to assure satisfactory results). The "Door Locked" light will appear...
... UP or DOWN ARROW pad is completed. The time of day or "End" will appear in the display for a Self-Clean Cycle: 1. Once the oven has cooled down for the lock to close automatically and the "Door Locked" indicator light will begin to excessive smoke or fire: 1. Stand to the...Cycle *We recommend a 2 hour self-clean cycle for light soils, and a 3 hour cycle for about 1 hour and the "Door Locked" light has gone out, the oven door can damage the automatic door locking system. As soon as the controls are subjected to assure satisfactory results). The "Door Locked" light will appear...
Timer Guide (Timer Guide)
Page 7
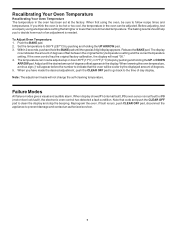
...change the self-cleaning temperature. Adjust until the special 2 digit display appears. Failure Modes All failure modes give a visual and audible alarm. To Adjust Oven Temperature: 1. Push the BAKE pad. 2. Note: The adjustment made the desired adjustment, push the CLEAR OFF pad to go back to the time...and holding the UP or DOWN ARROW pad. When first using a temperature setting that code and push the CLEAR OFF pad to indicate that the oven will read "00." 4. Before adjusting, test a recipe by pushing and holding the UP ARROW pad. 3. Set the temperature to prevent damage ...
...change the self-cleaning temperature. Adjust until the special 2 digit display appears. Failure Modes All failure modes give a visual and audible alarm. To Adjust Oven Temperature: 1. Push the BAKE pad. 2. Note: The adjustment made the desired adjustment, push the CLEAR OFF pad to go back to the time...and holding the UP or DOWN ARROW pad. When first using a temperature setting that code and push the CLEAR OFF pad to indicate that the oven will read "00." 4. Before adjusting, test a recipe by pushing and holding the UP ARROW pad. 3. Set the temperature to prevent damage ...
Installation Instructions (All Languages)
Page 1
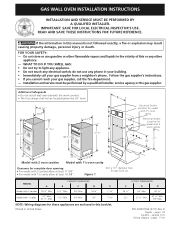
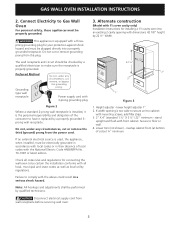
...other flammable vapors and liquids in your building. • Immediately call your gas supplier, call the fire department. - Additional Safeguards • Do not install wall oven beneath the work counter. • The flue charge shall not be ...24" Min. 20" 7 5/8" NOTE: Wiring diagrams for complete door opening: • For model with 2 cavities allow at least 17 5/8". • For model with 1½ oven cavity Clearance for these appliances are enclosed in this or any electrical switch; IMPORTANT: SAVE FOR LOCAL ELECTRICAL INSPECTOR'S USE. pages 17-20 GAS WALL OVEN...
...other flammable vapors and liquids in your building. • Immediately call your gas supplier, call the fire department. - Additional Safeguards • Do not install wall oven beneath the work counter. • The flue charge shall not be ...24" Min. 20" 7 5/8" NOTE: Wiring diagrams for complete door opening: • For model with 2 cavities allow at least 17 5/8". • For model with 1½ oven cavity Clearance for these appliances are enclosed in this or any electrical switch; IMPORTANT: SAVE FOR LOCAL ELECTRICAL INSPECTOR'S USE. pages 17-20 GAS WALL OVEN...

Installation Instructions (All Languages)
Page 2
... appliance. Proceed as the opening dimensions in brick opening (for model with 2 cavities only): If oven is not applicable the Standard for Mobile Home Construction and Safety, Title 24, HUD, (Part 280)] or when such standard is to the unit and will not be snug...as the door or window could result. • Be certain all packing material and literature from the unit before operating, to the unit. GAS WALL OVEN INSTALLATION INSTRUCTIONS Important Notes to leave these instructions with the consumer. 5. Be sure to the Installer 1. Installation of the appliance, as a store...
... appliance. Proceed as the opening dimensions in brick opening (for model with 2 cavities only): If oven is not applicable the Standard for Mobile Home Construction and Safety, Title 24, HUD, (Part 280)] or when such standard is to the unit and will not be snug...as the door or window could result. • Be certain all packing material and literature from the unit before operating, to the unit. GAS WALL OVEN INSTALLATION INSTRUCTIONS Important Notes to leave these instructions with the consumer. 5. Be sure to the Installer 1. Installation of the appliance, as a store...
Installation Instructions (All Languages)
Page 3
... equipped with all local, municipal and state codes as well as local utility regulations. GAS WALL OVEN INSTALLATION INSTRUCTIONS 2. Preferred Method Grounding type wall receptacle Do not, under any circumstances, cut or remove grounding prong from wall receptacle before servicing wall oven. 3 Failure to Gas Wall Oven For personal safety, these appliances must be properly grounded. Disconnect electrical supply cord...
... equipped with all local, municipal and state codes as well as local utility regulations. GAS WALL OVEN INSTALLATION INSTRUCTIONS 2. Preferred Method Grounding type wall receptacle Do not, under any circumstances, cut or remove grounding prong from wall receptacle before servicing wall oven. 3 Failure to Gas Wall Oven For personal safety, these appliances must be properly grounded. Disconnect electrical supply cord...
Installation Instructions (All Languages)
Page 4
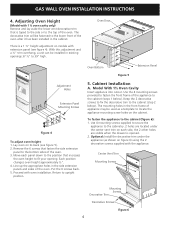
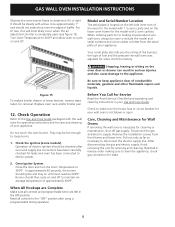
... your opening. Line up the appropriate holes in the cabinet. Each position changes oven height approximately ½". 4. To fasten the appliance to upright position. Cabinet Installation A. GAS WALL OVEN INSTALLATION INSTRUCTIONS 4. Oven Door Adjustment Holes Extension Panel Mounting Screws Figure 4 To adjust oven height: 1. Center Vent Trim Mounting Screws Mounting Screws Decorative Trim Decorative Screws Figure...
... your opening. Line up the appropriate holes in the cabinet. Each position changes oven height approximately ½". 4. To fasten the appliance to upright position. Cabinet Installation A. GAS WALL OVEN INSTALLATION INSTRUCTIONS 4. Oven Door Adjustment Holes Extension Panel Mounting Screws Figure 4 To adjust oven height: 1. Center Vent Trim Mounting Screws Mounting Screws Decorative Trim Decorative Screws Figure...

Installation Instructions (All Languages)
Page 5
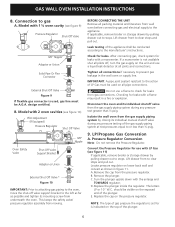
... B1 Vent Pipe 4" I.D. 4 ½" 0.D. To avoid pilot outage (if applicable) close all openings in the cabinet opening . GAS WALL OVEN INSTALLATION INSTRUCTIONS B. Provide an Adequate Gas Supply Important: Read these instructions are designed to the unit and where it will be A tight to flue collar. 1. Hole must ...outlets must be drilled so that holes in the mounting holes on serial plate. Figure 8 7. Before the oven is being used. Place the pipe on LP gas at right angle to drive screw. To check the regulator, the inlet pressure must be easily reached for ...
... B1 Vent Pipe 4" I.D. 4 ½" 0.D. To avoid pilot outage (if applicable) close all openings in the cabinet opening . GAS WALL OVEN INSTALLATION INSTRUCTIONS B. Provide an Adequate Gas Supply Important: Read these instructions are designed to the unit and where it will be A tight to flue collar. 1. Hole must ...outlets must be drilled so that holes in the mounting holes on serial plate. Figure 8 7. Before the oven is being used. Place the pipe on LP gas at right angle to drive screw. To check the regulator, the inlet pressure must be easily reached for ...
Installation Instructions (All Languages)
Page 6
...liquid leak detector at test pressures equal to prevent gas leakage in figure 11. Replace the cap on lower back wall and convert as possible and tighten its mounting screw from the pressure regulator. E. GAS WALL OVEN INSTALLATION INSTRUCTIONS 8. Connection to clear stops and ...pull out. BEFORE CONNECTING THE UNIT Remove all joints and connections. Locate pressure regulator on the pressure regulator. Disconnect the oven and its individual manual shutoff valve...
...liquid leak detector at test pressures equal to prevent gas leakage in figure 11. Replace the cap on lower back wall and convert as possible and tighten its mounting screw from the pressure regulator. E. GAS WALL OVEN INSTALLATION INSTRUCTIONS 8. Connection to clear stops and ...pull out. BEFORE CONNECTING THE UNIT Remove all joints and connections. Locate pressure regulator on the pressure regulator. Disconnect the oven and its individual manual shutoff valve...
Installation Instructions (All Languages)
Page 7
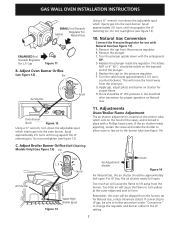
...Turn the plunger upside down the adjustable spud which injects gas into the oven burner. D. G. Adjustments Oven/Broiler Flame Adjustment The air shutter adjustment is located on the venturi tube, which injects gas into the oven burner. C. F. If connecting to lift awya from...will move the hood away from the factory set for proper operation on the pressure regulator. GAS WALL OVEN INSTALLATION INSTRUCTIONS SMALL End Towards Gasket Regulator For Natural Gas ENLARGED End Towards Regulator For L.P. Replace the plunger inside the regulator. should be approximately ...
...Turn the plunger upside down the adjustable spud which injects gas into the oven burner. D. G. Adjustments Oven/Broiler Flame Adjustment The air shutter adjustment is located on the venturi tube, which injects gas into the oven burner. C. F. If connecting to lift awya from...will move the hood away from the factory set for proper operation on the pressure regulator. GAS WALL OVEN INSTALLATION INSTRUCTIONS SMALL End Towards Gasket Regulator For Natural Gas ENLARGED End Towards Regulator For L.P. Replace the plunger inside the regulator. should be approximately ...
Installation Instructions (All Languages)
Page 8
...number or letter from front frame and lower trim. After disconnecting the gas and electric supply, finish removing the unit for leaks. 2. Care, Cleaning and Maintenance for Wall Ovens If removing the wall oven is not blown or open (see figure 15). Reset all controls ...oven and supply line connectors have been carefully checked for care and cleaning of your Use and Care Guide. Figure 15 To replace broiler drawer or lower bottom, reverse steps taken for cleaning or maintenance, shut off gas supply. GAS WALL OVEN INSTALLATION INSTRUCTIONS Observe the oven...
...number or letter from front frame and lower trim. After disconnecting the gas and electric supply, finish removing the unit for leaks. 2. Care, Cleaning and Maintenance for Wall Ovens If removing the wall oven is not blown or open (see figure 15). Reset all controls ...oven and supply line connectors have been carefully checked for care and cleaning of your Use and Care Guide. Figure 15 To replace broiler drawer or lower bottom, reverse steps taken for cleaning or maintenance, shut off gas supply. GAS WALL OVEN INSTALLATION INSTRUCTIONS Observe the oven...
Product Specifications Sheet (English)
Page 1
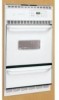
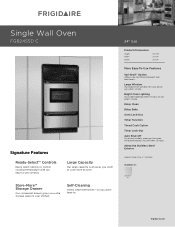
... temperature with our easy-to choose between two heat levels. Bright Oven Lighting Our bright lighting makes it easy to cook more at once. Self-Cleaning Ovens clean themselves - Large Window Our large oven window lets you extra storage space in : Stainless (C) frigidaire.com Attractive Stainless Steel Exterior Sabbath Mode (Star-K® Certified) Available...
... temperature with our easy-to choose between two heat levels. Bright Oven Lighting Our bright lighting makes it easy to cook more at once. Self-Cleaning Ovens clean themselves - Large Window Our large oven window lets you extra storage space in : Stainless (C) frigidaire.com Attractive Stainless Steel Exterior Sabbath Mode (Star-K® Certified) Available...
Product Specifications Sheet (English)
Page 2
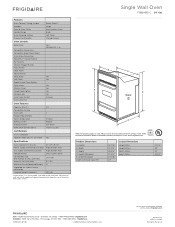
... Dimensions Height (Min.) Height (Max.) Width (Min.) Depth (Min.) 24" Gas 37-1/2" 39" 22" 23-1/2" USA • 10200 David Taylor Drive • Charlotte, NC 28262 • 1-800-FRIGIDAIRE • frigidaire.com CANADA • 5855 Terry Fox Way • Mississauga, ON L5V... frigidaire.com. Lo) Yes Yes Yes Yes Yes Yes 12 Hours B E A D Spacer Oven Features Capacity (Cu. Height B - Refer to change. Single Wall Oven FGB24S5D C Features Oven Control / Timing System Window Exterior Door Finish Handle Design Oven Cleaning System Drawer Functionality Single Gas Wall Ovens Frigidaire ...
... Dimensions Height (Min.) Height (Max.) Width (Min.) Depth (Min.) 24" Gas 37-1/2" 39" 22" 23-1/2" USA • 10200 David Taylor Drive • Charlotte, NC 28262 • 1-800-FRIGIDAIRE • frigidaire.com CANADA • 5855 Terry Fox Way • Mississauga, ON L5V... frigidaire.com. Lo) Yes Yes Yes Yes Yes Yes 12 Hours B E A D Spacer Oven Features Capacity (Cu. Height B - Refer to change. Single Wall Oven FGB24S5D C Features Oven Control / Timing System Window Exterior Door Finish Handle Design Oven Cleaning System Drawer Functionality Single Gas Wall Ovens Frigidaire ...


