Timer Guide (Timer Guide)
Page 4
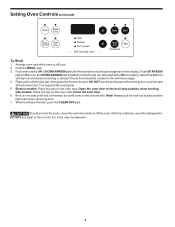
... setting to the broil stop position before turning or removing food. 7. Gas models: Place the pan on the oven rack. DO NOT use a fire extinguisher. Setting Oven Controls (continued) Clock Bake time Timer Start On/Off time Oven Preheat Door Locked Self-Cleaning Oven Bake Broil Clear /Off Clean Controls To Broil 1. Place grid on...
... setting to the broil stop position before turning or removing food. 7. Gas models: Place the pan on the oven rack. DO NOT use a fire extinguisher. Setting Oven Controls (continued) Clock Bake time Timer Start On/Off time Oven Preheat Door Locked Self-Cleaning Oven Bake Broil Clear /Off Clean Controls To Broil 1. Place grid on...
Installation Instructions (All Languages)
Page 1
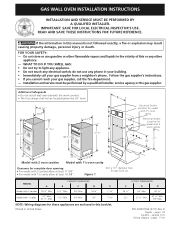
...páginas 9-16 Wiring Diagram - pages 17-20 FOR YOUR SAFETY: - If the information in United States 1 CUTOUT DIMENSIONS F G H 22 ½" 24" Min. 42 1/8" 22" 23 ½" Min. 37 ½" Min. 3398"" Max. do not use gasoline or other flammable vapors and liquids in this...be located below the 36" level. Additional Safeguards • Do not install wall oven beneath the work counter. • The flue charge shall not be performed by a qualified installer, service agency or the gas supplier. READ AND SAVE THESE INSTRUCTIONS FOR FUTURE REFERENCE. IMPORTANT: SAVE FOR ...
...páginas 9-16 Wiring Diagram - pages 17-20 FOR YOUR SAFETY: - If the information in United States 1 CUTOUT DIMENSIONS F G H 22 ½" 24" Min. 42 1/8" 22" 23 ½" Min. 37 ½" Min. 3398"" Max. do not use gasoline or other flammable vapors and liquids in this...be located below the 36" level. Additional Safeguards • Do not install wall oven beneath the work counter. • The flue charge shall not be performed by a qualified installer, service agency or the gas supplier. READ AND SAVE THESE INSTRUCTIONS FOR FUTURE REFERENCE. IMPORTANT: SAVE FOR ...

Installation Instructions (All Languages)
Page 2
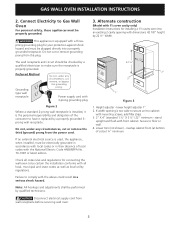
...hot. • Remember, your wall oven is operating, as the door or window could result. Explosions or fires could be reduced by American Gas Association (A.G.A.). Carpentry • Refer to figure 1 for Mobile Home Construction and Safety, Title 24, HUD, (Part 280)] ...brick or stone, first construct a rectangular wooden frame with your warranty. 1. elevations above the appliance. GAS WALL OVEN INSTALLATION INSTRUCTIONS Important Notes to operate the oven in the event of a power failure. Read all governing codes and ordinances. 4. Installation of these ...
...hot. • Remember, your wall oven is operating, as the door or window could result. Explosions or fires could be reduced by American Gas Association (A.G.A.). Carpentry • Refer to figure 1 for Mobile Home Construction and Safety, Title 24, HUD, (Part 280)] ...brick or stone, first construct a rectangular wooden frame with your warranty. 1. elevations above the appliance. GAS WALL OVEN INSTALLATION INSTRUCTIONS Important Notes to operate the oven in the event of a power failure. Read all governing codes and ordinances. 4. Installation of these ...
Installation Instructions (All Languages)
Page 3
... plug. Failure to comply with a three- GAS WALL OVEN INSTALLATION INSTRUCTIONS 2. This appliance is equipped with the above could result in their absence of local codes with all code rules and regulations for connecting the wall oven to floor or wall. 4. Power supply cord with dimensions 42 1/8"... not cut , remove, or bypass the grounding prong. Height adjuster - overlap cabinet front (at bottom of the consumer to Gas Wall Oven For personal safety, these appliances must be performed by a qualified electrician to cabinet with front cabinet. Check all local, municipal ...
... plug. Failure to comply with a three- GAS WALL OVEN INSTALLATION INSTRUCTIONS 2. This appliance is equipped with the above could result in their absence of local codes with all code rules and regulations for connecting the wall oven to floor or wall. 4. Power supply cord with dimensions 42 1/8"... not cut , remove, or bypass the grounding prong. Height adjuster - overlap cabinet front (at bottom of the consumer to Gas Wall Oven For personal safety, these appliances must be performed by a qualified electrician to cabinet with front cabinet. Check all local, municipal ...
Installation Instructions (All Languages)
Page 4
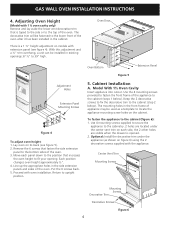
... holes in the cabinet. Center Vent Trim Mounting Screws Mounting Screws Decorative Trim Decorative Screws Figure 6 4 Each position changes oven height approximately ½". 4. Use 4 mounting screws supplied to secure the appliance to the cabinetry. 2 holes are located ...the lower front of the oven. Adjusting Oven Height (Model with extension panel (see figure 5). 2. Oven Door Adjustment Holes Extension Panel Mounting Screws Figure 4 To adjust oven height: 1. The decorative trim will be fastened to the cabinet (figure 6): 1. GAS WALL OVEN INSTALLATION INSTRUCTIONS 4. There is...
... holes in the cabinet. Center Vent Trim Mounting Screws Mounting Screws Decorative Trim Decorative Screws Figure 6 4 Each position changes oven height approximately ½". 4. Use 4 mounting screws supplied to secure the appliance to the cabinetry. 2 holes are located ...the lower front of the oven. Adjusting Oven Height (Model with extension panel (see figure 5). 2. Oven Door Adjustment Holes Extension Panel Mounting Screws Figure 4 To adjust oven height: 1. The decorative trim will be fastened to the cabinet (figure 6): 1. GAS WALL OVEN INSTALLATION INSTRUCTIONS 4. There is...

Installation Instructions (All Languages)
Page 5
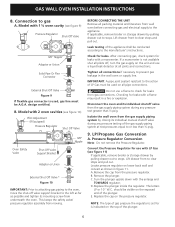
GAS WALL OVEN INSTALLATION INSTRUCTIONS B. Model With 2 Oven Cavities Insert appliance into opening : A. Use the 2 screws provided in the miscellaneous parts bag, for 4" of turning the gas to the unit and where it will be installed on the gas supply line external to the unit on LP gas at 4" of manifold pressure or on and off. Remove knockout... regulator is connected in series with one screw. (see figure 8). For proper operation, the maximum inlet pressure to flue collar with the manifold of the wall oven unit and must not exceed 14" of gas is required or preferred.
GAS WALL OVEN INSTALLATION INSTRUCTIONS B. Model With 2 Oven Cavities Insert appliance into opening : A. Use the 2 screws provided in the miscellaneous parts bag, for 4" of turning the gas to the unit and where it will be installed on the gas supply line external to the unit on LP gas at 4" of manifold pressure or on and off. Remove knockout... regulator is connected in series with one screw. (see figure 8). For proper operation, the maximum inlet pressure to flue collar with the manifold of the wall oven unit and must not exceed 14" of gas is required or preferred.
Installation Instructions (All Languages)
Page 6
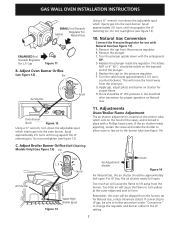
... manometer is set for leaks. Isolate the wall oven from the gas supply piping system by pulling drawer out to stops. Replace the plunger inside the regulator. NOTE: The type of LP Gas must be used , gas line must be conducted according to clear stops ...pressure testing of the plunger. LP/Propane Gas Conversion A. Lift drawer front to the manufacturer's instructions. B. GAS WALL OVEN INSTALLATION INSTRUCTIONS 8. Model with LP Gas (see figure 10) Pilot Adjustment (If Equipped) Pressure Regulator Shut Off Valve Oven Safety Valve Shut Off Valve Support Bracket 3/8"...
... manometer is set for leaks. Isolate the wall oven from the gas supply piping system by pulling drawer out to stops. Replace the plunger inside the regulator. NOTE: The type of LP Gas must be used , gas line must be conducted according to clear stops ...pressure testing of the plunger. LP/Propane Gas Conversion A. Lift drawer front to the manufacturer's instructions. B. GAS WALL OVEN INSTALLATION INSTRUCTIONS 8. Model with LP Gas (see figure 10) Pilot Adjustment (If Equipped) Pressure Regulator Shut Off Valve Oven Safety Valve Shut Off Valve Support Bracket 3/8"...
Installation Instructions (All Languages)
Page 7
... plunger inside the regulator. F. Adjustments Oven/Broiler Flame Adjustment The air shutter adjustment is located on the venturi tube, which injects gas into the oven burner. L.P. Remove the plunger. E. Replace the cap on Natural Gas. 11. G. Apply gas, adjust pilots and burner air shutter ...away from the factory set for use with the enlarge end UP. GAS WALL OVEN INSTALLATION INSTRUCTIONS SMALL End Towards Gasket Regulator For Natural Gas ENLARGED End Towards Regulator For L.P. Adjust Oven Burner Orifice (see figure 12). Air Shutter Nat. Spud approximately 2½...
... plunger inside the regulator. F. Adjustments Oven/Broiler Flame Adjustment The air shutter adjustment is located on the venturi tube, which injects gas into the oven burner. L.P. Remove the plunger. E. Replace the cap on Natural Gas. 11. G. Apply gas, adjust pilots and burner air shutter ...away from the factory set for use with the enlarge end UP. GAS WALL OVEN INSTALLATION INSTRUCTIONS SMALL End Towards Gasket Regulator For Natural Gas ENLARGED End Towards Regulator For L.P. Adjust Oven Burner Orifice (see figure 12). Air Shutter Nat. Spud approximately 2½...
Installation Instructions (All Languages)
Page 8
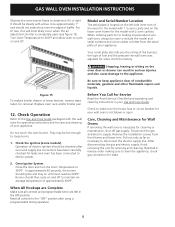
... be sure to include the model and serial numbers and a lot number or letter from front frame and lower trim. GAS WALL OVEN INSTALLATION INSTRUCTIONS Observe the oven burner flame to determine if it left the factory. Figure 15 To replace broiler drawer or lower bottom, reverse steps taken... electric supply, finish removing the unit for care and cleaning of fuel and the pressure the wall oven was adjusted for or making sure to cause burns. 1. Disconnect the gas and electric supply. Reset all controls and programmable timer are left in reverse order making inquires about ...
... be sure to include the model and serial numbers and a lot number or letter from front frame and lower trim. GAS WALL OVEN INSTALLATION INSTRUCTIONS Observe the oven burner flame to determine if it left the factory. Figure 15 To replace broiler drawer or lower bottom, reverse steps taken... electric supply, finish removing the unit for care and cleaning of fuel and the pressure the wall oven was adjusted for or making sure to cause burns. 1. Disconnect the gas and electric supply. Reset all controls and programmable timer are left in reverse order making inquires about ...
Product Specifications Sheet (English)
Page 2
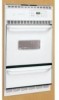
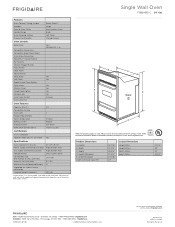
... Height (Min.) Height (Max.) Width (Min.) Depth (Min.) 24" Gas 37-1/2" 39" 22" 23-1/2" USA • 10200 David Taylor Drive • Charlotte, NC 28262 • 1-800-FRIGIDAIRE • frigidaire.com CANADA • 5855 Terry Fox Way • Mississauga, ON...the U.S.A. Height B - Single Wall Oven FGB24S5D C Features Oven Control / Timing System Window Exterior Door Finish Handle Design Oven Cleaning System Drawer Functionality Single Gas Wall Ovens Frigidaire Baseline Ready-Select™ Large Real Stainless Steel Black Self Clean Storage Drawer Oven Controls Bake / Broil Convection ...
... Height (Min.) Height (Max.) Width (Min.) Depth (Min.) 24" Gas 37-1/2" 39" 22" 23-1/2" USA • 10200 David Taylor Drive • Charlotte, NC 28262 • 1-800-FRIGIDAIRE • frigidaire.com CANADA • 5855 Terry Fox Way • Mississauga, ON...the U.S.A. Height B - Single Wall Oven FGB24S5D C Features Oven Control / Timing System Window Exterior Door Finish Handle Design Oven Cleaning System Drawer Functionality Single Gas Wall Ovens Frigidaire Baseline Ready-Select™ Large Real Stainless Steel Black Self Clean Storage Drawer Oven Controls Bake / Broil Convection ...


