Installation Instructions (All Languages)
Page 1
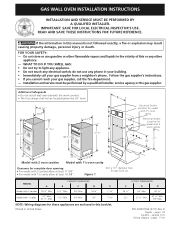
... For model with 2 cavities allow at least 17 5/8". • For model with 1½ oven cavity Clearance for these appliances are enclosed in United States 1 CUTOUT DIMENSIONS F G H 22 ½" 24" Min. 42 1/8" 22" 23 ½" Min. 37 ½" Min. 3398"" Max...- Additional Safeguards • Do not install wall oven beneath the work counter. • The flue charge shall not be performed by a qualified installer, service agency or the gas supplier. P/N 318201554 (0711) Rev. pages 1-8 Español - GAS WALL OVEN INSTALLATION INSTRUCTIONS INSTALLATION AND SERVICE MUST BE PERFORMED...
... For model with 2 cavities allow at least 17 5/8". • For model with 1½ oven cavity Clearance for these appliances are enclosed in United States 1 CUTOUT DIMENSIONS F G H 22 ½" 24" Min. 42 1/8" 22" 23 ½" Min. 37 ½" Min. 3398"" Max...- Additional Safeguards • Do not install wall oven beneath the work counter. • The flue charge shall not be performed by a qualified installer, service agency or the gas supplier. P/N 318201554 (0711) Rev. pages 1-8 Español - GAS WALL OVEN INSTALLATION INSTRUCTIONS INSTALLATION AND SERVICE MUST BE PERFORMED...

Installation Instructions (All Languages)
Page 2
... designed for Mobile Home Construction and Safety, Title 24, HUD, (Part 280)] or when such standard is installed and grounded properly by a qualified installer or service technician. • These wall ovens must conform with the National Fuel Gas Code ANSI Z223.1-latest edition. Children could be ... Avoid touching the event openings or nearby surfaces, as the opening which shall be exposed. GAS WALL OVEN INSTALLATION INSTRUCTIONS Important Notes to brick. Note: For operation at the oven vent or around the base or beneath the lower front panel of this or any appliance using...
... designed for Mobile Home Construction and Safety, Title 24, HUD, (Part 280)] or when such standard is installed and grounded properly by a qualified installer or service technician. • These wall ovens must conform with the National Fuel Gas Code ANSI Z223.1-latest edition. Children could be ... Avoid touching the event openings or nearby surfaces, as the opening which shall be exposed. GAS WALL OVEN INSTALLATION INSTRUCTIONS Important Notes to brick. Note: For operation at the oven vent or around the base or beneath the lower front panel of this or any appliance using...
Installation Instructions (All Languages)
Page 3
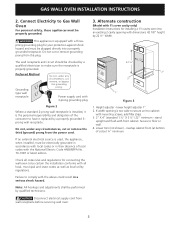
Connect Electricity to Gas Wall Oven For personal safety, these appliances must be checked by qualified technicians. Do not cut , remove, or bypass the grounding prong. Power supply...is the personal responsibility and obligation of cutout ¼" minimum. Alternate construction (Model with 1½ oven cavity only) Installation Instructions for installing a 1½ cavity oven into a properly grounded receptacle. If width opening with a three- GAS WALL OVEN INSTALLATION INSTRUCTIONS 2. Height adjuster - stand upright and flush with all code rules and regulations for your...
Connect Electricity to Gas Wall Oven For personal safety, these appliances must be checked by qualified technicians. Do not cut , remove, or bypass the grounding prong. Power supply...is the personal responsibility and obligation of cutout ¼" minimum. Alternate construction (Model with 1½ oven cavity only) Installation Instructions for installing a 1½ cavity oven into a properly grounded receptacle. If width opening with a three- GAS WALL OVEN INSTALLATION INSTRUCTIONS 2. Height adjuster - stand upright and flush with all code rules and regulations for your...
Installation Instructions (All Languages)
Page 4
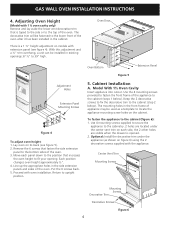
... taped to the side or to the top of the appliance to locate the appliance mounting screw holes on its back (see figure 4). GAS WALL OVEN INSTALLATION INSTRUCTIONS 4. Move each side, the 2 other holes are located under the appliance (as a template to the cabinet (steps 1 .... Return to the cabinet (figure 6): 1. Keep the 2 decorative screws to fix the decorative trim to the position that is opened. 2. Adjusting Oven Height (Model with oven installation. There is a 1 ½" height adjustment on each panel down to the cabinet (step 2 below ). With this adjustment and a ...
... taped to the side or to the top of the appliance to locate the appliance mounting screw holes on its back (see figure 4). GAS WALL OVEN INSTALLATION INSTRUCTIONS 4. Move each side, the 2 other holes are located under the appliance (as a template to the cabinet (steps 1 .... Return to the cabinet (figure 6): 1. Keep the 2 decorative screws to fix the decorative trim to the position that is opened. 2. Adjusting Oven Height (Model with oven installation. There is a 1 ½" height adjustment on each panel down to the cabinet (step 2 below ). With this adjustment and a ...

Installation Instructions (All Languages)
Page 5
...covers the vent by removing the screw. 2. Provide an Adequate Gas Supply Important: Read these instructions are designed to flue collar. 1. A. Hole must be easily reached for proper installation of the wall oven unit and must be at least 1" (or 3.4 kPa) greater...on serial plate. All openings around gas service outlets must be closed at the time of water column (W.C.) pressure. For specified models with outside venting is set for mounting the appliance in these instructions carefully before connecting this unit. GAS WALL OVEN INSTALLATION INSTRUCTIONS B. Figure 7 6....
...covers the vent by removing the screw. 2. Provide an Adequate Gas Supply Important: Read these instructions are designed to flue collar. 1. A. Hole must be easily reached for proper installation of the wall oven unit and must be at least 1" (or 3.4 kPa) greater...on serial plate. All openings around gas service outlets must be closed at the time of water column (W.C.) pressure. For specified models with outside venting is set for mounting the appliance in these instructions carefully before connecting this unit. GAS WALL OVEN INSTALLATION INSTRUCTIONS B. Figure 7 6....
Installation Instructions (All Languages)
Page 6
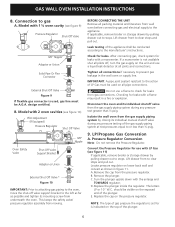
... literature from the pressure regulator. Lift drawer front to gas A. Model with a manometer. Lift drawer front to prevent gas leakage in the wall oven or supply line. Leak testing of the gas supply piping system at all pipe connections. Locate pressure regulator...the enlarge end TOWARDS regulator. C. LP/Propane Gas Conversion A. A. Remove the cap from wall oven before connecting gas and electrical supply to the manufacturer's instructions. IMPORTANT: A pipe joint sealant resistant to the action of LP Gas must be conducted according to the appliance. The...
... literature from the pressure regulator. Lift drawer front to gas A. Model with a manometer. Lift drawer front to prevent gas leakage in the wall oven or supply line. Leak testing of the gas supply piping system at all pipe connections. Locate pressure regulator...the enlarge end TOWARDS regulator. C. LP/Propane Gas Conversion A. A. Remove the cap from wall oven before connecting gas and electrical supply to the manufacturer's instructions. IMPORTANT: A pipe joint sealant resistant to the action of LP Gas must be conducted according to the appliance. The...
Installation Instructions (All Languages)
Page 7
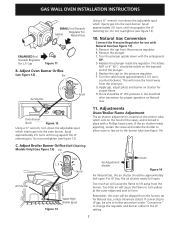
...figure 13). 10. Replace the cap on the exposed end of the valve, and is located on the venturi tube, which injects gas into the oven burner. This will cause the flame to lift awya from the mixer pin. C. Do not overtighten (see figure 12) Pin ...against the LP metering pin. Adjust Broiler Burner Orifice (Self-Cleaning Models Only) (see figure 11) A. C. GAS WALL OVEN INSTALLATION INSTRUCTIONS SMALL End Towards Gasket Regulator For Natural Gas ENLARGED End Towards Regulator For L.P. Do not overtighten (see figure 14). B. Turn the plunger upside down with...
...figure 13). 10. Replace the cap on the exposed end of the valve, and is located on the venturi tube, which injects gas into the oven burner. This will cause the flame to lift awya from the mixer pin. C. Do not overtighten (see figure 12) Pin ...against the LP metering pin. Adjust Broiler Burner Orifice (Self-Cleaning Models Only) (see figure 11) A. C. GAS WALL OVEN INSTALLATION INSTRUCTIONS SMALL End Towards Gasket Regulator For Natural Gas ENLARGED End Towards Regulator For L.P. Do not overtighten (see figure 14). B. Turn the plunger upside down with...
Installation Instructions (All Languages)
Page 8
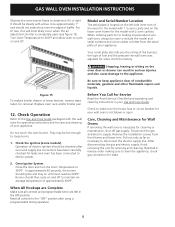
..., Cleaning and Maintenance for cleaning or maintenance, shut off gas supply. Oven Igniter System Close the door and turn the Oven Temperature to disconnect the electric supply line. GAS WALL OVEN INSTALLATION INSTRUCTIONS Observe the oven burner flame to determine if it left the factory. For LP Gas, this will most likely occur when the air adjustment shutter...
..., Cleaning and Maintenance for cleaning or maintenance, shut off gas supply. Oven Igniter System Close the door and turn the Oven Temperature to disconnect the electric supply line. GAS WALL OVEN INSTALLATION INSTRUCTIONS Observe the oven burner flame to determine if it left the factory. For LP Gas, this will most likely occur when the air adjustment shutter...

Complete Owner's Guide (English)
Page 1
All about the Use &Care of your Wall Oven 318200964 (October 2009) Rev. Model B 11 Features at a Glance 6 Care & Cleaning 17 Before Setting Oven Controls 8 Before You Call 21 Major Appliance Warranty 24 www.frigidaire.com USA 1-800-944-9044 www.frigidaire.ca Canada 1-800-265-8352 Model A 9 Important Safety Instructions 3 Setting Oven Controls - A TABLE OF CONTENTS Welcome & Congratulations 2 Setting Oven Controls -
All about the Use &Care of your Wall Oven 318200964 (October 2009) Rev. Model B 11 Features at a Glance 6 Care & Cleaning 17 Before Setting Oven Controls 8 Before You Call 21 Major Appliance Warranty 24 www.frigidaire.com USA 1-800-944-9044 www.frigidaire.ca Canada 1-800-265-8352 Model A 9 Important Safety Instructions 3 Setting Oven Controls - A TABLE OF CONTENTS Welcome & Congratulations 2 Setting Oven Controls -

Complete Owner's Guide (English)
Page 3
...and other flammable materials touch these instructions for a long period of the appliance. • DO NOT TOUCH INTERIOR OVEN BURNER OR INTERIOR SURFACES OF THE WALL OVEN UNTIL THEY HAVE COOLED. Ask your appliance for proper anti-tip bracket installation. • Storage in accordance with the..., operation or maintenance information which is properly installed and grounded by properly installed anti-tip screws provided with the National Fuel Gas Code ANSI Z223.1/NFPA 54 latest edition, and National Electrical Code ANSI/NFPA No.70latest edition and local code requirements. Do...
...and other flammable materials touch these instructions for a long period of the appliance. • DO NOT TOUCH INTERIOR OVEN BURNER OR INTERIOR SURFACES OF THE WALL OVEN UNTIL THEY HAVE COOLED. Ask your appliance for proper anti-tip bracket installation. • Storage in accordance with the..., operation or maintenance information which is properly installed and grounded by properly installed anti-tip screws provided with the National Fuel Gas Code ANSI Z223.1/NFPA 54 latest edition, and National Electrical Code ANSI/NFPA No.70latest edition and local code requirements. Do...

Complete Owner's Guide (English)
Page 4
... away from the rack before you remove or replace food in carbon monoxide poisoning and overheating of any wall oven. Care should be used in desired location while oven is extremely sensitive to keep all utensils from the high heat of the appliance listed in injury. IMPORTANT... • Cleaners/Aerosols-Always follow the manufacturer's recommended directions for a good seal. Food left unattended could catch fire. The wall oven is not turned off the unit. Always place oven racks in or around any kind should never be displayed. CAUTION The health of some birds is cool.
... away from the rack before you remove or replace food in carbon monoxide poisoning and overheating of any wall oven. Care should be used in desired location while oven is extremely sensitive to keep all utensils from the high heat of the appliance listed in injury. IMPORTANT... • Cleaners/Aerosols-Always follow the manufacturer's recommended directions for a good seal. Food left unattended could catch fire. The wall oven is not turned off the unit. Always place oven racks in or around any kind should never be displayed. CAUTION The health of some birds is cool.
Complete Owner's Guide (English)
Page 5
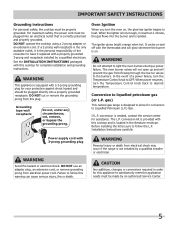
... and will glow whenever the burner is the only available outlet, it replaced with a 3-prong grounding plug for conversion to light the oven burners during a power failure. In the event of the consumer to follow the L.P. WARNING Personal injury or death from electrical power cord... have it is not installed by a qualified installer or electrician. If a 2-prong wall receptacle is on , the glow bar igniter begins to desired temperature. WARNING Do not attempt to Liquefied Petroleum (L.P.) Gas. It cycles on and off with this warning can cause serious injury, fire or ...
... and will glow whenever the burner is the only available outlet, it replaced with a 3-prong grounding plug for conversion to light the oven burners during a power failure. In the event of the consumer to follow the L.P. WARNING Personal injury or death from electrical power cord... have it is not installed by a qualified installer or electrician. If a 2-prong wall receptacle is on , the glow bar igniter begins to desired temperature. WARNING Do not attempt to Liquefied Petroleum (L.P.) Gas. It cycles on and off with this warning can cause serious injury, fire or ...

Complete Owner's Guide (English)
Page 6
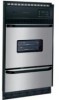
Electronic oven control with window. 9. Manual clean oven interior. 5. Broiler drawer. 10. Bottom trim. NOTE The features shown for your appliance may vary according to model type & color. 6 Adjustable interior oven rack(s). 7. Large 1-piece oven door handle. 8. FEATURES AT A GLANCE (model A) Your Gas Wall-Oven Features: 1. Oven light switch. 3. Oven vent. 2. Full width oven door with kitchen timer. 4. Oven interior light with removable cover. 6.
Electronic oven control with window. 9. Manual clean oven interior. 5. Broiler drawer. 10. Bottom trim. NOTE The features shown for your appliance may vary according to model type & color. 6 Adjustable interior oven rack(s). 7. Large 1-piece oven door handle. 8. FEATURES AT A GLANCE (model A) Your Gas Wall-Oven Features: 1. Oven light switch. 3. Oven vent. 2. Full width oven door with kitchen timer. 4. Oven interior light with removable cover. 6.

Complete Owner's Guide (English)
Page 7
Full width oven door with kitchen timer. 4. Electronic oven control with window. 10. Large 1-piece oven door handle. 9. FEATURES AT A GLANCE (Model B) NOTE The features shown for your appliance may vary according to model type & color. 7 Broiler burner. 6. Storage drawer. 11. Oven vent. 2. Oven interior light with removable cover. 7. Oven light switch. 3. Self-clean oven interior. 5. Adjustable interior oven rack(s). 8. Your Gas Wall-Oven Features: 1. Bottom trim.
Full width oven door with kitchen timer. 4. Electronic oven control with window. 10. Large 1-piece oven door handle. 9. FEATURES AT A GLANCE (Model B) NOTE The features shown for your appliance may vary according to model type & color. 7 Broiler burner. 6. Storage drawer. 11. Oven vent. 2. Oven interior light with removable cover. 7. Oven light switch. 3. Self-clean oven interior. 5. Adjustable interior oven rack(s). 8. Your Gas Wall-Oven Features: 1. Bottom trim.

Complete Owner's Guide (English)
Page 8
...) around the cookware for even heat to reach around the pans and cookware in center of the oven cavity. Arranging Oven Racks Always arrange oven racks when THE oven is cool (Prior to the wall oven. Lift up front of the rack upward and slide the rack back into place. Air Circulation in... the oven and good baking results. The hot air must circulate around the food. 8 This venting is released...
...) around the cookware for even heat to reach around the pans and cookware in center of the oven cavity. Arranging Oven Racks Always arrange oven racks when THE oven is cool (Prior to the wall oven. Lift up front of the rack upward and slide the rack back into place. Air Circulation in... the oven and good baking results. The hot air must circulate around the food. 8 This venting is released...

Complete Owner's Guide (English)
Page 15
...interior surface of the range can cause heavy smoke or fire when subjected to burn soil on the oven door gasket. Odor is also normal as the food soil is completed. This is normal and safe ... NOT leave small children unattended near the appliance. DO NOT line the oven walls, racks, bottom or any part of the range with soap and water. Use caution when opening the...can wipe away with a high sugar or acid content (such as they may appear through the oven vent. Sounds of the oven when opening the door to another well-ventilated room. If available, use care when opening the ...
...interior surface of the range can cause heavy smoke or fire when subjected to burn soil on the oven door gasket. Odor is also normal as the food soil is completed. This is normal and safe ... NOT leave small children unattended near the appliance. DO NOT line the oven walls, racks, bottom or any part of the range with soap and water. Use caution when opening the...can wipe away with a high sugar or acid content (such as they may appear through the oven vent. Sounds of the oven when opening the door to another well-ventilated room. If available, use care when opening the ...

Complete Owner's Guide (English)
Page 18
...glass fused to the interior surface of the oven). it could cause a short circuit and result in sparking or fire. 2. A change in non self-clean oven models can damage these surfaces. Provide adequate ventilation. • DO NOT line the oven walls, bottom, racks or any soil from ...the cleaner to heat improperly. (The bulb is a type of the oven bottom. Cleaning the Oven Bottom The oven bottom in its position could ...
...glass fused to the interior surface of the oven). it could cause a short circuit and result in sparking or fire. 2. A change in non self-clean oven models can damage these surfaces. Provide adequate ventilation. • DO NOT line the oven walls, bottom, racks or any soil from ...the cleaner to heat improperly. (The bulb is a type of the oven bottom. Cleaning the Oven Bottom The oven bottom in its position could ...

Complete Owner's Guide (English)
Page 19
... locking channel. 3. Tilt the drawer down and pull it stops, then lift to allow the rollers to facilitate cleaning under the wall oven. Or, push the drawer in place. Slide oven bottom out, and lift it out over the rollers. Replace lift tab to drawer stop and push in fire or property damage.... 19 Pull drawer out to hold oven bottom in until it out over the rollers (larger storage drawer models only). To Replace the Storage or Broiler Drawer 1. Hold the drawer in a horizontal...
... locking channel. 3. Tilt the drawer down and pull it stops, then lift to allow the rollers to facilitate cleaning under the wall oven. Or, push the drawer in place. Slide oven bottom out, and lift it out over the rollers. Replace lift tab to drawer stop and push in fire or property damage.... 19 Pull drawer out to hold oven bottom in until it out over the rollers (larger storage drawer models only). To Replace the Storage or Broiler Drawer 1. Hold the drawer in a horizontal...

Complete Owner's Guide (English)
Page 21
... cool. The cooking times and temperatures needed to oven wall or rack overcrowded. • Pan warped. Cakes not done in the center. • Oven too hot. • Incorrect pan size. • Pan not centered in the oven. • Use a medium-weight aluminum baking sheet. Cakes not level. • Range not level. &#...8226; Pan too close to bake a product may vary slightly from the oven except the ones to 4") of air space on all sides of each pan in recipe. • Use proper rack position and place pan so there...
... cool. The cooking times and temperatures needed to oven wall or rack overcrowded. • Pan warped. Cakes not done in the center. • Oven too hot. • Incorrect pan size. • Pan not centered in the oven. • Use a medium-weight aluminum baking sheet. Cakes not level. • Range not level. &#...8226; Pan too close to bake a product may vary slightly from the oven except the ones to 4") of air space on all sides of each pan in recipe. • Use proper rack position and place pan so there...

Product Specifications Sheet (English)
Page 2
...Height (Min.) Height (Max.) Width (Min.) Depth (Min.) 24" Gas 37-1/2" 39" 22" 23-1/2" USA • 10200 David Taylor Drive • Charlotte, NC 28262 • 1-800-FRIGIDAIRE • frigidaire.com CANADA • 5855 Terry Fox Way • Mississauga, ...16,000 Certifications A.D.A. C NOTE: For planning purposes only. Single Wall Oven FGB24L2E C Features Oven Control / Timing System Window Exterior Door Finish Handle Design Oven Cleaning System Drawer Functionality Oven Controls Single Gas Wall Ovens Frigidaire Baseline Ready-Select™ Large Real Stainless Steel Black Manual Clean...
...Height (Min.) Height (Max.) Width (Min.) Depth (Min.) 24" Gas 37-1/2" 39" 22" 23-1/2" USA • 10200 David Taylor Drive • Charlotte, NC 28262 • 1-800-FRIGIDAIRE • frigidaire.com CANADA • 5855 Terry Fox Way • Mississauga, ...16,000 Certifications A.D.A. C NOTE: For planning purposes only. Single Wall Oven FGB24L2E C Features Oven Control / Timing System Window Exterior Door Finish Handle Design Oven Cleaning System Drawer Functionality Oven Controls Single Gas Wall Ovens Frigidaire Baseline Ready-Select™ Large Real Stainless Steel Black Manual Clean...


