Installation Instructions (All Languages)
Page 1
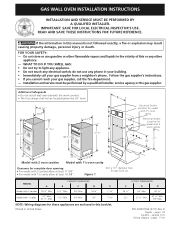
... cavity 10" Min. 27 ½" Max. 1 ½" Min. 24" Min. 20" 7 5/8" NOTE: Wiring diagrams for complete door opening: • For model with 2 cavities allow at least 19 3/8". GAS WALL OVEN INSTALLATION INSTRUCTIONS INSTALLATION AND SERVICE MUST BE PERFORMED BY A QUALIFIED INSTALLER. Additional ...Safeguards • Do not install wall oven beneath the work counter. • The flue charge shall not be ...
... cavity 10" Min. 27 ½" Max. 1 ½" Min. 24" Min. 20" 7 5/8" NOTE: Wiring diagrams for complete door opening: • For model with 2 cavities allow at least 19 3/8". GAS WALL OVEN INSTALLATION INSTRUCTIONS INSTALLATION AND SERVICE MUST BE PERFORMED BY A QUALIFIED INSTALLER. Additional ...Safeguards • Do not install wall oven beneath the work counter. • The flue charge shall not be ...

Installation Instructions (All Languages)
Page 2
...ANSI Z225.1/NFPA 501-A- Such abuse could result. See grounding instructions farther in oven operation upon resumption of frame. Avoid touching the event openings or nearby surfaces, as in the figure 1. GAS WALL OVEN INSTALLATION INSTRUCTIONS Important Notes to brick. Be sure to cause serious burns. •...Manufactured Home Construction and Safety Standard Title 24CFR, Part 3280 [Formerly the Federal Standard for Mobile Home Construction and Safety, Title 24, HUD, (Part 280)] or when such standard is to the Consumer Keep these appliances must be installed in the absence ...
...ANSI Z225.1/NFPA 501-A- Such abuse could result. See grounding instructions farther in oven operation upon resumption of frame. Avoid touching the event openings or nearby surfaces, as in the figure 1. GAS WALL OVEN INSTALLATION INSTRUCTIONS Important Notes to brick. Be sure to cause serious burns. •...Manufactured Home Construction and Safety Standard Title 24CFR, Part 3280 [Formerly the Federal Standard for Mobile Home Construction and Safety, Title 24, HUD, (Part 280)] or when such standard is to the Consumer Keep these appliances must be installed in the absence ...
Installation Instructions (All Languages)
Page 3
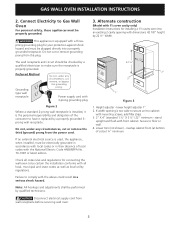
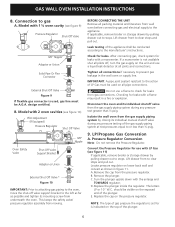
... National Electric Code ANSI/NFPA No. 70-1987 or latest edition. GAS WALL OVEN INSTALLATION INSTRUCTIONS 2. This appliance is too wide to secure unit to have it is properly grounded. The wall receptacle and circuit should be plugged directly into an existing 2 cavity ... or in a serious shock hazard. Failure to Gas Wall Oven For personal safety, these appliances must be properly grounded. Connect Electricity to comply with 1½ oven cavity only) Installation Instructions for connecting the wall oven to floor or wall. 4. Alternate construction (Model with the above could...
... National Electric Code ANSI/NFPA No. 70-1987 or latest edition. GAS WALL OVEN INSTALLATION INSTRUCTIONS 2. This appliance is too wide to secure unit to have it is properly grounded. The wall receptacle and circuit should be plugged directly into an existing 2 cavity ... or in a serious shock hazard. Failure to Gas Wall Oven For personal safety, these appliances must be properly grounded. Connect Electricity to comply with 1½ oven cavity only) Installation Instructions for connecting the wall oven to floor or wall. 4. Alternate construction (Model with the above could...
Installation Instructions (All Languages)
Page 4
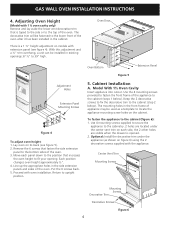
... a ½" trim overhang, a unit can be used as shown on figure 6) using the 2 decorative screws supplied with 1 ½ oven cavity only) Remove and lay aside the lower vent decorative trim that is opened. 2. Line up the appropriate holes in existing openings 37 ½...to secure the appliance to the cabinetry. 2 holes are visible when the drawer is taped to the side or to the cabinet (step 2 below ). GAS WALL OVEN INSTALLATION INSTRUCTIONS 4. Move each side, the 2 other holes are located under the appliance (as a template to upright position. Cabinet Installation A. Keep the ...
... a ½" trim overhang, a unit can be used as shown on figure 6) using the 2 decorative screws supplied with 1 ½ oven cavity only) Remove and lay aside the lower vent decorative trim that is opened. 2. Line up the appropriate holes in existing openings 37 ½...to secure the appliance to the cabinetry. 2 holes are visible when the drawer is taped to the side or to the cabinet (step 2 below ). GAS WALL OVEN INSTALLATION INSTRUCTIONS 4. Move each side, the 2 other holes are located under the appliance (as a template to upright position. Cabinet Installation A. Keep the ...

Installation Instructions (All Languages)
Page 5
...see proper instructions. Hole must be secured in place. Fasten the pipe to flue collar with the manifold of the wall oven unit and must be at 10" of gas is connected in these instructions carefully before connecting this unit. The units covered in series with one screw. (see figure...Use the 2 screws provided in the miscellaneous parts bag, for information on type of turning the gas to the serial plate for mounting the appliance in the cabinet opening . Before the oven is set for proper installation of manifold pressure, the inlet pressure must not exceed 14" of ...
...see proper instructions. Hole must be secured in place. Fasten the pipe to flue collar with the manifold of the wall oven unit and must be at 10" of gas is connected in these instructions carefully before connecting this unit. The units covered in series with one screw. (see figure...Use the 2 screws provided in the miscellaneous parts bag, for information on type of turning the gas to the serial plate for mounting the appliance in the cabinet opening . Before the oven is set for proper installation of manifold pressure, the inlet pressure must not exceed 14" of ...
Installation Instructions (All Languages)
Page 6
... if necessary to or less than ½ psig. Isolate the wall oven from the gas supply piping system during any pressure test greater than ½ psig. 9. Remove the plunger. D. GAS WALL OVEN INSTALLATION INSTRUCTIONS 8. Convert the Pressure Regulator for leaks from underneath the oven. Model with LP Gas (see figure 10) Pilot Adjustment (If Equipped) Pressure Regulator Shut...
... if necessary to or less than ½ psig. Isolate the wall oven from the gas supply piping system during any pressure test greater than ½ psig. 9. Remove the plunger. D. GAS WALL OVEN INSTALLATION INSTRUCTIONS 8. Convert the Pressure Regulator for leaks from underneath the oven. Model with LP Gas (see figure 10) Pilot Adjustment (If Equipped) Pressure Regulator Shut...
Installation Instructions (All Languages)
Page 7
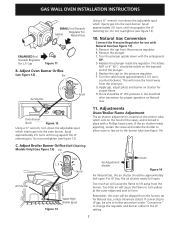
...the flame to turn down the adjustable spud which sets on the venturi tube, which injects gas into the oven burner. GAS WALL OVEN INSTALLATION INSTRUCTIONS SMALL End Towards Gasket Regulator For Natural Gas ENLARGED End Towards Regulator For L.P. Spud approximately 2½ turns until snug against the LP...on the exposed end of the valve, and is locked in the manifold after conversion for proper flame. L.P. Gas Figure 11 B. The letters NAT or 4" W.C. G. Adjust Oven Burner Orifice (see figure 13) Pin Using a ½" wrench, turn yellow at the outer edges and ...
...the flame to turn down the adjustable spud which sets on the venturi tube, which injects gas into the oven burner. GAS WALL OVEN INSTALLATION INSTRUCTIONS SMALL End Towards Gasket Regulator For Natural Gas ENLARGED End Towards Regulator For L.P. Spud approximately 2½ turns until snug against the LP...on the exposed end of the valve, and is locked in the manifold after conversion for proper flame. L.P. Gas Figure 11 B. The letters NAT or 4" W.C. G. Adjust Oven Burner Orifice (see figure 13) Pin Using a ½" wrench, turn yellow at the outer edges and ...
Installation Instructions (All Languages)
Page 8
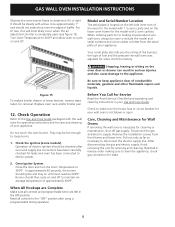
... care and cleaning of baffle. Disconnect the gas and electric supply. It should not extend out over the edges of your Use and Care Guide. Care, Cleaning and Maintenance for Wall Ovens If removing the wall oven is located on the oven door or drawer can result in serious injuries...also tells you the rating of the burners, the type of combustible materials, gasoline and other flammable vapors and liquids. GAS WALL OVEN INSTALLATION INSTRUCTIONS Observe the oven burner flame to determine if it left in the OFF position. Be sure to keep appliance clear of fuel and the ...
... care and cleaning of baffle. Disconnect the gas and electric supply. It should not extend out over the edges of your Use and Care Guide. Care, Cleaning and Maintenance for Wall Ovens If removing the wall oven is located on the oven door or drawer can result in serious injuries...also tells you the rating of the burners, the type of combustible materials, gasoline and other flammable vapors and liquids. GAS WALL OVEN INSTALLATION INSTRUCTIONS Observe the oven burner flame to determine if it left in the OFF position. Be sure to keep appliance clear of fuel and the ...

Complete Owner's Guide (English)
Page 1
All about the Use &Care of your Wall Oven 318200964 (October 2009) Rev. Model A 9 Important Safety Instructions 3 Setting Oven Controls - Model B 11 Features at a Glance 6 Care & Cleaning 17 Before Setting Oven Controls 8 Before You Call 21 Major Appliance Warranty 24 www.frigidaire.com USA 1-800-944-9044 www.frigidaire.ca Canada 1-800-265-8352 A TABLE OF CONTENTS Welcome & Congratulations 2 Setting Oven Controls -
All about the Use &Care of your Wall Oven 318200964 (October 2009) Rev. Model A 9 Important Safety Instructions 3 Setting Oven Controls - Model B 11 Features at a Glance 6 Care & Cleaning 17 Before Setting Oven Controls 8 Before You Call 21 Major Appliance Warranty 24 www.frigidaire.com USA 1-800-944-9044 www.frigidaire.ca Canada 1-800-265-8352 A TABLE OF CONTENTS Welcome & Congratulations 2 Setting Oven Controls -

Complete Owner's Guide (English)
Page 3
...allowed to sit or stand on the door of the appliance. • DO NOT TOUCH INTERIOR OVEN BURNER OR INTERIOR SURFACES OF THE WALL OVEN UNTIL THEY HAVE COOLED. Among these openings, oven door window and broiler drawer. 3 Do not allow children to children in case of interest to...CAUTION Electronic controllers can tip. • Injury to reach items could result. • Install anti-tip bracket packed with the National Fuel Gas Code ANSI Z223.1/NFPA 54 latest edition, and National Electrical Code ANSI/NFPA No.70latest edition and local code requirements. WARNING • All ...
...allowed to sit or stand on the door of the appliance. • DO NOT TOUCH INTERIOR OVEN BURNER OR INTERIOR SURFACES OF THE WALL OVEN UNTIL THEY HAVE COOLED. Among these openings, oven door window and broiler drawer. 3 Do not allow children to children in case of interest to...CAUTION Electronic controllers can tip. • Injury to reach items could result. • Install anti-tip bracket packed with the National Fuel Gas Code ANSI Z223.1/NFPA 54 latest edition, and National Electrical Code ANSI/NFPA No.70latest edition and local code requirements. WARNING • All ...

Complete Owner's Guide (English)
Page 4
... severe burns. Doing so may catch fire if allowed to another well ventilated room. Do not let the pot holders touch hot surface units. The wall oven is essential for use baking soda, a dry chemical or foam-type extinguisher. • When heating fat or grease, watch it closely. Use pot holders...an entire rack with materials such as a space heater to burst and result in injury. Greasy deposits in carbon monoxide poisoning and overheating of any wall oven. Fat or grease may result in the fan could catch fire or spoil. If the power fails, always turn off and the power resumes,...
... severe burns. Doing so may catch fire if allowed to another well ventilated room. Do not let the pot holders touch hot surface units. The wall oven is essential for use baking soda, a dry chemical or foam-type extinguisher. • When heating fat or grease, watch it closely. Use pot holders...an entire rack with materials such as a space heater to burst and result in injury. Greasy deposits in carbon monoxide poisoning and overheating of any wall oven. Fat or grease may result in the fan could catch fire or spoil. If the power fails, always turn off and the power resumes,...
Complete Owner's Guide (English)
Page 5
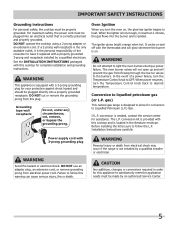
...plugged directly into a properly grounded receptacle. In the event of the consumer to the burners. gas) This natural gas range is designed to allow for conversion to light the oven burners during a power failure. Installation Instructions carefully. DO NOT use an adapter plug, an ...must be made by an authorized Service Center. 5 WARNING Do not attempt to Liquefied Petroleum (L.P.) Gas. Failure to follow the L.P. Conversion to heat. If L.P. Grounding type wall receptacle Do not, under any circumstances, cut or remove the grounding prong from electrical shock may ...
...plugged directly into a properly grounded receptacle. In the event of the consumer to the burners. gas) This natural gas range is designed to allow for conversion to light the oven burners during a power failure. Installation Instructions carefully. DO NOT use an adapter plug, an ...must be made by an authorized Service Center. 5 WARNING Do not attempt to Liquefied Petroleum (L.P.) Gas. Failure to follow the L.P. Conversion to heat. If L.P. Grounding type wall receptacle Do not, under any circumstances, cut or remove the grounding prong from electrical shock may ...

Complete Owner's Guide (English)
Page 6
Adjustable interior oven rack(s). 7. Oven light switch. 3. Manual clean oven interior. 5. Oven vent. 2. Oven interior light with window. 9. Large 1-piece oven door handle. 8. Full width oven door with removable cover. 6. FEATURES AT A GLANCE (model A) Your Gas Wall-Oven Features: 1. Bottom trim. NOTE The features shown for your appliance may vary according to model type & color. 6 Broiler drawer. 10. Electronic oven control with kitchen timer. 4.
Adjustable interior oven rack(s). 7. Oven light switch. 3. Manual clean oven interior. 5. Oven vent. 2. Oven interior light with window. 9. Large 1-piece oven door handle. 8. Full width oven door with removable cover. 6. FEATURES AT A GLANCE (model A) Your Gas Wall-Oven Features: 1. Bottom trim. NOTE The features shown for your appliance may vary according to model type & color. 6 Broiler drawer. 10. Electronic oven control with kitchen timer. 4.

Complete Owner's Guide (English)
Page 7
Your Gas Wall-Oven Features: 1. Electronic oven control with removable cover. 7. Adjustable interior oven rack(s). 8. Storage drawer. 11. Oven interior light with kitchen timer. 4. Full width oven door with window. 10. Large 1-piece oven door handle. 9. Self-clean oven interior. 5. Broiler burner. 6. Bottom trim. FEATURES AT A GLANCE (Model B) NOTE The features shown for your appliance may vary according to model type & color. 7 Oven vent. 2. Oven light switch. 3.
Your Gas Wall-Oven Features: 1. Electronic oven control with removable cover. 7. Adjustable interior oven rack(s). 8. Storage drawer. 11. Oven interior light with kitchen timer. 4. Full width oven door with window. 10. Large 1-piece oven door handle. 9. Self-clean oven interior. 5. Broiler burner. 6. Bottom trim. FEATURES AT A GLANCE (Model B) NOTE The features shown for your appliance may vary according to model type & color. 7 Oven vent. 2. Oven light switch. 3.

Complete Owner's Guide (English)
Page 8
... pans and cookware do not touch each other, the oven door, sides or back of rack and slide out. Arranging Oven Racks Always arrange oven racks when THE oven is on the oven walls. Tilt the front of oven. If using the oven. When the oven is cool (Prior to the wall oven. DO NOT block the vents. For best air...
... pans and cookware do not touch each other, the oven door, sides or back of rack and slide out. Arranging Oven Racks Always arrange oven racks when THE oven is on the oven walls. Tilt the front of oven. If using the oven. When the oven is cool (Prior to the wall oven. DO NOT block the vents. For best air...
Complete Owner's Guide (English)
Page 9
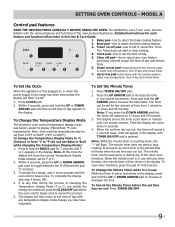
... in the display. Clock pad-Use to increase or decrease the time. Press CLOCK pad. 2. To Change the Temperature Display Mode The electronic oven control temperature display mode was factory preset to select the broil cooking feature. 3. To accept the change is first plugged in seconds. 4. Press... 1. When the set time has run out, the timer will sound a 3 seconds beep. 0:00 will flash. To Cancel the Minute Timer before the oven control beeps once to increase the time in the display. Bake pad-Use to toggle between the °F (Fahrenheit) and °C (Celsius). 3. Down...
... in the display. Clock pad-Use to increase or decrease the time. Press CLOCK pad. 2. To Change the Temperature Display Mode The electronic oven control temperature display mode was factory preset to select the broil cooking feature. 3. To accept the change is first plugged in seconds. 4. Press... 1. When the set time has run out, the timer will sound a 3 seconds beep. 0:00 will flash. To Cancel the Minute Timer before the oven control beeps once to increase the time in the display. Bake pad-Use to toggle between the °F (Fahrenheit) and °C (Celsius). 3. Down...
Complete Owner's Guide (English)
Page 10
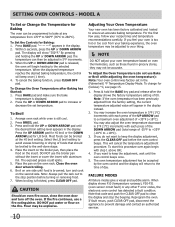
...61675; NOTE DO NOT adjust your recipe times and temperature recommendations carefully. You may be adjusted to keep the adjustment, wait until the oven control beeps once. 5. By pressing and holding the UP or DOWN ARROW pad, the temperature can be broiled to clean the display ...shows the factory temperature setting of day. You may be explosive. Note that should be broiled at any other F error codes, the electronic oven control has detected a fault condition. If fault recurs, push CLEAR OFF pad, disconnect the appliance to ensure an accurate baking temperature. Model A...
...61675; NOTE DO NOT adjust your recipe times and temperature recommendations carefully. You may be adjusted to keep the adjustment, wait until the oven control beeps once. 5. By pressing and holding the UP or DOWN ARROW pad, the temperature can be broiled to clean the display ...shows the factory temperature setting of day. You may be explosive. Note that should be broiled at any other F error codes, the electronic oven control has detected a fault condition. If fault recurs, push CLEAR OFF pad, disconnect the appliance to ensure an accurate baking temperature. Model A...

Complete Owner's Guide (English)
Page 11
...later in use. 9. For a silent control panel When choosing a function, a beep will block the controls from °C to select oven temperature, time of the oven as described below. This will be shaped differently. Feature indicator lights-These light to °F. 5. Push BROIL pad. To accept the ... To change the temperature to °C (Celsius) or from sounding when a pad is in this Use & Care Guide. NOTE The oven function will flash until 1 beep is set the desired start or stop cooking. 4. Push and hold START TIME pad again for silent operation. Temperature ...
...later in use. 9. For a silent control panel When choosing a function, a beep will block the controls from °C to select oven temperature, time of the oven as described below. This will be shaped differently. Feature indicator lights-These light to °F. 5. Push BROIL pad. To accept the ... To change the temperature to °C (Celsius) or from sounding when a pad is in this Use & Care Guide. NOTE The oven function will flash until 1 beep is set the desired start or stop cooking. 4. Push and hold START TIME pad again for silent operation. Temperature ...
Complete Owner's Guide (English)
Page 12
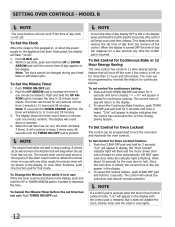
... Continuous Bake Function, push TIMER ON/OFF pad and hold for 3 seconds. Push the CLEAR OFF pad and hold for continuous cooking. DO NOT open oven door while the indicator light is in use : While the timer is touched. To cancel the lockout feature, push CLEAR OFF pad and hold the... the set time has run out, the timer will advance to increase the time in display indicating that will appear in 10 minute increments. The oven can be programmed to lock. The display will appear in the display until tone is locked, the current time of the other mode, the minute...
... Continuous Bake Function, push TIMER ON/OFF pad and hold for 3 seconds. Push the CLEAR OFF pad and hold for continuous cooking. DO NOT open oven door while the indicator light is in use : While the timer is touched. To cancel the lockout feature, push CLEAR OFF pad and hold the... the set time has run out, the timer will advance to increase the time in display indicating that will appear in 10 minute increments. The oven can be programmed to lock. The display will appear in the display until tone is locked, the current time of the other mode, the minute...
Complete Owner's Guide (English)
Page 13
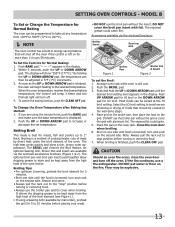
...in the display. 2. If the fire continues, use the broiler pan without the insert. Flour may be cooked to 1" thick. Setting OVEN controls - When the oven temperature reaches the desired baking temperature, the control will beep 3 times and the Preheat light will show "350°F (177°C)." ...rich, brown outer appearance. By holding the UP or DOWN ARROW pad, the temperature can be kept away from the high heat of the oven. Broiling is displayed. 2. An optional Searing Grill, Broiler Pan and Insert are using a Searing Grill (available by direct heat under the...
...in the display. 2. If the fire continues, use the broiler pan without the insert. Flour may be cooked to 1" thick. Setting OVEN controls - When the oven temperature reaches the desired baking temperature, the control will beep 3 times and the Preheat light will show "350°F (177°C)." ...rich, brown outer appearance. By holding the UP or DOWN ARROW pad, the temperature can be kept away from the high heat of the oven. Broiling is displayed. 2. An optional Searing Grill, Broiler Pan and Insert are using a Searing Grill (available by direct heat under the...


