

Complete Owner's Guide (English)
Page 1
All about the Use &Care of your Refrigerator 242063800 (November 2009) TABLE OF CONTENTS Important Safety Instructions 2 Installation 4 Door Removal Instructions 5 Handle Installation 6 Connecting Water Supply 8 Ice Service 9 Controls 9 Normal Operating Sounds and Sights 10 Care and Cleaning 11 Before you Call 12 Major Appliance Warranty 13 www.frigidaire.com USA 1-800-944-9044 www.frigidaire.ca Canada 1-800-265-8352
All about the Use &Care of your Refrigerator 242063800 (November 2009) TABLE OF CONTENTS Important Safety Instructions 2 Installation 4 Door Removal Instructions 5 Handle Installation 6 Connecting Water Supply 8 Ice Service 9 Controls 9 Normal Operating Sounds and Sights 10 Care and Cleaning 11 Before you Call 12 Major Appliance Warranty 13 www.frigidaire.com USA 1-800-944-9044 www.frigidaire.ca Canada 1-800-265-8352

Complete Owner's Guide (English)
Page 2
...labels for warnings regarding flammability and other appliance. Important Safety Instructions WARNING Please read all instructions before using this symbol to refrigerator No water leaks present at all connections - Obey all staples from the carton. DANGER DANGER indicates an imminently... set Registration card sent in the presence of automatic ice maker. • Remove all safety messages that follow this refrigerator. CAUTION CAUTION indicates a potentially hazardous situation which is turned ON Ice & water dispenser operates correctly Front ...
...labels for warnings regarding flammability and other appliance. Important Safety Instructions WARNING Please read all instructions before using this symbol to refrigerator No water leaks present at all connections - Obey all staples from the carton. DANGER DANGER indicates an imminently... set Registration card sent in the presence of automatic ice maker. • Remove all safety messages that follow this refrigerator. CAUTION CAUTION indicates a potentially hazardous situation which is turned ON Ice & water dispenser operates correctly Front ...

Complete Owner's Guide (English)
Page 3
.../ disposal methods. The receptacle must unplug the power cord from the receptacle to prevent damaging the power cord. • Unplug the refrigerator before cleaning and before replacing a light bulb to avoid electrical shock. • Performance may break suddenly if nicked, scratched, or ...power cord is equipped with insufficient power can quickly cause suffocation. IMPORTANT Pressing and holding the On/Off button for your old refrigerator or freezer, please follow the instructions below to play. CAUTION To avoid personal injury or property damage, handle tempered glass shelves...
.../ disposal methods. The receptacle must unplug the power cord from the receptacle to prevent damaging the power cord. • Unplug the refrigerator before cleaning and before replacing a light bulb to avoid electrical shock. • Performance may break suddenly if nicked, scratched, or ...power cord is equipped with insufficient power can quickly cause suffocation. IMPORTANT Pressing and holding the On/Off button for your old refrigerator or freezer, please follow the instructions below to play. CAUTION To avoid personal injury or property damage, handle tempered glass shelves...

Complete Owner's Guide (English)
Page 4
...as instructed in this Use & Care Guide. Do Not use an extension cord or an adapter plug. • If possible, place the refrigerator out of your refrigerator is placed with Leveling Screw (some models) Raise Stationary Front Roller with the door hinge side against a wall, you do not hook ... will not be installed on the lower front of direct sunlight and away from the range, dishwasher or other heat sources. • The refrigerator must rest firmly on a solid floor. Sufficient air circulation is level and strong enough to allow additional space so the door can be opened...
...as instructed in this Use & Care Guide. Do Not use an extension cord or an adapter plug. • If possible, place the refrigerator out of your refrigerator is placed with Leveling Screw (some models) Raise Stationary Front Roller with the door hinge side against a wall, you do not hook ... will not be installed on the lower front of direct sunlight and away from the range, dishwasher or other heat sources. • The refrigerator must rest firmly on a solid floor. Sufficient air circulation is level and strong enough to allow additional space so the door can be opened...

Complete Owner's Guide (English)
Page 5
... center hinge pin using adjustable wrench. Move hinge pin to other . This makes reinstallation easier. Remove top hinge and lift door off of refrigerator, remove inside screw and loosening two outside screws on opposite side of bottom hinge and set aside. 5 Remove center hinge and shim by ...opposite side. 15 Lower freezer door onto center hinge pin. 16 Close freezer door. Ensure plastic washer stays on hinge pin. 4 Lift refrigerator door off center hinge pin. Door Removal Instructions Top Hinge Cover Front Screw Top Hinge Cover Rear Screw Tools Necessary: Top Hinge Screw ...
... center hinge pin using adjustable wrench. Move hinge pin to other . This makes reinstallation easier. Remove top hinge and lift door off of refrigerator, remove inside screw and loosening two outside screws on opposite side of bottom hinge and set aside. 5 Remove center hinge and shim by ...opposite side. 15 Lower freezer door onto center hinge pin. 16 Close freezer door. Ensure plastic washer stays on hinge pin. 4 Lift refrigerator door off center hinge pin. Door Removal Instructions Top Hinge Cover Front Screw Top Hinge Cover Rear Screw Tools Necessary: Top Hinge Screw ...

Complete Owner's Guide (English)
Page 6
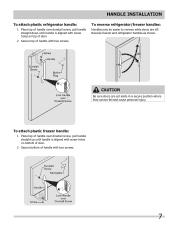
... bottom of the handle until the handle is flush with the two (2) holes in the Use & Care Guide to installing the handles. To attach metal refrigerator handle: 1 Place rounded part of handle onto shoulder screw on the rounded part of handle with the door, then tighten another 1/2 turn . Your model will...
... bottom of the handle until the handle is flush with the two (2) holes in the Use & Care Guide to installing the handles. To attach metal refrigerator handle: 1 Place rounded part of handle onto shoulder screw on the rounded part of handle with the door, then tighten another 1/2 turn . Your model will...
Complete Owner's Guide (English)
Page 7
... be easier to reverse while doors are set aside in a secure position where they cannot fall and cause personal injury. Handle installation To attach plastic refrigerator handle: 1 Place top of handle over dovetail screw, pull handle straight up until handle is aligned with screw holes on top of door. 2 Secure top..., pull handle straight down until handle is aligned with screw holes on bottom of door. 2 Secure bottom of handle with two screws. 7 Reverse freezer and refrigerator handles as shown.
... be easier to reverse while doors are set aside in a secure position where they cannot fall and cause personal injury. Handle installation To attach plastic refrigerator handle: 1 Place top of handle over dovetail screw, pull handle straight up until handle is aligned with screw holes on top of door. 2 Secure top..., pull handle straight down until handle is aligned with screw holes on bottom of door. 2 Secure bottom of handle with two screws. 7 Reverse freezer and refrigerator handles as shown.

Complete Owner's Guide (English)
Page 8
... for cleaning.) Figure 1 Figure 2 IMPORTANT After connecting the water supply, refer to "How to the household water supply line. Reconnect refrigerator to www.frigidaire.com/store for more information. 8 To Connect Water Supply Line To Ice Maker Inlet Valve 1. Turn ON water supply and flush supply line until water ...
... for cleaning.) Figure 1 Figure 2 IMPORTANT After connecting the water supply, refer to "How to the household water supply line. Reconnect refrigerator to www.frigidaire.com/store for more information. 8 To Connect Water Supply Line To Ice Maker Inlet Valve 1. Turn ON water supply and flush supply line until water ...
Complete Owner's Guide (English)
Page 9
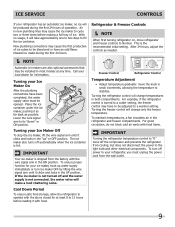
...at any time. The ice maker also turns off and the water supply is not connected, the water valve will change temperatures in the refrigerator and freezer compartments. To maintain temperatures, a fan circulates air in both compartments. Discard ice made during the first 24 hours of operation...discolored or have been completed, the water supply valve must unplug the power cord from the wall outlet. 9 For example, if the refrigerator control is shipped from cooling, but does not disconnect the power to the light bulb and other electrical components. Turning the freezer control ...
...at any time. The ice maker also turns off and the water supply is not connected, the water valve will change temperatures in the refrigerator and freezer compartments. To maintain temperatures, a fan circulates air in both compartments. Discard ice made during the first 24 hours of operation...discolored or have been completed, the water supply valve must unplug the power cord from the wall outlet. 9 For example, if the refrigerator control is shipped from cooling, but does not disconnect the power to the light bulb and other electrical components. Turning the freezer control ...
Complete Owner's Guide (English)
Page 10
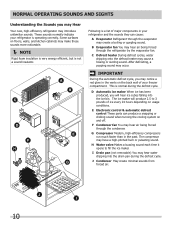
...cabinets may make these sounds more noticeable. NOTE Rigid foam insulation is very energy efficient, but is a list of your refrigerator is normal during the defrost cycle. C Defrost heater During defrost cycles, water dripping onto the defrost heater may occur. E Electronic... control & automatic defrost control These parts can cause: A Evaporator Refrigerant through the evaporator may create a boiling or gurgling sound. Some surfaces on and off. This is operating correctly. F Condenser fan You...
...cabinets may make these sounds more noticeable. NOTE Rigid foam insulation is very energy efficient, but is a list of your refrigerator is normal during the defrost cycle. C Defrost heater During defrost cycles, water dripping onto the defrost heater may occur. E Electronic... control & automatic defrost control These parts can cause: A Evaporator Refrigerant through the evaporator may create a boiling or gurgling sound. Some surfaces on and off. This is operating correctly. F Condenser fan You...

Complete Owner's Guide (English)
Page 11
... dry with a clean soft cloth. Rinse well, and wipe dry with the grain to prevent scratching. CAUTION • Pull the refrigerator straight out to move it from the wall outlet. IMPORTANT If you unplug the power cord from side to side may damage flooring... the freezer and fresh food compartments at most home improvement or major department stores. Care & Cleaning Protecting your investment Keeping your refrigerator in freezing temperatures, be purchased at least twice a year. Stainless Steel Cleaners Clean stainless steel front and handles with bleach to...
... dry with a clean soft cloth. Rinse well, and wipe dry with the grain to prevent scratching. CAUTION • Pull the refrigerator straight out to move it from the wall outlet. IMPORTANT If you unplug the power cord from side to side may damage flooring... the freezer and fresh food compartments at most home improvement or major department stores. Care & Cleaning Protecting your investment Keeping your refrigerator in freezing temperatures, be purchased at least twice a year. Stainless Steel Cleaners Clean stainless steel front and handles with bleach to...

Complete Owner's Guide (English)
Page 12
...calling for temperature to a warmer setting. Automatic ice maker not working . Wait 20 minutes and check again. • Set freezer control to "O". • Refrigerator may be in a 24 hour period. • Water supply is turned off. • Water pressure is too low. • The freezer is not... save you time and expense. Before You Call 1-800-944-9044 (United States) 1-800-265-8352 (Canada) Visit our web site at www.frigidaire.com. Allow 24 hours for service, review this appliance. • Ensure plug is weak. • See Normal Operating Sounds and Sights section. ...
...calling for temperature to a warmer setting. Automatic ice maker not working . Wait 20 minutes and check again. • Set freezer control to "O". • Refrigerator may be in a 24 hour period. • Water supply is turned off. • Water pressure is too low. • The freezer is not... save you time and expense. Before You Call 1-800-944-9044 (United States) 1-800-265-8352 (Canada) Visit our web site at www.frigidaire.com. Allow 24 hours for service, review this appliance. • Ensure plug is weak. • See Normal Operating Sounds and Sights section. ...

Complete Owner's Guide (English)
Page 13
... applies in accordance with the provided instructions. In the USA, your best interest to , any parts of this warranty. 5. Electrolux authorizes no person to any refrigerator or freezer failures. 6. Product features or specifications as -is installed, used in your appliance is warranted by this appliance that have been removed, altered or...
... applies in accordance with the provided instructions. In the USA, your best interest to , any parts of this warranty. 5. Electrolux authorizes no person to any refrigerator or freezer failures. 6. Product features or specifications as -is installed, used in your appliance is warranted by this appliance that have been removed, altered or...

Wiring Diagram (All Languages)
Page 2
... BLACK YELLOW GRN/YEL RED YEL/RED COIL HEATER SPLICE DEFROST THERMOSTAT LT. BLUE LT. REFRIGERATOR COMPARTMENT DEFROST TIMER BROWN ORANGE RED LT. BLUE YEL/BLACK MIDLEVEL LIGHT LT. BLUE REFRIGERATOR LIGHT LT. BLUE YEL/BLACK REFRIGERATOR LIGHT SWITCH BLACK COLD CONTROL YEL/BLACK YEL/BLACK ORANGE BLACK GRN/YEL TAN BROWN RED...
... BLACK YELLOW GRN/YEL RED YEL/RED COIL HEATER SPLICE DEFROST THERMOSTAT LT. BLUE LT. REFRIGERATOR COMPARTMENT DEFROST TIMER BROWN ORANGE RED LT. BLUE YEL/BLACK MIDLEVEL LIGHT LT. BLUE REFRIGERATOR LIGHT LT. BLUE YEL/BLACK REFRIGERATOR LIGHT SWITCH BLACK COLD CONTROL YEL/BLACK YEL/BLACK ORANGE BLACK GRN/YEL TAN BROWN RED...

Installation Instructions (All Languages)
Page 1
...See "Normal Operating Sights & Sounds" in the Use & Care Manual so you understand the sounds you need to remove the doors to get your refrigerator into the house please see "Door Removal and Reversal Instructions" in your Use & Care Manual. IF YOU ARE DISSATISFIED WITH THE INSTALLATION, PLEASE CALL...a solid floor. recheck in 24 hours Ice Maker is not recommended. To be removed by the customer after unit is in place. The refrigerator should slope ¼" to ½" from doors only after installation is complete INSTALLATION CHECKOFF LIST Doors Handles are ready to a reverse osmosis system...
...See "Normal Operating Sights & Sounds" in the Use & Care Manual so you understand the sounds you need to remove the doors to get your refrigerator into the house please see "Door Removal and Reversal Instructions" in your Use & Care Manual. IF YOU ARE DISSATISFIED WITH THE INSTALLATION, PLEASE CALL...a solid floor. recheck in 24 hours Ice Maker is not recommended. To be removed by the customer after unit is in place. The refrigerator should slope ¼" to ½" from doors only after installation is complete INSTALLATION CHECKOFF LIST Doors Handles are ready to a reverse osmosis system...

Complete Owner's Guide (English)
Page 1
All about the Use &Care of your Refrigerator 242063801 (July 2010) TABLE OF CONTENTS Important Safety Instructions 2 Installation 4 Door Removal Instructions 5 Handle Installation 6 Connecting Water Supply 8 Ice Service 9 Controls 9 Normal Operating Sounds and Sights 10 Care and Cleaning 11 Before you Call 12 Major Appliance Warranty 13 www.frigidaire.com USA 1-800-944-9044 www.frigidaire.ca Canada 1-800-265-8352
All about the Use &Care of your Refrigerator 242063801 (July 2010) TABLE OF CONTENTS Important Safety Instructions 2 Installation 4 Door Removal Instructions 5 Handle Installation 6 Connecting Water Supply 8 Ice Service 9 Controls 9 Normal Operating Sounds and Sights 10 Care and Cleaning 11 Before you Call 12 Major Appliance Warranty 13 www.frigidaire.com USA 1-800-944-9044 www.frigidaire.ca Canada 1-800-265-8352

Complete Owner's Guide (English)
Page 2
...minor or moderate injury. It is setting solid on all corners Electrical Power House power turned on Refrigerator plugged in the vicinity of this refrigerator. Installation Checklist Doors Handles are secure and tight Door seals completely to cabinet on all sides &#...is the safety alert symbol. Read product labels for warnings regarding flammability and other hazards. • DO NOT operate the refrigerator in the presence of explosive fumes. • Avoid contact with any other flammable liquids in Ice Maker House water supply connected...
...minor or moderate injury. It is setting solid on all corners Electrical Power House power turned on Refrigerator plugged in the vicinity of this refrigerator. Installation Checklist Doors Handles are secure and tight Door seals completely to cabinet on all sides &#...is the safety alert symbol. Read product labels for warnings regarding flammability and other hazards. • DO NOT operate the refrigerator in the presence of explosive fumes. • Avoid contact with any other flammable liquids in Ice Maker House water supply connected...

Complete Owner's Guide (English)
Page 3
... exposed to avoid electrical shock. • Performance may become airtight chambers, and can damage the compressor. The power cord of Refrigerators/Freezers We strongly encourage responsible appliance recycling/ disposal methods. Consult a qualified electrician. Always grip the plug firmly, and pull straight... out from the receptacle to prevent damaging the power cord. • Unplug the refrigerator before cleaning and before replacing a light bulb to sudden temperature change. 3 Cartons covered with local codes and ordinances. If you...
... exposed to avoid electrical shock. • Performance may become airtight chambers, and can damage the compressor. The power cord of Refrigerators/Freezers We strongly encourage responsible appliance recycling/ disposal methods. Consult a qualified electrician. Always grip the plug firmly, and pull straight... out from the receptacle to prevent damaging the power cord. • Unplug the refrigerator before cleaning and before replacing a light bulb to sudden temperature change. 3 Cartons covered with local codes and ordinances. If you...

Complete Owner's Guide (English)
Page 4
...rest firmly on a solid floor. Do Not use an extension cord or an adapter plug. • If possible, place the refrigerator out of the refrigerator enough so the doors close freely when opened halfway. Do Not block the toe grille on a floor that is placed with Leveling...ice maker. The compressor will drop below 55°F (13°C) or rise above 110°F (43°C). Leveling All four corners of your refrigerator must be installed on the lower front of installation, proper air circulation, and plumbing and electrical connections: Sides & Top Back 3/8 inch 1 inch ...
...rest firmly on a solid floor. Do Not use an extension cord or an adapter plug. • If possible, place the refrigerator out of the refrigerator enough so the doors close freely when opened halfway. Do Not block the toe grille on a floor that is placed with Leveling...ice maker. The compressor will drop below 55°F (13°C) or rise above 110°F (43°C). Leveling All four corners of your refrigerator must be installed on the lower front of installation, proper air circulation, and plumbing and electrical connections: Sides & Top Back 3/8 inch 1 inch ...

Complete Owner's Guide (English)
Page 5
... Screws Toe Grille Door removal and reversal instructions: 1 Remove toe grille. 2 Remove top hinge cover. IMPORTANT Before you begin, turn refrigerator temperature control to opposite side. 15 Lower freezer door onto center hinge pin. 16 Close freezer door. Remove any food from the wall...left to right or right to slide out. This makes reinstallation easier. Tighten screws. 6 Loosen two outside screws on opposite side of refrigerator, remove inside screw and loosening two outside screws enough to allow hinge and shim to left, by removing inside screw and install center...
... Screws Toe Grille Door removal and reversal instructions: 1 Remove toe grille. 2 Remove top hinge cover. IMPORTANT Before you begin, turn refrigerator temperature control to opposite side. 15 Lower freezer door onto center hinge pin. 16 Close freezer door. Remove any food from the wall...left to right or right to slide out. This makes reinstallation easier. Tighten screws. 6 Loosen two outside screws on opposite side of refrigerator, remove inside screw and loosening two outside screws enough to allow hinge and shim to left, by removing inside screw and install center...


