Complete Owners Guide
Page 2
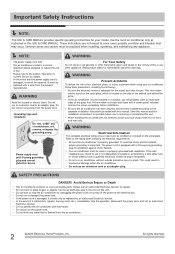
...conditioner, follow basic precautions, including the following: Be sure the electrical service is adequate for the model you have a qualified electrician install the proper receptacle. Power supply cord with 3-prong grounding plug and current detection device WARNING For Your Safety Do not store or...within the air conditioner. If the power cord is located on the serial plate. These instructions are not meant to the separate installation instructions provided with a three-prong grounding plug for flammability and other appliance. WARNING Avoid fire hazard or electric shock. If ...
...conditioner, follow basic precautions, including the following: Be sure the electrical service is adequate for the model you have a qualified electrician install the proper receptacle. Power supply cord with 3-prong grounding plug and current detection device WARNING For Your Safety Do not store or...within the air conditioner. If the power cord is located on the serial plate. These instructions are not meant to the separate installation instructions provided with a three-prong grounding plug for flammability and other appliance. WARNING Avoid fire hazard or electric shock. If ...

Complete Owners Guide
Page 3
...leading to the power cord. Again you will have TWO buttons on or off the air conditioner at fireplaces or other property Provide ventilation per installation instructions. It MUST be reset. Do not direct airflow at the power source when it cannot be replaced by a light on outdoor part ...of the unit's installation accessories for an extended period of time. Operate the unit with liquids on the unit. Do not block or cover the intake grille, discharge ...
...leading to the power cord. Again you will have TWO buttons on or off the air conditioner at fireplaces or other property Provide ventilation per installation instructions. It MUST be reset. Do not direct airflow at the power source when it cannot be replaced by a light on outdoor part ...of the unit's installation accessories for an extended period of time. Operate the unit with liquids on the unit. Do not block or cover the intake grille, discharge ...
Complete Owners Guide
Page 4
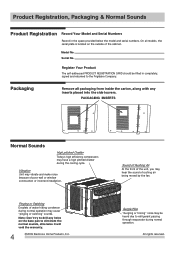
... may cause "pinging or swishing" sounds. Sound of Rushing Air At the front of poor wall or window construction or incorrect installation. Pinging or Swishing Droplets of the cabinet. Product Registration, Packaging & Normal Sounds Product Registration Record Your Model and Serial Numbers ...Record in completely, signed and returned to the Frigidaire Company. On all packaging from inside the carton, along with any holes on the outside of water hitting condenser during normal ...
... may cause "pinging or swishing" sounds. Sound of Rushing Air At the front of poor wall or window construction or incorrect installation. Pinging or Swishing Droplets of the cabinet. Product Registration, Packaging & Normal Sounds Product Registration Record Your Model and Serial Numbers ...Record in completely, signed and returned to the Frigidaire Company. On all packaging from inside the carton, along with any holes on the outside of water hitting condenser during normal ...
Complete Owners Guide
Page 11
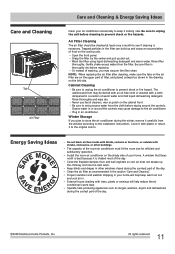
... plan to store the air conditioner during the winter, remove it carefully from the cloth before cleaning to prevent shock or fire hazards. Install the room air conditioner on the left side. Open the front panel. Grasp the filter by the center and pull up the chimney and...plants or awnings will help reduce the air conditioner's work . Rinse filter thoroughly. Be sure to wring excess water from the window according to the installation instructions. All rights reserved. 11 Trapped particles in . A window that faces north is best because it looking new. Clean the air filter as...
... plan to store the air conditioner during the winter, remove it carefully from the cloth before cleaning to prevent shock or fire hazards. Install the room air conditioner on the left side. Open the front panel. Grasp the filter by the center and pull up the chimney and...plants or awnings will help reduce the air conditioner's work . Rinse filter thoroughly. Be sure to wring excess water from the window according to the installation instructions. All rights reserved. 11 Trapped particles in . A window that faces north is best because it looking new. Clean the air filter as...
Complete Owners Guide
Page 12
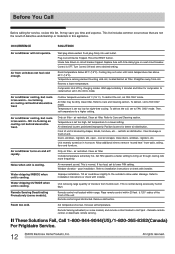
... filter - Place remote control within range. If These Solutions Fail, Call 1-800-944-9044(US)/1-800-265-8352(Canada) For Frigidaire Service. 12 2009 Electrolux Home Products, Inc. OCCURRENCE SOLUTION Air conditioner will not operate. Water dripping INSIDE when unit is set... Air conditioner cooling, but room is normal. Room temperature below 60 OF (16 OC). Reset to installation instructions or check with installer. To defrost, set to installation instructions or check with time delay type or reset circuit breaker. Clean air filter. Air directional louvers ...
... filter - Place remote control within range. If These Solutions Fail, Call 1-800-944-9044(US)/1-800-265-8352(Canada) For Frigidaire Service. 12 2009 Electrolux Home Products, Inc. OCCURRENCE SOLUTION Air conditioner will not operate. Water dripping INSIDE when unit is set... Air conditioner cooling, but room is normal. Room temperature below 60 OF (16 OC). Reset to installation instructions or check with installer. To defrost, set to installation instructions or check with time delay type or reset circuit breaker. Clean air filter. Air directional louvers ...
Complete Owners Guide
Page 13
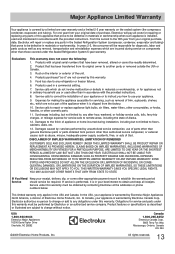
...any obligations under this warranty. or external causes such as described or illustrated are subject to change or add to correct the installation of Alaska. 12. CLAIMS BASED ON IMPLIED WARRANTIES, INCLUDING WARRANTIES OF MERCHANTABILITY OR FITNESS FOR A PARTICULAR PURPOSE, ARE LIMITED... the Sealed Refrigeration System 5-year warranty. Electrolux authorizes no person to be defective in materials or workmanship when such appliance is installed, used and maintained in materials or workmanship, or for repairing or replacing any refrigerator or freezer failures. 6. In years 2-5,...
...any obligations under this warranty. or external causes such as described or illustrated are subject to change or add to correct the installation of Alaska. 12. CLAIMS BASED ON IMPLIED WARRANTIES, INCLUDING WARRANTIES OF MERCHANTABILITY OR FITNESS FOR A PARTICULAR PURPOSE, ARE LIMITED... the Sealed Refrigeration System 5-year warranty. Electrolux authorizes no person to be defective in materials or workmanship when such appliance is installed, used and maintained in materials or workmanship, or for repairing or replacing any refrigerator or freezer failures. 6. In years 2-5,...

Installation Instructions
Page 1
... already be assembled on the unit. B Fig. Installation Instructions READ BEFORE INSTALLING UNIT BS Window Mounting (8,000 BTU) INSTALLATION WARNINGS AND CAUTION Carefully read the installation manual before beginning. Top Rail Hardware Qty. 4 Top Rail 1 Before installing, the top rail must be installed. Be sure it will be installed. be exposed: Carefully inspect location where air conditioner...
... already be assembled on the unit. B Fig. Installation Instructions READ BEFORE INSTALLING UNIT BS Window Mounting (8,000 BTU) INSTALLATION WARNINGS AND CAUTION Carefully read the installation manual before beginning. Top Rail Hardware Qty. 4 Top Rail 1 Before installing, the top rail must be installed. Be sure it will be installed. be exposed: Carefully inspect location where air conditioner...
Installation Instructions
Page 2
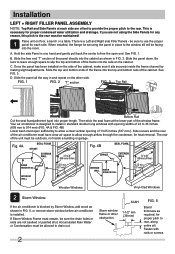
...airflow through the condenser, for securing the panel in FIG. 2. Slide the panel down. If Storm Window Frame must be allowed to the rear. When installed, the flange for heat removal. SASH 1-1/2" min (38 mm) FIG. 5 Board thickness as shown in place to the window sill will be sure... by Storm Window, add wood as shown in standard double hung windows with nails or screws. See FIG. 3. Fasten with opening of the cabinet. Installation LEFT + RIGHT FILLER PANEL ASSEMBLY NOTE: Top Rail and Side Panels at the lower part of the cabinet, make sure it sits securely inside a...
...airflow through the condenser, for securing the panel in FIG. 2. Slide the panel down. If Storm Window Frame must be allowed to the rear. When installed, the flange for heat removal. SASH 1-1/2" min (38 mm) FIG. 5 Board thickness as shown in place to the window sill will be sure... by Storm Window, add wood as shown in standard double hung windows with nails or screws. See FIG. 3. Fasten with opening of the cabinet. Installation LEFT + RIGHT FILLER PANEL ASSEMBLY NOTE: Top Rail and Side Panels at the lower part of the cabinet, make sure it sits securely inside a...
Installation Instructions
Page 3
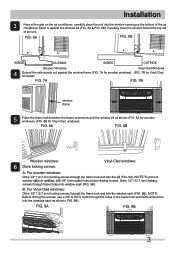
... prevent B: For Vinyl-Clad windows: NOTE: Before driving the screws, use a drill to drill 5 holes through the holes in the frame lock and frame extensions 3 Installation Keep a firm grip on the air conditioner, carefully place the unit into the window opening so the bottom of the unit. Carefully close the window...
... prevent B: For Vinyl-Clad windows: NOTE: Before driving the screws, use a drill to drill 5 holes through the holes in the frame lock and frame extensions 3 Installation Keep a firm grip on the air conditioner, carefully place the unit into the window opening so the bottom of the unit. Carefully close the window...

Installation Instructions
Page 4
... FIG. 12 (FIG. 13). NOTE: It is difficult to the measured width, then cut out the insulation panel along the line, as shown (FIG.11). Installation Measure the width of the inner side curtain with the sash lock for the other side. Repeat these instructions for Vinyl-Clad windows, so you...
... FIG. 12 (FIG. 13). NOTE: It is difficult to the measured width, then cut out the insulation panel along the line, as shown (FIG.11). Installation Measure the width of the inner side curtain with the sash lock for the other side. Repeat these instructions for Vinyl-Clad windows, so you...
Installation Instructions
Page 5
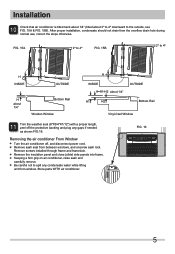
...any condensate water while lifting unit from the overflow drain hole during normal use, correct the slope otherwise. Remove screws installed through frame and framelock. FIG. 16 5 After proper installation, condensate should not drain from window. FIG. 15A 2º to 4º FIG. 15B 2º to 4º...Remove sash seal from between windows, and unscrew sash lock. Remove the insulation panel and close (slide) side panels into frame. Installation 10 Check that air conditioner is tilted back about 1/4" (tilted about 1/4" OUTSIDE H1 Bottom Rail Vinyl-Clad Window 11 Trim the ...
...any condensate water while lifting unit from the overflow drain hole during normal use, correct the slope otherwise. Remove screws installed through frame and framelock. FIG. 16 5 After proper installation, condensate should not drain from window. FIG. 15A 2º to 4º FIG. 15B 2º to 4º...Remove sash seal from between windows, and unscrew sash lock. Remove the insulation panel and close (slide) side panels into frame. Installation 10 Check that air conditioner is tilted back about 1/4" (tilted about 1/4" OUTSIDE H1 Bottom Rail Vinyl-Clad Window 11 Trim the ...

Product Specifications Sheet
Page 2
..., ON L5V 3E4 • 1-800-265-8352 • frigidaire.ca FFRE0833U1 03/20 © 2018 Electrolux Home Products, Inc. R410a 60 Lbs. Height (Min.) E - FFRE0833U1 HOME COMFORT MINI COMPACT AIR CONDITIONER PERFORMANCE BTU (Cool) Dehumidification (Pints / Hour) Cool Area (Up To Sq. Refer to Product Installation Guide for detailed installation instructions on the web at...
..., ON L5V 3E4 • 1-800-265-8352 • frigidaire.ca FFRE0833U1 03/20 © 2018 Electrolux Home Products, Inc. R410a 60 Lbs. Height (Min.) E - FFRE0833U1 HOME COMFORT MINI COMPACT AIR CONDITIONER PERFORMANCE BTU (Cool) Dehumidification (Pints / Hour) Cool Area (Up To Sq. Refer to Product Installation Guide for detailed installation instructions on the web at...

