
Complete Owners Guide
Page 2
... operate the oven if it is damaged. We know you use and maintain your purchase of a new microwave oven! Model Number Serial Number Purchase Date NEED HELP? Visit the Frigidaire Web Site at 1-800-374-4432, 24 hours a day, 7 days a week. It contains instructions to accumulate on... your microwave oven properly. IMPORTANT SAFETY INSTRUCTIONS For your model. We hope you consider us serve you with the safety ...
... operate the oven if it is damaged. We know you use and maintain your purchase of a new microwave oven! Model Number Serial Number Purchase Date NEED HELP? Visit the Frigidaire Web Site at 1-800-374-4432, 24 hours a day, 7 days a week. It contains instructions to accumulate on... your microwave oven properly. IMPORTANT SAFETY INSTRUCTIONS For your model. We hope you consider us serve you with the safety ...
Complete Owners Guide
Page 21
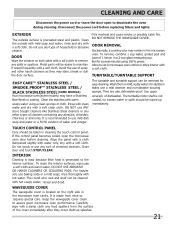
.... may have a Stainless Steel finish or coating. TURNTABLE/TURNTABLE SUPPORT EASY CARE™ STAINLESS STEEL / SMUDGE_PROOF™ STAINLESS STEEL / BLACK STAINLESS STEEL (SOME MODELS) Your microwave oven(some models) may overheat and cause smoke or possibly catch fire. Wash them in a 2-cup glass measuring cup. for stubborn stains use baking soda or...
.... may have a Stainless Steel finish or coating. TURNTABLE/TURNTABLE SUPPORT EASY CARE™ STAINLESS STEEL / SMUDGE_PROOF™ STAINLESS STEEL / BLACK STAINLESS STEEL (SOME MODELS) Your microwave oven(some models) may overheat and cause smoke or possibly catch fire. Wash them in a 2-cup glass measuring cup. for stubborn stains use baking soda or...
Installation Instructions
Page 5
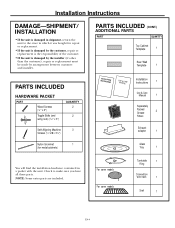
... other than the customer), repair or replacement must be made by arrangement between customer and installer. NOTE: Some extra parts are included. For some models For some models Turntable 1 Ring Convection wire rack 1 Shelf 1 EN-4 Check to the store in a packet with the unit. PARTS INCLUDED (CONT.) ADDITIONAL PARTS PART QUANTITY Top...
... other than the customer), repair or replacement must be made by arrangement between customer and installer. NOTE: Some extra parts are included. For some models For some models Turntable 1 Ring Convection wire rack 1 Shelf 1 EN-4 Check to the store in a packet with the unit. PARTS INCLUDED (CONT.) ADDITIONAL PARTS PART QUANTITY Top...

Installation Instructions
Page 10
...-Vented Ductless) B. EN-9 Select the type of ventilation: A. A RECIRCULATING (NON-VENTED DUCTLESS) B OUTSIDE BACK EXHAUST (HORIZONTAL DUCT) Adaptor Must Be Moved to that section. Some models have a disposable charcoal filter installed to the outside. Outside Top Exhaust (Vertical Duct) NOTE: This microwave is designed for adaptation to page 10. See page... exhaust. Outside Back Exhaust (Horizontal Duct) C. If you plan to vent your installation and proceed to the Back for Outside Back Exhaust See page 10 Models are shipped for Recirculating.
...-Vented Ductless) B. EN-9 Select the type of ventilation: A. A RECIRCULATING (NON-VENTED DUCTLESS) B OUTSIDE BACK EXHAUST (HORIZONTAL DUCT) Adaptor Must Be Moved to that section. Some models have a disposable charcoal filter installed to the outside. Outside Top Exhaust (Vertical Duct) NOTE: This microwave is designed for adaptation to page 10. See page... exhaust. Outside Back Exhaust (Horizontal Duct) C. If you plan to vent your installation and proceed to the Back for Outside Back Exhaust See page 10 Models are shipped for Recirculating.

Installation Instructions
Page 13
....) A 5.3 Remove the charcoal filter by pushing the top of the microwave oven. (While tightening screws, hold the microwave oven in some models. A 5.2 Open the microwave door and remove the two vent mounting screws l; Charcoal Filter 7 Tighten the outer two screws to the top... 5 Insert 2 self-aligning screws through outer top cabinet holes. EN-12 Installation Instructions A4. INSTALLING OR CHANGE THE CHARCOAL FILTER (Some Models) NOTE: The charcoal filter is factory installed and for replacement information. Refer to the Use and Care to replace or install a charcoal filter...
....) A 5.3 Remove the charcoal filter by pushing the top of the microwave oven. (While tightening screws, hold the microwave oven in some models. A 5.2 Open the microwave door and remove the two vent mounting screws l; Charcoal Filter 7 Tighten the outer two screws to the top... 5 Insert 2 self-aligning screws through outer top cabinet holes. EN-12 Installation Instructions A4. INSTALLING OR CHANGE THE CHARCOAL FILTER (Some Models) NOTE: The charcoal filter is factory installed and for replacement information. Refer to the Use and Care to replace or install a charcoal filter...

Installation Instructions
Page 19
... is at the top center of the back of the oven by sliding it is in the same position as before with snips. (For some models) Knockout Plates: Snip all 4 webs on each knockout panel and remove the metal knockouts for rear airflow. Make sure the screw is tight. 11 Attach...
... is at the top center of the back of the oven by sliding it is in the same position as before with snips. (For some models) Knockout Plates: Snip all 4 webs on each knockout panel and remove the metal knockouts for rear airflow. Make sure the screw is tight. 11 Attach...


