Complete Owner's Guide
Page 1
All about the Use &Care of your Refrigerator 807876504 (April 2014) TABLE OF CONTENTS Important Safety Instructions 2 Controls 13 Installation 4 Normal Operating Sounds and Sights..........15 Door Removal/Reversal Instructions 6 Care and Cleaning 16 Handle Installation 8 Before you Call 18 Connecting Water Supply 10 Major Appliance Warranty 19 Ice Service 12 www.frigidaire.com USA 1-800-944-9044 www.frigidaire.ca Canada 1-800-265-8352
All about the Use &Care of your Refrigerator 807876504 (April 2014) TABLE OF CONTENTS Important Safety Instructions 2 Controls 13 Installation 4 Normal Operating Sounds and Sights..........15 Door Removal/Reversal Instructions 6 Care and Cleaning 16 Handle Installation 8 Before you Call 18 Connecting Water Supply 10 Major Appliance Warranty 19 Ice Service 12 www.frigidaire.com USA 1-800-944-9044 www.frigidaire.ca Canada 1-800-265-8352

Complete Owner's Guide
Page 2
...; Avoid contact with rugs, bedspreads, plastic sheets or stretch wrap may result in Ice Maker House water supply connected to refrigerator No water leaks present at all connections - Staples can quickly cause suffocation. WARNING Final Checks Shipping material removed Fresh food and freezer temperatures set Crisper humidity controls set Registration card sent in WARNING indicates a potentially hazardous situation which, if not avoided...
...; Avoid contact with rugs, bedspreads, plastic sheets or stretch wrap may result in Ice Maker House water supply connected to refrigerator No water leaks present at all connections - Staples can quickly cause suffocation. WARNING Final Checks Shipping material removed Fresh food and freezer temperatures set Crisper humidity controls set Registration card sent in WARNING indicates a potentially hazardous situation which, if not avoided...
Complete Owner's Guide
Page 3
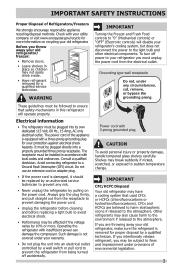
... service technician. Avoid connecting refrigerator to the atmosphere. Grounding type wall receptacle Do not, under provisions of environmental legislation. 3 The power cord of Refrigerators/Freezers We strongly encourage responsible appliance recycling/disposal methods. IMPORTANT SAFETY INSTRUCTIONS Proper Disposal of the appliance is equipped with 3-prong grounded plug CAUTION To avoid personal injury or property damage, handle tempered glass shelves carefully. Operating the refrigerator with local codes...
... service technician. Avoid connecting refrigerator to the atmosphere. Grounding type wall receptacle Do not, under provisions of environmental legislation. 3 The power cord of Refrigerators/Freezers We strongly encourage responsible appliance recycling/disposal methods. IMPORTANT SAFETY INSTRUCTIONS Proper Disposal of the appliance is equipped with 3-prong grounded plug CAUTION To avoid personal injury or property damage, handle tempered glass shelves carefully. Operating the refrigerator with local codes...
Complete Owner's Guide
Page 4
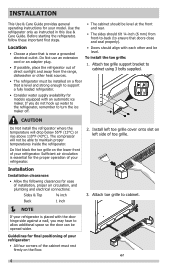
... installed on left side of installation, proper air circulation, and plumbing and electrical connections: Sides & Top ⅜ inch Back 1 inch NOTE If your refrigerator is essential for ease of toe grille. 3. Attach toe grille support bracket to turn the ice maker off. Guidelines for models equipped with the door hinge side against a wall, you do not hook up water to the refrigerator, remember to cabinet using 3 bolts supplied...
... installed on left side of installation, proper air circulation, and plumbing and electrical connections: Sides & Top ⅜ inch Back 1 inch NOTE If your refrigerator is essential for ease of toe grille. 3. Attach toe grille support bracket to turn the ice maker off. Guidelines for models equipped with the door hinge side against a wall, you do not hook up water to the refrigerator, remember to cabinet using 3 bolts supplied...

Complete Owner's Guide
Page 6
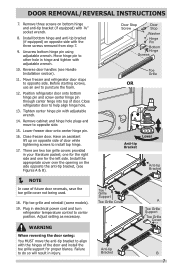
..., from left , by moving the door hinges from door shelves. Door removal and reversal instructions: 1. Set door aside. Tighten screws. 6. DOOR REMOVAL/REVERSAL INSTRUCTIONS Tools Necessary: Adjustable Wrench or PhillipsTM Head Socket Wrench Set Top Hinge Cover Front Screw Top Hinge Cover Rear Screw or 3/8" Fixed Wrench Top Hinge Screw Bottom Hinge Screw NOTE The direction in which your refrigerator doors open (door swing) can be performed by removing inside screw and install center hinge. This makes reinstallation easier. Unscrew center hinge pin using...
..., from left , by moving the door hinges from door shelves. Door removal and reversal instructions: 1. Set door aside. Tighten screws. 6. DOOR REMOVAL/REVERSAL INSTRUCTIONS Tools Necessary: Adjustable Wrench or PhillipsTM Head Socket Wrench Set Top Hinge Cover Front Screw Top Hinge Cover Rear Screw or 3/8" Fixed Wrench Top Hinge Screw Bottom Hinge Screw NOTE The direction in which your refrigerator doors open (door swing) can be performed by removing inside screw and install center hinge. This makes reinstallation easier. Unscrew center hinge pin using...
Complete Owner's Guide
Page 7
... grille cover not being used. 18. Adjust setting as necessary. Have an assistant lift up on the side opposite the anti-tip bracket, (see Handle Installation section). 11. Door Stop Screw Door Stop Washer Hinge Pin Bottom Hinge Screws Toe Grille OR Anti-tip Bracket Lower Anti-tip Bracket Toe Grille Support Toe Grille Cover A Toe Grille Support Toe Grille Cover Anti-tip Bracket B 7 DOOR REMOVAL/REVERSAL INSTRUCTIONS 7. Move freezer and refrigerator door stops...
... grille cover not being used. 18. Adjust setting as necessary. Have an assistant lift up on the side opposite the anti-tip bracket, (see Handle Installation section). 11. Door Stop Screw Door Stop Washer Hinge Pin Bottom Hinge Screws Toe Grille OR Anti-tip Bracket Lower Anti-tip Bracket Toe Grille Support Toe Grille Cover A Toe Grille Support Toe Grille Cover Anti-tip Bracket B 7 DOOR REMOVAL/REVERSAL INSTRUCTIONS 7. Move freezer and refrigerator door stops...
Complete Owner's Guide
Page 10
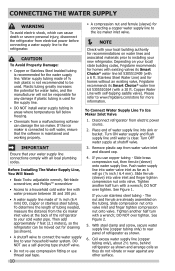
... panel of water supply line into sink or bucket. Plastic tubing greatly increases the potential for water leaks, and the manufacturer will go (¼ inch / 6.4 mm). Depending on water lines and associated materials prior to installing your new refrigerator. Please refer to www.frigidaire.com/store for homes without an existing valve, Frigidaire recommends its Smart Choice® water line kit 5305513409 (with self-tapping saddle valve). To Connect Water Supply Line To Ice Maker...
... panel of water supply line into sink or bucket. Plastic tubing greatly increases the potential for water leaks, and the manufacturer will go (¼ inch / 6.4 mm). Depending on water lines and associated materials prior to installing your new refrigerator. Please refer to www.frigidaire.com/store for homes without an existing valve, Frigidaire recommends its Smart Choice® water line kit 5305513409 (with self-tapping saddle valve). To Connect Water Supply Line To Ice Maker...
Complete Owner's Guide
Page 12
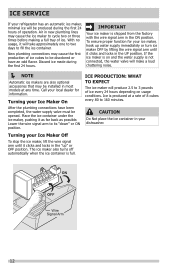
... most models at a rate of ice every 24 hours depending on and the water supply is shipped from the factory with the wire signal arm in your dishwasher. ON OFF Wire Signal Arm 12 ICE SERVICE If your refrigerator has an automatic ice maker, minimal ice will be produced during the first 24 hours. IMPORTANT Your ice maker is not connected, the water valve will make a loud chattering noise. ...
... most models at a rate of ice every 24 hours depending on and the water supply is shipped from the factory with the wire signal arm in your dishwasher. ON OFF Wire Signal Arm 12 ICE SERVICE If your refrigerator has an automatic ice maker, minimal ice will be produced during the first 24 hours. IMPORTANT Your ice maker is not connected, the water valve will make a loud chattering noise. ...
Complete Owner's Guide
Page 13
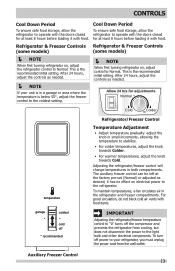
...-set (Normal) or adjusted as needed . NOTE If your refrigerator, you must unplug the power cord from cooling, but does not disconnect the power to the light bulb and other electrical components. CONTROLS Cool Down Period To ensure safe food storage, allow the refrigerator to operate with food. Allow 24 hrs for adjustments Normal Cold Colder temperature Refrigerator/Freezer Control Temperature Adjustment • Adjust temperature gradually: adjust the knob in both compartments. Adjusting the refrigerator/freezer control will change temperatures...
...-set (Normal) or adjusted as needed . NOTE If your refrigerator, you must unplug the power cord from cooling, but does not disconnect the power to the light bulb and other electrical components. CONTROLS Cool Down Period To ensure safe food storage, allow the refrigerator to operate with food. Allow 24 hrs for adjustments Normal Cold Colder temperature Refrigerator/Freezer Control Temperature Adjustment • Adjust temperature gradually: adjust the knob in both compartments. Adjusting the refrigerator/freezer control will change temperatures...
Complete Owner's Guide
Page 15
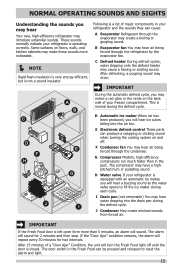
... defrost control These parts can cause: A Evaporator Refrigerant through the condenser. I Following is a list of your freezer compartment. After defrosting, a popping sound may create a boiling or gurgling sound. G Compressor Modern, high-efficiency compressors run much faster than 5 minutes, an alarm will sound. J Condenser May create minimal sounds from forced air. D Automatic ice maker When ice has been produced, you will hear ice cubes falling into the drain pan during...
... defrost control These parts can cause: A Evaporator Refrigerant through the condenser. I Following is a list of your freezer compartment. After defrosting, a popping sound may create a boiling or gurgling sound. G Compressor Modern, high-efficiency compressors run much faster than 5 minutes, an alarm will sound. J Condenser May create minimal sounds from forced air. D Automatic ice maker When ice has been produced, you will hear ice cubes falling into the drain pan during...
Complete Owner's Guide
Page 16
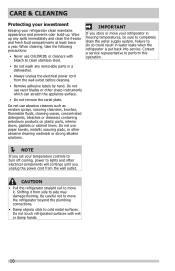
... plastic parts, interior doors, gaskets or cabinet liners. Do not touch refrigerated surfaces with bleach to completely drain the water supply system. CAUTION • Pull the refrigerator straight out to move it from side to lights and other abrasive cleaning materials or strong alkaline solutions. Wipe up . Shifting it . IMPORTANT If you set your temperature controls to turn off cooling, power to side may damage flooring. Be careful...
... plastic parts, interior doors, gaskets or cabinet liners. Do not touch refrigerated surfaces with bleach to completely drain the water supply system. CAUTION • Pull the refrigerator straight out to move it from side to lights and other abrasive cleaning materials or strong alkaline solutions. Wipe up . Shifting it . IMPORTANT If you set your temperature controls to turn off cooling, power to side may damage flooring. Be careful...

Complete Owner's Guide
Page 17
... follow manufacturer's instructions. CAUTION: Wear gloves when replacing light bulbs to clean smooth handles. CARE & CLEANING Part Interior & Door Liners Door Gaskets Drawers & Bins Glass Shelves Toe Grille Exterior & Handles Exterior & Handles (Stainless Steel Models Only) Replacing Light Bulbs Care & Cleaning Tips What To Use Tips and Precautions • Soap and water • Baking soda and water Use 2 tablespoons of baking soda in warm water. DO NOT use CHLORIDE or cleaners with a clean soft cloth. • Soap and water Use a soft cloth to clean drawer runners and...
... follow manufacturer's instructions. CAUTION: Wear gloves when replacing light bulbs to clean smooth handles. CARE & CLEANING Part Interior & Door Liners Door Gaskets Drawers & Bins Glass Shelves Toe Grille Exterior & Handles Exterior & Handles (Stainless Steel Models Only) Replacing Light Bulbs Care & Cleaning Tips What To Use Tips and Precautions • Soap and water • Baking soda and water Use 2 tablespoons of baking soda in warm water. DO NOT use CHLORIDE or cleaners with a clean soft cloth. • Soap and water Use a soft cloth to clean drawer runners and...
Complete Owner's Guide
Page 18
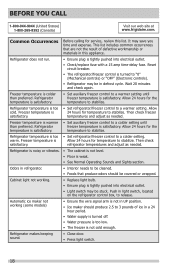
.... Freezer temperature is satisfactory. Reset circuit breaker. • The refrigerator/freezer control is satisfactory. Then check freezer satisfactory. Refrigerator freezer temperature is too • Set refrigerator/freezer control to 3 pounds of defective workmanship or materials in this list. warm. refrigerator temperatures and adjust as needed . Automatic ice maker not working . • Replace light bulb. • Ensure plug is colder than preferred. Freezer temperature is tightly pushed into electrical outlet. • Check/replace fuse with a 15 amp...
.... Freezer temperature is satisfactory. Reset circuit breaker. • The refrigerator/freezer control is satisfactory. Then check freezer satisfactory. Refrigerator freezer temperature is too • Set refrigerator/freezer control to 3 pounds of defective workmanship or materials in this list. warm. refrigerator temperatures and adjust as needed . Automatic ice maker not working . • Replace light bulb. • Ensure plug is colder than preferred. Freezer temperature is tightly pushed into electrical outlet. • Check/replace fuse with a 15 amp...
Complete Owner's Guide
Page 19
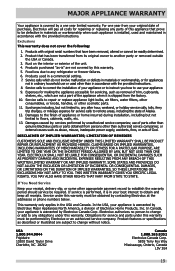
... expense for service and parts under this warranty must be performed by this warranty must be readily determined. 2. Products used and maintained in the USA and Canada. Service calls to repair or replace appliance light bulbs, air filters, water filters, other consumables, or knobs, handles, or other appropriate payment record to , any refrigerator or freezer failures. 6. Damages to the finish of appliance or home incurred during installation, including...
... expense for service and parts under this warranty must be performed by this warranty must be readily determined. 2. Products used and maintained in the USA and Canada. Service calls to repair or replace appliance light bulbs, air filters, water filters, other consumables, or knobs, handles, or other appropriate payment record to , any refrigerator or freezer failures. 6. Damages to the finish of appliance or home incurred during installation, including...

Installation Instructions
Page 1
...; Freezer door is level across the top Leveling Refrigerator is level, side to side and tilted ¼" (6mm) front to back Toe grille is properly attached to refrigerator No water leaks present at all materials for a water supply installation, including 25 feet of copper tubing and full instructions. Top Hinge Cover Top Hinge Shim Pin Door Stop Screw Door Stop Washer Hinge Pin Bottom Hinge Screws Center Hinge Toe Grille 9 Installation Checkoff List Doors Ice Maker...
...; Freezer door is level across the top Leveling Refrigerator is level, side to side and tilted ¼" (6mm) front to back Toe grille is properly attached to refrigerator No water leaks present at all materials for a water supply installation, including 25 feet of copper tubing and full instructions. Top Hinge Cover Top Hinge Shim Pin Door Stop Screw Door Stop Washer Hinge Pin Bottom Hinge Screws Center Hinge Toe Grille 9 Installation Checkoff List Doors Ice Maker...
Wiring Diagram
Page 1
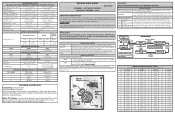
...Watts RPM Amps 3.1 1100 CW Opposite Shaft 0.03 Running EVAPORATOR FAN MOTOR Watts RPM Amps 6.2 2600 CW 0.05 Running ICE MAKER SPECIFICATIONS Electrical 115 vac (127 vac max) 60 Hertz Thermostat Heater Wattage Opens at 48°F (9°C) 165 vac Closes at 15°F ( -9°C) (ice maker with black housing) 9°F (-13°C) (ice maker with white housing) ICE MAKER CONNECTOR PLUG CONNECTIONS Wire Number Wire Color Connects to: 1 Green / Yellow Ground 2 Yellow Water Valve 3 Black Line 4 Light Blue Neutral ICE MAKER INFORMATION Test Cycling: Remove cover...
...Watts RPM Amps 3.1 1100 CW Opposite Shaft 0.03 Running EVAPORATOR FAN MOTOR Watts RPM Amps 6.2 2600 CW 0.05 Running ICE MAKER SPECIFICATIONS Electrical 115 vac (127 vac max) 60 Hertz Thermostat Heater Wattage Opens at 48°F (9°C) 165 vac Closes at 15°F ( -9°C) (ice maker with black housing) 9°F (-13°C) (ice maker with white housing) ICE MAKER CONNECTOR PLUG CONNECTIONS Wire Number Wire Color Connects to: 1 Green / Yellow Ground 2 Yellow Water Valve 3 Black Line 4 Light Blue Neutral ICE MAKER INFORMATION Test Cycling: Remove cover...
Wiring Diagram
Page 2
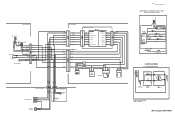
.../BLK RED/WHITE SERVICE CORD SEE COMPRESSOR WIRING CONDENSER FAN I /M WATER VALVE COMPRESSOR WIRING P.T.C. BLUE ERF-1500 BOARD COMP CN1-5 FAN CN1-9 HEATER CN1-3 LAMP CN1-7 NEUTRAL CN1-1/CN5-3 LINE CN5-1 CONDENSER FAN FRESH FOOD LIGHT SWITCH EVAPORATOR FAN COIL HEATER SAFETY/ DEFROST BI-METAL FRESH FOOD LIGHT NEUTRAL LINE AUTO ICE MAKER I /M WATER VALVE LIGHT, AIR & WATER BOX LT. STARTER WITH RUN CAPACITOR START 6 S S RUN 5 C M M 3 2 L1 OVERLOAD COMR MOTOR PTC STARTER RUN CAPACITOR * CAPACITOR IS ONLY USED WITH SOME...
.../BLK RED/WHITE SERVICE CORD SEE COMPRESSOR WIRING CONDENSER FAN I /M WATER VALVE COMPRESSOR WIRING P.T.C. BLUE ERF-1500 BOARD COMP CN1-5 FAN CN1-9 HEATER CN1-3 LAMP CN1-7 NEUTRAL CN1-1/CN5-3 LINE CN5-1 CONDENSER FAN FRESH FOOD LIGHT SWITCH EVAPORATOR FAN COIL HEATER SAFETY/ DEFROST BI-METAL FRESH FOOD LIGHT NEUTRAL LINE AUTO ICE MAKER I /M WATER VALVE LIGHT, AIR & WATER BOX LT. STARTER WITH RUN CAPACITOR START 6 S S RUN 5 C M M 3 2 L1 OVERLOAD COMR MOTOR PTC STARTER RUN CAPACITOR * CAPACITOR IS ONLY USED WITH SOME...
Product Specifications Sheet
Page 1
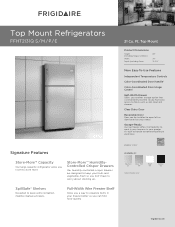
Top Mount Product Dimensions Height (Including Hinges & Rollers) Width Depth (Including Door) 69" 30" 31-3/4" More Easy-To-Use Features Independent Temperature Controls Color-Coordinated Door Handle1 Color-Coordinated Door Hinge Covers1 Half-Width Drawer Offers you another storage option that is conveniently located so you have to open left or right based on your freezer better so you don't have easy access to work in your...
Top Mount Product Dimensions Height (Including Hinges & Rollers) Width Depth (Including Door) 69" 30" 31-3/4" More Easy-To-Use Features Independent Temperature Controls Color-Coordinated Door Handle1 Color-Coordinated Door Hinge Covers1 Half-Width Drawer Offers you another storage option that is conveniently located so you have to open left or right based on your freezer better so you don't have easy access to work in your...

Product Specifications Sheet
Page 2
... Door Design Door Handle Design Cabinet Finish (Textured) Door Stops Door Hinge Covers Door Reverse Option Rollers - C A Top View B Recessed water line Recessed (ice maker models only) electrical outlet Allow 1" min. Refer to Product Installation Guide for 90° door swing which will ONLY allow for detailed installation instructions on the web at frigidaire.com. Product Dimensions A - Ft.) 20.5 Refrigerator Capacity (Cu. clearance at rear for safe operation. Hinges & Rollers) B - Always consult local and national electric and plumbing codes...
... Door Design Door Handle Design Cabinet Finish (Textured) Door Stops Door Hinge Covers Door Reverse Option Rollers - C A Top View B Recessed water line Recessed (ice maker models only) electrical outlet Allow 1" min. Refer to Product Installation Guide for 90° door swing which will ONLY allow for detailed installation instructions on the web at frigidaire.com. Product Dimensions A - Ft.) 20.5 Refrigerator Capacity (Cu. clearance at rear for safe operation. Hinges & Rollers) B - Always consult local and national electric and plumbing codes...

Product Specifications Sheet
Page 3
... will provide limited crisper access with restricted removal.) 31 3/4" 29 5/8" 69" with 3/8" rollers 68 1/4" with 3/8" rollers Water line inlet location (left bottom rear) 28 1/2" 34 1/8" Power cord location (right bottom rear) Allow 60" min. (with doors 90° open) Top Mount Refrigerator Specifications • Product Shipping Weight (approx.) - 220 Lbs. • An electrical supply with wall, to allow for 90° door opening* * When installing refrigerator adjacent to...
... will provide limited crisper access with restricted removal.) 31 3/4" 29 5/8" 69" with 3/8" rollers 68 1/4" with 3/8" rollers Water line inlet location (left bottom rear) 28 1/2" 34 1/8" Power cord location (right bottom rear) Allow 60" min. (with doors 90° open) Top Mount Refrigerator Specifications • Product Shipping Weight (approx.) - 220 Lbs. • An electrical supply with wall, to allow for 90° door opening* * When installing refrigerator adjacent to...


