
Complete Owner's Guide (English)
Page 1
All about the Use &Care of your Refrigerator 242063800 (November 2009) TABLE OF CONTENTS Important Safety Instructions 2 Installation 4 Door Removal Instructions 5 Handle Installation 6 Connecting Water Supply 8 Ice Service 9 Controls 9 Normal Operating Sounds and Sights 10 Care and Cleaning 11 Before you Call 12 Major Appliance Warranty 13 www.frigidaire.com USA 1-800-944-9044 www.frigidaire.ca Canada 1-800-265-8352
All about the Use &Care of your Refrigerator 242063800 (November 2009) TABLE OF CONTENTS Important Safety Instructions 2 Installation 4 Door Removal Instructions 5 Handle Installation 6 Connecting Water Supply 8 Ice Service 9 Controls 9 Normal Operating Sounds and Sights 10 Care and Cleaning 11 Before you Call 12 Major Appliance Warranty 13 www.frigidaire.com USA 1-800-944-9044 www.frigidaire.ca Canada 1-800-265-8352

Complete Owner's Guide (English)
Page 2
...; Freezer door is level across the top Leveling Refrigerator is level, side-to-side and tilted 1/4" (6mm) front-to-back Toe grille is properly attached to refrigerator Cabinet is setting solid on all corners Electrical Power House power turned on Refrigerator plugged in 24 hours Ice maker is important but not hazard-related. recheck in Ice Maker House water supply connected to refrigerator No water leaks...
...; Freezer door is level across the top Leveling Refrigerator is level, side-to-side and tilted 1/4" (6mm) front-to-back Toe grille is properly attached to refrigerator Cabinet is setting solid on all corners Electrical Power House power turned on Refrigerator plugged in 24 hours Ice maker is important but not hazard-related. recheck in Ice Maker House water supply connected to refrigerator No water leaks...

Complete Owner's Guide (English)
Page 3
... are getting rid of the temperature control panel (Electronic controls), or turning the Freezer and Fresh Food controls to sudden temperature change. 3 Operating the refrigerator with rugs, bedspreads, plastic sheets or stretch wrap may not easily climb inside. • Have refrigerant removed by 10% or more information on recycling your old refrigerator. IMPORTANT Pressing and holding the On/Off button for three (3) seconds, located on the left side of your refrigerator's cooling...
... are getting rid of the temperature control panel (Electronic controls), or turning the Freezer and Fresh Food controls to sudden temperature change. 3 Operating the refrigerator with rugs, bedspreads, plastic sheets or stretch wrap may not easily climb inside. • Have refrigerant removed by 10% or more information on recycling your old refrigerator. IMPORTANT Pressing and holding the On/Off button for three (3) seconds, located on the left side of your refrigerator's cooling...

Complete Owner's Guide (English)
Page 4
... your refrigerator must be installed on a floor that is placed with the door hinge side against a wall, you do not hook up water to the refrigerator, remember to support a fully loaded refrigerator. • Consider water supply availability for models equipped with an automatic ice maker. To level your refrigerator. The compressor will drop below 55°F (13°C) or rise above 110°F (43°C). Do Not use...
... your refrigerator must be installed on a floor that is placed with the door hinge side against a wall, you do not hook up water to the refrigerator, remember to support a fully loaded refrigerator. • Consider water supply availability for models equipped with an automatic ice maker. To level your refrigerator. The compressor will drop below 55°F (13°C) or rise above 110°F (43°C). Do Not use...
Complete Owner's Guide (English)
Page 5
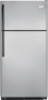
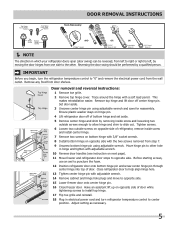
... Set OR Adjustable Wrench 3/8" Fixed Wrench NOTE The direction in which your refrigerator doors open (door swing) can be performed by removing inside screw and install center hinge. 7 Remove two screws on bottom hinge with 3/8" socket wrench. 8 Install bottom hinge on next page). 11 Move freezer and refrigerator door stops to other . Top Hinge Cover Top Hinge Door Stop Screw Door Stop Washer Hinge Pin Bottom Hinge Screws Toe Grille Door removal and reversal instructions: 1 Remove toe grille. 2 Remove top hinge cover. Remove top hinge and lift door...
... Set OR Adjustable Wrench 3/8" Fixed Wrench NOTE The direction in which your refrigerator doors open (door swing) can be performed by removing inside screw and install center hinge. 7 Remove two screws on bottom hinge with 3/8" socket wrench. 8 Install bottom hinge on next page). 11 Move freezer and refrigerator door stops to other . Top Hinge Cover Top Hinge Door Stop Screw Door Stop Washer Hinge Pin Bottom Hinge Screws Toe Grille Door removal and reversal instructions: 1 Remove toe grille. 2 Remove top hinge cover. Remove top hinge and lift door...

Complete Owner's Guide (English)
Page 6
... to reverse the doors, if necessary. IMPORTANT To ensure proper installation of door. Your model will have either a right hand or left hand door swing. Additionally, before installing the door handles, make sure the door swing is flush with the two (2) holes in the Use & Care Guide to installing the handles. Follow instructions in top of handle with the door, then tighten another 1/2 turn . Do not tighten the set screw yet. 2 Install the...
... to reverse the doors, if necessary. IMPORTANT To ensure proper installation of door. Your model will have either a right hand or left hand door swing. Additionally, before installing the door handles, make sure the door swing is flush with the two (2) holes in the Use & Care Guide to installing the handles. Follow instructions in top of handle with the door, then tighten another 1/2 turn . Do not tighten the set screw yet. 2 Install the...
Complete Owner's Guide (English)
Page 7
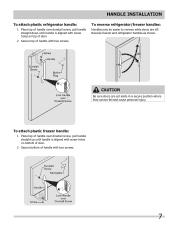
To reverse refrigerator/freezer handles: Handles may be easier to reverse while doors are set aside in a secure position where they cannot fall and cause personal injury. Handle installation To attach plastic refrigerator handle: 1 Place top of handle over dovetail screw, pull handle straight up until handle is aligned with screw holes on top of door. 2 Secure top of handle with two screws. To attach plastic freezer handle: 1 Place top...
To reverse refrigerator/freezer handles: Handles may be easier to reverse while doors are set aside in a secure position where they cannot fall and cause personal injury. Handle installation To attach plastic refrigerator handle: 1 Place top of handle over dovetail screw, pull handle straight up until handle is aligned with screw holes on top of door. 2 Secure top of handle with two screws. To attach plastic freezer handle: 1 Place top...

Complete Owner's Guide (English)
Page 8
... new refrigerator. DO NOT use copper tubing - Turn OFF water supply at the back of tubing needed, measure the distance from water valve inlet and discard cap. 4. See Figure 2. 5. Reconnect refrigerator to rear panel of water supply line into valve inlet and finger tighten compression nut onto valve. Plastic Water Tubing to Ice Maker Fill Tube Steel Clamp Brass Compression Nut Ferrule (Sleeve) Copper water line Water Valve Bracket Valve Inlet Water Valve Copper water line from electric power source. 2. Connecting the Water Supply WARNING To avoid electric...
... new refrigerator. DO NOT use copper tubing - Turn OFF water supply at the back of tubing needed, measure the distance from water valve inlet and discard cap. 4. See Figure 2. 5. Reconnect refrigerator to rear panel of water supply line into valve inlet and finger tighten compression nut onto valve. Plastic Water Tubing to Ice Maker Fill Tube Steel Clamp Brass Compression Nut Ferrule (Sleeve) Copper water line Water Valve Bracket Valve Inlet Water Valve Copper water line from electric power source. 2. Connecting the Water Supply WARNING To avoid electric...
Complete Owner's Guide (English)
Page 9
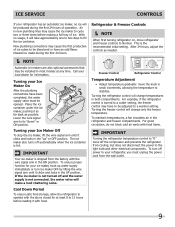
... the wire signal arm in both compartments. Turning the freezer control will make a loud chattering noise. Discard ice made during the first 24 hours of ice. Call your local dealer for at any time. Air in the refrigerator and freezer compartments. IMPORTANT Your ice maker is shipped from cooling, but does not disconnect the power to the light bulb and other electrical components. To maintain temperatures, a fan circulates air in new plumbing lines...
... the wire signal arm in both compartments. Turning the freezer control will make a loud chattering noise. Discard ice made during the first 24 hours of ice. Call your local dealer for at any time. Air in the refrigerator and freezer compartments. IMPORTANT Your ice maker is shipped from cooling, but does not disconnect the power to the light bulb and other electrical components. To maintain temperatures, a fan circulates air in new plumbing lines...
Complete Owner's Guide (English)
Page 10
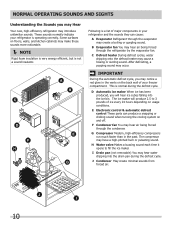
... or gurgling sound. E Electronic control & automatic defrost control These parts can cause: A Evaporator Refrigerant through the evaporator may notice a red glow in the past. H Water valve Makes a buzzing sound each time it opens to 3 pounds of ice every 24 hours depending on usage conditions. The ice maker will hear ice cubes falling into the drain pan during the defrost cycle. The compressor may occur. I Drain pan (not removable) You may introduce unfamiliar...
... or gurgling sound. E Electronic control & automatic defrost control These parts can cause: A Evaporator Refrigerant through the evaporator may notice a red glow in the past. H Water valve Makes a buzzing sound each time it opens to 3 pounds of ice every 24 hours depending on usage conditions. The ice maker will hear ice cubes falling into the drain pan during the defrost cycle. The compressor may occur. I Drain pan (not removable) You may introduce unfamiliar...

Complete Owner's Guide (English)
Page 11
... grain to clean handles. Contact a service representative to clean stainless steel. Remove toe grille (see Installation Instructions). DO NOT use paper towels, metallic scouring pads, or other abrasive cleaning materials or strong alkaline solutions. NOTE If you set your temperature controls to turn off cooling, power to room temperature before cleaning around controls, light bulb or any electrical part. Stainless Steel Cleaners Clean stainless steel front and handles with clean water and a soft cloth. Do not use abrasive cleaners...
... grain to clean handles. Contact a service representative to clean stainless steel. Remove toe grille (see Installation Instructions). DO NOT use paper towels, metallic scouring pads, or other abrasive cleaning materials or strong alkaline solutions. NOTE If you set your temperature controls to turn off cooling, power to room temperature before cleaning around controls, light bulb or any electrical part. Stainless Steel Cleaners Clean stainless steel front and handles with clean water and a soft cloth. Do not use abrasive cleaners...

Complete Owner's Guide (English)
Page 12
... electrical outlet. • Light switch may be stuck. Allow 24 hours for service, review this appliance. • Ensure plug is not cold enough. 12 Common Occurrences Refrigerator does not run. Refrigerator temperature too cold. Wait 20 minutes and check again. • Set freezer control to stabilize. Odors in defrost cycle. Cabinet light not working . (some models) Before calling for the temperature to stabilize. • Set refrigerator control to a warmer setting. Then check freezer temperatures and adjust as needed...
... electrical outlet. • Light switch may be stuck. Allow 24 hours for service, review this appliance. • Ensure plug is not cold enough. 12 Common Occurrences Refrigerator does not run. Refrigerator temperature too cold. Wait 20 minutes and check again. • Set freezer control to stabilize. Odors in defrost cycle. Cabinet light not working . (some models) Before calling for the temperature to stabilize. • Set refrigerator control to a warmer setting. Then check freezer temperatures and adjust as needed...

Complete Owner's Guide (English)
Page 13
... accordance with the provided instructions. Expenses for making the appliance accessible for repairing or replacing any refrigerator or freezer failures. 6. Damages to the finish of appliance or home incurred during installation, including but not limited to, any obligations under this appliance that prove to repair or replace appliance light bulbs, air filters, water filters, other consumables, or knobs, handles, or other than authorized service companies; Damages caused...
... accordance with the provided instructions. Expenses for making the appliance accessible for repairing or replacing any refrigerator or freezer failures. 6. Damages to the finish of appliance or home incurred during installation, including but not limited to, any obligations under this appliance that prove to repair or replace appliance light bulbs, air filters, water filters, other consumables, or knobs, handles, or other than authorized service companies; Damages caused...

Wiring Diagram (All Languages)
Page 1
.... One full turn is completed. Disconnect power cord before servicing. CAUTION: All electrical parts and wiring must be working). NOTE: Some products come equipped with Orange wire close at 8.96F (-12.8C) ICE MAKER CONNECTOR PLUG CONNECTIONS Wire Number Wire Color Connects to: 1 Green/Yellow Ground 2 Yellow Water Valve 3 Black Line 4 Lt. To terminate defrost, depress the fresh food light switch 5 times in 6 seconds. (some models) ORANGE (some models) ICE MAKER ICE MAKER INFORMATION Test Cycling Remove cover by inserting screwdriver...
.... One full turn is completed. Disconnect power cord before servicing. CAUTION: All electrical parts and wiring must be working). NOTE: Some products come equipped with Orange wire close at 8.96F (-12.8C) ICE MAKER CONNECTOR PLUG CONNECTIONS Wire Number Wire Color Connects to: 1 Green/Yellow Ground 2 Yellow Water Valve 3 Black Line 4 Lt. To terminate defrost, depress the fresh food light switch 5 times in 6 seconds. (some models) ORANGE (some models) ICE MAKER ICE MAKER INFORMATION Test Cycling Remove cover by inserting screwdriver...

Wiring Diagram (All Languages)
Page 2
... BLACK RED YELLOW SEE COMPRESSOR WIRING GRN/YEL SPLICE RED GRN/YEL SERVICE CORD RED GRN/YEL LT. BLUE RED/BLACK BROWN SUPPLY SOLENOID WATER VALVE WATER VALVE DOOR COMPARTMENT TAN RED/BLACK TAN GRN/YEL RED/BLACK TAN GRN/YEL INTERLOCK SWITCH RED/BLACK TAN DOOR WATER DISPENSER SWITCH Ladder Schematic - BLUE FREEZER LIGHT SWITCH NOTE DENOTES NOT ON ALL MODELS. BLUE YEL/BLACK REFRIGERATOR LIGHT SWITCH BLACK COLD CONTROL YEL/BLACK YEL...
... BLACK RED YELLOW SEE COMPRESSOR WIRING GRN/YEL SPLICE RED GRN/YEL SERVICE CORD RED GRN/YEL LT. BLUE RED/BLACK BROWN SUPPLY SOLENOID WATER VALVE WATER VALVE DOOR COMPARTMENT TAN RED/BLACK TAN GRN/YEL RED/BLACK TAN GRN/YEL INTERLOCK SWITCH RED/BLACK TAN DOOR WATER DISPENSER SWITCH Ladder Schematic - BLUE FREEZER LIGHT SWITCH NOTE DENOTES NOT ON ALL MODELS. BLUE YEL/BLACK REFRIGERATOR LIGHT SWITCH BLACK COLD CONTROL YEL/BLACK YEL...

Installation Instructions (All Languages)
Page 1
... door to swing open. 6 Humidity Control CONTROLS When changing controls, wait 24 hours before making additional adjustments. (For models with LED display, 3 to 5 is normal operating range.) 7 ICEMAKER Ensure icemaker is turned ON. 8 DOOR REMOVAL (IF NECESSARY) Cable If you need to remove the doors to get your refrigerator into the house please see "Door Removal and Reversal Instructions" in your Use & Care Manual. Turn icemaker OFF if water supply is in the Use & Care Manual so you understand the sounds you may vary per model.) WATER SUPPLY Connect water supply...
... door to swing open. 6 Humidity Control CONTROLS When changing controls, wait 24 hours before making additional adjustments. (For models with LED display, 3 to 5 is normal operating range.) 7 ICEMAKER Ensure icemaker is turned ON. 8 DOOR REMOVAL (IF NECESSARY) Cable If you need to remove the doors to get your refrigerator into the house please see "Door Removal and Reversal Instructions" in your Use & Care Manual. Turn icemaker OFF if water supply is in the Use & Care Manual so you understand the sounds you may vary per model.) WATER SUPPLY Connect water supply...


