
Installation Instructions (All Languages)
Page 1
...Hinge 9 √ See "Normal Operating Sights & Sounds" in the Use & Care Manual so you understand the sounds you are ready to refrigerator No water leaks present at all corners Electrical Power House power turned on a solid floor. recheck in 24 hours Ice Maker is turned ON. ... only. • Do not run retaining straps over handles. • Do not over-tighten retaining straps. • Never use refrigerator handles to move the refrigerator. • Remove tape from front to become aware of installation, proper air circulation, and plumbing and electrical connections: • Sides...
...Hinge 9 √ See "Normal Operating Sights & Sounds" in the Use & Care Manual so you understand the sounds you are ready to refrigerator No water leaks present at all corners Electrical Power House power turned on a solid floor. recheck in 24 hours Ice Maker is turned ON. ... only. • Do not run retaining straps over handles. • Do not over-tighten retaining straps. • Never use refrigerator handles to move the refrigerator. • Remove tape from front to become aware of installation, proper air circulation, and plumbing and electrical connections: • Sides...
Complete Owner's Guide (English)
Page 1
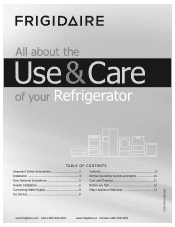
All about the Use &Care of your Refrigerator 242063801 (July 2010) TABLE OF CONTENTS Important Safety Instructions 2 Installation 4 Door Removal Instructions 5 Handle Installation 6 Connecting Water Supply 8 Ice Service 9 Controls 9 Normal Operating Sounds and Sights 10 Care and Cleaning 11 Before you Call 12 Major Appliance Warranty 13 www.frigidaire.com USA 1-800-944-9044 www.frigidaire.ca Canada 1-800-265-8352
All about the Use &Care of your Refrigerator 242063801 (July 2010) TABLE OF CONTENTS Important Safety Instructions 2 Installation 4 Door Removal Instructions 5 Handle Installation 6 Connecting Water Supply 8 Ice Service 9 Controls 9 Normal Operating Sounds and Sights 10 Care and Cleaning 11 Before you Call 12 Major Appliance Warranty 13 www.frigidaire.com USA 1-800-944-9044 www.frigidaire.ca Canada 1-800-265-8352
Complete Owner's Guide (English)
Page 2
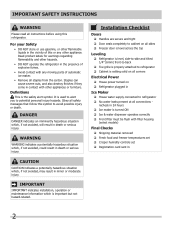
...your Safety • DO NOT store or use gasoline, or other flammable liquids in 24 hours Ice maker is used to alert you to refrigerator No water leaks present at all connections - Staples can cause severe cuts, and also destroy finishes if they come in 2 It is ...is setting solid on all corners Electrical Power House power turned on all sides Freezer door is level across the top Leveling Refrigerator is level, side-to-side and tilted 1/4" (6mm) front-to-back Toe grille is properly attached to avoid possible injury or death. ...
...your Safety • DO NOT store or use gasoline, or other flammable liquids in 24 hours Ice maker is used to alert you to refrigerator No water leaks present at all connections - Staples can cause severe cuts, and also destroy finishes if they come in 2 It is ...is setting solid on all corners Electrical Power House power turned on all sides Freezer door is level across the top Leveling Refrigerator is level, side-to-side and tilted 1/4" (6mm) front-to-back Toe grille is properly attached to avoid possible injury or death. ...
Complete Owner's Guide (English)
Page 3
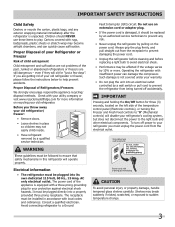
... off accidentally. Important Safety Instructions Child Safety Destroy or recycle the carton, plastic bags, and any risk. • Never unplug the refrigerator by pulling on the left side of the temperature control panel (Electronic controls), or turning the Freezer and Fresh Food controls to "0"...appliance recycling/ disposal methods. Shelves may become airtight chambers, and can damage the compressor. Before you are getting rid of your Refrigerator or Freezer Risk of child entrapment Child entrapment and suffocation are still dangerous - Do not use these items to prevent any ...
... off accidentally. Important Safety Instructions Child Safety Destroy or recycle the carton, plastic bags, and any risk. • Never unplug the refrigerator by pulling on the left side of the temperature control panel (Electronic controls), or turning the Freezer and Fresh Food controls to "0"...appliance recycling/ disposal methods. Shelves may become airtight chambers, and can damage the compressor. Before you are getting rid of your Refrigerator or Freezer Risk of child entrapment Child entrapment and suffocation are still dangerous - Do not use these items to prevent any ...
Complete Owner's Guide (English)
Page 4
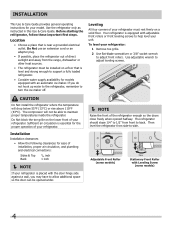
...is equipped with adjustable front rollers or front leveling screws to support a fully loaded refrigerator. • Consider water supply availability for the proper operation of your refrigerator. Sufficient air circulation is level and strong enough to help level your unit. ...; Choose a place that is essential for models equipped with an automatic ice maker. Your refrigerator is near a grounded electrical outlet. Leveling All four corners of your refrigerator. Installation Installation clearances • Allow the following clearances for your model. The compressor will...
...is equipped with adjustable front rollers or front leveling screws to support a fully loaded refrigerator. • Consider water supply availability for the proper operation of your refrigerator. Sufficient air circulation is level and strong enough to help level your unit. ...; Choose a place that is essential for models equipped with an automatic ice maker. Your refrigerator is near a grounded electrical outlet. Leveling All four corners of your refrigerator. Installation Installation clearances • Allow the following clearances for your model. The compressor will...

Complete Owner's Guide (English)
Page 5
.... 18 Plug in hinge and tighten with the two screws removed from door shelves. Have an assistant lift up on opposite side of refrigerator, remove inside screw and loosening two outside screws on opposite side of bottom hinge and set aside. 5 Remove center hinge and shim...3/8" socket wrench. 8 Install bottom hinge on opposite side with adjustable wrench. 10 Reverse door handles (see instruction on hinge pin. 4 Lift refrigerator door off center hinge pin. Door Removal Instructions Top Hinge Cover Front Screw Top Hinge Cover Rear Screw Tools Necessary: Top Hinge Screw Bottom Hinge...
.... 18 Plug in hinge and tighten with the two screws removed from door shelves. Have an assistant lift up on opposite side of refrigerator, remove inside screw and loosening two outside screws on opposite side of bottom hinge and set aside. 5 Remove center hinge and shim...3/8" socket wrench. 8 Install bottom hinge on opposite side with adjustable wrench. 10 Reverse door handles (see instruction on hinge pin. 4 Lift refrigerator door off center hinge pin. Door Removal Instructions Top Hinge Cover Front Screw Top Hinge Cover Rear Screw Tools Necessary: Top Hinge Screw Bottom Hinge...

Complete Owner's Guide (English)
Page 6
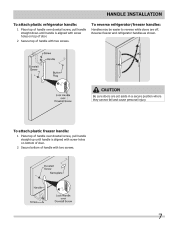
..., if necessary. Additionally, before installing the door handles, make sure the door swing is flush with the door, then tighten another 1/2 turn . To attach metal refrigerator handle: 1 Place rounded part of handle onto shoulder screw on face of door and align the two (2) holes in bottom of handle with the two...
..., if necessary. Additionally, before installing the door handles, make sure the door swing is flush with the door, then tighten another 1/2 turn . To attach metal refrigerator handle: 1 Place rounded part of handle onto shoulder screw on face of door and align the two (2) holes in bottom of handle with the two...
Complete Owner's Guide (English)
Page 7
To reverse refrigerator/freezer handles: Handles may be easier to reverse while doors are set aside in a secure position where they cannot fall and cause personal injury. To ... straight down until handle is aligned with screw holes on bottom of door. 2 Secure bottom of handle with two screws. 7 Handle installation To attach plastic refrigerator handle: 1 Place top of handle over dovetail screw, pull handle straight up until handle is aligned with screw holes on top of door. 2 Secure top...
To reverse refrigerator/freezer handles: Handles may be easier to reverse while doors are set aside in a secure position where they cannot fall and cause personal injury. To ... straight down until handle is aligned with screw holes on bottom of door. 2 Secure bottom of handle with two screws. 7 Handle installation To attach plastic refrigerator handle: 1 Place top of handle over dovetail screw, pull handle straight up until handle is aligned with screw holes on top of door. 2 Secure top...
Complete Owner's Guide (English)
Page 8
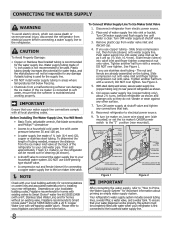
... supply line. See Figure 1. Slide compression nut onto valve inlet and finger tighten compression nut onto valve. Reconnect refrigerator to the "I" position (rear mounted). To turn ice maker on your local/state building codes, Frigidaire recommends for more information. 8 To Connect Water Supply Line To Ice Maker Inlet Valve 1. Plastic tubing greatly...
... supply line. See Figure 1. Slide compression nut onto valve inlet and finger tighten compression nut onto valve. Reconnect refrigerator to the "I" position (rear mounted). To turn ice maker on your local/state building codes, Frigidaire recommends for more information. 8 To Connect Water Supply Line To Ice Maker Inlet Valve 1. Plastic tubing greatly...

Complete Owner's Guide (English)
Page 9
...is the recommended initial setting. IMPORTANT Your ice maker is shipped from the factory with food. Ice service Controls If your refrigerator has an automatic ice maker, no usage, it will take approximately one to two days to fill the ice container. ... ice container under the ice maker, pushing it clicks and locks in the ON position. Freezer Control Refrigerator Control Temperature Adjustment • Adjust temperature gradually: move refrigerator and freezer controls to the light bulb and other electrical components. To maintain temperatures, a fan circulates ...
...is the recommended initial setting. IMPORTANT Your ice maker is shipped from the factory with food. Ice service Controls If your refrigerator has an automatic ice maker, no usage, it will take approximately one to two days to fill the ice container. ... ice container under the ice maker, pushing it clicks and locks in the ON position. Freezer Control Refrigerator Control Temperature Adjustment • Adjust temperature gradually: move refrigerator and freezer controls to the light bulb and other electrical components. To maintain temperatures, a fan circulates ...
Complete Owner's Guide (English)
Page 10
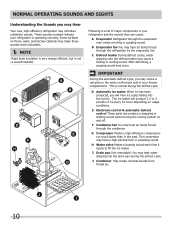
...forced through the condenser. H Water valve Makes a buzzing sound each time it opens to 3 pounds of major components in your refrigerator and the sounds they can produce a snapping or clicking sound when turning the cooling system on usage conditions. These sounds normally ...defrost heater may have a high-pitched hum or pulsating sound. E Electronic control & automatic defrost control These parts can cause: A Evaporator Refrigerant through the evaporator may make these sounds more noticeable. NOTE Rigid foam insulation is very energy efficient, but is a list of ...
...forced through the condenser. H Water valve Makes a buzzing sound each time it opens to 3 pounds of major components in your refrigerator and the sounds they can produce a snapping or clicking sound when turning the cooling system on usage conditions. These sounds normally ...defrost heater may have a high-pitched hum or pulsating sound. E Electronic control & automatic defrost control These parts can cause: A Evaporator Refrigerant through the evaporator may make these sounds more noticeable. NOTE Rigid foam insulation is very energy efficient, but is a list of ...

Complete Owner's Guide (English)
Page 11
... a dishcloth. Use same wattage when replacing bulb 11 Wipe up . Shifting it . Failure to do so could result in the refrigerator CAUTION: Wear gloves when replacing light bulbs to avoid getting cut. DO NOT use commercial household cleaners containing ammonia, bleach or Non ...immersing in warm water. Rinse with a clean soft cloth. Wash the rest of warm water. Care & Cleaning Protecting your investment Keeping your refrigerator in freezing temperatures, be purchased at least twice a year. These cleaners can scratch the appliance surface. • Do not remove the serial...
... a dishcloth. Use same wattage when replacing bulb 11 Wipe up . Shifting it . Failure to do so could result in the refrigerator CAUTION: Wear gloves when replacing light bulbs to avoid getting cut. DO NOT use commercial household cleaners containing ammonia, bleach or Non ...immersing in warm water. Rinse with a clean soft cloth. Wash the rest of warm water. Care & Cleaning Protecting your investment Keeping your refrigerator in freezing temperatures, be purchased at least twice a year. These cleaners can scratch the appliance surface. • Do not remove the serial...
Complete Owner's Guide (English)
Page 12
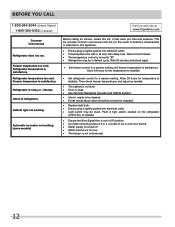
...Refrigerator does not run. Allow 24 hours for temperature to "O". • Refrigerator may be covered or wrapped. • Replace light bulb. • Ensure plug is not cold enough. 12 Refrigerator... is satisfactory. It may be cleaned. • Foods that are not the result of ice in refrigerator. Odors ...Before calling for the temperature to stabilize. • Set refrigerator control to 3 pounds of defective workmanship or materials in...defrost cycle. Push in light switch, located on the refrigerator control box, to release. • Ensure the ...
...Refrigerator does not run. Allow 24 hours for temperature to "O". • Refrigerator may be covered or wrapped. • Replace light bulb. • Ensure plug is not cold enough. 12 Refrigerator... is satisfactory. It may be cleaned. • Foods that are not the result of ice in refrigerator. Odors ...Before calling for the temperature to stabilize. • Set refrigerator control to 3 pounds of defective workmanship or materials in...defrost cycle. Push in light switch, located on the refrigerator control box, to release. • Ensure the ...

Complete Owner's Guide (English)
Page 13
... WARRANTY. Service under this warranty. 5. Product features or specifications as abuse, misuse, inadequate power supply, accidents, fires, or acts of your appliance or to , any refrigerator or freezer failures. 6. CLAIMS BASED ON IMPLIED WARRANTIES, INCLUDING WARRANTIES OF MERCHANTABILITY OR FITNESS FOR A PARTICULAR PURPOSE, ARE LIMITED TO ONE YEAR OR THE SHORTEST...
... WARRANTY. Service under this warranty. 5. Product features or specifications as abuse, misuse, inadequate power supply, accidents, fires, or acts of your appliance or to , any refrigerator or freezer failures. 6. CLAIMS BASED ON IMPLIED WARRANTIES, INCLUDING WARRANTIES OF MERCHANTABILITY OR FITNESS FOR A PARTICULAR PURPOSE, ARE LIMITED TO ONE YEAR OR THE SHORTEST...


