Complete Owner's Guide (English)
Page 5
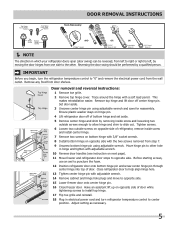
... from step 7. 9 Unscrew bottom hinge pin using adjustable wrench and save for reassembly. Move hinge pin to slide out. Reversing the door swing should be reversed, from left to right or right to center position. Adjust setting as necessary. 5 IMPORTANT Before you begin, turn refrigerator ... can be performed by a qualified person. Ensure plastic washer stays on opposite side with adjustable wrench. 10 Reverse door handles (see instruction on opposite side of door while tightening screws to install top hinge. 17 Flip toe grille and reinstall. 18 Plug in electrical power ...
... from step 7. 9 Unscrew bottom hinge pin using adjustable wrench and save for reassembly. Move hinge pin to slide out. Reversing the door swing should be reversed, from left to right or right to center position. Adjust setting as necessary. 5 IMPORTANT Before you begin, turn refrigerator ... can be performed by a qualified person. Ensure plastic washer stays on opposite side with adjustable wrench. 10 Reverse door handles (see instruction on opposite side of door while tightening screws to install top hinge. 17 Flip toe grille and reinstall. 18 Plug in electrical power ...

Complete Owner's Guide (English)
Page 6
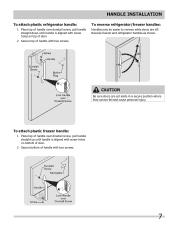
... of handle with the door, then tighten another 1/2... or left hand door swing. The rounded end of the handle until the...door. Do not tighten the set screw yet. 2 Install the two (2) screws into the bottom of the handle. 3 Tighten the set screw on face of door... and align the two (2) holes in top of handle with the door, then tighten another 1/2 turn ...may be sharp. IMPORTANT To ensure proper installation of door. Do not tighten the set screw yet. 2 Install the...handle. 3 Tighten the set screw on face of door and align the two (2) holes in bottom of handles...
... of handle with the door, then tighten another 1/2... or left hand door swing. The rounded end of the handle until the...door. Do not tighten the set screw yet. 2 Install the two (2) screws into the bottom of the handle. 3 Tighten the set screw on face of door... and align the two (2) holes in top of handle with the door, then tighten another 1/2 turn ...may be sharp. IMPORTANT To ensure proper installation of door. Do not tighten the set screw yet. 2 Install the...handle. 3 Tighten the set screw on face of door and align the two (2) holes in bottom of handles...
Complete Owner's Guide (English)
Page 7
..., pull handle straight down until handle is aligned with screw holes on bottom of door. 2 Secure bottom of handle with two screws. 7 Reverse freezer and refrigerator handles as shown. To reverse refrigerator/freezer handles: Handles may be easier to reverse while doors are set aside in a secure position where they cannot fall and cause personal...
..., pull handle straight down until handle is aligned with screw holes on bottom of door. 2 Secure bottom of handle with two screws. 7 Reverse freezer and refrigerator handles as shown. To reverse refrigerator/freezer handles: Handles may be easier to reverse while doors are set aside in a secure position where they cannot fall and cause personal...

Installation Instructions (All Languages)
Page 1
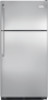
... THE STORE YOU PURCHASED IT FROM. Turn icemaker OFF if water supply is turned ON. 8 DOOR REMOVAL (IF NECESSARY) Cable If you need to remove the doors to get your refrigerator into the house please see "Door Removal and Reversal Instructions" in place. q L K e äáåÉ t K WATER SUPPLY 4 INSTALLATION CLEARANCES Allow the following...
... THE STORE YOU PURCHASED IT FROM. Turn icemaker OFF if water supply is turned ON. 8 DOOR REMOVAL (IF NECESSARY) Cable If you need to remove the doors to get your refrigerator into the house please see "Door Removal and Reversal Instructions" in place. q L K e äáåÉ t K WATER SUPPLY 4 INSTALLATION CLEARANCES Allow the following...


