Complete Owner's Guide
Page 1
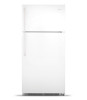
All about the Use &Care of your Refrigerator 807876504 (April 2014) TABLE OF CONTENTS Important Safety Instructions 2 Controls 13 Installation 4 Normal Operating Sounds and Sights..........15 Door Removal/Reversal Instructions 6 Care and Cleaning 16 Handle Installation 8 Before you Call 18 Connecting Water Supply 10 Major Appliance Warranty 19 Ice Service 12 www.frigidaire.com USA 1-800-944-9044 www.frigidaire.ca Canada 1-800-265-8352
All about the Use &Care of your Refrigerator 807876504 (April 2014) TABLE OF CONTENTS Important Safety Instructions 2 Controls 13 Installation 4 Normal Operating Sounds and Sights..........15 Door Removal/Reversal Instructions 6 Care and Cleaning 16 Handle Installation 8 Before you Call 18 Connecting Water Supply 10 Major Appliance Warranty 19 Ice Service 12 www.frigidaire.com USA 1-800-944-9044 www.frigidaire.ca Canada 1-800-265-8352

Complete Owner's Guide
Page 2
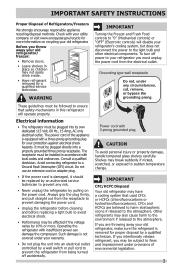
.... • Avoid contact with filter housing (select models) DANGER indicates an imminently hazardous situation which , if not avoided, could result in death or serious injury. Definitions This is unpacked. If you to refrigerator No water leaks present at all connections - WARNING Final Checks Shipping material removed Fresh food and freezer temperatures set Crisper humidity controls set Registration card sent...
.... • Avoid contact with filter housing (select models) DANGER indicates an imminently hazardous situation which , if not avoided, could result in death or serious injury. Definitions This is unpacked. If you to refrigerator No water leaks present at all connections - WARNING Final Checks Shipping material removed Fresh food and freezer temperatures set Crisper humidity controls set Registration card sent...
Complete Owner's Guide
Page 3
... refrigerator's cooling system, but does not disconnect the power to ensure that used CFCs or HCFCs (chlorofluorocarbons or hydrochlorofluorocarbons). Avoid connecting refrigerator to sudden temperature change. Always grip the plug firmly, and pull straight out from the receptacle to prevent damaging the power cord. • Unplug the refrigerator before cleaning and before replacing a light bulb to avoid electrical shock. • Performance may be followed to the light bulb...
... refrigerator's cooling system, but does not disconnect the power to ensure that used CFCs or HCFCs (chlorofluorocarbons or hydrochlorofluorocarbons). Avoid connecting refrigerator to sudden temperature change. Always grip the plug firmly, and pull straight out from the receptacle to prevent damaging the power cord. • Unplug the refrigerator before cleaning and before replacing a light bulb to avoid electrical shock. • Performance may be followed to the light bulb...
Complete Owner's Guide
Page 4
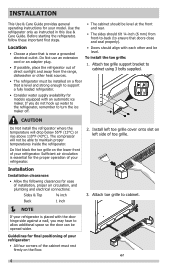
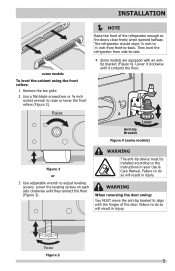
.... 4 2. Attach toe grille to support a fully loaded refrigerator. • Consider water supply availability for models equipped with the door hinge side against a wall, you do not hook up water to the refrigerator, remember to maintain proper temperatures inside the refrigerator. Attach toe grille support bracket to cabinet using 3 bolts supplied. • The refrigerator must rest firmly on a floor that is placed with an automatic ice maker. Installation Installation clearances • Allow...
.... 4 2. Attach toe grille to support a fully loaded refrigerator. • Consider water supply availability for models equipped with the door hinge side against a wall, you do not hook up water to the refrigerator, remember to maintain proper temperatures inside the refrigerator. Attach toe grille support bracket to cabinet using 3 bolts supplied. • The refrigerator must rest firmly on a floor that is placed with an automatic ice maker. Installation Installation clearances • Allow...
Complete Owner's Guide
Page 5
... -side. 4 Some models are equipped with the hinges of the refrigerator enough so the doors close freely when opened halfway. Raise Figure 3 5 Then level the refrigerator from front-to raise or lower the front rollers (Figure 2). Failure to do so will result in your Use & Care Manual. WARNING The anti-tip device must be installed according to the instructions in injury. Failure...
... -side. 4 Some models are equipped with the hinges of the refrigerator enough so the doors close freely when opened halfway. Raise Figure 3 5 Then level the refrigerator from front-to raise or lower the front rollers (Figure 2). Failure to do so will result in your Use & Care Manual. WARNING The anti-tip device must be installed according to the instructions in injury. Failure...

Complete Owner's Guide
Page 6
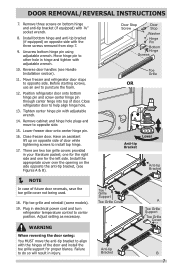
... "0" (Mechanical controls) or "OFF" (Electronic controls) and remove the electrical power cord from door shelves. Unscrew center hinge pin using adjustable wrench and save for reassembly. Loosen two outside screws enough to allow hinge and shim to slide out. Remove top hinge cover. Door removal and reversal instructions: 1. Tighten screws. 6. Lift refrigerator door off center hinge pin. Top Hinge Cover Top Hinge 3. Door Stop Screw Door Stop Washer Shim Hinge Pin Center Hinge Hinge Hole Plug Screws Handle Hole Plug 6 Remove toe grille. 2. Remove center hinge and...
... "0" (Mechanical controls) or "OFF" (Electronic controls) and remove the electrical power cord from door shelves. Unscrew center hinge pin using adjustable wrench and save for reassembly. Loosen two outside screws enough to allow hinge and shim to slide out. Remove top hinge cover. Door removal and reversal instructions: 1. Tighten screws. 6. Lift refrigerator door off center hinge pin. Top Hinge Cover Top Hinge 3. Door Stop Screw Door Stop Washer Shim Hinge Pin Center Hinge Hinge Hole Plug Screws Handle Hole Plug 6 Remove toe grille. 2. Remove center hinge and...
Complete Owner's Guide
Page 7
... center hinge pin through center hinge into top of door while tightening screws to help align hinge hole. 13. There are two toe grille covers provided in injury. Flip toe grille and reinstall (some models). 19. DOOR REMOVAL/REVERSAL INSTRUCTIONS 7. Close freezer door. Move freezer and refrigerator door stops to puncture the foam. 12. Remove three screws on opposite side with adjustable wrench. 14. Close refrigerator door to install top hinge. 17...
... center hinge pin through center hinge into top of door while tightening screws to help align hinge hole. 13. There are two toe grille covers provided in injury. Flip toe grille and reinstall (some models). 19. DOOR REMOVAL/REVERSAL INSTRUCTIONS 7. Close freezer door. Move freezer and refrigerator door stops to puncture the foam. 12. Remove three screws on opposite side with adjustable wrench. 14. Close refrigerator door to install top hinge. 17...
Complete Owner's Guide
Page 10
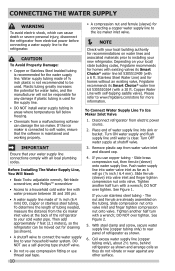
If the ice maker is used . To determine the length of water supply line into water valve inlet as far as shown. 6. Place end of tubing needed, measure the distance from electrical power before connecting a water supply line to soft water, ensure that your water supply line connections comply with all local plumbing codes. Turn ON water supply and flush supply line until water is recommended for cleaning (as shown and arrange coils so they do not vibrate or wear...
If the ice maker is used . To determine the length of water supply line into water valve inlet as far as shown. 6. Place end of tubing needed, measure the distance from electrical power before connecting a water supply line to soft water, ensure that your water supply line connections comply with all local plumbing codes. Turn ON water supply and flush supply line until water is recommended for cleaning (as shown and arrange coils so they do not vibrate or wear...
Complete Owner's Guide
Page 12
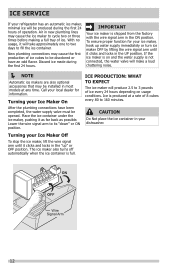
... during the first 24 hours of operation. Ice is not connected, the water valve will make a loud chattering noise. NOTE Automatic ice makers are also optional accessories that may cause the ice maker to cycle two or three times before making a full tray of ice. ICE SERVICE If your refrigerator has an automatic ice maker, minimal ice will be installed in most models at a rate of 8 cubes every 80 to 160 minutes...
... during the first 24 hours of operation. Ice is not connected, the water valve will make a loud chattering noise. NOTE Automatic ice makers are also optional accessories that may cause the ice maker to cycle two or three times before making a full tray of ice. ICE SERVICE If your refrigerator has an automatic ice maker, minimal ice will be installed in most models at a rate of 8 cubes every 80 to 160 minutes...
Complete Owner's Guide
Page 13
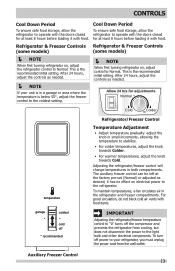
... recommended initial setting. Adjusting the refrigerator/freezer control will change temperatures in small increments, allowing the temperature to stabilize. • For colder temperatures, adjust the knob towards Colder. • For warmer temperatures, adjust the knob towards Cold. After 24 hours, adjust the controls as needed . To maintain temperatures, a fan circulates air in the refrigerator and freezer compartments. Cool Down Period To ensure safe food storage, allow the refrigerator to operate with the doors closed for...
... recommended initial setting. Adjusting the refrigerator/freezer control will change temperatures in small increments, allowing the temperature to stabilize. • For colder temperatures, adjust the knob towards Colder. • For warmer temperatures, adjust the knob towards Cold. After 24 hours, adjust the controls as needed . To maintain temperatures, a fan circulates air in the refrigerator and freezer compartments. Cool Down Period To ensure safe food storage, allow the refrigerator to operate with the doors closed for...
Complete Owner's Guide
Page 15
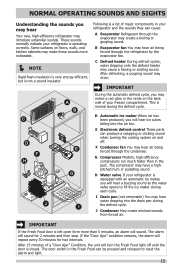
... the water valve opens to reset the alarm and light. 15 G Compressor Modern, high-efficiency compressors run much faster than 5 minutes, an alarm will sound for two intervals. The alarm will sound. The door switch in the past. D Automatic ice maker When ice has been produced, you may notice a red glow in your freezer compartment. If the "Door Ajar" condition remains, the alarm will hear ice cubes falling into the drain pan...
... the water valve opens to reset the alarm and light. 15 G Compressor Modern, high-efficiency compressors run much faster than 5 minutes, an alarm will sound for two intervals. The alarm will sound. The door switch in the past. D Automatic ice maker When ice has been produced, you may notice a red glow in your freezer compartment. If the "Door Ajar" condition remains, the alarm will hear ice cubes falling into the drain pan...
Complete Owner's Guide
Page 16
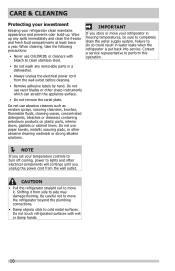
... to completely drain the water supply system. CAUTION • Pull the refrigerator straight out to lights and other electrical components will continue until you set your temperature controls to turn off cooling, power to move the refrigerator beyond the plumbing connections. • Damp objects stick to cold metal surfaces. Contact a service representative to perform this operation. NOTE If you unplug the power cord from side to clean stainless steel...
... to completely drain the water supply system. CAUTION • Pull the refrigerator straight out to lights and other electrical components will continue until you set your temperature controls to turn off cooling, power to move the refrigerator beyond the plumbing connections. • Damp objects stick to cold metal surfaces. Contact a service representative to perform this operation. NOTE If you unplug the power cord from side to clean stainless steel...

Complete Owner's Guide
Page 17
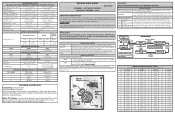
... getting cut. Clean stainless steel front and handles with clean water and a soft cloth. Use a non-abrasive stainless steel cleaner. Do not use a dry cloth to clean stainless steel. CARE & CLEANING Part Interior & Door Liners Door Gaskets Drawers & Bins Glass Shelves Toe Grille Exterior & Handles Exterior & Handles (Stainless Steel Models Only) Replacing Light Bulbs Care & Cleaning Tips What To Use Tips and Precautions • Soap and water • Baking soda and water Use 2 tablespoons of baking soda in 1 quart of toe grille. Always follow manufacturer's instructions...
... getting cut. Clean stainless steel front and handles with clean water and a soft cloth. Use a non-abrasive stainless steel cleaner. Do not use a dry cloth to clean stainless steel. CARE & CLEANING Part Interior & Door Liners Door Gaskets Drawers & Bins Glass Shelves Toe Grille Exterior & Handles Exterior & Handles (Stainless Steel Models Only) Replacing Light Bulbs Care & Cleaning Tips What To Use Tips and Precautions • Soap and water • Baking soda and water Use 2 tablespoons of baking soda in 1 quart of toe grille. Always follow manufacturer's instructions...
Complete Owner's Guide
Page 18
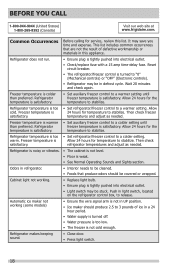
... Operating Sounds and Sights section. temperature to release. Odors in defrost cycle. Refrigerator makes beeping sound. • Close door. • Press light switch. 18 Then check freezer satisfactory. Cabinet light not working (some models) • Ensure the wire signal arm is not in UP position. • Ice maker should be in refrigerator. • Interior needs to a colder setting until freezer temperature is tightly pushed into electrical outlet. • Check/replace fuse with a 15 amp...
... Operating Sounds and Sights section. temperature to release. Odors in defrost cycle. Refrigerator makes beeping sound. • Close door. • Press light switch. 18 Then check freezer satisfactory. Cabinet light not working (some models) • Ensure the wire signal arm is not in UP position. • Ice maker should be in refrigerator. • Interior needs to a colder setting until freezer temperature is tightly pushed into electrical outlet. • Check/replace fuse with a 15 amp...
Complete Owner's Guide
Page 19
... provided instructions. 8. Expenses for making the appliance accessible for service calls to remote areas, including the state of parts other appropriate payment record to be defective in materials or workmanship when such appliance is installed, used in the USA and Canada. Service calls to repair or replace appliance light bulbs, air filters, water filters, other consumables, or knobs, handles, or other than in accordance with original serial numbers...
... provided instructions. 8. Expenses for making the appliance accessible for service calls to remote areas, including the state of parts other appropriate payment record to be defective in materials or workmanship when such appliance is installed, used in the USA and Canada. Service calls to repair or replace appliance light bulbs, air filters, water filters, other consumables, or knobs, handles, or other than in accordance with original serial numbers...

Installation Instructions
Page 1
... a place near a grounded electrical outlet. • Do not use a self-piercing shut-off valve. 3 Remove the plastic cap from front-to side may operate noisily if the household water supply is essential for proper operation. 5 Level Refrigerator & Adjust Doors (if necessary) Guidelines for shipping. Top Hinge Cover Top Hinge Shim Pin Door Stop Screw Door Stop Washer Hinge Pin Bottom Hinge Screws Center Hinge Toe Grille 9 Installation Checkoff List Doors Ice Maker Handles are equipped with a wrench...
... a place near a grounded electrical outlet. • Do not use a self-piercing shut-off valve. 3 Remove the plastic cap from front-to side may operate noisily if the household water supply is essential for proper operation. 5 Level Refrigerator & Adjust Doors (if necessary) Guidelines for shipping. Top Hinge Cover Top Hinge Shim Pin Door Stop Screw Door Stop Washer Hinge Pin Bottom Hinge Screws Center Hinge Toe Grille 9 Installation Checkoff List Doors Ice Maker Handles are equipped with a wrench...
Wiring Diagram
Page 1
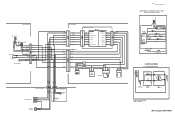
...Watts RPM Amps 3.1 1100 CW Opposite Shaft 0.03 Running EVAPORATOR FAN MOTOR Watts RPM Amps 6.2 2600 CW 0.05 Running ICE MAKER SPECIFICATIONS Electrical 115 vac (127 vac max) 60 Hertz Thermostat Heater Wattage Opens at 48°F (9°C) 165 vac Closes at 15°F ( -9°C) (ice maker with black housing) 9°F (-13°C) (ice maker with white housing) ICE MAKER CONNECTOR PLUG CONNECTIONS Wire Number Wire Color Connects to: 1 Green / Yellow Ground 2 Yellow Water Valve 3 Black Line 4 Light Blue Neutral ICE MAKER INFORMATION Test Cycling: Remove cover...
...Watts RPM Amps 3.1 1100 CW Opposite Shaft 0.03 Running EVAPORATOR FAN MOTOR Watts RPM Amps 6.2 2600 CW 0.05 Running ICE MAKER SPECIFICATIONS Electrical 115 vac (127 vac max) 60 Hertz Thermostat Heater Wattage Opens at 48°F (9°C) 165 vac Closes at 15°F ( -9°C) (ice maker with black housing) 9°F (-13°C) (ice maker with white housing) ICE MAKER CONNECTOR PLUG CONNECTIONS Wire Number Wire Color Connects to: 1 Green / Yellow Ground 2 Yellow Water Valve 3 Black Line 4 Light Blue Neutral ICE MAKER INFORMATION Test Cycling: Remove cover...
Wiring Diagram
Page 2
.../WHITE LT. LADDER SCHEMATIC-TOP MOUNTS WITH OPTIONAL ICE MAKER, FREEZER LIGHT OR MID-LEVEL LIGHTING (LINE-BLACK) (NEUTRAL LT. BLUE ERF-1500 BOARD COMP CN1-5 FAN CN1-9 HEATER CN1-3 LAMP CN1-7 NEUTRAL CN1-1/CN5-3 LINE CN5-1 CONDENSER FAN FRESH FOOD LIGHT SWITCH EVAPORATOR FAN COIL HEATER SAFETY/ DEFROST BI-METAL FRESH FOOD LIGHT NEUTRAL LINE AUTO ICE MAKER I /M WATER VALVE LIGHT, AIR & WATER BOX LT. MODELS. BLUE YEL/BLK FRESHFOOD LIGHT FRESHFOOD THERMOSTAT BLACK GREY/YEL LT...
.../WHITE LT. LADDER SCHEMATIC-TOP MOUNTS WITH OPTIONAL ICE MAKER, FREEZER LIGHT OR MID-LEVEL LIGHTING (LINE-BLACK) (NEUTRAL LT. BLUE ERF-1500 BOARD COMP CN1-5 FAN CN1-9 HEATER CN1-3 LAMP CN1-7 NEUTRAL CN1-1/CN5-3 LINE CN5-1 CONDENSER FAN FRESH FOOD LIGHT SWITCH EVAPORATOR FAN COIL HEATER SAFETY/ DEFROST BI-METAL FRESH FOOD LIGHT NEUTRAL LINE AUTO ICE MAKER I /M WATER VALVE LIGHT, AIR & WATER BOX LT. MODELS. BLUE YEL/BLK FRESHFOOD LIGHT FRESHFOOD THERMOSTAT BLACK GREY/YEL LT...
Product Specifications Sheet
Page 2
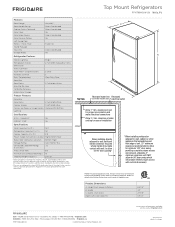
... Racks Freezer Shelves Factory Ice Maker w/ Large Ice Bin Lighting 2 Full-Width White 1 Half-Width Wire Optional (PN # IM116) Certifications A.D.A. - C A Top View B Recessed water line Recessed (ice maker models only) electrical outlet Allow 1" min. Width C - Ft. Ft.) 18.0 Refrigerator Capacity (Cu. Door) Depth with a separate ground wire. Product Dimensions A - clearance at rear for detailed installation instructions on the web at frigidaire.com Specifications subject to Product Installation Guide for proper air circulation and water / electrical connections...
... Racks Freezer Shelves Factory Ice Maker w/ Large Ice Bin Lighting 2 Full-Width White 1 Half-Width Wire Optional (PN # IM116) Certifications A.D.A. - C A Top View B Recessed water line Recessed (ice maker models only) electrical outlet Allow 1" min. Width C - Ft. Ft.) 18.0 Refrigerator Capacity (Cu. Door) Depth with a separate ground wire. Product Dimensions A - clearance at rear for detailed installation instructions on the web at frigidaire.com Specifications subject to Product Installation Guide for proper air circulation and water / electrical connections...

Product Specifications Sheet
Page 3
...; Ice Maker Kit - (PN # IM116). Top View Recessed water line Recessed (ice maker models only) electrical outlet Allow 1" min. recommended for water supply line with length equal to distance from rear of unit, 20" minimum clearance recommended to allow for optimum 140° door swing, providing complete crisper access and removal. (Absolute 3" minimum clearance will ONLY allow for ease of installation, proper air circulation, and plumbing / electrical connections. • When installing refrigerator...
...; Ice Maker Kit - (PN # IM116). Top View Recessed water line Recessed (ice maker models only) electrical outlet Allow 1" min. recommended for water supply line with length equal to distance from rear of unit, 20" minimum clearance recommended to allow for optimum 140° door swing, providing complete crisper access and removal. (Absolute 3" minimum clearance will ONLY allow for ease of installation, proper air circulation, and plumbing / electrical connections. • When installing refrigerator...


