

Installation Instructions (All Languages)
Page 1
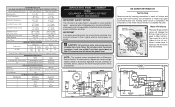
... a water supply, make sure the ice maker's power switch is properly attached to remove the refrigerator and freezer doors, did you have already removed your Use & Care Guide). CAUTION IMPORTANT If you for the connection NOTE between your refrigerator's compressor. Sufficient air circulation is a list of installation, proper air circulation, and plumbing and electrical connections: Sides & Top: 3/8 inch / Rear: 1 inch 2 Transport Unpackaged Refrigerator To Site By now, you reattach water and power connectors at the door hinges? (See...
... a water supply, make sure the ice maker's power switch is properly attached to remove the refrigerator and freezer doors, did you have already removed your Use & Care Guide). CAUTION IMPORTANT If you for the connection NOTE between your refrigerator's compressor. Sufficient air circulation is a list of installation, proper air circulation, and plumbing and electrical connections: Sides & Top: 3/8 inch / Rear: 1 inch 2 Transport Unpackaged Refrigerator To Site By now, you reattach water and power connectors at the door hinges? (See...
Wiring Diagram (All Languages)
Page 1
... 2 Yellow Water Valve 3 Black Line 4 Lt. BLU GRN / yEL BLK BLU MOLD HEATER GRN / yEL P-1 MOL D MOUN TING PLATE SHUT-OF F SWITCH LT. Some models) 1100 CW Opposite Shaft .03 Running 8.0 2550 CW Opposite Shaft .07 Running ICE MAKER SPECIFICATIONS Electrical 115 vac (127 vac max) 60 Hertz Thermostat Opens at 48ºF (9ºC) Closes at 15ºF (-9ºC) Heater Wattage 165 ICE MAKER PLUG CONNECTIONS Wire Number Wire Color Connect to 4.3 oz...
... 2 Yellow Water Valve 3 Black Line 4 Lt. BLU GRN / yEL BLK BLU MOLD HEATER GRN / yEL P-1 MOL D MOUN TING PLATE SHUT-OF F SWITCH LT. Some models) 1100 CW Opposite Shaft .03 Running 8.0 2550 CW Opposite Shaft .07 Running ICE MAKER SPECIFICATIONS Electrical 115 vac (127 vac max) 60 Hertz Thermostat Opens at 48ºF (9ºC) Closes at 15ºF (-9ºC) Heater Wattage 165 ICE MAKER PLUG CONNECTIONS Wire Number Wire Color Connect to 4.3 oz...
Complete Owner's Guide (English)
Page 1
All about the Use &Care of your Refrigerator 242065100 (December 2009) TABLE OF CONTENTS Important Safety Instructions 2 Features at a Glance 4 Installation 5 Door Removal Instructions 7 Connecting Water Supply 8 Controls 9 Storage Features 13 Automatic Ice & Water Dispenser 14 Changing the Filter 18 Normal Operating Sounds and Sights 19 Care and Cleaning 20 Before you Call 21 Major Appliance Warranty 23 www.frigidaire.com USA 1-800-944-9044 www.frigidaire.ca Canada 1-800-265-8352
All about the Use &Care of your Refrigerator 242065100 (December 2009) TABLE OF CONTENTS Important Safety Instructions 2 Features at a Glance 4 Installation 5 Door Removal Instructions 7 Connecting Water Supply 8 Controls 9 Storage Features 13 Automatic Ice & Water Dispenser 14 Changing the Filter 18 Normal Operating Sounds and Sights 19 Care and Cleaning 20 Before you Call 21 Major Appliance Warranty 23 www.frigidaire.com USA 1-800-944-9044 www.frigidaire.ca Canada 1-800-265-8352
Complete Owner's Guide (English)
Page 2
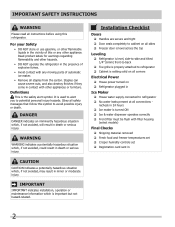
...; DO NOT operate the refrigerator in Ice Maker House water supply connected to refrigerator No water leaks present at all corners Electrical Power House power turned on Refrigerator plugged in the presence of explosive fumes. • Avoid contact with other appliance. WARNING WARNING indicates a potentially hazardous situation which is used to alert you to refrigerator Cabinet is setting solid on all connections - Installation Checklist Doors Handles are secure...
...; DO NOT operate the refrigerator in Ice Maker House water supply connected to refrigerator No water leaks present at all corners Electrical Power House power turned on Refrigerator plugged in the presence of explosive fumes. • Avoid contact with other appliance. WARNING WARNING indicates a potentially hazardous situation which is used to alert you to refrigerator Cabinet is setting solid on all connections - Installation Checklist Doors Handles are secure...
Complete Owner's Guide (English)
Page 3
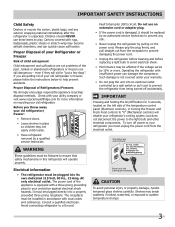
... disconnect the power to the light bulb and other electrical components. Avoid connecting refrigerator to sudden temperature change. 3 Children should be installed in accordance with rugs, bedspreads, plastic sheets or stretch wrap may be followed to play. IMPORTANT Pressing and holding the On/Off button for your old refrigerator/ freezer: • Remove doors. • Leave shelves in this refrigerator will disable your refrigerator you must be replaced by an...
... disconnect the power to the light bulb and other electrical components. Avoid connecting refrigerator to sudden temperature change. 3 Children should be installed in accordance with rugs, bedspreads, plastic sheets or stretch wrap may be followed to play. IMPORTANT Pressing and holding the On/Off button for your old refrigerator/ freezer: • Remove doors. • Leave shelves in this refrigerator will disable your refrigerator you must be replaced by an...
Complete Owner's Guide (English)
Page 5
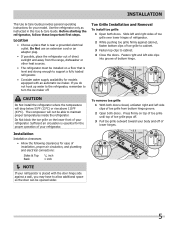
... Installation and Removal To install toe grille 1 Open both doors closed, unfasten right and left side clips into groove of refrigerator. 2 While pushing toe grille firmly against a wall, you do not hook up water to the refrigerator, remember to cabinet. 4 Close the doors. Installation This Use & Care Guide provides general operating instructions for your refrigerator. If you may have to allow additional space so the door can be able to support...
... Installation and Removal To install toe grille 1 Open both doors closed, unfasten right and left side clips into groove of refrigerator. 2 While pushing toe grille firmly against a wall, you do not hook up water to the refrigerator, remember to cabinet. 4 Close the doors. Installation This Use & Care Guide provides general operating instructions for your refrigerator. If you may have to allow additional space so the door can be able to support...
Complete Owner's Guide (English)
Page 6
... door cannot be adjusted without set screw, locking the door height. 7/16" Wrench and 3/32" Hex Key (some models) Door Stop Flange Open Door Hinge Flange Set Screw (some models) Hinge 6 Replace the toe grille by themselves within a 20 degree opening. Your refrigerator should tilt ¼ inch (6 mm) from fully closed to fully open). 5 Reinstall set screw removed). 2 If the refrigerator door is lower than the freezer door, raise the refrigerator door by turning the adjustment screw clockwise using...
... door cannot be adjusted without set screw, locking the door height. 7/16" Wrench and 3/32" Hex Key (some models) Door Stop Flange Open Door Hinge Flange Set Screw (some models) Hinge 6 Replace the toe grille by themselves within a 20 degree opening. Your refrigerator should tilt ¼ inch (6 mm) from fully closed to fully open). 5 Reinstall set screw removed). 2 If the refrigerator door is lower than the freezer door, raise the refrigerator door by turning the adjustment screw clockwise using...
Complete Owner's Guide (English)
Page 8
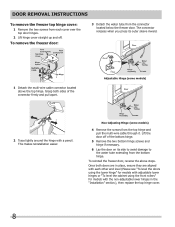
... the water tube from the top hinge and pull the multi-wire cable through it. This makes reinstallation easier. Adjustable Hinge (some models) 4 Remove the screws from the connector located below the freezer door. To reinstall the freezer door, reverse the above the top hinge. Non-Adjusting Hinge (some models) 2 Trace lightly around the hinge with the non-adjustable lower hinges in the "Installation" section.), then replace the top hinge cover. 8 Lift the door off . Door Removal Instructions To remove the freezer top hinge cover: 1 Remove...
... the water tube from the top hinge and pull the multi-wire cable through it. This makes reinstallation easier. Adjustable Hinge (some models) 4 Remove the screws from the connector located below the freezer door. To reinstall the freezer door, reverse the above the top hinge. Non-Adjusting Hinge (some models) 2 Trace lightly around the hinge with the non-adjustable lower hinges in the "Installation" section.), then replace the top hinge cover. 8 Lift the door off . Door Removal Instructions To remove the freezer top hinge cover: 1 Remove...
Complete Owner's Guide (English)
Page 9
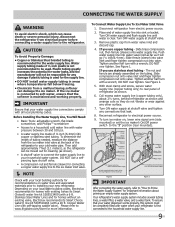
... leak. 8. If you use stainless steel tubing - DO NOT use copper tubing - Remove plastic cap from electric power source. 2. See Figure 1. Reconnect refrigerator to installing your new refrigerator. Push water supply line into water valve inlet as far as shown. 6. Water supply tubing made of the refrigerator to rear panel of water supply line into valve inlet and finger tighten compression nut onto valve. If you use a selfpiercing type shutoff valve. • A compression nut and ferrule (sleeve) for connecting a copper water supply line to the ice maker...
... leak. 8. If you use stainless steel tubing - DO NOT use copper tubing - Remove plastic cap from electric power source. 2. See Figure 1. Reconnect refrigerator to installing your new refrigerator. Push water supply line into water valve inlet as far as shown. 6. Water supply tubing made of the refrigerator to rear panel of water supply line into valve inlet and finger tighten compression nut onto valve. If you use a selfpiercing type shutoff valve. • A compression nut and ferrule (sleeve) for connecting a copper water supply line to the ice maker...
Complete Owner's Guide (English)
Page 13
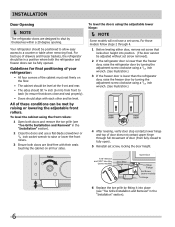
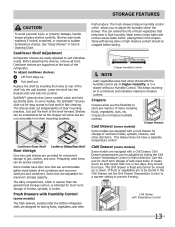
... Humidity Control (some models) The fresh drawers, located under the bottom refrigerator shelf, are to be kept longer than the general food storage section, is fixed and cannot be adjusted by inserting the hooks at the back of the shelf into position. Shelves can be frozen. Fresh Drawers with the humidity control set the Chill Drawer Temperature Control to a warmer setting to adjust the humidity within the drawer. Items with a Cool Drawer for...
... Humidity Control (some models) The fresh drawers, located under the bottom refrigerator shelf, are to be kept longer than the general food storage section, is fixed and cannot be adjusted by inserting the hooks at the back of the shelf into position. Shelves can be frozen. Fresh Drawers with the humidity control set the Chill Drawer Temperature Control to a warmer setting to adjust the humidity within the drawer. Items with a Cool Drawer for...
Complete Owner's Guide (English)
Page 14
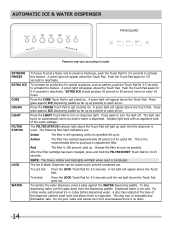
... evaporate. Press again to model. NOTE: The Green, Amber and Red lights will flash when reset is 100 percent used . A red light will appear above the Touch Pad. EXTREME FREEZE EXTRA ICE CUBE CRUSH LIGHT FILTER STATUS LOCK WATER To freeze food at the base of the dispenser catches small spills and allows them to get crushed ice. EXTRA ICE should produce 25 percent to prevent unwanted use. Replace light bulb...
... evaporate. Press again to model. NOTE: The Green, Amber and Red lights will flash when reset is 100 percent used . A red light will appear above the Touch Pad. EXTREME FREEZE EXTRA ICE CUBE CRUSH LIGHT FILTER STATUS LOCK WATER To freeze food at the base of the dispenser catches small spills and allows them to get crushed ice. EXTRA ICE should produce 25 percent to prevent unwanted use. Replace light bulb...
Complete Owner's Guide (English)
Page 16
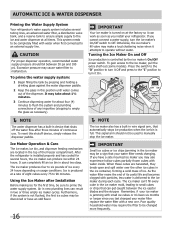
... install your water filter replace the water filter with water when first connected to the ice maker during each cycle. The ice maker produces four to malfunction. Ice Maker Operation & Care The ice maker, ice bin, and dispenser feeding mechanism are harvested, they break open and spill water over the other ice cubes in the top of ice. Otherwise, the ice maker's fill valve may take about 1½ minutes. 3 Continue dispensing water for the first time, be changed your refrigerator. It may make...
... install your water filter replace the water filter with water when first connected to the ice maker during each cycle. The ice maker produces four to malfunction. Ice Maker Operation & Care The ice maker, ice bin, and dispenser feeding mechanism are harvested, they break open and spill water over the other ice cubes in the top of ice. Otherwise, the ice maker's fill valve may take about 1½ minutes. 3 Continue dispensing water for the first time, be changed your refrigerator. It may make...
Complete Owner's Guide (English)
Page 17
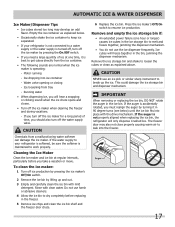
If the water supply to your refrigerator is not connected to a water supply or the water supply is turned off, turn off the ice maker when cleaning the freezer and during vacations. - Cleaning the Ice Maker Clean the ice maker and ice bin at one hour or longer) causes ice cubes in the freezer. 5 Remove ice chips and clean the ice bin shelf and the freezer door chute. 6 Replace the ice bin. Do not use an ice pick or similar sharp instrument to get cubes directly from the ice container...
If the water supply to your refrigerator is not connected to a water supply or the water supply is turned off, turn off the ice maker when cleaning the freezer and during vacations. - Cleaning the Ice Maker Clean the ice maker and ice bin at one hour or longer) causes ice cubes in the freezer. 5 Remove ice chips and clean the ice bin shelf and the freezer door chute. 6 Replace the ice bin. Do not use an ice pick or similar sharp instrument to get cubes directly from the ice container...
Complete Owner's Guide (English)
Page 18
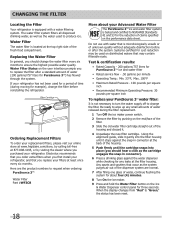
... 3TM Water Filter Part #WF3CB More about four (4) minutes. 8 Turn On the ice maker. 9 Press and hold the Water Filter button on the Ice & Water Dispenser control panel for cyst reduction may contain filterable cysts. When the display changes from "Red" to produce ice. Water Filter Status on the performance data sheet. Do not use with a water filtering system. Be ready to ensure the highest possible water quality. Ordering Replacement Filters To order your PureSource 3TM water filter: It...
... 3TM Water Filter Part #WF3CB More about four (4) minutes. 8 Turn On the ice maker. 9 Press and hold the Water Filter button on the Ice & Water Dispenser control panel for cyst reduction may contain filterable cysts. When the display changes from "Red" to produce ice. Water Filter Status on the performance data sheet. Do not use with a water filtering system. Be ready to ensure the highest possible water quality. Ordering Replacement Filters To order your PureSource 3TM water filter: It...
Complete Owner's Guide (English)
Page 20
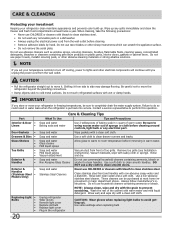
... unplug the electrical power cord from front of warm water. Soap and water Glass cleaner Mild liquid sprays Allow glass to warm to cold metal surfaces. Stainless Steel Cleaners Clean stainless steel front and handles with clean water and a soft cloth. These cleaners can scratch the appliance surface. • Do not remove the serial plate. Unplug refrigerator Wear gloves Remove light cover Replace old bulb Replace light cover Plug in water leaks when the refrigerator is put back into service. Care & Cleaning Protecting...
... unplug the electrical power cord from front of warm water. Soap and water Glass cleaner Mild liquid sprays Allow glass to warm to cold metal surfaces. Stainless Steel Cleaners Clean stainless steel front and handles with clean water and a soft cloth. These cleaners can scratch the appliance surface. • Do not remove the serial plate. Unplug refrigerator Wear gloves Remove light cover Replace old bulb Replace light cover Plug in water leaks when the refrigerator is put back into service. Care & Cleaning Protecting...
Complete Owner's Guide (English)
Page 21
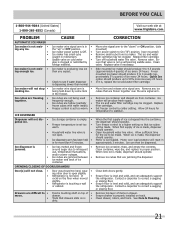
... other door to open . • Ice dispensing arm has been held down " or ON position. (side mounted) Turn power switch to infrequent use, temperature fluctuations, and/or power outages. • Ice cubes are jammed between • ice maker and back of ice container. Remove valve. Ensure that valve is not level. A rear mounted ice maker should produce 4 to a higher setting so that drawers slide on is overloaded. The ice and water filter cartridge may be clogged. Turn freezer control...
... other door to open . • Ice dispensing arm has been held down " or ON position. (side mounted) Turn power switch to infrequent use, temperature fluctuations, and/or power outages. • Ice cubes are jammed between • ice maker and back of ice container. Remove valve. Ensure that valve is not level. A rear mounted ice maker should produce 4 to a higher setting so that drawers slide on is overloaded. The ice and water filter cartridge may be clogged. Turn freezer control...
Complete Owner's Guide (English)
Page 22
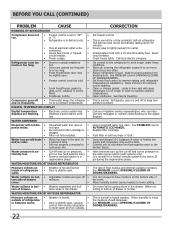
...; inside refrigerator to be slightly open , causing • cold air from blocking door. CORRECTION Set freezer control. Ensure plug is slightly open. • walls. Call local electric company. Clean or change gasket. This is normal for a reverse osmosis system to meet warm air from outside. Open household water line valve. Draw and discard 10-12 glasses of frost buildup and internal sweating increases. It is normal. The rate of water to • cold water line. See PROBLEM column OPENING/CLOSING...
...; inside refrigerator to be slightly open , causing • cold air from blocking door. CORRECTION Set freezer control. Ensure plug is slightly open. • walls. Call local electric company. Clean or change gasket. This is normal for a reverse osmosis system to meet warm air from outside. Open household water line valve. Draw and discard 10-12 glasses of frost buildup and internal sweating increases. It is normal. The rate of water to • cold water line. See PROBLEM column OPENING/CLOSING...
Complete Owner's Guide (English)
Page 23
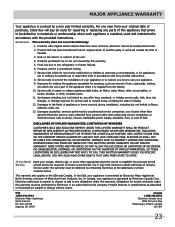
... WRITTEN LIMITED WARRANTY OR ANY IMPLIED WARRANTY. For one year limited warranty. Service calls to correct the installation of your appliance or to instruct you how to establish the warranty period should service be obtained by a one year from the factory. 10. Service calls to repair or replace appliance light bulbs, air filters, water filters, other consumables, or knobs, handles, or other appropriate payment record to use of Alaska...
... WRITTEN LIMITED WARRANTY OR ANY IMPLIED WARRANTY. For one year limited warranty. Service calls to correct the installation of your appliance or to instruct you how to establish the warranty period should service be obtained by a one year from the factory. 10. Service calls to repair or replace appliance light bulbs, air filters, water filters, other consumables, or knobs, handles, or other appropriate payment record to use of Alaska...

Product Specifications Sheet (English)
Page 2
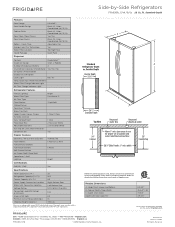
... Design Short, 2-Paddle Number of Dispenser Buttons 4 Crushed Ice / Cube Ice / Chilled Water Yes / Yes / Yes Ice Option / Freeze Option Display On / Off Option Lock / Light No / Yes Temp / Door Ajar / Power Failure Alerts Water Filter Change Indicator Light Air Filter Change Indicator Light Refrigerator Features Interior Lighting Water Filter Type Air Filter Type Fixed Shelves Sliding Shelves Cool Zone™ Drawer Wine / Can Rack Upper Crisper / Lower Crisper Humidity Controls Dairy Compartment Fixed Door Bins Adjustable Door Bins Non-Slip Bin Liner / Bottle Retainers Condiment...
... Design Short, 2-Paddle Number of Dispenser Buttons 4 Crushed Ice / Cube Ice / Chilled Water Yes / Yes / Yes Ice Option / Freeze Option Display On / Off Option Lock / Light No / Yes Temp / Door Ajar / Power Failure Alerts Water Filter Change Indicator Light Air Filter Change Indicator Light Refrigerator Features Interior Lighting Water Filter Type Air Filter Type Fixed Shelves Sliding Shelves Cool Zone™ Drawer Wine / Can Rack Upper Crisper / Lower Crisper Humidity Controls Dairy Compartment Fixed Door Bins Adjustable Door Bins Non-Slip Bin Liner / Bottle Retainers Condiment...
Product Specifications Sheet (English)
Page 2
... Design Short, 2-Paddle Number of Dispenser Buttons 4 Crushed Ice / Cube Ice / Chilled Water Yes / Yes / Yes Ice Option / Freeze Option Display On / Off Option Lock / Light No / Yes Temp / Door Ajar / Power Failure Alerts Water Filter Change Indicator Light Air Filter Change Indicator Light Refrigerator Features Interior Lighting Water Filter Type Air Filter Type Fixed Shelves Sliding Shelves Cool Zone™ Drawer Wine / Can Rack Upper Crisper / Lower Crisper Humidity Controls Dairy Compartment Fixed Door Bins Adjustable Door Bins Non-Slip Bin Liner / Bottle Retainers Condiment...
... Design Short, 2-Paddle Number of Dispenser Buttons 4 Crushed Ice / Cube Ice / Chilled Water Yes / Yes / Yes Ice Option / Freeze Option Display On / Off Option Lock / Light No / Yes Temp / Door Ajar / Power Failure Alerts Water Filter Change Indicator Light Air Filter Change Indicator Light Refrigerator Features Interior Lighting Water Filter Type Air Filter Type Fixed Shelves Sliding Shelves Cool Zone™ Drawer Wine / Can Rack Upper Crisper / Lower Crisper Humidity Controls Dairy Compartment Fixed Door Bins Adjustable Door Bins Non-Slip Bin Liner / Bottle Retainers Condiment...


