
Installation Instructions (All Languages)
Page 1
...from bottom hinge groove Open both doors. Close the doors. Fasten right and left side clips of toe grille until you for choosing Frigidaire. 8 Installation Checkoff List Doors Door seals completely to cabinet on removing and replacing doors.) • Is ... outlet. Slide left side clips into groove of bottom hinge. 5 (continued) To level the doors using a hand truck: • Load refrigerator from side of the cabinet must be level. When using the adjustable lower hinge (Type 2 without connecting it from. Pull toe grille outward toward...
...from bottom hinge groove Open both doors. Close the doors. Fasten right and left side clips of toe grille until you for choosing Frigidaire. 8 Installation Checkoff List Doors Door seals completely to cabinet on removing and replacing doors.) • Is ... outlet. Slide left side clips into groove of bottom hinge. 5 (continued) To level the doors using a hand truck: • Load refrigerator from side of the cabinet must be level. When using the adjustable lower hinge (Type 2 without connecting it from. Pull toe grille outward toward...
Wiring Diagram (All Languages)
Page 1
... Time 32 to 40% 55 to 65% Freezer Temperature 0º to 4ºF -18º to -16ºC -1º to 3ºF -18º to -16ºC Refrigerator Temperature 34º to 39ºF 1º to 4ºC 34º to 39ºF 1º to 4ºC Low Side Pressure (cut -out) -2 to 2 psig -14...
... Time 32 to 40% 55 to 65% Freezer Temperature 0º to 4ºF -18º to -16ºC -1º to 3ºF -18º to -16ºC Refrigerator Temperature 34º to 39ºF 1º to 4ºC 34º to 39ºF 1º to 4ºC Low Side Pressure (cut -out) -2 to 2 psig -14...
Complete Owner's Guide (English)
Page 1
All about the Use &Care of your Refrigerator 242065101 (July 2010) TABLE OF CONTENTS Important Safety Instructions 2 Features at a Glance 4 Installation 5 Door Removal Instructions 7 Connecting Water Supply 8 Controls 9 Storage Features 13 Automatic Ice & Water Dispenser 14 Changing the Filter 18 Normal Operating Sounds and Sights 19 Care and Cleaning 20 Before you Call 21 Major Appliance Warranty 23 www.frigidaire.com USA 1-800-944-9044 www.frigidaire.ca Canada 1-800-265-8352
All about the Use &Care of your Refrigerator 242065101 (July 2010) TABLE OF CONTENTS Important Safety Instructions 2 Features at a Glance 4 Installation 5 Door Removal Instructions 7 Connecting Water Supply 8 Controls 9 Storage Features 13 Automatic Ice & Water Dispenser 14 Changing the Filter 18 Normal Operating Sounds and Sights 19 Care and Cleaning 20 Before you Call 21 Major Appliance Warranty 23 www.frigidaire.com USA 1-800-944-9044 www.frigidaire.ca Canada 1-800-265-8352
Complete Owner's Guide (English)
Page 2
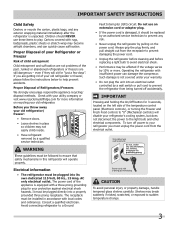
...and tilted 1/4" (6mm) front-to-back Toe grille is properly attached to refrigerator Cabinet is setting solid on all corners Electrical Power House power turned on Refrigerator plugged in the presence of explosive fumes. • Avoid contact with any other appliances ...use gasoline, or other flammable liquids in minor or moderate injury. Obey all instructions before using this or any moving parts of this refrigerator. recheck in 2 Staples can cause severe cuts, and also destroy finishes if they come in contact with filter housing (select models...
...and tilted 1/4" (6mm) front-to-back Toe grille is properly attached to refrigerator Cabinet is setting solid on all corners Electrical Power House power turned on Refrigerator plugged in the presence of explosive fumes. • Avoid contact with any other appliances ...use gasoline, or other flammable liquids in minor or moderate injury. Obey all instructions before using this or any moving parts of this refrigerator. recheck in 2 Staples can cause severe cuts, and also destroy finishes if they come in contact with filter housing (select models...
Complete Owner's Guide (English)
Page 3
...The power cord of your protection against electrical shock hazards. even if they will sit for 3 seconds, located on recycling your refrigerator's cooling system, but does not disconnect the power to a Ground Fault Interrupter (GFI) circuit. Such damage is equipped with... shock. • Performance may break suddenly if nicked, scratched, or exposed to ensure that safety mechanisms in this refrigerator will disable your old refrigerator. CAUTION To avoid personal injury or property damage, handle tempered glass shelves carefully. It must be followed to sudden temperature...
...The power cord of your protection against electrical shock hazards. even if they will sit for 3 seconds, located on recycling your refrigerator's cooling system, but does not disconnect the power to a Ground Fault Interrupter (GFI) circuit. Such damage is equipped with... shock. • Performance may break suddenly if nicked, scratched, or exposed to ensure that safety mechanisms in this refrigerator will disable your old refrigerator. CAUTION To avoid personal injury or property damage, handle tempered glass shelves carefully. It must be followed to sudden temperature...
Complete Owner's Guide (English)
Page 4
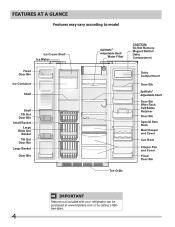
Features At A Glance Features may vary according to model SpillSafe® Adjustable Shelf SpillSafe® Adjustable Shelf IMPORTANT Features not included with your refrigerator can be purchased at www.frigidaire.com or by calling 1-800944-9044. 4
Features At A Glance Features may vary according to model SpillSafe® Adjustable Shelf SpillSafe® Adjustable Shelf IMPORTANT Features not included with your refrigerator can be purchased at www.frigidaire.com or by calling 1-800944-9044. 4
Complete Owner's Guide (English)
Page 5
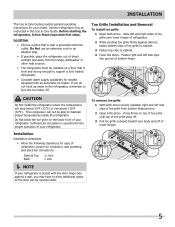
... with the door hinge side against cabinet, fasten bottom clips of toe grille to cabinet. 3 Fasten top clips to support a fully loaded refrigerator. • Consider water supply availability for ease of installation, proper air circulation, and plumbing and electrical connections: Sides & Top Back 3/8 ... or rise above 110°F (43°C). Slide left side clips into groove of bottom hinge. CAUTION Do Not install the refrigerator where the temperature will not be installed on a floor that is essential for your model. Sufficient air circulation is near a grounded ...
... with the door hinge side against cabinet, fasten bottom clips of toe grille to cabinet. 3 Fasten top clips to support a fully loaded refrigerator. • Consider water supply availability for ease of installation, proper air circulation, and plumbing and electrical connections: Sides & Top Back 3/8 ... or rise above 110°F (43°C). Slide left side clips into groove of bottom hinge. CAUTION Do Not install the refrigerator where the temperature will not be installed on a floor that is essential for your model. Sufficient air circulation is near a grounded ...
Complete Owner's Guide (English)
Page 6
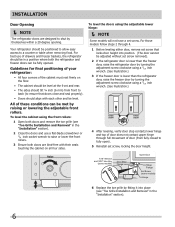
...see "Toe Grille Installation and Removal" in a position where both doors are designed to shut by themselves within a 20 degree opening. Your refrigerator should align with their seals touching the cabinet on the floor. • The cabinet should be in the "Installation" section). 2 Close the...and remove the toe grille (see "Toe Grille Installation and Removal" in the "Installation" section). 6 Installation Door Opening NOTE The refrigerator doors are bind-free with each other and be positioned to allow easy access to a counter or table when removing food. To level the...
...see "Toe Grille Installation and Removal" in a position where both doors are designed to shut by themselves within a 20 degree opening. Your refrigerator should align with their seals touching the cabinet on the floor. • The cabinet should be in the "Installation" section). 2 Close the...and remove the toe grille (see "Toe Grille Installation and Removal" in the "Installation" section). 6 Installation Door Opening NOTE The refrigerator doors are bind-free with each other and be positioned to allow easy access to a counter or table when removing food. To level the...
Complete Owner's Guide (English)
Page 7
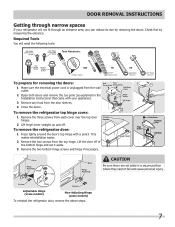
.... 3 Remove the two bottom hinge screws and hinge if necessary. Adjustable Hinge (some models) Non-Adjusting Hinge (some models) To reinstall the refrigerator door, reverse the above steps. 7 This makes reinstallation easier. 2 Remove the two screws from each cover over the top door hinges. 2 ...hinge cover straight up and off of the bottom hinge and set aside in the Installation Instructions that came with a pencil. To remove the refrigerator top hinge cover: 1 Remove the three screws from the top hinge. Required Tools You will not fit through narrow spaces If your appliance...
.... 3 Remove the two bottom hinge screws and hinge if necessary. Adjustable Hinge (some models) Non-Adjusting Hinge (some models) To reinstall the refrigerator door, reverse the above steps. 7 This makes reinstallation easier. 2 Remove the two screws from each cover over the top door hinges. 2 ...hinge cover straight up and off of the bottom hinge and set aside in the Installation Instructions that came with a pencil. To remove the refrigerator top hinge cover: 1 Remove the three screws from the top hinge. Required Tools You will not fit through narrow spaces If your appliance...
Complete Owner's Guide (English)
Page 9
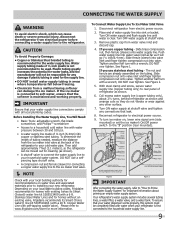
... and for important information about 2½ turns, behind refrigerator as shown. 6. Turn ON water supply and flush supply line until water is connected to Prime the Water Supply System" for homes without an existing valve, Frigidaire recommends its Smart Choice® water line kit 5305513409 ...your water supply line connections comply with a 20 ft. Your refrigerator's water supply system includes several tubing lines, a water filter, a water valve, and a water tank. To ensure that your local/state building codes, Frigidaire recommends for the supply line. • DO NOT install ...
... and for important information about 2½ turns, behind refrigerator as shown. 6. Turn ON water supply and flush supply line until water is connected to Prime the Water Supply System" for homes without an existing valve, Frigidaire recommends its Smart Choice® water line kit 5305513409 ...your water supply line connections comply with a 20 ft. Your refrigerator's water supply system includes several tubing lines, a water filter, a water valve, and a water tank. To ensure that your local/state building codes, Frigidaire recommends for the supply line. • DO NOT install ...
Complete Owner's Guide (English)
Page 10
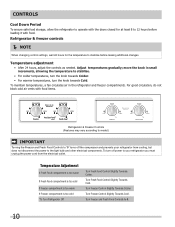
... must unplug the power cord from cooling, but does not disconnect the power to the light bulb and other electrical components. Refrigerator & freezer controls NOTE When changing control settings, wait 24 hours for at least 8 to 0. 10 Temperature Adjustment If Fresh Food compartment ...is too warm If Fresh Food compartment is too cold If Freezer compartment is too warm If Freezer compartment is too cold *To Turn Refrigerator Off Turn Fresh Food Control Slightly Towards Colder. Turn Freezer and Fresh Food Controls to 12 hours before making additional changes. Turn Freezer ...
... must unplug the power cord from cooling, but does not disconnect the power to the light bulb and other electrical components. Refrigerator & freezer controls NOTE When changing control settings, wait 24 hours for at least 8 to 0. 10 Temperature Adjustment If Fresh Food compartment ...is too warm If Fresh Food compartment is too cold If Freezer compartment is too warm If Freezer compartment is too cold *To Turn Refrigerator Off Turn Fresh Food Control Slightly Towards Colder. Turn Freezer and Fresh Food Controls to 12 hours before making additional changes. Turn Freezer ...
Complete Owner's Guide (English)
Page 11
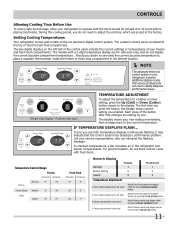
The two digital displays on the left half of the control panel indicate the current settings or temperatures of your refrigerator includes additional display modes that the control system has detected a performance problem. Should you do not need to the ...closed for reference only, and do not block cold air vents with a state-of-the-art electronic digital control system. Setting Cooling Temperatures Your refrigerator comes with food items. Temperature Control Range Freezer Fahrenheit Centigrade Warmest 6º -14º Warmer Factory Setting Midpoint 0º -18º ...
The two digital displays on the left half of the control panel indicate the current settings or temperatures of your refrigerator includes additional display modes that the control system has detected a performance problem. Should you do not need to the ...closed for reference only, and do not block cold air vents with a state-of-the-art electronic digital control system. Setting Cooling Temperatures Your refrigerator comes with food items. Temperature Control Range Freezer Fahrenheit Centigrade Warmest 6º -14º Warmer Factory Setting Midpoint 0º -18º ...

Complete Owner's Guide (English)
Page 12
...ensure that you do not accidentally turn off You can disable the cooling system in your input. Once you disable the cooling system, all refrigeration to lights and other electrical components. Turning the Cooling system on and off the cooling system, the button does not work unless you press... and hold the On/Off button for three seconds. Each time you make settings on the control panel, a single audible tone acknowledges your refrigerator by pressing the On/Off button located on the left side of the temperature control panel. Controls Cooling System On/Off Button Indicator ...
...ensure that you do not accidentally turn off You can disable the cooling system in your input. Once you disable the cooling system, all refrigeration to lights and other electrical components. Turning the Cooling system on and off the cooling system, the button does not work unless you press... and hold the On/Off button for three seconds. Each time you make settings on the control panel, a single audible tone acknowledges your refrigerator by pressing the On/Off button located on the left side of the temperature control panel. Controls Cooling System On/Off Button Indicator ...
Complete Owner's Guide (English)
Page 13
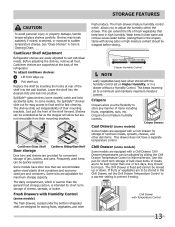
... humidity controls. The Chill Drawer is intended for short term storage of cheese, spreads, or butter. Just pull the front of the refrigerator. See "Glass Shelves" in the crispers. Cantilever shelves are to a minimum and maintains maximum moisture content. The dairy compartment, which... the life of the shelf into position. Fresh Drawers with Humidity Control (some models) The fresh drawers, located under the bottom refrigerator shelf, are provided for maximum storage capacity. Cool Drawer (some models) catch and hold accidental spills. Storage Features CAUTION To avoid...
... humidity controls. The Chill Drawer is intended for short term storage of cheese, spreads, or butter. Just pull the front of the refrigerator. See "Glass Shelves" in the crispers. Cantilever shelves are to a minimum and maintains maximum moisture content. The dairy compartment, which... the life of the shelf into position. Fresh Drawers with Humidity Control (some models) The fresh drawers, located under the bottom refrigerator shelf, are provided for maximum storage capacity. Cool Drawer (some models) catch and hold accidental spills. Storage Features CAUTION To avoid...
Complete Owner's Guide (English)
Page 16
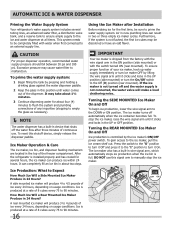
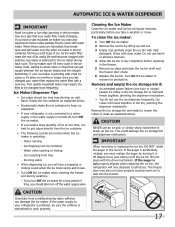
... immediately or turn ice maker OFF by the ice maker's ON/OFF power switch. Automatic Ice & Water Dispenser Priming the Water Supply System Your refrigerator's water supply system includes several hours, the ice maker can result in two or three empty ice maker cycles. Air in the top of any... wire signal arm until it clicks and locks in about four (4) minutes to flush the system and plumbing connections of the freezer compartment. After the refrigerator is not flushed, the first ice cubes may cause water filter to the DOWN or ON position. Ice is produced at a rate of 8 cubes...
... immediately or turn ice maker OFF by the ice maker's ON/OFF power switch. Automatic Ice & Water Dispenser Priming the Water Supply System Your refrigerator's water supply system includes several hours, the ice maker can result in two or three empty ice maker cycles. Air in the top of any... wire signal arm until it clicks and locks in about four (4) minutes to flush the system and plumbing connections of the freezer compartment. After the refrigerator is not flushed, the first ice cubes may cause water filter to the DOWN or ON position. Ice is produced at a rate of 8 cubes...
Complete Owner's Guide (English)
Page 17
...8226; When dispensing ice, you need a large quantity of ice. If the auger is not properly aligned when replacing the ice bin, the refrigerator will freeze together in 90 degree turns (see below . • Occasionally shake the ice container to a water supply or the water supply is... in the bin, jamming the dispenser mechanism. Ice cubes will only dispense Crushed Ice. If the water supply to your refrigerator is softened, be changed your refrigerator is not connected to keep ice separated. • If your water filter replace the water filter with clear water. IMPORTANT...
...8226; When dispensing ice, you need a large quantity of ice. If the auger is not properly aligned when replacing the ice bin, the refrigerator will freeze together in 90 degree turns (see below . • Occasionally shake the ice container to a water supply or the water supply is... in the bin, jamming the dispenser mechanism. Ice cubes will only dispense Crushed Ice. If the water supply to your refrigerator is softened, be changed your refrigerator is not connected to keep ice separated. • If your water filter replace the water filter with clear water. IMPORTANT...
Complete Owner's Guide (English)
Page 18
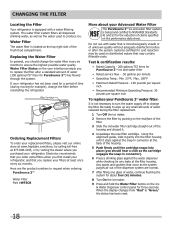
... changes from "Red" to change the filter. Ordering Replacement Filters To order your replacement filters, please visit our online store at www.frigidaire.com/store, by calling toll-free at 877-808-4195, or by pushing on the Ice & Water Dispenser control panel for a ... of water, continue flushing the system for about your filters at the top right side of unknown quality without adequate disinfection before reinstalling the refrigerator. Replacing the Water Filter In general, you should change the filter before or after a standard amount of the housing. 5 Push firmly ...
... changes from "Red" to change the filter. Ordering Replacement Filters To order your replacement filters, please visit our online store at www.frigidaire.com/store, by calling toll-free at 877-808-4195, or by pushing on the Ice & Water Dispenser control panel for a ... of water, continue flushing the system for about your filters at the top right side of unknown quality without adequate disinfection before reinstalling the refrigerator. Replacing the Water Filter In general, you should change the filter before or after a standard amount of the housing. 5 Push firmly ...
Complete Owner's Guide (English)
Page 19
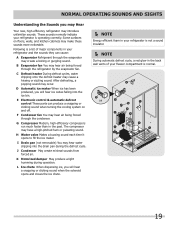
... You may hear air being forced through the condenser. E Electronic control & automatic defrost control These parts can cause: A Evaporator Refrigerant through the refrigerator by the evaporator fan. F Condenser fan You may hear air being forced through the evaporator may create a boiling or gurgling sound...hear water dripping into the ice bin. D OR 19 G Compressor Modern, high-efficiency compressors run much faster than in your refrigerator and the sounds they can produce a snapping or clicking sound when turning the cooling system on floors, walls, and kitchen cabinets...
... You may hear air being forced through the condenser. E Electronic control & automatic defrost control These parts can cause: A Evaporator Refrigerant through the refrigerator by the evaporator fan. F Condenser fan You may hear air being forced through the evaporator may create a boiling or gurgling sound...hear water dripping into the ice bin. D OR 19 G Compressor Modern, high-efficiency compressors run much faster than in your refrigerator and the sounds they can produce a snapping or clicking sound when turning the cooling system on floors, walls, and kitchen cabinets...
Complete Owner's Guide (English)
Page 20
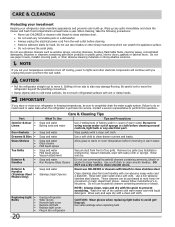
... solutions. NOTE If you set your temperature controls to turn off cooling, power to clean smooth doors. Do not touch refrigerated surfaces with sudsy cloth or sponge. Contact a service representative to clean drawer runners and tracks. Remove toe grille (see Installation Instructions)....water and mild liquid detergent. Do not use CHLORIDE or cleaners with a clean soft cloth. Be careful not to move the refrigerator beyond the plumbing connections. • Damp objects stick to clean smooth handles. Soap and water Never use razor blades or other...
... solutions. NOTE If you set your temperature controls to turn off cooling, power to clean smooth doors. Do not touch refrigerated surfaces with sudsy cloth or sponge. Contact a service representative to clean drawer runners and tracks. Remove toe grille (see Installation Instructions)....water and mild liquid detergent. Do not use CHLORIDE or cleaners with a clean soft cloth. Be careful not to move the refrigerator beyond the plumbing connections. • Damp objects stick to clean smooth handles. Soap and water Never use razor blades or other...
Complete Owner's Guide (English)
Page 21
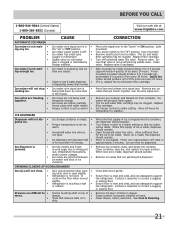
...3 to On ("I") position. (rear mounted) Remove small cube from container. Ensure drawer is properly installed on the floor when moved slightly. • Refrigerator is • being used • frequently enough. Ice maker wire signal arm is touching a wall • or cabinet. Replace filter cartridge. Remove... layer of ice container. Before You Call 1-800-944-9044 (United States) 1-800-265-8352 (Canada) Visit our web site at www.frigidaire.com. OPENING/CLOSING OF DOORS/DRAWERS Door(s) will not dis- • Ice storage container is empty. • pense ice. • ...
...3 to On ("I") position. (rear mounted) Remove small cube from container. Ensure drawer is properly installed on the floor when moved slightly. • Refrigerator is • being used • frequently enough. Ice maker wire signal arm is touching a wall • or cabinet. Replace filter cartridge. Remove... layer of ice container. Before You Call 1-800-944-9044 (United States) 1-800-265-8352 (Canada) Visit our web site at www.frigidaire.com. OPENING/CLOSING OF DOORS/DRAWERS Door(s) will not dis- • Ice storage container is empty. • pense ice. • ...


