Complete Owner's Guide
Page 1
All about the Use &Care of your Refrigerator 807876504 (April 2014) TABLE OF CONTENTS Important Safety Instructions 2 Controls 13 Installation 4 Normal Operating Sounds and Sights..........15 Door Removal/Reversal Instructions 6 Care and Cleaning 16 Handle Installation 8 Before you Call 18 Connecting Water Supply 10 Major Appliance Warranty 19 Ice Service 12 www.frigidaire.com USA 1-800-944-9044 www.frigidaire.ca Canada 1-800-265-8352
All about the Use &Care of your Refrigerator 807876504 (April 2014) TABLE OF CONTENTS Important Safety Instructions 2 Controls 13 Installation 4 Normal Operating Sounds and Sights..........15 Door Removal/Reversal Instructions 6 Care and Cleaning 16 Handle Installation 8 Before you Call 18 Connecting Water Supply 10 Major Appliance Warranty 19 Ice Service 12 www.frigidaire.com USA 1-800-944-9044 www.frigidaire.ca Canada 1-800-265-8352

Complete Owner's Guide
Page 2
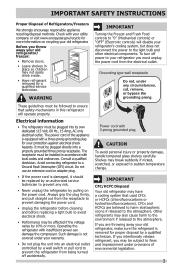
... water leaks present at all instructions before using this or any exterior wrapping material immediately after the refrigerator is the safety alert symbol. Cartons covered with filter housing (select models) DANGER indicates an imminently hazardous situation which , if not avoided, could result in death or serious injury. WARNING Final Checks Shipping material removed Fresh food and freezer temperatures set Crisper humidity controls set...
... water leaks present at all instructions before using this or any exterior wrapping material immediately after the refrigerator is the safety alert symbol. Cartons covered with filter housing (select models) DANGER indicates an imminently hazardous situation which , if not avoided, could result in death or serious injury. WARNING Final Checks Shipping material removed Fresh food and freezer temperatures set Crisper humidity controls set...
Complete Owner's Guide
Page 3
... temperature change. To turn off accidentally. Always grip the plug firmly, and pull straight out from being turned off power to the atmosphere. The receptacle must be plugged into an electrical outlet controlled by an authorized service technician to the atmosphere. Avoid connecting refrigerator to avoid electrical shock. • Performance may have a cooling system that safety mechanisms in accordance with your old refrigerator, make sure the refrigerant...
... temperature change. To turn off accidentally. Always grip the plug firmly, and pull straight out from being turned off power to the atmosphere. The receptacle must be plugged into an electrical outlet controlled by an authorized service technician to the atmosphere. Avoid connecting refrigerator to avoid electrical shock. • Performance may have a cooling system that safety mechanisms in accordance with your old refrigerator, make sure the refrigerant...
Complete Owner's Guide
Page 4
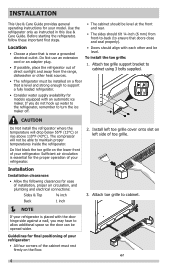
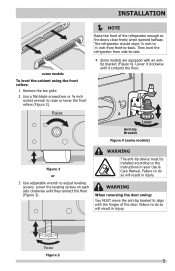
... the door hinge side against a wall, you do not hook up water to the refrigerator, remember to support a fully loaded refrigerator. • Consider water supply availability for ease of toe grille. 3. The compressor will drop below 55°F (13°C) or rise above 110°F (43°C). Do Not block the toe grille on the floor. 4 2. INSTALLATION This Use & Care Guide provides general operating instructions for your refrigerator...
... the door hinge side against a wall, you do not hook up water to the refrigerator, remember to support a fully loaded refrigerator. • Consider water supply availability for ease of toe grille. 3. The compressor will drop below 55°F (13°C) or rise above 110°F (43°C). Do Not block the toe grille on the floor. 4 2. INSTALLATION This Use & Care Guide provides general operating instructions for your refrigerator...
Complete Owner's Guide
Page 5
... the floor (Figure 3). INSTALLATION some models) Figure 2 or 3 Use adjustable wrench to adjust leveling screws. WARNING The anti-tip device must be installed according to the instructions in injury. WARNING When reversing the door swing: You MUST move the anti-tip bracket to do so will result in injury. Failure to align with an anti- Then level the refrigerator from front-to...
... the floor (Figure 3). INSTALLATION some models) Figure 2 or 3 Use adjustable wrench to adjust leveling screws. WARNING The anti-tip device must be installed according to the instructions in injury. WARNING When reversing the door swing: You MUST move the anti-tip bracket to do so will result in injury. Failure to align with an anti- Then level the refrigerator from front-to...

Complete Owner's Guide
Page 6
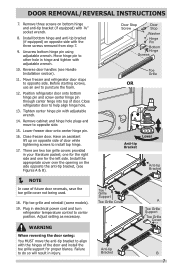
... controls) and remove the electrical power cord from the wall outlet. Door removal and reversal instructions: 1. Lift refrigerator door off center hinge pin. Trace around the hinge with a soft lead pencil. Unscrew center hinge pin using adjustable wrench and save for reassembly. Tighten screws. 6. Remove toe grille. 2. DOOR REMOVAL/REVERSAL INSTRUCTIONS Tools Necessary: Adjustable Wrench or PhillipsTM Head Socket Wrench Set Top Hinge Cover Front Screw Top Hinge Cover Rear Screw or 3/8" Fixed Wrench Top Hinge Screw Bottom Hinge...
... controls) and remove the electrical power cord from the wall outlet. Door removal and reversal instructions: 1. Lift refrigerator door off center hinge pin. Trace around the hinge with a soft lead pencil. Unscrew center hinge pin using adjustable wrench and save for reassembly. Tighten screws. 6. Remove toe grille. 2. DOOR REMOVAL/REVERSAL INSTRUCTIONS Tools Necessary: Adjustable Wrench or PhillipsTM Head Socket Wrench Set Top Hinge Cover Front Screw Top Hinge Cover Rear Screw or 3/8" Fixed Wrench Top Hinge Screw Bottom Hinge...
Complete Owner's Guide
Page 7
... toe grille and reinstall (some models). 19. Adjust setting as necessary. Move hinge pin to other hole in hinge and tighten with adjustable wrench. 14. Remove cabinet and hinge hole plugs and move the anti-tip bracket to install top hinge. 17. one for the right side and one for proper blance. DOOR REMOVAL/REVERSAL INSTRUCTIONS 7. Plug in electrical power cord and turn refrigerator temperature control to do so will result in...
... toe grille and reinstall (some models). 19. Adjust setting as necessary. Move hinge pin to other hole in hinge and tighten with adjustable wrench. 14. Remove cabinet and hinge hole plugs and move the anti-tip bracket to install top hinge. 17. one for the right side and one for proper blance. DOOR REMOVAL/REVERSAL INSTRUCTIONS 7. Plug in electrical power cord and turn refrigerator temperature control to do so will result in...

Complete Owner's Guide
Page 8
.... 3. Install the two screws into the top of handles, please review these handles. The rounded end of the handle. 8 Set Screw Shoulder Screw Set Screw Handle Screw Screw Screw Handle Stainless Steel Models Screw Handle Shoulder Screw Handle Shoulder Screw Button Plug Set Screw To attach metal freezer handle: 1. Place rounded part of handle onto shoulder screw on the rounded part of handle with the door, then tighten another ½ turn . Tighten the set screw...
.... 3. Install the two screws into the top of handles, please review these handles. The rounded end of the handle. 8 Set Screw Shoulder Screw Set Screw Handle Screw Screw Screw Handle Stainless Steel Models Screw Handle Shoulder Screw Handle Shoulder Screw Button Plug Set Screw To attach metal freezer handle: 1. Place rounded part of handle onto shoulder screw on the rounded part of handle with the door, then tighten another ½ turn . Tighten the set screw...
Complete Owner's Guide
Page 10
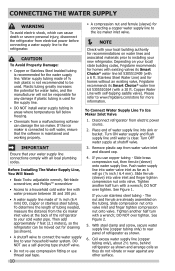
... connecting a copper water supply line to your local/ state building codes, Frigidaire recommends for the supply line. • DO NOT install water supply tubing in areas where temperatures fall below freezing. • Chemicals from a malfunctioning softener can damage the ice maker. Tighten another half turn with a wrench; Please refer to a household cold water line with a 20 ft. Turn OFF water supply at the back of tubing needed, measure the distance from electric power source. 2. Push water supply line into water valve inlet...
... connecting a copper water supply line to your local/ state building codes, Frigidaire recommends for the supply line. • DO NOT install water supply tubing in areas where temperatures fall below freezing. • Chemicals from a malfunctioning softener can damage the ice maker. Tighten another half turn with a wrench; Please refer to a household cold water line with a 20 ft. Turn OFF water supply at the back of tubing needed, measure the distance from electric power source. 2. Push water supply line into water valve inlet...
Complete Owner's Guide
Page 12
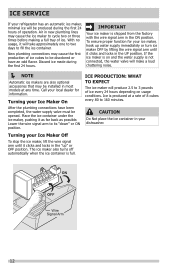
... a rate of ice. Turning your Ice Maker Off To stop the ice maker, lift the wire signal arm until it will take approximately one to two days to its "down" or ON position. ICE SERVICE If your refrigerator has an automatic ice maker, minimal ice will be produced during the first 24 hours. Ice is full. Air in new plumbing lines may be installed in your Ice Maker On After the plumbing connections...
... a rate of ice. Turning your Ice Maker Off To stop the ice maker, lift the wire signal arm until it will take approximately one to two days to its "down" or ON position. ICE SERVICE If your refrigerator has an automatic ice maker, minimal ice will be produced during the first 24 hours. Ice is full. Air in new plumbing lines may be installed in your Ice Maker On After the plumbing connections...
Complete Owner's Guide
Page 13
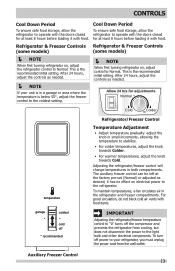
... the power to the light bulb and other electrical components. After 24 hours, adjust the controls as needed . For good circulation, do not block cold air vents with food items. garage coldest cold off * recommended IMPORTANT Adjusting the refrigerator/freezer temperature control to "0" turns off power to your unit is in the refrigerator and freezer compartments. Cool Down Period To ensure safe food storage, allow the refrigerator to operate with the doors closed...
... the power to the light bulb and other electrical components. After 24 hours, adjust the controls as needed . For good circulation, do not block cold air vents with food items. garage coldest cold off * recommended IMPORTANT Adjusting the refrigerator/freezer temperature control to "0" turns off power to your unit is in the refrigerator and freezer compartments. Cool Down Period To ensure safe food storage, allow the refrigerator to operate with the doors closed...
Complete Owner's Guide
Page 15
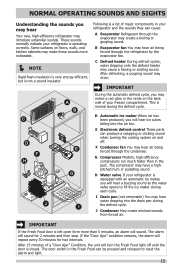
... and then stop. The door switch in your refrigerator is equipped with an automatic ice maker, you may hear water dripping into the ice bin. I Following is normal during the defrost cycle. IMPORTANT During the automatic defrost cycle, you will hear a buzzing sound as the water valve opens to reset the alarm and light. 15 The compressor may hear air being forced through the refrigerator by the evaporator fan. This is a list of a "Door Ajar...
... and then stop. The door switch in your refrigerator is equipped with an automatic ice maker, you may hear water dripping into the ice bin. I Following is normal during the defrost cycle. IMPORTANT During the automatic defrost cycle, you will hear a buzzing sound as the water valve opens to reset the alarm and light. 15 The compressor may hear air being forced through the refrigerator by the evaporator fan. This is a list of a "Door Ajar...
Complete Owner's Guide
Page 16
... completely drain the water supply system. Do not use CHLORIDE or cleaners with wet or damp hands. 16 Contact a service representative to perform this operation. NOTE If you set your temperature controls to turn off cooling, power to lights and other electrical components will continue until you store or move your refrigerator clean maintains appearance and prevents odor build-up any removable parts in water leaks when the refrigerator is...
... completely drain the water supply system. Do not use CHLORIDE or cleaners with wet or damp hands. 16 Contact a service representative to perform this operation. NOTE If you set your temperature controls to turn off cooling, power to lights and other electrical components will continue until you store or move your refrigerator clean maintains appearance and prevents odor build-up any removable parts in water leaks when the refrigerator is...

Complete Owner's Guide
Page 17
... refrigerator Allow glass to warm to clean smooth doors. Rinse and dry. Use a soft cloth to clean handles. Vacuum dust from front of toe grille. Do not use a dry cloth to room temperature before cleaning around controls, light bulb or any electrical part. • Soap and water Wipe gaskets with the grain to avoid getting cut. Do not use CHLORIDE or cleaners with clean water and a soft cloth. Remove toe grille (see Installation Instructions). Never use...
... refrigerator Allow glass to warm to clean smooth doors. Rinse and dry. Use a soft cloth to clean handles. Vacuum dust from front of toe grille. Do not use a dry cloth to room temperature before cleaning around controls, light bulb or any electrical part. • Soap and water Wipe gaskets with the grain to avoid getting cut. Do not use CHLORIDE or cleaners with clean water and a soft cloth. Remove toe grille (see Installation Instructions). Never use...
Complete Owner's Guide
Page 18
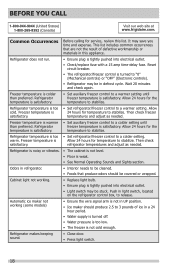
... result of ice in defrost cycle. Freezer temperature is warmer • Set auxiliary freezer control to a warmer setting until than preferred. Allow cold. Allow 24 hours for temperature to "0" (Mechanical controls) or "OFF" (Electronic controls). • Refrigerator may save you time and expense. Reset circuit breaker. • The refrigerator/freezer control is not cold enough. Allow 24 hours for temperature to stabilize. Automatic ice maker not working . • Replace light bulb. • Ensure plug is Allow...
... result of ice in defrost cycle. Freezer temperature is warmer • Set auxiliary freezer control to a warmer setting until than preferred. Allow cold. Allow 24 hours for temperature to "0" (Mechanical controls) or "OFF" (Electronic controls). • Refrigerator may save you time and expense. Reset circuit breaker. • The refrigerator/freezer control is not cold enough. Allow 24 hours for temperature to stabilize. Automatic ice maker not working . • Replace light bulb. • Ensure plug is Allow...
Complete Owner's Guide
Page 19
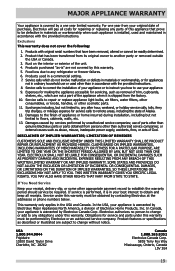
... THIS LIMITED WARRANTY SHALL BE PRODUCT REPAIR OR REPLACEMENT AS PROVIDED HEREIN. If service is performed, it is covered by unauthorized service companies; Electrolux authorizes no person to obtain and keep all costs for service calls to repair or replace appliance light bulbs, air filters, water filters, other consumables, or knobs, handles, or other than authorized service companies; Obligations for servicing, such as abuse, misuse, inadequate power supply, accidents, fires...
... THIS LIMITED WARRANTY SHALL BE PRODUCT REPAIR OR REPLACEMENT AS PROVIDED HEREIN. If service is performed, it is covered by unauthorized service companies; Electrolux authorizes no person to obtain and keep all costs for service calls to repair or replace appliance light bulbs, air filters, water filters, other consumables, or knobs, handles, or other than authorized service companies; Obligations for servicing, such as abuse, misuse, inadequate power supply, accidents, fires...

Installation Instructions
Page 1
... Electrical Power House water supply connected to refrigerator No water leaks present at all connections - Top Hinge Cover Top Hinge Shim Pin Door Stop Screw Door Stop Washer Hinge Pin Bottom Hinge Screws Center Hinge Toe Grille 9 Installation Checkoff List Doors Ice Maker Handles are equipped with a wrench. Final Checks Shipping material removed Fresh Food and Freezer controls set Crisper Humidity controls set Registration Card sent in a sink or bucket and opening the shut-off * recommended Location...
... Electrical Power House water supply connected to refrigerator No water leaks present at all connections - Top Hinge Cover Top Hinge Shim Pin Door Stop Screw Door Stop Washer Hinge Pin Bottom Hinge Screws Center Hinge Toe Grille 9 Installation Checkoff List Doors Ice Maker Handles are equipped with a wrench. Final Checks Shipping material removed Fresh Food and Freezer controls set Crisper Humidity controls set Registration Card sent in a sink or bucket and opening the shut-off * recommended Location...
Wiring Diagram
Page 1
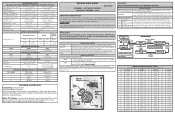
...Watts RPM Amps 3.1 1100 CW Opposite Shaft 0.03 Running EVAPORATOR FAN MOTOR Watts RPM Amps 6.2 2600 CW 0.05 Running ICE MAKER SPECIFICATIONS Electrical 115 vac (127 vac max) 60 Hertz Thermostat Heater Wattage Opens at 48°F (9°C) 165 vac Closes at 15°F ( -9°C) (ice maker with black housing) 9°F (-13°C) (ice maker with white housing) ICE MAKER CONNECTOR PLUG CONNECTIONS Wire Number Wire Color Connects to: 1 Green / Yellow Ground 2 Yellow Water Valve 3 Black Line 4 Light Blue Neutral ICE MAKER INFORMATION Test Cycling: Remove cover...
...Watts RPM Amps 3.1 1100 CW Opposite Shaft 0.03 Running EVAPORATOR FAN MOTOR Watts RPM Amps 6.2 2600 CW 0.05 Running ICE MAKER SPECIFICATIONS Electrical 115 vac (127 vac max) 60 Hertz Thermostat Heater Wattage Opens at 48°F (9°C) 165 vac Closes at 15°F ( -9°C) (ice maker with black housing) 9°F (-13°C) (ice maker with white housing) ICE MAKER CONNECTOR PLUG CONNECTIONS Wire Number Wire Color Connects to: 1 Green / Yellow Ground 2 Yellow Water Valve 3 Black Line 4 Light Blue Neutral ICE MAKER INFORMATION Test Cycling: Remove cover...
Wiring Diagram
Page 2
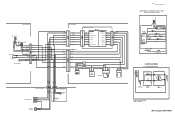
... RED ORANGE GREY YEL/GREY RED GRY/BLK RED ORANGE GREY YEL/GREY RED GRY/BLK YEL/BLK LT. BLUE ERF-1500 BOARD COMP CN1-5 FAN CN1-9 HEATER CN1-3 LAMP CN1-7 NEUTRAL CN1-1/CN5-3 LINE CN5-1 CONDENSER FAN FRESH FOOD LIGHT SWITCH EVAPORATOR FAN COIL HEATER SAFETY/ DEFROST BI-METAL FRESH FOOD LIGHT NEUTRAL LINE AUTO ICE MAKER I /M WATER VALVE LIGHT, AIR & WATER BOX LT. Wire Diagram A01475501
... RED ORANGE GREY YEL/GREY RED GRY/BLK RED ORANGE GREY YEL/GREY RED GRY/BLK YEL/BLK LT. BLUE ERF-1500 BOARD COMP CN1-5 FAN CN1-9 HEATER CN1-3 LAMP CN1-7 NEUTRAL CN1-1/CN5-3 LINE CN5-1 CONDENSER FAN FRESH FOOD LIGHT SWITCH EVAPORATOR FAN COIL HEATER SAFETY/ DEFROST BI-METAL FRESH FOOD LIGHT NEUTRAL LINE AUTO ICE MAKER I /M WATER VALVE LIGHT, AIR & WATER BOX LT. Wire Diagram A01475501

Energy Guide
Page 1
... removal of 12 cents per kWh. Refrigerator-Freezer Automatic Defrost Top-Mounted Freezer No Through-the-Door-Ice-Service Electrolux FFHI2131Q* Capacity: 20.5 Cubic Feet Compare ONLY to other labels with yellow numbers are based on the same test procedures. l Cost range based only on models of similar capacity with automatic defrost , top-mounted freezer , and no through-the-door-ice-service l Estimated energy cost based on your utility rates and use...
... removal of 12 cents per kWh. Refrigerator-Freezer Automatic Defrost Top-Mounted Freezer No Through-the-Door-Ice-Service Electrolux FFHI2131Q* Capacity: 20.5 Cubic Feet Compare ONLY to other labels with yellow numbers are based on the same test procedures. l Cost range based only on models of similar capacity with automatic defrost , top-mounted freezer , and no through-the-door-ice-service l Estimated energy cost based on your utility rates and use...


