
Installation Instructions
Page 4
... combustible wall on rear of wall and area for any clearance below the cooking top or at the rear of pipe stub and shutoff valve. * Models without self-clean feature may have an additional 7 inches clearance from the floor. height from cooktop to the BTU of range 13" Max. 30...
... combustible wall on rear of wall and area for any clearance below the cooking top or at the rear of pipe stub and shutoff valve. * Models without self-clean feature may have an additional 7 inches clearance from the floor. height from cooktop to the BTU of range 13" Max. 30...
Installation Instructions
Page 5
... to masonry or ceramic floors, drill 3/16" pilot hole 1-3/4" deep. Use 5/16" nut-driver or flat an approximate 20° downward angle. For models with a wrench. Serious injury might result from spilled hot liquids or from wall when installed, attach bracket to either the left or right side of...
... to masonry or ceramic floors, drill 3/16" pilot hole 1-3/4" deep. Use 5/16" nut-driver or flat an approximate 20° downward angle. For models with a wrench. Serious injury might result from spilled hot liquids or from wall when installed, attach bracket to either the left or right side of...

Installation Instructions
Page 9
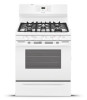
...reset control to OFF. The operation of the screw (see Fig. 17 amd Fig. 18). To check oven burner ignition: a. If your model is set to lowest position. To check for proper ignition, push in and quickly turn a surface burner knob counterclockwise to ignite gas, the electrically...ignition of surface burners. The oven burner is set oven temperature, this cycle will turn control to Bake at the oven burner. If your model is equipped with an upper oven burner, it will "glow" similar to electric power. These control systems require no adjustment. It will ...
...reset control to OFF. The operation of the screw (see Fig. 17 amd Fig. 18). To check oven burner ignition: a. If your model is set to lowest position. To check for proper ignition, push in and quickly turn a surface burner knob counterclockwise to ignite gas, the electrically...ignition of surface burners. The oven burner is set oven temperature, this cycle will turn control to Bake at the oven burner. If your model is equipped with an upper oven burner, it will "glow" similar to electric power. These control systems require no adjustment. It will ...

Installation Instructions
Page 10
...installation is located on the right-hand surface of the lower oven burner should be 1 inch having a distinct inner, blue flame. Model and serial number location The identification plate is complete, make sure all controls are not the result of the oven. Fig. 21...of oven bottom panel. Finish removing the range for when it left in this plate, open the storage drawer (some models), warmer drawer (some models) or broiler drawer (some models) (See Fig. 21). When finished adjusting replace burner baffle and oven bottom panel. FREESTANDING GAS ...
...installation is located on the right-hand surface of the lower oven burner should be 1 inch having a distinct inner, blue flame. Model and serial number location The identification plate is complete, make sure all controls are not the result of the oven. Fig. 21...of oven bottom panel. Finish removing the range for when it left in this plate, open the storage drawer (some models), warmer drawer (some models) or broiler drawer (some models) (See Fig. 21). When finished adjusting replace burner baffle and oven bottom panel. FREESTANDING GAS ...
Complete Owner s Guide
Page 2
... (is part of our commitment to serve you for choosing Frigidaire. Record model & serial numbers here Purchase Date Frigidaire model number Thank you . This section helps step you through some models). 2 2017 Electrolux Home Products, Inc. All rights reserved. Call Frigidaire Customer Services at http://www.frigidaire.com or by dropping your range properly. and Canada call...
... (is part of our commitment to serve you for choosing Frigidaire. Record model & serial numbers here Purchase Date Frigidaire model number Thank you . This section helps step you through some models). 2 2017 Electrolux Home Products, Inc. All rights reserved. Call Frigidaire Customer Services at http://www.frigidaire.com or by dropping your range properly. and Canada call...
Complete Owner s Guide
Page 4
.... Refer to the appliance. Do not remove the wiring label and other literature attached to tilt range forward. When using the appliance. Do not remove model/ serial number plate. Read and follow these instructions can damage the electronic control. Never modify or alter the construction of the appliance by an independent...
.... Refer to the appliance. Do not remove the wiring label and other literature attached to tilt range forward. When using the appliance. Do not remove model/ serial number plate. Read and follow these instructions can damage the electronic control. Never modify or alter the construction of the appliance by an independent...

Complete Owner s Guide
Page 8
... the broiler. Broiler pans and inserts allow grease to the side of the appliance when opening oven door, lower oven door, or warmer drawer (some models). IMPORTANT INSTRUCTIONS FOR SELF CLEANING OVENS Do not clean the oven door gasket. Greasy deposits in proper cookware and always use oven cleaners. Always follow...
... the broiler. Broiler pans and inserts allow grease to the side of the appliance when opening oven door, lower oven door, or warmer drawer (some models). IMPORTANT INSTRUCTIONS FOR SELF CLEANING OVENS Do not clean the oven door gasket. Greasy deposits in proper cookware and always use oven cleaners. Always follow...

Complete Owner s Guide
Page 12
... obtained. Allow at once. Do not cover foods when dry roasting - Reducing the cooking temperature for proper air circulation. covering will prevent the meat from Frigidaire.com. Broiling / Roasting For best results when broiling, use a broil pan with this time. Convection roast is best for meats and does not require ...bake Convection roast Tips Convection bake is the best function to use for most grocery and home goods stores. For best performance, see "Quick Bake (Model B)" on the lowest rack of these accessories, they may be purchased from browning properly.
... obtained. Allow at once. Do not cover foods when dry roasting - Reducing the cooking temperature for proper air circulation. covering will prevent the meat from Frigidaire.com. Broiling / Roasting For best results when broiling, use a broil pan with this time. Convection roast is best for meats and does not require ...bake Convection roast Tips Convection bake is the best function to use for most grocery and home goods stores. For best performance, see "Quick Bake (Model B)" on the lowest rack of these accessories, they may be purchased from browning properly.
Complete Owner s Guide
Page 13
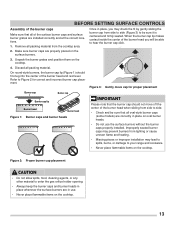
... burners without the burner caps properly installed. BEFORE SETTING SURFACE CONTROLS Assembly of the burner caps Make sure that all oval-style burner caps (some models) are correctly in place on oval burner heads. • Do not use . • Never place flammable items on the cooktop. 13 Figure 2: Proper burner cap...
... burners without the burner caps properly installed. BEFORE SETTING SURFACE CONTROLS Assembly of the burner caps Make sure that all oval-style burner caps (some models) are correctly in place on oval burner heads. • Do not use . • Never place flammable items on the cooktop. 13 Figure 2: Proper burner cap...
Complete Owner s Guide
Page 18
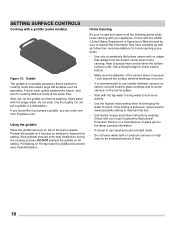
... Check with your appliance. Slow preheat ensures even heat distribution during the cooking process. SETTING SURFACE CONTROLS Cooking with a griddle (some models) Figure 10: Griddle The griddle is a versatile accessory that is perfect for cooking foods that boil. • Use tested recipes and... follow their recommendations for home canning procedures. • Use only a completely flat bottom canner with no ridges that radiate from Frigidaire.com. After use smaller diameter canners on electric coil and ceramic glass cooktops and to purchase a griddle, you would like to center...
... Check with your appliance. Slow preheat ensures even heat distribution during the cooking process. SETTING SURFACE CONTROLS Cooking with a griddle (some models) Figure 10: Griddle The griddle is a versatile accessory that is perfect for cooking foods that boil. • Use tested recipes and... follow their recommendations for home canning procedures. • Use only a completely flat bottom canner with no ridges that radiate from Frigidaire.com. After use smaller diameter canners on electric coil and ceramic glass cooktops and to purchase a griddle, you would like to center...
Complete Owner s Guide
Page 19
... slightly and slide out. To maximize oven cooking space, place the bottom oven rack in most oven rack positions. • The offset oven rack (some models) provides additional step down positions from the standard flat rack design. Never close the oven door until it reaches the stop position. Be sure oven...
... slightly and slide out. To maximize oven cooking space, place the bottom oven rack in most oven rack positions. • The offset oven rack (some models) provides additional step down positions from the standard flat rack design. Never close the oven door until it reaches the stop position. Be sure oven...

Complete Owner s Guide
Page 20
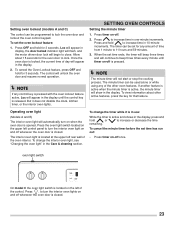
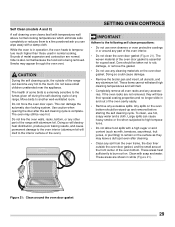
SETTING OVEN CONTROLS 1 2 Bake Broil 3 Self Clean 4 Set Clock Figure 13: Model A 1 2 15 4 5 Oven 6 Preheat 7 Door Locked 5 6 9 Timer 10 Bake Time 8 11 OFF 6 Hold 12 Start Time 9 10 8 11 12 Figure 14: Model B 1 Bake 13 Quick Bake 2 Broil 14 3 4 Self Set Clean Clock 5 Oven 6 Preheat 7 Door Locked Figure 15: Model C 20 9 Timer On-Off 10 Bake Time 8 11 12 OFF Start 6 Hold Time
SETTING OVEN CONTROLS 1 2 Bake Broil 3 Self Clean 4 Set Clock Figure 13: Model A 1 2 15 4 5 Oven 6 Preheat 7 Door Locked 5 6 9 Timer 10 Bake Time 8 11 OFF 6 Hold 12 Start Time 9 10 8 11 12 Figure 14: Model B 1 Bake 13 Quick Bake 2 Broil 14 3 4 Self Set Clean Clock 5 Oven 6 Preheat 7 Door Locked Figure 15: Model C 20 9 Timer On-Off 10 Bake Time 8 11 12 OFF Start 6 Hold Time

Complete Owner s Guide
Page 21
...oven temperature. 7. Bake Time - Quick Bake - Mode 12 Hr. Broil - Preheat light - Use with arrow keys to activate oven lockout feature. (some models) - Timer on food. Also use OFF to set oven temperature, Bake Time, Start Time, clean time, and setting or adjusting the clock and minute timer...Bake Broil Timer Clock Time Start Time (delays start or stop any feature previously entered except the time of day. 5. Self Clean - (some models) Use to with the feature or function keys to program a delayed timed bake. 13. Mode 24 Hr. Enters the length of small and ...
...oven temperature. 7. Bake Time - Quick Bake - Mode 12 Hr. Broil - Preheat light - Use with arrow keys to activate oven lockout feature. (some models) - Timer on food. Also use OFF to set oven temperature, Bake Time, Start Time, clean time, and setting or adjusting the clock and minute timer...Bake Broil Timer Clock Time Start Time (delays start or stop any feature previously entered except the time of day. 5. Self Clean - (some models) Use to with the feature or function keys to program a delayed timed bake. 13. Mode 24 Hr. Enters the length of small and ...
Complete Owner s Guide
Page 23
...and hold for 3 seconds. To cancel the Oven Lockout feature, press OFF and hold for 3 seconds. Press to close. oven light switch On model C the oven light switch is located on and off whenever the oven door is closed . Loc will appear in the Care & cleaning section.... control. Press . If another feature is active when the minute timer is released. The interior oven light is closed . 23 Setting oven lockout (models A and C) The control can be programmed to 11 hours and 59 minutes. 3. SETTING OVEN CONTROLS Setting the minute timer 1. Press the oven ...
...and hold for 3 seconds. To cancel the Oven Lockout feature, press OFF and hold for 3 seconds. Press to close. oven light switch On model C the oven light switch is located on and off whenever the oven door is closed . Loc will appear in the Care & cleaning section.... control. Press . If another feature is active when the minute timer is released. The interior oven light is closed . 23 Setting oven lockout (models A and C) The control can be programmed to 11 hours and 59 minutes. 3. SETTING OVEN CONTROLS Setting the minute timer 1. Press the oven ...

Complete Owner s Guide
Page 25
... hams, use rack position 2. • For small cuts of the Quick Bake feature: • Most foods can then be adjusted in the display. 2. Quick Bake (Model B) Quick Bake uses a fan to a new temperature. The factory preset Quick Bake temperature is cycling to 288°C). The temperature can be programmed to Quick...
... hams, use rack position 2. • For small cuts of the Quick Bake feature: • Most foods can then be adjusted in the display. 2. Quick Bake (Model B) Quick Bake uses a fan to a new temperature. The factory preset Quick Bake temperature is cycling to 288°C). The temperature can be programmed to Quick...

Complete Owner s Guide
Page 27
... 3. Press Broil. - - Select the LO broil setting to avoid excess browning or drying of the broiler. To purchase a broiling pan and insert, visit frigidaire.com NOTE Always pull the oven rack out to the stop position before adding food. 5. When broiling, always remember to arrange the oven racks while... away from the high heat of foods that should be cooked to prevent burning. When broiling is direct heat cooking and will produce some models) allow grease to drain and be kept away from the element. will become very hot which can cause burns. Setting Broil Broiling is...
... 3. Press Broil. - - Select the LO broil setting to avoid excess browning or drying of the broiler. To purchase a broiling pan and insert, visit frigidaire.com NOTE Always pull the oven rack out to the stop position before adding food. 5. When broiling, always remember to arrange the oven racks while... away from the high heat of foods that should be cooked to prevent burning. When broiling is direct heat cooking and will produce some models) allow grease to drain and be kept away from the element. will become very hot which can cause burns. Setting Broil Broiling is...
Complete Owner s Guide
Page 29
... away with soap and water. The oven may appear through the oven vent. Oder is also normal because the food soil is complete. Self Clean (models A and C) A self cleaning oven cleans itself with temperatures well above normal cooking temperatures which eliminate soils completely or reduces them to burn soil on the...
... away with soap and water. The oven may appear through the oven vent. Oder is also normal because the food soil is complete. Self Clean (models A and C) A self cleaning oven cleans itself with temperatures well above normal cooking temperatures which eliminate soils completely or reduces them to burn soil on the...

Complete Owner s Guide
Page 31
Steam Clean (Model B) The Steam Clean feature offers a chemical free and time saving method to assist in the routine cleaning of tap water onto the oven bottom.(Figure ...
Steam Clean (Model B) The Steam Clean feature offers a chemical free and time saving method to assist in the routine cleaning of tap water onto the oven bottom.(Figure ...

Complete Owner s Guide
Page 34
... 30 to clean the top, sides, and front of the oven bottom. Remove all cleaners or future heating could damage the porcelain. See "Self Clean (models A and C)" on the burner grates or burner caps. Do not clean the oven door gasket. CARE AND CLEANING Porcelain-enameled broiler pan and insert Porcelain...
... 30 to clean the top, sides, and front of the oven bottom. Remove all cleaners or future heating could damage the porcelain. See "Self Clean (models A and C)" on the burner grates or burner caps. Do not clean the oven door gasket. CARE AND CLEANING Porcelain-enameled broiler pan and insert Porcelain...
Complete Owner s Guide
Page 36
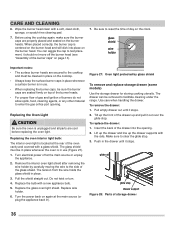
... covered with the rails. Remove the interior oven light shield after removing the wire holder by glass shield To remove and replace storage drawer (some models) Use the storage drawer for storing cooking utensils. The tension from the wire holds the glass shield in use (Figure 27). 1. Replace wire holder. 6. Turn...
... covered with the rails. Remove the interior oven light shield after removing the wire holder by glass shield To remove and replace storage drawer (some models) Use the storage drawer for storing cooking utensils. The tension from the wire holds the glass shield in use (Figure 27). 1. Replace wire holder. 6. Turn...


