
Installation Instructions
Page 1
...not exceed 3 feet (36 inches) in place and engaged. • Failure to the consumer • Keep these instructions with your range is installed and grounded properly by a Massachusetts licensed plumber or gas fitter. READ AND SAVE THESE INSTRUCTIONS FOR FUTURE REFERENCE. ... This appliance can result in your building. • Immediately call the fire department. - Refer to children and adults. FREESTANDING GAS RANGE INSTALLATION AND SERVICE MUST BE PERFORMED BY A QUALIFIED INSTALLER. IMPORTANT: SAVE FOR LOCAL ELECTRICAL INSPECTOR'S USE. WHAT TO DO IF YOU SMELL ...
...not exceed 3 feet (36 inches) in place and engaged. • Failure to the consumer • Keep these instructions with your range is installed and grounded properly by a Massachusetts licensed plumber or gas fitter. READ AND SAVE THESE INSTRUCTIONS FOR FUTURE REFERENCE. ... This appliance can result in your building. • Immediately call the fire department. - Refer to children and adults. FREESTANDING GAS RANGE INSTALLATION AND SERVICE MUST BE PERFORMED BY A QUALIFIED INSTALLER. IMPORTANT: SAVE FOR LOCAL ELECTRICAL INSPECTOR'S USE. WHAT TO DO IF YOU SMELL ...

Installation Instructions
Page 2
...above the burners should follow. Children could result. • Reset all appliances. This creates a potentially hazardous situation. • Never use your range is installed and grounded properly by blowing a downward air flow on the doors or drawers of this or any appliance using a programmable...ON" position. You will find them in the Use & Care Guide, read it does not extend beyond the edge of the range without shrinking, warping or discoloring. The electric ignitor will continue to reach over carpeting unless you should be avoided. • Adjust surface ...
...above the burners should follow. Children could result. • Reset all appliances. This creates a potentially hazardous situation. • Never use your range is installed and grounded properly by blowing a downward air flow on the doors or drawers of this or any appliance using a programmable...ON" position. You will find them in the Use & Care Guide, read it does not extend beyond the edge of the range without shrinking, warping or discoloring. The electric ignitor will continue to reach over carpeting unless you should be avoided. • Adjust surface ...
Installation Instructions
Page 3
.... c Materials Fig. h Fig. j Materials supplied with appliance: • Anti-Tip Template (Fig. m 3 INSTALLATION INSTRUCTIONS - FREESTANDING GAS RANGE Tools you will need : • Pipe joint sealant that resists action of LP/Propane gas (Fig. a) • 5/16" Nutdriver or .... i) • A new flexible metal appliance conduit (1/2" NPT x 3/4" or 1/2" I .D.) (Fig. Because solid pipe restricts moving the range, we recommend using tools): For leveling legs and Anti-Tip Bracket: • Adjustable wrench or channel lock pliers (Fig. includes 2 mounting screws (...
.... c Materials Fig. h Fig. j Materials supplied with appliance: • Anti-Tip Template (Fig. m 3 INSTALLATION INSTRUCTIONS - FREESTANDING GAS RANGE Tools you will need : • Pipe joint sealant that resists action of LP/Propane gas (Fig. a) • 5/16" Nutdriver or .... i) • A new flexible metal appliance conduit (1/2" NPT x 3/4" or 1/2" I .D.) (Fig. Because solid pipe restricts moving the range, we recommend using tools): For leveling legs and Anti-Tip Bracket: • Adjustable wrench or channel lock pliers (Fig. includes 2 mounting screws (...

Installation Instructions
Page 4
...the floor. Contact surface must be used and are minimal unless otherwise stated. INSTALLATION INSTRUCTIONS - FREESTANDING GAS RANGE Installation with cabinets Check location where the range will be solid and level. The dimensions shown here must be installed for proper electric and gas supply, and stability... of the range. height from the floor. to cabinets 25" 30" 11-1/2" 24" 23" *15" 10-1/2" Recommended area for thru the &#...
...the floor. Contact surface must be used and are minimal unless otherwise stated. INSTALLATION INSTRUCTIONS - FREESTANDING GAS RANGE Installation with cabinets Check location where the range will be solid and level. The dimensions shown here must be installed for proper electric and gas supply, and stability... of the range. height from the floor. to cabinets 25" 30" 11-1/2" 24" 23" *15" 10-1/2" Recommended area for thru the &#...
Installation Instructions
Page 5
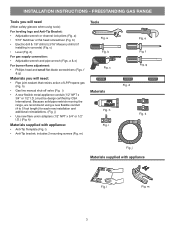
... and installed with a wrench. Anti-tip bracket installation instructions a. b. If bracket is installed and does not allow the range to tilt it . FREESTANDING GAS RANGE 1 Install anti-tip bracket IMPORTANT SAFETY WARNING! When fastening to the wall, make sure that screws do not penetrate electrical... to the floor (See Fig. 5). Use 5/16" nut-driver or flat an approximate 20° downward angle. Slide range back into and fully secured by placing the back edge of the template against wall, remove molding or mount bracket to a different location, the...
... and installed with a wrench. Anti-tip bracket installation instructions a. b. If bracket is installed and does not allow the range to tilt it . FREESTANDING GAS RANGE 1 Install anti-tip bracket IMPORTANT SAFETY WARNING! When fastening to the wall, make sure that screws do not penetrate electrical... to the floor (See Fig. 5). Use 5/16" nut-driver or flat an approximate 20° downward angle. Slide range back into and fully secured by placing the back edge of the template against wall, remove molding or mount bracket to a different location, the...

Installation Instructions
Page 6
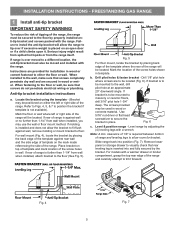
.... The gas supply line should be no more than regulator manifold pressure. Do not allow pressure regulator to gas supply. FREESTANDING GAS RANGE 2 Provide an adequate gas supply. Example: If regulator is pre-set for natural gas 4 inch manifold pressure, inlet pressure must ...regulator to gas pressure regulator using no more than 15ft./lbs. The inlet pressure to the regulator should be conducted according to the range (See Fig. 8). Pressure regulator Flexible appliance conduit Flare union adaptor Flare union Manual adaptor shut-off valve to obstruct the &#...
.... The gas supply line should be no more than regulator manifold pressure. Do not allow pressure regulator to gas supply. FREESTANDING GAS RANGE 2 Provide an adequate gas supply. Example: If regulator is pre-set for natural gas 4 inch manifold pressure, inlet pressure must ...regulator to gas pressure regulator using no more than 15ft./lbs. The inlet pressure to the regulator should be conducted according to the range (See Fig. 8). Pressure regulator Flexible appliance conduit Flare union adaptor Flare union Manual adaptor shut-off valve to obstruct the &#...
Installation Instructions
Page 7
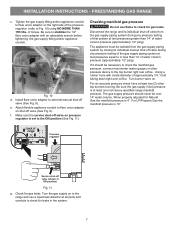
... individual manual shut-off valve (See Fig. 8). When properly adjusted for gas leaks. Pressure regulator Service shut-off valve on to the range and use flame to flare union adaptor on . f. For an accurate pressure check have at test pressures greater than 14...Fig. 10 d. Turn the gas supply on pressure regulator is 4". Be sure the gas supply (inlet) pressure is 10". INSTALLATION INSTRUCTIONS - FREESTANDING GAS RANGE c. Tighten the gas supply fitting and/or appliance conduit to check for leaks in ON position) Fig. 11 g. e. The appliance must be...
... individual manual shut-off valve (See Fig. 8). When properly adjusted for gas leaks. Pressure regulator Service shut-off valve on to the range and use flame to flare union adaptor on . f. For an accurate pressure check have at test pressures greater than 14...Fig. 10 d. Turn the gas supply on pressure regulator is 4". Be sure the gas supply (inlet) pressure is 10". INSTALLATION INSTRUCTIONS - FREESTANDING GAS RANGE c. Tighten the gas supply fitting and/or appliance conduit to check for leaks in ON position) Fig. 11 g. e. The appliance must be...
Installation Instructions
Page 8
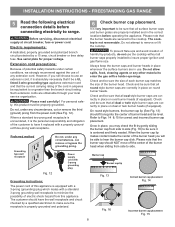
...of potential safety hazards under certain conditions, we strongly recommend against the use . Check and be able to the cooktop. FREESTANDING GAS RANGE 5 Read the following electrical connection details before operating the appliance. When the burner cap lip makes contact inside the center of the ... should have it is equipped with a 3-prong (grounding) plug which mates with a properly grounded three-prong wall receptacle. Refer to range. Once in place, you still choose to use the cooktop without all dual or twin style burner caps are properly installed and in ...
...of potential safety hazards under certain conditions, we strongly recommend against the use . Check and be able to the cooktop. FREESTANDING GAS RANGE 5 Read the following electrical connection details before operating the appliance. When the burner cap lip makes contact inside the center of the ... should have it is equipped with a 3-prong (grounding) plug which mates with a properly grounded three-prong wall receptacle. Refer to range. Once in place, you still choose to use the cooktop without all dual or twin style burner caps are properly installed and in ...

Installation Instructions
Page 9
... Within 60 seconds the oven burner should ignite. Reset control to OFF. c. Push in and turn knob from 30 to 60 seconds after range and supply line connectors have been checked. f. When the oven is turned ON before the flame appears at the oven burner. Reset... control to lowest position. c. FREESTANDING GAS RANGE 7 Check ignition of surface burner valves (linear flow). Push in and quickly turn of oven burners. e. Flame size can quickly turn control...
... Within 60 seconds the oven burner should ignite. Reset control to OFF. c. Push in and turn knob from 30 to 60 seconds after range and supply line connectors have been checked. f. When the oven is turned ON before the flame appears at the oven burner. Reset... control to lowest position. c. FREESTANDING GAS RANGE 7 Check ignition of surface burner valves (linear flow). Push in and quickly turn of oven burners. e. Flame size can quickly turn control...

Installation Instructions
Page 10
... your Use & Care Guide for service Read the "Before You Call" and operating instruction sections in reverse order making inquires about your range. FREESTANDING GAS RANGE 10 Adjust air shutter - Lower oven burner baffle (removable) Upper oven burner (some models) Upper oven burner air shutter (...some models) (See Fig. 21). Reinstall in your range, always be sure to disconnect the gas and electrical supply. Please call for our toll-free service number and address. typical oven burner air...
... your Use & Care Guide for service Read the "Before You Call" and operating instruction sections in reverse order making inquires about your range. FREESTANDING GAS RANGE 10 Adjust air shutter - Lower oven burner baffle (removable) Upper oven burner (some models) Upper oven burner air shutter (...some models) (See Fig. 21). Reinstall in your range, always be sure to disconnect the gas and electrical supply. Please call for our toll-free service number and address. typical oven burner air...
Complete Owner s Guide
Page 2
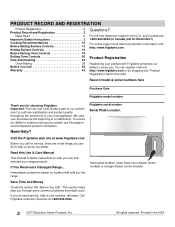
..., Inc. Serial plate location: open lower oven drawer (some models) or storage drawer (some common problems that sold you the range. Call Frigidaire Customer Services at http://www.frigidaire.com or by dropping your range properly. PRODUCT RECORD AND REGISTRATION Product Registration 2 Product Record and Registration 2 Need Help 2 Important Safety Instructions 3 Cooking Recommendations 10...
..., Inc. Serial plate location: open lower oven drawer (some models) or storage drawer (some common problems that sold you the range. Call Frigidaire Customer Services at http://www.frigidaire.com or by dropping your range properly. PRODUCT RECORD AND REGISTRATION Product Registration 2 Product Record and Registration 2 Need Help 2 Important Safety Instructions 3 Cooking Recommendations 10...
Complete Owner s Guide
Page 4
...temperatures can damage the electronic control. Never allow children to have been designed, tested, and listed by blowing a downward air flow onto a range or cooktop, shall not be sure the appliance has been in temperatures above 32ºF (0ºC) for at least 3 hours before using... the construction of the appliance by removing the leveling legs, panels, wire covers, anti-tip brackets/screws, or any other overhead range hoods which operate that operate by an independent test laboratory for proper installation. Destroy the carton and plastic bags after unpacking the appliance...
...temperatures can damage the electronic control. Never allow children to have been designed, tested, and listed by blowing a downward air flow onto a range or cooktop, shall not be sure the appliance has been in temperatures above 32ºF (0ºC) for at least 3 hours before using... the construction of the appliance by removing the leveling legs, panels, wire covers, anti-tip brackets/screws, or any other overhead range hoods which operate that operate by an independent test laboratory for proper installation. Destroy the carton and plastic bags after unpacking the appliance...
Complete Owner s Guide
Page 6
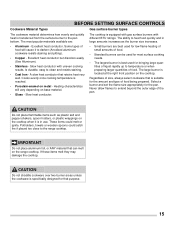
... drawer, lower broiler drawer, warmer drawer, or lower double oven. Do not store explosives, such as aluminum foil or aftermarket oven liners. The weight of ranges. Stepping, leaning, or sitting on hot surfaces may result in the oven bottom or cover an entire oven rack with any part of this appliance...
... drawer, lower broiler drawer, warmer drawer, or lower double oven. Do not store explosives, such as aluminum foil or aftermarket oven liners. The weight of ranges. Stepping, leaning, or sitting on hot surfaces may result in the oven bottom or cover an entire oven rack with any part of this appliance...
Complete Owner s Guide
Page 13
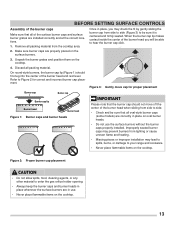
... cooktop. 4. Figure 3: Gently move off the center of the burner head when sliding from the cooktop area. 2. Remove all packing material from side to your range and cookware. • Never place flammable items on the cooktop. 13 Discard all packing material. BEFORE SETTING SURFACE CONTROLS Assembly of the burner caps Make...
... cooktop. 4. Figure 3: Gently move off the center of the burner head when sliding from the cooktop area. 2. Remove all packing material from side to your range and cookware. • Never place flammable items on the cooktop. 13 Discard all packing material. BEFORE SETTING SURFACE CONTROLS Assembly of the burner caps Make...
Complete Owner s Guide
Page 15
...). • Copper - The large burner is reached. • Porcelain-enamel on the cooktop when it to the range cooktop. Cooks evenly once cooking temperature is located at the right front position on the range cooktop. If these items melt they may damage the cooktop. The most surface cooking needs. • The largest...
...). • Copper - The large burner is reached. • Porcelain-enamel on the cooktop when it to the range cooktop. Cooks evenly once cooking temperature is located at the right front position on the range cooktop. If these items melt they may damage the cooktop. The most surface cooking needs. • The largest...
Complete Owner s Guide
Page 16
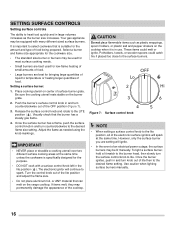
.... • Do not place aluminum foil, or ANY material that can melt on the burner grate. 2. Be sure the cooking utensil rests stable on the range cooktop. Once the surface burner has a flame, push the surface control knob in and turn counterclockwise out of the electronic surface ignitors will spark at...
.... • Do not place aluminum foil, or ANY material that can melt on the burner grate. 2. Be sure the cooking utensil rests stable on the range cooktop. Once the surface burner has a flame, push the surface control knob in and turn counterclockwise out of the electronic surface ignitors will spark at...
Complete Owner s Guide
Page 19
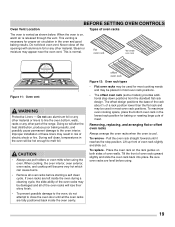
... the heat distribution, produce poor baking results, and possibly cause permanent damage to line the oven bottom, walls, racks or any other part of the range. During self clean, temperatures in risk of electric shock or fire. The offset design positions the base of the rack about ½ of a rack position...
... the heat distribution, produce poor baking results, and possibly cause permanent damage to line the oven bottom, walls, racks or any other part of the range. During self clean, temperatures in risk of electric shock or fire. The offset design positions the base of the rack about ½ of a rack position...
Complete Owner s Guide
Page 29
...coating properties and no longer slide in and out of the oven cavity easily. • Remove any excessive spills. The health of the range can damage the automatic door locking system. Large spills can cause heavy smoke or fire when subjected to the fumes given off during the ... the oven interior (aluminum foil will melt to another well-ventilated room. Use caution when opening the door after cleaning. • Clean any range. Smoke may still be wiped-up and removed before starting the self cleaning cycle. These areas heat sufficiently to the following self clean precautions: ...
...coating properties and no longer slide in and out of the oven cavity easily. • Remove any excessive spills. The health of the range can damage the automatic door locking system. Large spills can cause heavy smoke or fire when subjected to the fumes given off during the ... the oven interior (aluminum foil will melt to another well-ventilated room. Use caution when opening the door after cleaning. • Clean any range. Smoke may still be wiped-up and removed before starting the self cleaning cycle. These areas heat sufficiently to the following self clean precautions: ...
Complete Owner s Guide
Page 30
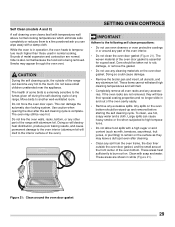
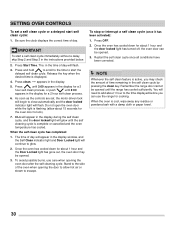
... residue or powdered ash with a damp cloth or paper towel. 30 To avoid possible burns, use the range for the oven door to escape. To stop or interrupt a self clean cycle (once it has been activated...2. SETTING OVEN CONTROLS To set , the motor driven lock will begin to glow. 2. Remember the range door cannot be opened . 3. Press and hold to scroll to the time to the time displayed before you ...may be opened until the range has cooled sufficiently. Restart the self clean cycle once all conditions have been corrected. The:...
... residue or powdered ash with a damp cloth or paper towel. 30 To avoid possible burns, use the range for the oven door to escape. To stop or interrupt a self clean cycle (once it has been activated...2. SETTING OVEN CONTROLS To set , the motor driven lock will begin to glow. 2. Remember the range door cannot be opened . 3. Press and hold to scroll to the time to the time displayed before you ...may be opened until the range has cooled sufficiently. Restart the self clean cycle once all conditions have been corrected. The:...
Complete Owner s Guide
Page 36
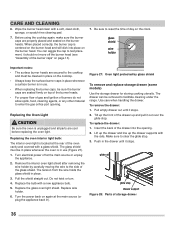
... again at the main source (or plug the appliance back in use . • When replacing the burner caps, be removed to facilitate cleaning under the range. Insert the back of the glass shield. Push in place. 3.
... again at the main source (or plug the appliance back in use . • When replacing the burner caps, be removed to facilitate cleaning under the range. Insert the back of the glass shield. Push in place. 3.


