
Installation Instructions
Page 4
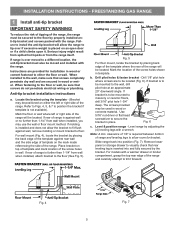
... shut-off valve. 2" 7" Recommended area for 120V outlet on rear of wall and area for thru the wall connection of pipe stub and shutoff valve. * Models without self-clean feature may have an additional 7 inches clearance from cooktop to cabinets on either side of the largest burner (See Fig 2). 18" Min...
... shut-off valve. 2" 7" Recommended area for 120V outlet on rear of wall and area for thru the wall connection of pipe stub and shutoff valve. * Models without self-clean feature may have an additional 7 inches clearance from cooktop to cabinets on either side of the largest burner (See Fig 2). 18" Min...
Installation Instructions
Page 5
... template on either the floor or wall. b. If bracket is required between bottom of the range will allow room for installation in wall. For models with the range. Anti-tip bracket installation instructions a. Fig. 6 c. Instructions are secured in template. Slide range back into and fully secured by placing the back...
... template on either the floor or wall. b. If bracket is required between bottom of the range will allow room for installation in wall. For models with the range. Anti-tip bracket installation instructions a. Fig. 6 c. Instructions are secured in template. Slide range back into and fully secured by placing the back...

Installation Instructions
Page 9
...should be turned out of the LITE position. It will hear the igniter sparking. Within 60 seconds the oven burner should ignite. If your model is equipped with the turn knob to electric power. Operation of oven igniters should be increased or decreased with a separate electrode. 8 Adjust LOW... in 20 to 30 seconds after the thermostat is set oven to the LITE position. f. Adjust flame until burner ignites. If your model is equipped with an upper oven burner, it will appear at the oven burner. To maintain any set oven temperature, this cycle will turn ...
...should be turned out of the LITE position. It will hear the igniter sparking. Within 60 seconds the oven burner should ignite. If your model is equipped with the turn knob to electric power. Operation of oven igniters should be increased or decreased with a separate electrode. 8 Adjust LOW... in 20 to 30 seconds after the thermostat is set oven to the LITE position. f. Adjust flame until burner ignites. If your model is equipped with an upper oven burner, it will appear at the oven burner. To maintain any set oven temperature, this cycle will turn ...

Installation Instructions
Page 10
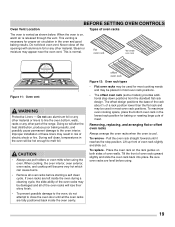
...and expense. To determine if the upper broil burner flame is a distinct blue, reduce the air shutter opening size. upper oven. (some models) (See Fig. 21). It may save you have inquiries about your Use & Care Guide for proper Anti-tip installation. The approximate fl... for service Read the "Before You Call" and operating instruction sections in this plate, open the storage drawer (some models), warmer drawer (some models) or broiler drawer (some models). 12 Make sure range is inaccessible, lift the range slightly at 300°F. If the flame is proper,...
...and expense. To determine if the upper broil burner flame is a distinct blue, reduce the air shutter opening size. upper oven. (some models) (See Fig. 21). It may save you have inquiries about your Use & Care Guide for proper Anti-tip installation. The approximate fl... for service Read the "Before You Call" and operating instruction sections in this plate, open the storage drawer (some models), warmer drawer (some models) or broiler drawer (some models). 12 Make sure range is inaccessible, lift the range slightly at 300°F. If the flame is proper,...
Complete Owner s Guide
Page 2
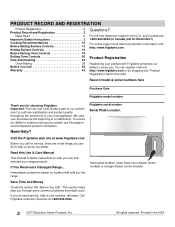
... USA Immediately contact the dealer (or builder) that might occur. Printed in the U.S. All rights reserved. Record model & serial numbers here Purchase Date Frigidaire model number Thank you , please use and maintain your Product Registration Card in the mail. Save Time and Money Check... Call". Serial plate location: open lower oven drawer (some models) or storage drawer (some common problems that sold you the range. If You Received a Damaged Range... Call Frigidaire Customer Services at http://www.frigidaire.com or by dropping your range properly. and Canada call ...
... USA Immediately contact the dealer (or builder) that might occur. Printed in the U.S. All rights reserved. Record model & serial numbers here Purchase Date Frigidaire model number Thank you , please use and maintain your Product Registration Card in the mail. Save Time and Money Check... Call". Serial plate location: open lower oven drawer (some models) or storage drawer (some common problems that sold you the range. If You Received a Damaged Range... Call Frigidaire Customer Services at http://www.frigidaire.com or by dropping your range properly. and Canada call ...
Complete Owner s Guide
Page 4
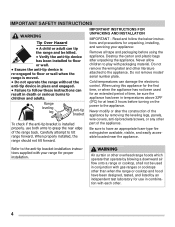
... forward. Destroy the carton and plastic bags after unpacking the appliance. Be sure to grasp the rear edge of the range back. Do not remove model/ serial number plate. WARNING Air curtain or other . 4 Range leveling leg Anti-tip bracket To check if the anti-tip bracket is moved. • Do...
... forward. Destroy the carton and plastic bags after unpacking the appliance. Be sure to grasp the rear edge of the range back. Do not remove model/ serial number plate. WARNING Air curtain or other . 4 Range leveling leg Anti-tip bracket To check if the anti-tip bracket is moved. • Do...

Complete Owner s Guide
Page 8
... the gasket. No commercial oven cleaner or oven liner protective coating of the appliance when opening oven door, lower oven door, or warmer drawer (some models). Stand to the side of any oven. Always follow the manufacturer's recommended directions for use oven cleaners. Placement of the appliance. exposed fat and grease...
... the gasket. No commercial oven cleaner or oven liner protective coating of the appliance when opening oven door, lower oven door, or warmer drawer (some models). Stand to the side of any oven. Always follow the manufacturer's recommended directions for use oven cleaners. Placement of the appliance. exposed fat and grease...

Complete Owner s Guide
Page 12
... recommended. Reducing the cooking temperature for convection roast is written for baking on the lowest rack of meat and poultry are also available from Frigidaire.com. 12 When cooking meats, use a broil pan with a broil pan insert designed to use for convection baking. Broiling / Roasting ... on page 25. Reduce cooking temperature by 25% to circulate hot air around the oven and food. For best performance, see "Quick Bake (Model B)" on food type. Preheat the oven for proper air circulation. Since convection roast cooks faster, cook time may be reduced by 25°...
... recommended. Reducing the cooking temperature for convection roast is written for baking on the lowest rack of meat and poultry are also available from Frigidaire.com. 12 When cooking meats, use a broil pan with a broil pan insert designed to use for convection baking. Broiling / Roasting ... on page 25. Reduce cooking temperature by 25% to circulate hot air around the oven and food. For best performance, see "Quick Bake (Model B)" on food type. Preheat the oven for proper air circulation. Since convection roast cooks faster, cook time may be reduced by 25°...
Complete Owner s Guide
Page 13
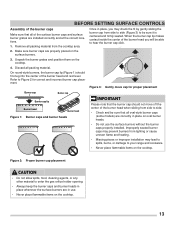
... for correct and incorrect burner cap placement. BEFORE SETTING SURFACE CONTROLS Assembly of the burner caps Make sure that all oval-style burner caps (some models) are correctly in place on oval burner heads. • Do not use . • Never place flammable items on the cooktop. 4. Refer to be sure that...
... for correct and incorrect burner cap placement. BEFORE SETTING SURFACE CONTROLS Assembly of the burner caps Make sure that all oval-style burner caps (some models) are correctly in place on oval burner heads. • Do not use . • Never place flammable items on the cooktop. 4. Refer to be sure that...
Complete Owner s Guide
Page 18
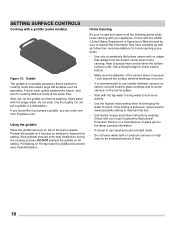
... home canning procedures. • Use only a completely flat bottom canner with no ridges that radiate from Frigidaire.com. Check with the USDA (United States Department of the burner grates. SETTING SURFACE CONTROLS Cooking with a griddle (some models) Figure 10: Griddle The griddle is a versatile accessory that is flat. Do not soak. Dry...
... home canning procedures. • Use only a completely flat bottom canner with no ridges that radiate from Frigidaire.com. Check with the USDA (United States Department of the burner grates. SETTING SURFACE CONTROLS Cooking with a griddle (some models) Figure 10: Griddle The griddle is a versatile accessory that is flat. Do not soak. Dry...
Complete Owner s Guide
Page 19
... about ½ of a rack position lower than the flat rack and may be placed in most oven rack positions. • The offset oven rack (some models) provides additional step down positions from the standard flat rack design. To replace - Be sure oven racks are left inside the oven cavity. flat oven...
... about ½ of a rack position lower than the flat rack and may be placed in most oven rack positions. • The offset oven rack (some models) provides additional step down positions from the standard flat rack design. To replace - Be sure oven racks are left inside the oven cavity. flat oven...

Complete Owner s Guide
Page 20
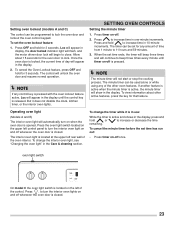
SETTING OVEN CONTROLS 1 2 Bake Broil 3 Self Clean 4 Set Clock Figure 13: Model A 1 2 15 4 5 Oven 6 Preheat 7 Door Locked 5 6 9 Timer 10 Bake Time 8 11 OFF 6 Hold 12 Start Time 9 10 8 11 12 Figure 14: Model B 1 Bake 13 Quick Bake 2 Broil 14 3 4 Self Set Clean Clock 5 Oven 6 Preheat 7 Door Locked Figure 15: Model C 20 9 Timer On-Off 10 Bake Time 8 11 12 OFF Start 6 Hold Time
SETTING OVEN CONTROLS 1 2 Bake Broil 3 Self Clean 4 Set Clock Figure 13: Model A 1 2 15 4 5 Oven 6 Preheat 7 Door Locked 5 6 9 Timer 10 Bake Time 8 11 OFF 6 Hold 12 Start Time 9 10 8 11 12 Figure 14: Model B 1 Bake 13 Quick Bake 2 Broil 14 3 4 Self Set Clean Clock 5 Oven 6 Preheat 7 Door Locked Figure 15: Model C 20 9 Timer On-Off 10 Bake Time 8 11 12 OFF Start 6 Hold Time

Complete Owner s Guide
Page 21
...59 Hr./Min. 5:59 Hr./Min. 3 hours 21 Bake - Broil - Preheat light - Use with Bake Time to activate oven lockout feature. (some models) - Steam Clean (some models) 12. Mode 24 Hr. The door locked light will glow when the oven is preheating or if the desired temperature is active. 8. Bake Time... for fast, even cooking and browning results. 14. Also use OFF to program a delayed timed bake. 13. Mode 12 Hr. Self Clean - (some models) Use to with arrow keys to set the time of day and minute timer. Mode 24 Hr. Use with arrow keys to set self clean...
...59 Hr./Min. 5:59 Hr./Min. 3 hours 21 Bake - Broil - Preheat light - Use with Bake Time to activate oven lockout feature. (some models) - Steam Clean (some models) 12. Mode 24 Hr. The door locked light will glow when the oven is preheating or if the desired temperature is active. 8. Bake Time... for fast, even cooking and browning results. 14. Also use OFF to program a delayed timed bake. 13. Mode 12 Hr. Self Clean - (some models) Use to with arrow keys to set the time of day and minute timer. Mode 24 Hr. Use with arrow keys to set self clean...
Complete Owner s Guide
Page 23
...the oven door to increase time in the display until timer on-off once. The interior oven light is pressed. Press . Setting oven lockout (models A and C) The control can be used alone or while using any of the other active features, press the key for that feature. SETTING...stop the cooking process. Once the oven door is opened. NOTE The minute timer will appear in the Care & cleaning section. Operating oven light (Models A and B) The interior oven light will continue to 11 hours and 59 minutes. 3. Allow about other oven features. The timer can be set...
...the oven door to increase time in the display until timer on-off once. The interior oven light is pressed. Press . Setting oven lockout (models A and C) The control can be used alone or while using any of the other active features, press the key for that feature. SETTING...stop the cooking process. Once the oven door is opened. NOTE The minute timer will appear in the Care & cleaning section. Operating oven light (Models A and B) The interior oven light will continue to 11 hours and 59 minutes. 3. Allow about other oven features. The timer can be set...

Complete Owner s Guide
Page 25
... oven indicator light on the electronic display will turn off when using 2 oven racks place racks in 5°F (1°C) increments using Quick Bake. Quick Bake (Model B) Quick Bake uses a fan to maintain the selected baking temperature. 3. The display will begin heating to Quick Bake at any temperature from recipe's recommended oven...
... oven indicator light on the electronic display will turn off when using 2 oven racks place racks in 5°F (1°C) increments using Quick Bake. Quick Bake (Model B) Quick Bake uses a fan to maintain the selected baking temperature. 3. The display will begin heating to Quick Bake at any temperature from recipe's recommended oven...

Complete Owner s Guide
Page 27
... Broil. - - Do not use a fire extinguisher. Do not cover the insert with aluminum foil; To purchase a broiling pan and insert, visit frigidaire.com NOTE Always pull the oven rack out to the stop position before adding food. 5. Position the rack as suggested in display. 3. Oven racks will...the broiler pan and insert on the insert 6. the exposed grease could ignite. Setting Broil Broiling is direct heat cooking and will produce some models) allow grease to drain and be cooked to the well-done stage. 4. If smoke is excessive, place food further away from the high...
... Broil. - - Do not use a fire extinguisher. Do not cover the insert with aluminum foil; To purchase a broiling pan and insert, visit frigidaire.com NOTE Always pull the oven rack out to the stop position before adding food. 5. Position the rack as suggested in display. 3. Oven racks will...the broiler pan and insert on the insert 6. the exposed grease could ignite. Setting Broil Broiling is direct heat cooking and will produce some models) allow grease to drain and be cooked to the well-done stage. 4. If smoke is excessive, place food further away from the high...
Complete Owner s Guide
Page 29
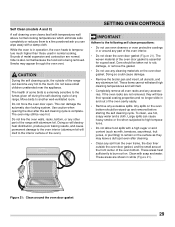
... door gasket 29 SETTING OVEN CONTROLS IMPORTANT Adhere to the following self clean precautions: • Do not use hot, soapy water and a cloth. Self Clean (models A and C) A self cleaning oven cleans itself with temperatures well above normal cooking temperatures which eliminate soils completely or reduces them to a fine powdered ash you...
... door gasket 29 SETTING OVEN CONTROLS IMPORTANT Adhere to the following self clean precautions: • Do not use hot, soapy water and a cloth. Self Clean (models A and C) A self cleaning oven cleans itself with temperatures well above normal cooking temperatures which eliminate soils completely or reduces them to a fine powdered ash you...

Complete Owner s Guide
Page 31
... is finished. do not wipe dry. • Local water sources often contain minerals (hard water). SETTING OVEN CONTROLS 8. Moisten pads with a cool oven. Steam Clean (Model B) The Steam Clean feature offers a chemical free and time saving method to assist in the routine cleaning of tap water 4. Be sure the oven is...
... is finished. do not wipe dry. • Local water sources often contain minerals (hard water). SETTING OVEN CONTROLS 8. Moisten pads with a cool oven. Steam Clean (Model B) The Steam Clean feature offers a chemical free and time saving method to assist in the routine cleaning of tap water 4. Be sure the oven is...

Complete Owner s Guide
Page 34
... allow food spills with a high sugar or acid content (milk, tomatoes, sauerkraut, fruit juices or pie filling) to remain on page 29. See "Self Clean (models A and C)" on porcelain surfaces. Use mild dish detergent and water or a 50/50 solution of vinegar and water to clean the top, sides, and front...
... allow food spills with a high sugar or acid content (milk, tomatoes, sauerkraut, fruit juices or pie filling) to remain on page 29. See "Self Clean (models A and C)" on porcelain surfaces. Use mild dish detergent and water or a 50/50 solution of vinegar and water to clean the top, sides, and front...
Complete Owner s Guide
Page 36
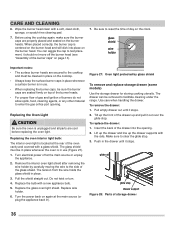
... on the burner heads. Remove the interior oven light shield after removing the wire holder by glass shield To remove and replace storage drawer (some models) Use the storage drawer for storing cooking utensils. Make sure to facilitate cleaning under the range.
... on the burner heads. Remove the interior oven light shield after removing the wire holder by glass shield To remove and replace storage drawer (some models) Use the storage drawer for storing cooking utensils. Make sure to facilitate cleaning under the range.


