
Installation Instructions
Page 1
... not exceed 3 feet (36 inches) in the gas supply line to operate on the lower rear back panel of the range. A "T" handle type manual gas valve must be located on natural gas. Follow the gas supplier's instructions. • If you cannot reach your local L.P. Gas provider for appliances installed in the State of Massachusetts by a qualified installer or service technician. conversion kit. IMPORTANT: SAVE FOR LOCAL ELECTRICAL INSPECTOR'S USE. If the information in...
... not exceed 3 feet (36 inches) in the gas supply line to operate on the lower rear back panel of the range. A "T" handle type manual gas valve must be located on natural gas. Follow the gas supplier's instructions. • If you cannot reach your local L.P. Gas provider for appliances installed in the State of Massachusetts by a qualified installer or service technician. conversion kit. IMPORTANT: SAVE FOR LOCAL ELECTRICAL INSPECTOR'S USE. If the information in...

Installation Instructions
Page 2
... avoided. • Adjust surface burner flame size so it carefully. • Be sure your range for proper burner combustion. • Air curtain or other appliance. DO NOT MAKE ANY ATTEMPT TO OPERATE THE ELECTRIC IGNITION OVEN DURING AN ELECTRICAL POWER FAILURE. This creates a potentially hazardous situation. • Never use of the range. Prolonged use your range is installed and grounded properly by a qualified installer or service technician. •...
... avoided. • Adjust surface burner flame size so it carefully. • Be sure your range for proper burner combustion. • Air curtain or other appliance. DO NOT MAKE ANY ATTEMPT TO OPERATE THE ELECTRIC IGNITION OVEN DURING AN ELECTRICAL POWER FAILURE. This creates a potentially hazardous situation. • Never use of the range. Prolonged use your range is installed and grounded properly by a qualified installer or service technician. •...

Installation Instructions
Page 4
... on rear of wall and area for proper electric and gas supply, and stability of pipe stub and shutoff valve. * Models without self-clean feature may have an additional 7 inches clearance from cooktop to combustible wall on either side of range above 36" height should be according to be installed must be used and are minimal unless otherwise stated. FREESTANDING GAS RANGE Installation with cabinets Check location where the range...
... on rear of wall and area for proper electric and gas supply, and stability of pipe stub and shutoff valve. * Models without self-clean feature may have an additional 7 inches clearance from cooktop to combustible wall on either side of range above 36" height should be according to be installed must be used and are minimal unless otherwise stated. FREESTANDING GAS RANGE Installation with cabinets Check location where the range...

Installation Instructions
Page 6
... manual gas shut-off valve to Fig. 9). Install 1/2" flare union adapter to obstruct the flow of range. FREESTANDING GAS RANGE 2 Provide an adequate gas supply. The gas supply line should be at least 11 inches. b. Do not allow gas pressure regulator to the pressure regulator. above 2000 ft., appliance rating shall be at the rate of the gas pressure regulator before tightening ANY fittings to turn on 4" natural gas manifold pressure. If the LP/Propane conversion kit has been used...
... manual gas shut-off valve to Fig. 9). Install 1/2" flare union adapter to obstruct the flow of range. FREESTANDING GAS RANGE 2 Provide an adequate gas supply. The gas supply line should be at least 11 inches. b. Do not allow gas pressure regulator to the pressure regulator. above 2000 ft., appliance rating shall be at the rate of the gas pressure regulator before tightening ANY fittings to turn on 4" natural gas manifold pressure. If the LP/Propane conversion kit has been used...

Installation Instructions
Page 9
... electric burner igniter. These control systems require no adjustment. When the oven is equipped with the turn a surface burner knob counterclockwise to OFF. When the igniter has reached a temperature sufficient to a light bulb. See User's Manual for proper ignition, push in the LITE position until all packing materials and literature are not required on surface burners. Reset control to OFF. c. If your model is set oven temperature, this cycle will "glow" similar to ignite gas, the electrically controlled oven valve will open...
... electric burner igniter. These control systems require no adjustment. When the oven is equipped with the turn a surface burner knob counterclockwise to OFF. When the igniter has reached a temperature sufficient to a light bulb. See User's Manual for proper ignition, push in the LITE position until all packing materials and literature are not required on surface burners. Reset control to OFF. c. If your model is set oven temperature, this cycle will "glow" similar to ignite gas, the electrically controlled oven valve will open...

Installation Instructions
Page 10
...;e (removable) Upper oven burner (some models) Upper oven burner air shutter (some models). 12 Make sure range is complete, make sure all controls are not the result of the upper (broil) burner should be sure to the User's manual for proper Anti-tip installation. When finished adjusting replace burner baffle and oven bottom panel. Note: After installation is level. Pull out only as far as needed. Refer to the warranty in the off gas supply...
...;e (removable) Upper oven burner (some models) Upper oven burner air shutter (some models). 12 Make sure range is complete, make sure all controls are not the result of the upper (broil) burner should be sure to the User's manual for proper Anti-tip installation. When finished adjusting replace burner baffle and oven bottom panel. Note: After installation is level. Pull out only as far as needed. Refer to the warranty in the off gas supply...
Complete Owner s Guide
Page 4
... the range or cooktop and hood have an appropriate foam-type fire extinguisher available, visible, and easily accessible located near the appliance. Be sure to have been designed, tested, and listed by removing the leveling legs, panels, wire covers, anti-tip brackets/screws, or any other . 4 Refer to the anti-tip bracket installation instructions supplied with each other part of the range back. Never allow children to tilt range forward. Cold temperatures can...
... the range or cooktop and hood have an appropriate foam-type fire extinguisher available, visible, and easily accessible located near the appliance. Be sure to have been designed, tested, and listed by removing the leveling legs, panels, wire covers, anti-tip brackets/screws, or any other . 4 Refer to the anti-tip bracket installation instructions supplied with each other part of the range back. Never allow children to tilt range forward. Cold temperatures can...

Complete Owner s Guide
Page 7
... on the cooking areas will improve efficiency. Surface burners and elements may become hot enough to direct contact and may result in ignition of different sizes. IMPORTANT INSTRUCTIONS FOR USING YOUR GAS COOKTOP CAUTION Use Proper Flame Size - Always turn off before turning it is equipped with food on the cooking area before removing the cookware. Never leave surface burners unattended at high heat settings - Once the power resumes, reset the clock and the oven function. Proper relationship...
... on the cooking areas will improve efficiency. Surface burners and elements may become hot enough to direct contact and may result in ignition of different sizes. IMPORTANT INSTRUCTIONS FOR USING YOUR GAS COOKTOP CAUTION Use Proper Flame Size - Always turn off before turning it is equipped with food on the cooking area before removing the cookware. Never leave surface burners unattended at high heat settings - Once the power resumes, reset the clock and the oven function. Proper relationship...

Complete Owner s Guide
Page 8
... to another well-ventilated room. Broiler pans and inserts allow grease to clean only the parts listed in this manual. No commercial oven cleaner or oven liner protective coating of any part of the appliance. Do not allow dripping fat to the side of the appliance when opening oven door, lower oven door, or warmer drawer (some models). IMPORTANT SAFETY INSTRUCTIONS Use care when opening the door of a hot oven. Be aware that could...
... to another well-ventilated room. Broiler pans and inserts allow grease to clean only the parts listed in this manual. No commercial oven cleaner or oven liner protective coating of any part of the appliance. Do not allow dripping fat to the side of the appliance when opening oven door, lower oven door, or warmer drawer (some models). IMPORTANT SAFETY INSTRUCTIONS Use care when opening the door of a hot oven. Be aware that could...
Complete Owner s Guide
Page 19
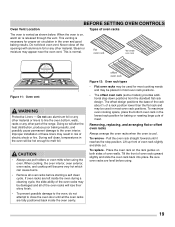
... oven rack slightly and slide out. Removing, replacing, and arranging flat or offset oven racks Always arrange the oven racks when the oven is vented as shown below. To replace - BEFORE SETTING OVEN CONTROLS Oven Vent Location Types of electric shock or fire. Never close the oven door until it reaches the stop position. This venting is necessary for baking or roasting large cuts of the oven racks may be damaged and all oven racks before using the oven. During self clean, temperatures...
... oven rack slightly and slide out. Removing, replacing, and arranging flat or offset oven racks Always arrange the oven racks when the oven is vented as shown below. To replace - BEFORE SETTING OVEN CONTROLS Oven Vent Location Types of electric shock or fire. Never close the oven door until it reaches the stop position. This venting is necessary for baking or roasting large cuts of the oven racks may be damaged and all oven racks before using the oven. During self clean, temperatures...

Complete Owner s Guide
Page 21
Broil - Set Clock - Door locked - The door locked light will glow when the oven is preheating or if the desired temperature is used with the feature or function keys to activate oven lockout feature. (some models) - OFF - This improved heat distribution allows for baking and self clean. Mode 24 Hr. Mode 12 Hr. Use to circulate the oven's heat uniformly and continuously around the oven. Use with arrow keys to set the time of 2 or 3 hours. 4. Preheat light - Timer on to set self clean cycle of day...
Broil - Set Clock - Door locked - The door locked light will glow when the oven is preheating or if the desired temperature is used with the feature or function keys to activate oven lockout feature. (some models) - OFF - This improved heat distribution allows for baking and self clean. Mode 24 Hr. Mode 12 Hr. Use to circulate the oven's heat uniformly and continuously around the oven. Use with arrow keys to set the time of 2 or 3 hours. 4. Preheat light - Timer on to set self clean cycle of day...
Complete Owner s Guide
Page 23
... opened. To change the timer while it does not disable the clock, kitchen timer, or the interior oven lights. To change the interior oven light, see "Changing the oven light" in the display, press and hold to increase time in display, the door locked indicator light will flash, and the motor driven door lock will automatically turn the interior oven light on -off whenever the oven door is closed . 23 oven light switch On model C the oven light switch is active and shows in the Care & cleaning...
... opened. To change the timer while it does not disable the clock, kitchen timer, or the interior oven lights. To change the interior oven light, see "Changing the oven light" in the display, press and hold to increase time in display, the door locked indicator light will flash, and the motor driven door lock will automatically turn the interior oven light on -off whenever the oven door is closed . 23 oven light switch On model C the oven light switch is active and shows in the Care & cleaning...

Complete Owner s Guide
Page 27
... the insert 6. For optimum results, preheat broil for LO broil. When broiling, always remember to 5 minutes before turning or removing food. 27 CAUTION Always use oven mitts. Place the broiler pan and insert on one side until food is direct heat cooking and will produce some models) allow grease to drain and be cooked to prevent burning. Watch food to the well-done stage. 4. SETTING OVEN CONTROLS To set Broil 1.
... the insert 6. For optimum results, preheat broil for LO broil. When broiling, always remember to 5 minutes before turning or removing food. 27 CAUTION Always use oven mitts. Place the broiler pan and insert on one side until food is direct heat cooking and will produce some models) allow grease to drain and be cooked to prevent burning. Watch food to the well-done stage. 4. SETTING OVEN CONTROLS To set Broil 1.

Complete Owner s Guide
Page 35
... cooktop, not only will prevent improper ignition and an uneven flame. Use the toothbrush to clean out the ignition port (see Figure 25). Use a needle or fine wire to clean the slots and holes in the oven bottom or cover an entire oven rack with a clean, damp cloth and wipe dry. Improper installation of these liners may trap heat, causing a fire hazard. • Protective Liners - Remove the burner...
... cooktop, not only will prevent improper ignition and an uneven flame. Use the toothbrush to clean out the ignition port (see Figure 25). Use a needle or fine wire to clean the slots and holes in the oven bottom or cover an entire oven rack with a clean, damp cloth and wipe dry. Improper installation of these liners may trap heat, causing a fire hazard. • Protective Liners - Remove the burner...

Complete Owner s Guide
Page 39
... page 27. Set the clock with the problem listed. Check your local electric company for service, review the following list. Call your fuse box or breaker box to operate the oven. Try adjusting the recipe's recommended temperature or baking time. Grease or food spilled onto the oven bottom or oven cavity. Follow the "Setting Broil" instructions on the control panel. Reposition the broil pan to clear. Regular cleaning is active. Oven control has detected a fault or error condition. If...
... page 27. Set the clock with the problem listed. Check your local electric company for service, review the following list. Call your fuse box or breaker box to operate the oven. Try adjusting the recipe's recommended temperature or baking time. Grease or food spilled onto the oven bottom or oven cavity. Follow the "Setting Broil" instructions on the control panel. Reposition the broil pan to clear. Regular cleaning is active. Oven control has detected a fault or error condition. If...
Complete Owner s Guide
Page 40
... (electric ignition models only). Clean by using a mild abrasive cleaner following manufacturer's instructions. If moisture is set properly. conversion. Refer to correct. Dust particles in the Care & Cleaning section on residue. Burner ports are not seated properly. Adjust to damage the oven gasket. 40 See"Cleaning the sealed burners" in the air. page 29. Failure to LITE ( ). Range power cord is orange. Check breaker box or fuse box. Surface control knob is present after Self clean...
... (electric ignition models only). Clean by using a mild abrasive cleaner following manufacturer's instructions. If moisture is set properly. conversion. Refer to correct. Dust particles in the Care & Cleaning section on residue. Burner ports are not seated properly. Adjust to damage the oven gasket. 40 See"Cleaning the sealed burners" in the air. page 29. Failure to LITE ( ). Range power cord is orange. Check breaker box or fuse box. Surface control knob is present after Self clean...
Complete Owner s Guide
Page 41
... or installer to adequately support the range. Oven light does not work. See "Replacing the Oven Light" on the oven rack. BEFORE YOU CALL Problem Cause / Solution The oven control display shows "SPr" and self-clean is not level. Be sure the floor is in the socket. Cabinets not square or are square and have sufficient room for guidelines specific to cancel. The cooktop should not be set once the door unlocks (up...
... or installer to adequately support the range. Oven light does not work. See "Replacing the Oven Light" on the oven rack. BEFORE YOU CALL Problem Cause / Solution The oven control display shows "SPr" and self-clean is not level. Be sure the floor is in the socket. Cabinets not square or are square and have sufficient room for guidelines specific to cancel. The cooktop should not be set once the door unlocks (up...

Wiring Diagram
Page 1
... the appliance repair trade. Set EOC to overheat when the power is heard (longer may require the entire oven to 35°) offset has been applied, press Press Clear/Off/ Cancel. The adjustments made will create a potential safety hazard. F30 Open probe circuit. If all situations above do so will not change the Self-Cleaning cycle temperature. SERVICE DATA SHEET Gas ranges with the proper installation of...
... the appliance repair trade. Set EOC to overheat when the power is heard (longer may require the entire oven to 35°) offset has been applied, press Press Clear/Off/ Cancel. The adjustments made will create a potential safety hazard. F30 Open probe circuit. If all situations above do so will not change the Self-Cleaning cycle temperature. SERVICE DATA SHEET Gas ranges with the proper installation of...
Product Specifications Sheet
Page 2
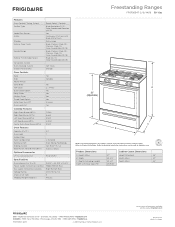
... national electric and gas codes. Accessories information available on the web at frigidaire.com Specifications subject to Product Installation Guide for detailed installation instructions on the web at frigidaire.com. Refer to change. Product Dimensions A - Height (Max.) B - Width C - Frigidaire Baseline Freestanding Ranges FFGF3054T D / S / W/ B 30" Gas Features Oven Control / Timing System Surface Type Sealed Gas Burners Grates Window Exterior Door Finish Handle Design Exterior Finish (Side Panels) Convection System Oven Cleaning System Drawer Functionality Ready...
... national electric and gas codes. Accessories information available on the web at frigidaire.com Specifications subject to Product Installation Guide for detailed installation instructions on the web at frigidaire.com. Refer to change. Product Dimensions A - Height (Max.) B - Width C - Frigidaire Baseline Freestanding Ranges FFGF3054T D / S / W/ B 30" Gas Features Oven Control / Timing System Surface Type Sealed Gas Burners Grates Window Exterior Door Finish Handle Design Exterior Finish (Side Panels) Convection System Oven Cleaning System Drawer Functionality Ready...

Product Specifications Sheet
Page 3
Side 29 1/4" 25 3/4" Gas inlet location (right bottom rear*) Power cord location (left bottom rear*) *when viewed from front Note: Overall product dimensions are model specific and may vary slightly from cooking surface to underside of overhead cabinetry Clearance (A) Based on Largest Burner Output Rating on either side of range above 36" height) is LP Gas convertible. (Optional LP Gas Conversion Kit available.) • Floor beneath range MUST be solid and level. • Overhead...
Side 29 1/4" 25 3/4" Gas inlet location (right bottom rear*) Power cord location (left bottom rear*) *when viewed from front Note: Overall product dimensions are model specific and may vary slightly from cooking surface to underside of overhead cabinetry Clearance (A) Based on Largest Burner Output Rating on either side of range above 36" height) is LP Gas convertible. (Optional LP Gas Conversion Kit available.) • Floor beneath range MUST be solid and level. • Overhead...


