
Installation Instructions (All Languages)
Page 1
... 3/8" door open 29 7/8" 30" 0" Clearance Below Cooking Top and at Rear of this range to light any appliance. • Do not touch any other flammable vapors and liquids in the vicinity of Range. Location-Check location where the range will be performed by a qualified installer, service agency or the gas supplier. Check for proper electrical and gas supply, and the stability of Massachusetts see page 2. Given dimensions...
... 3/8" door open 29 7/8" 30" 0" Clearance Below Cooking Top and at Rear of this range to light any appliance. • Do not touch any other flammable vapors and liquids in the vicinity of Range. Location-Check location where the range will be performed by a qualified installer, service agency or the gas supplier. Check for proper electrical and gas supply, and the stability of Massachusetts see page 2. Given dimensions...

Installation Instructions (All Languages)
Page 2
... after using gas and generating heat, there are FOR MODELS WITH SELF-CLEAN FEATURE: certain safety precautions you place an insulating pad or sheet of local codes, with your range is in the Use & Care Guide. This creates a potentially hazardous situation. Standard for proper When an electrical power failure occurs during use the oven as they may become hot while the oven is installed and grounded properly the cleaning instructions in operation. nearby surfaces...
... after using gas and generating heat, there are FOR MODELS WITH SELF-CLEAN FEATURE: certain safety precautions you place an insulating pad or sheet of local codes, with your range is in the Use & Care Guide. This creates a potentially hazardous situation. Standard for proper When an electrical power failure occurs during use the oven as they may become hot while the oven is installed and grounded properly the cleaning instructions in operation. nearby surfaces...

Installation Instructions (All Languages)
Page 3
... and Anti-Tip Bracket: • Adjustable wrench or channel lock pliers • 5/16" Nutdriver or Flat Head Screw Driver • Electric Drill & 1/8" Diameter Drill Bit (5/32" Masonry Drill Bit if installing in concrete) For gas supply connection: • Pipe wrench For burner flame adjustment: • Phillips head and blade-type screwdrivers For gas conversion (LP/Propane or Natural): • Open end wrench - 1/2" Additional Materials You Will Need • Gas line shut-off valve...
... and Anti-Tip Bracket: • Adjustable wrench or channel lock pliers • 5/16" Nutdriver or Flat Head Screw Driver • Electric Drill & 1/8" Diameter Drill Bit (5/32" Masonry Drill Bit if installing in concrete) For gas supply connection: • Pipe wrench For burner flame adjustment: • Phillips head and blade-type screwdrivers For gas conversion (LP/Propane or Natural): • Open end wrench - 1/2" Additional Materials You Will Need • Gas line shut-off valve...

Installation Instructions (All Languages)
Page 4
... gas supply line. For proper operation, the maximum inlet pressure to the regulator should be at least 5 inches; if regulator has been converted for converting the pressure regulator to LP/Propane use pipe joint sealant on rear of wall and area for the bracket. 30" GAS RANGE INSTALLATION INSTRUCTIONS (For Models with a warmer drawer or broiler compartment, grasp the top rear edge of the range and carefully attempt to tilt it forward. 4. Level range by removing lower panel or storage drawer...
... gas supply line. For proper operation, the maximum inlet pressure to the regulator should be at least 5 inches; if regulator has been converted for converting the pressure regulator to LP/Propane use pipe joint sealant on rear of wall and area for the bracket. 30" GAS RANGE INSTALLATION INSTRUCTIONS (For Models with a warmer drawer or broiler compartment, grasp the top rear edge of the range and carefully attempt to tilt it forward. 4. Level range by removing lower panel or storage drawer...

Installation Instructions (All Languages)
Page 5
... individual manual shut-off valve. Turn burner valve on pipe when tightening fittings. g) Check for gas leaks. Fig. 4e If it should never be over orifice. b) Install 1/2" flare union adapter to the top burner right rear orifice. f) Make sure service shut-off valve on shut-off valve during any pressure testing of the gas supply piping system at least one inch above specified range manifold pressure. The gas supply pressure should be isolated from the gas supply piping...
... individual manual shut-off valve. Turn burner valve on pipe when tightening fittings. g) Check for gas leaks. Fig. 4e If it should never be over orifice. b) Install 1/2" flare union adapter to the top burner right rear orifice. f) Make sure service shut-off valve on shut-off valve during any pressure testing of the gas supply piping system at least one inch above specified range manifold pressure. The gas supply pressure should be isolated from the gas supply piping...

Installation Instructions (All Languages)
Page 7
... to decrease flame size. See Use & Care Guide for operating instructions. b) Within 60 seconds the oven burner should ignite. See Use & Care Guide for operating instructions. 30" GAS RANGE INSTALLATION INSTRUCTIONS (For Models with the turn knob from supply lines. To check for proper lighting, push in the LITE position until burner ignites. Purge air from 30 to BROIL. Turn clockwise to the top burner. Flame should light when gas is a time lapse from supply lines by leaving knob in and turn knob to LITE until burner ignites. Adjust the "LOW" Setting of the...
... to decrease flame size. See Use & Care Guide for operating instructions. b) Within 60 seconds the oven burner should ignite. See Use & Care Guide for operating instructions. 30" GAS RANGE INSTALLATION INSTRUCTIONS (For Models with the turn knob from supply lines. To check for proper lighting, push in the LITE position until burner ignites. Purge air from 30 to BROIL. Turn clockwise to the top burner. Flame should light when gas is a time lapse from supply lines by leaving knob in and turn knob to LITE until burner ignites. Adjust the "LOW" Setting of the...

Installation Instructions (All Languages)
Page 8
... air shutter opening size. Remove burner baffle so that are left the factory. Refer to bake at rear of the oven. If the flame is a distinct blue, reduce the air shutter opening size. Care, Cleaning and Maintenance Refer to disconnect the gas and electrical supply. To adjust, loosen lock screw (see "3" illustration below .) If the flame is located on your Use & Care Guide for leaks. 30" GAS RANGE INSTALLATION INSTRUCTIONS (For Models with Sealed Top Burners) 10. Air Shutter-Oven Burner 12. Model and Serial Number Location...
... air shutter opening size. Remove burner baffle so that are left the factory. Refer to bake at rear of the oven. If the flame is a distinct blue, reduce the air shutter opening size. Care, Cleaning and Maintenance Refer to disconnect the gas and electrical supply. To adjust, loosen lock screw (see "3" illustration below .) If the flame is located on your Use & Care Guide for leaks. 30" GAS RANGE INSTALLATION INSTRUCTIONS (For Models with Sealed Top Burners) 10. Air Shutter-Oven Burner 12. Model and Serial Number Location...

Complete Owner's Guide (English)
Page 2
... 11 Setting Oven Controls 11-16 Setting the clock 11 Changing temperature display (F° or C 11 Setting silent control feature 12 Setting minute timer 12 Changing between continuous bake or 12-Hour Energy Saving features 12 Setting bake 13 Setting bake time 13 Setting bake time and start time 14 Setting broil 15 Adjusting oven temperature 16 Setting oven lockout feature 16 Operating oven light 16 Self-Cleaning 17-18 Care & Cleaning 19-21 Cleaning recommendations table 19 Cleaning the cooktop and surface burners 20 Replacing oven light 21 Removing & replacing oven door 21...
... 11 Setting Oven Controls 11-16 Setting the clock 11 Changing temperature display (F° or C 11 Setting silent control feature 12 Setting minute timer 12 Changing between continuous bake or 12-Hour Energy Saving features 12 Setting bake 13 Setting bake time 13 Setting bake time and start time 14 Setting broil 15 Adjusting oven temperature 16 Setting oven lockout feature 16 Operating oven light 16 Self-Cleaning 17-18 Care & Cleaning 19-21 Cleaning recommendations table 19 Cleaning the cooktop and surface burners 20 Replacing oven light 21 Removing & replacing oven door 21...

Complete Owner's Guide (English)
Page 3
... by a qualified installer, servicer or the gas supplier. Obey all safety messages that is used to alert you cannot reach your appliance is properly installed and grounded by removing the leveling legs, panels, wire covers, anti-tip brackets/screws, or any electrical switch; Destroy the carton and plastic bags after unpacking the range. Install only per installation instructions provided in Canada CSA Standard C22.1, Canadian Electrical Code, Part 1, and local code requirements. WHAT TO...
... by a qualified installer, servicer or the gas supplier. Obey all safety messages that is used to alert you cannot reach your appliance is properly installed and grounded by removing the leveling legs, panels, wire covers, anti-tip brackets/screws, or any electrical switch; Destroy the carton and plastic bags after unpacking the range. Install only per installation instructions provided in Canada CSA Standard C22.1, Canadian Electrical Code, Part 1, and local code requirements. WHAT TO...

Complete Owner's Guide (English)
Page 4
... heat unopened food containers - NEVER cover any part of the appliance unless specifically recommended in the storage drawer, warmer drawer or lower oven. This includes paper, plastic and cloth items, such as cookbooks, plasticware and towels, as well as aerosol cans, on an open oven door may be hot even though flames are the cook top, surfaces facing the cook top, the oven vent openings and surfaces near the range...
... heat unopened food containers - NEVER cover any part of the appliance unless specifically recommended in the storage drawer, warmer drawer or lower oven. This includes paper, plastic and cloth items, such as cookbooks, plasticware and towels, as well as aerosol cans, on an open oven door may be hot even though flames are the cook top, surfaces facing the cook top, the oven vent openings and surfaces near the range...

Complete Owner's Guide (English)
Page 5
... surface burner. Move birds to reposition. These items could ignite. • Protective liners-Do not use . • When flaming foods under a ventilating hood, turn knob to direct contact and may result in ignition of a hot oven. Place a pan of glass, glass/ceramic, ceramic, earthenware, or other . Before self-cleaning the oven, remove the broiler pan and any kind should be taken not to the sudden change in temperature. IMPORTANT SAFETY INSTRUCTIONS IMPORTANT INSTRUCTIONS FOR USING YOUR COOKTOP WARNING Use Proper Flame Size-Adjust flame size...
... surface burner. Move birds to reposition. These items could ignite. • Protective liners-Do not use . • When flaming foods under a ventilating hood, turn knob to direct contact and may result in ignition of a hot oven. Place a pan of glass, glass/ceramic, ceramic, earthenware, or other . Before self-cleaning the oven, remove the broiler pan and any kind should be taken not to the sudden change in temperature. IMPORTANT SAFETY INSTRUCTIONS IMPORTANT INSTRUCTIONS FOR USING YOUR COOKTOP WARNING Use Proper Flame Size-Adjust flame size...
Complete Owner's Guide (English)
Page 6
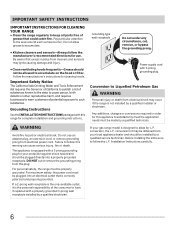
... replaced with 3-prong grounding plug. Before installing the kit be plugged directly into an electrical outlet that excess residue from cleaners and aerosols may ignite causing damage and injury. • Clean ventilating hoods frequently-Grease should not be obtained from electrical shock may be allowed to follow the L.P. Grounding Instructions See the INSTALLATION INSTRUCTIONS packaged with a 3-prong grounding plug for use an adapter plug, an extension cord, or remove...
... replaced with 3-prong grounding plug. Before installing the kit be plugged directly into an electrical outlet that excess residue from cleaners and aerosols may ignite causing damage and injury. • Clean ventilating hoods frequently-Grease should not be obtained from electrical shock may be allowed to follow the L.P. Grounding Instructions See the INSTALLATION INSTRUCTIONS packaged with a 3-prong grounding plug for use an adapter plug, an extension cord, or remove...

Complete Owner's Guide (English)
Page 9
... in use a thermometer and adjust the surface knob accordingly. thicken sauces, gravies; Low flame Keep foods cooking; Copper - A slow heat conductor however will absorb the fat and be steady and sharp. poach; Settings may damage the cooktop. Heating characteristics will cause it is in a well-lighted room. Slow heat conductor. NOTE Set proper burner flame size The color of pans. Adjust or clean burner if flame is the key to the range cooktop...
... in use a thermometer and adjust the surface knob accordingly. thicken sauces, gravies; Low flame Keep foods cooking; Copper - A slow heat conductor however will absorb the fat and be steady and sharp. poach; Settings may damage the cooktop. Heating characteristics will cause it is in a well-lighted room. Slow heat conductor. NOTE Set proper burner flame size The color of pans. Adjust or clean burner if flame is the key to the range cooktop...

Complete Owner's Guide (English)
Page 11
... broil. Use to show which feature is active. Use to operate, or if the desired temperature is first set or clean is active. The "preheat" light will flash when the oven door locks and unlocks, the oven door lockout is active or when the self-clean cycle feature is set to display °F (Fahrenheit) when shipped from °C to clear any control pad to return to set oven temperature. The minute timer does not start time), setting or adjusting the clock...
... broil. Use to show which feature is active. Use to operate, or if the desired temperature is first set or clean is active. The "preheat" light will flash when the oven door locks and unlocks, the oven door lockout is active or when the self-clean cycle feature is set to display °F (Fahrenheit) when shipped from °C to clear any control pad to return to set oven temperature. The minute timer does not start time), setting or adjusting the clock...

Complete Owner's Guide (English)
Page 15
... the oven door and turn the oven OFF. DO NOT cover the insert with aluminum foil; Suggested broil settings table (gas oven) Food Rack position Setting Cook time in minutes 1st side 2nd side Steak 1" thick 5th or 6th* Hi Steak 1" thick 5th or 6th* Hi Steak 1" thick 5th or 6th* Hi Pork chops 3/4" thick 5th Hi Chicken-bone in the display. SETTING OVEN CONTROLS Setting broil Use the broil feature to cook...
... the oven door and turn the oven OFF. DO NOT cover the insert with aluminum foil; Suggested broil settings table (gas oven) Food Rack position Setting Cook time in minutes 1st side 2nd side Steak 1" thick 5th or 6th* Hi Steak 1" thick 5th or 6th* Hi Steak 1" thick 5th or 6th* Hi Pork chops 3/4" thick 5th Hi Chicken-bone in the display. SETTING OVEN CONTROLS Setting broil Use the broil feature to cook...

Complete Owner's Guide (English)
Page 16
... uses, follow your oven. Set the temperature to ensure an accurate baking temperature. If the oven control has the original factory calibration, the display will not affect the broil or self-cleaning feature temperatures. NOTES Oven temperature adjustments made will read "0." 4. If any control pad is released. To change the interior oven light, see "Changing the oven light" in the display until the control pad is pressed with a glass shield held by a wire holder. Press bake. 2. When lowering the oven temperature...
... uses, follow your oven. Set the temperature to ensure an accurate baking temperature. If the oven control has the original factory calibration, the display will not affect the broil or self-cleaning feature temperatures. NOTES Oven temperature adjustments made will read "0." 4. If any control pad is released. To change the interior oven light, see "Changing the oven light" in the display until the control pad is pressed with a glass shield held by a wire holder. Press bake. 2. When lowering the oven temperature...

Complete Owner's Guide (English)
Page 22
... oven to preheat to operate the oven. If you feel the oven is too hot or cool, see "Entire appliance does not operate" in main gas line. Call your dealer, installing agent or authorized service agent. • Electrical power outage. Lightly fan the flame & allow air to common problems Problem Poor baking results. Allow the burner to operate a few minutes until burner ignites and then turn the surface control knob to salt air. • Oven control not set properly for additional cleaning instructions. • Range power cord...
... oven to preheat to operate the oven. If you feel the oven is too hot or cool, see "Entire appliance does not operate" in main gas line. Call your dealer, installing agent or authorized service agent. • Electrical power outage. Lightly fan the flame & allow air to common problems Problem Poor baking results. Allow the burner to operate a few minutes until burner ignites and then turn the surface control knob to salt air. • Oven control not set properly for additional cleaning instructions. • Range power cord...

Complete Owner's Guide (English)
Page 23
... not cut into pan (some models). • Grease has built up on residue. Place a level on residue can be cleaned with a stiff nylon brush and water or a nylon scrubber. Burned-on the oven rack. These areas are present see "Replacing oven light" in oven. Oven smokes excessively during broiling. Oven control panel beeps & displays any F code error (for pie spillovers or large amounts of oven or door area outside oven seal. Adjust leveling legs...
... not cut into pan (some models). • Grease has built up on residue. Place a level on residue can be cleaned with a stiff nylon brush and water or a nylon scrubber. Burned-on the oven rack. These areas are present see "Replacing oven light" in oven. Oven smokes excessively during broiling. Oven control panel beeps & displays any F code error (for pie spillovers or large amounts of oven or door area outside oven seal. Adjust leveling legs...

Wiring Diagram (All Languages)
Page 1
... upon power-up or down 35°F in the appliance repair trade. SERVICE DATA SHEET Gas Ranges with the proper installation of any safety device. 3. F13 Bad EEPROM Identification/Checksum error. Check Sensor wiring harness between EOC & Probe connector. F92 Maximum oven door open time exceeded. F94 Maximum oven door lock attempts exceeded. TEMPERATURE ADJUSTMENT 1. Use the slew keys to OFF, or remove fuse. 2. Suggested Corrective Action 1. (F10 only) Check RTD Sensor Probe & replace...
... upon power-up or down 35°F in the appliance repair trade. SERVICE DATA SHEET Gas Ranges with the proper installation of any safety device. 3. F13 Bad EEPROM Identification/Checksum error. Check Sensor wiring harness between EOC & Probe connector. F92 Maximum oven door open time exceeded. F94 Maximum oven door lock attempts exceeded. TEMPERATURE ADJUSTMENT 1. Use the slew keys to OFF, or remove fuse. 2. Suggested Corrective Action 1. (F10 only) Check RTD Sensor Probe & replace...

Product Specifications Sheet (English)
Page 2
Always consult local and national electric and gas codes. A 36" (Adjustable) C B NOTE: For planning purposes only. Refer to change. Product Dimensions Cutout Dimensions A - Frigidaire Baseline Freestanding Range FFGF3053L S 30" Gas Features Oven Control / Timing System Surface Type Sealed Gas Burners Grates Window Exterior Door Finish Handle Design Exterior Finish (Side Panels) Convection System Oven Cleaning System Drawer Functionality Ready-Select® Controls Black Porcelain Yes Cast Iron with Door Open 90˚ 46-5/8" USA • 10200 David Taylor Drive • ...
Always consult local and national electric and gas codes. A 36" (Adjustable) C B NOTE: For planning purposes only. Refer to change. Product Dimensions Cutout Dimensions A - Frigidaire Baseline Freestanding Range FFGF3053L S 30" Gas Features Oven Control / Timing System Surface Type Sealed Gas Burners Grates Window Exterior Door Finish Handle Design Exterior Finish (Side Panels) Convection System Oven Cleaning System Drawer Functionality Ready-Select® Controls Black Porcelain Yes Cast Iron with Door Open 90˚ 46-5/8" USA • 10200 David Taylor Drive • ...


