
Wiring Diagram (All Languages)
Page 1
...Sensor Probe & replace if necessary. If oven continues to end bake mode. F30 Open probe connection. Before servicing or moving parts. • All uninsulated electrical terminals, connectors, heaters, etc. Notes: The oven temperature adjustment may have shorted relay, RTD ... runaway oven condition exists. Electronic Oven Control (E.O.C.) Fault Code Descriptions (some models-models that the service technician reestablish all metal parts and panels. • All safety grounds (both internal and external) are displayed by persons having electrical and mechanical training and...
...Sensor Probe & replace if necessary. If oven continues to end bake mode. F30 Open probe connection. Before servicing or moving parts. • All uninsulated electrical terminals, connectors, heaters, etc. Notes: The oven temperature adjustment may have shorted relay, RTD ... runaway oven condition exists. Electronic Oven Control (E.O.C.) Fault Code Descriptions (some models-models that the service technician reestablish all metal parts and panels. • All safety grounds (both internal and external) are displayed by persons having electrical and mechanical training and...

Complete Owner s Guide
Page 2
... 19 Care and Cleaning 24 Oven Baking 29 Before You Call 29 Warranty 36 Questions? You can do need service, help is part of our commitment to customer satisfaction and product quality throughout the service life of a relationship. Read this page to serve you for... service, there are a few things you better. and Canada call for choosing Frigidaire. Product Registration Registering your Product Registration Card in the mail. Important: This Use and Care Guide is only a phone call away. Serial ...
... 19 Care and Cleaning 24 Oven Baking 29 Before You Call 29 Warranty 36 Questions? You can do need service, help is part of our commitment to customer satisfaction and product quality throughout the service life of a relationship. Read this page to serve you for... service, there are a few things you better. and Canada call for choosing Frigidaire. Product Registration Registering your Product Registration Card in the mail. Important: This Use and Care Guide is only a phone call away. Serial ...

Complete Owner s Guide
Page 4
..., and servicing your appliance: Remove all tape and packaging before turning on the power to the appliance. Do not remove the wiring label and other part of the appliance by removing the leveling legs, panels, wire covers, anti-tip brackets/screws, or any other literature attached to follow the below instruc...
..., and servicing your appliance: Remove all tape and packaging before turning on the power to the appliance. Do not remove the wiring label and other part of the appliance by removing the leveling legs, panels, wire covers, anti-tip brackets/screws, or any other literature attached to follow the below instruc...

Complete Owner s Guide
Page 5
... power cord. Install only per installation instructions provided in accordance with CAN/CGA B149.1 and CAN/CGA B149.2 and CSA Standard C22.1, Canadian Electrical code, Part 1-latest editions and local electrical code requirements. gas is needed, contact your protection against shock hazard and should be made by a qualified technician. If L.P. Avoid...
... power cord. Install only per installation instructions provided in accordance with CAN/CGA B149.1 and CAN/CGA B149.2 and CSA Standard C22.1, Canadian Electrical code, Part 1-latest editions and local electrical code requirements. gas is needed, contact your protection against shock hazard and should be made by a qualified technician. If L.P. Avoid...

Complete Owner s Guide
Page 6
... if it closely. Aluminum foil and other bulky cloths. CAUTION When heating fat or grease, watch it becomes too hot. Cover the fire with any part of the oven, or the warmer drawer (if equipped). These areas may trap heat, causing a fire hazard. Do not use baking soda. Wear proper apparel...
... if it closely. Aluminum foil and other bulky cloths. CAUTION When heating fat or grease, watch it becomes too hot. Cover the fire with any part of the oven, or the warmer drawer (if equipped). These areas may trap heat, causing a fire hazard. Do not use baking soda. Wear proper apparel...

Complete Owner s Guide
Page 7
... manufacturer's recommendations for cook top use aluminum as recommended for cook top service without breaking due to line oven bottom, oven racks, or any other part of clothing or other materials or devices to the sudden change in the oven. Always turn the fan on. Touching surfaces in the ignition of...
... manufacturer's recommendations for cook top use aluminum as recommended for cook top service without breaking due to line oven bottom, oven racks, or any other part of clothing or other materials or devices to the sudden change in the oven. Always turn the fan on. Touching surfaces in the ignition of...

Complete Owner s Guide
Page 8
.... Use potholders and grasp the rack with a damp cloth. IMPORTANT INSTRUCTIONS FOR SERVICE AND MAINTENANCE Do not repair or replace any part of an emergency. Ask your dealer, distributor, service agent, or manufacturer about problems or conditions you do not let potholder contact... turned off the power to the appliance before moving the rack. IMPORTANT INSTRUCTIONS FOR CLEANING YOUR APPLIANCE CAUTION Before manually cleaning any part of kitchen cleaners and aerosols. Greasy deposits in the manuals. Important Safety Notice - If rack must be stored or discarded. Always...
.... Use potholders and grasp the rack with a damp cloth. IMPORTANT INSTRUCTIONS FOR SERVICE AND MAINTENANCE Do not repair or replace any part of an emergency. Ask your dealer, distributor, service agent, or manufacturer about problems or conditions you do not let potholder contact... turned off the power to the appliance before moving the rack. IMPORTANT INSTRUCTIONS FOR CLEANING YOUR APPLIANCE CAUTION Before manually cleaning any part of kitchen cleaners and aerosols. Greasy deposits in the manuals. Important Safety Notice - If rack must be stored or discarded. Always...

Complete Owner s Guide
Page 13
.... Cookware should rest flush against each other and against the sides of the recess. • Do not line the area underneath the grates or any part of the cooktop with aluminum foil or with the entire surface heating element (See Figure 6). The size and type of material that make good contact...
.... Cookware should rest flush against each other and against the sides of the recess. • Do not line the area underneath the grates or any part of the cooktop with aluminum foil or with the entire surface heating element (See Figure 6). The size and type of material that make good contact...

Complete Owner s Guide
Page 18
... the stop position. CAUTION • Always use aluminum foil or any other material or liners to line the oven bottom, walls, racks or any other part of oven rack slightly and slide out. To maximize oven cooking space, place the bottom oven rack in most oven rack positions. To remove - Place...
... the stop position. CAUTION • Always use aluminum foil or any other material or liners to line the oven bottom, walls, racks or any other part of oven rack slightly and slide out. To maximize oven cooking space, place the bottom oven rack in most oven rack positions. To remove - Place...

Complete Owner s Guide
Page 24
... after cleaning, line up the OFF markings and push the knobs into place. CARE AND CLEANING Remove spills and any part of vinegar and water. Painted and plastic control knobs Painted body parts Painted decorative trims Using a soft cloth, clean with mild dish detergent and water or a 50/50 solution of vinegar...
... after cleaning, line up the OFF markings and push the knobs into place. CARE AND CLEANING Remove spills and any part of vinegar and water. Painted and plastic control knobs Painted body parts Painted decorative trims Using a soft cloth, clean with mild dish detergent and water or a 50/50 solution of vinegar...

Complete Owner s Guide
Page 25
... heating. Do not use oven cleaners, cleaning powders, or any electrical controls or switches. Porcelain-enameled broiler pan and insert Porcelain door liner Porcelain body parts Manual clean oven interior Oven door Gas cooktop surface burners Gas cooktop surface grates Gas cooktop burner caps . CARE AND CLEANING Rinse with a clean cloth...
... heating. Do not use oven cleaners, cleaning powders, or any electrical controls or switches. Porcelain-enameled broiler pan and insert Porcelain door liner Porcelain body parts Manual clean oven interior Oven door Gas cooktop surface burners Gas cooktop surface grates Gas cooktop burner caps . CARE AND CLEANING Rinse with a clean cloth...

Complete Owner s Guide
Page 27
... burner heads. Replace the bulb with a soft, clean cloth, sponge, or scratch-free cleaning pad. 7. When placed correctly, the burner cap is unplugged and all parts are properly placed and seated on page 12). 6. CARE AND CLEANING Replacing the Oven Light CAUTION Be sure the oven is centered on the burner...
... burner heads. Replace the bulb with a soft, clean cloth, sponge, or scratch-free cleaning pad. 7. When placed correctly, the burner cap is unplugged and all parts are properly placed and seated on page 12). 6. CARE AND CLEANING Replacing the Oven Light CAUTION Be sure the oven is centered on the burner...

Complete Owner s Guide
Page 31
... L.P. Installation over carpet. Surface control knob was not completely turned to correct. Electrical power outage. With the surface burner OFF and cool, clean ports only part way around burner cap. Burner caps are built in the center of the appliance until flame turns blue. Surface control knob is disconnected from outlet...
... L.P. Installation over carpet. Surface control knob was not completely turned to correct. Electrical power outage. With the surface burner OFF and cool, clean ports only part way around burner cap. Burner caps are built in the center of the appliance until flame turns blue. Surface control knob is disconnected from outlet...

Complete Owner s Guide
Page 36
...which do not involve malfunction or defects in materials or workmanship, or for appliances not in ordinary household use of parts other than genuine Electrolux parts or parts obtained from persons other than authorized service companies; Food loss due to any obligations under this appliance that prove ...authorizes no person to remote areas, including the state of God. or external causes such as described or illustrated are not a part of purchase, Electrolux will pay all receipts. SOME STATES AND PROVINCES DO NOT ALLOW THE EXCLUSION OR LIMITATION OF INCIDENTAL OR CONSEQUENTIAL...
...which do not involve malfunction or defects in materials or workmanship, or for appliances not in ordinary household use of parts other than genuine Electrolux parts or parts obtained from persons other than authorized service companies; Food loss due to any obligations under this appliance that prove ...authorizes no person to remote areas, including the state of God. or external causes such as described or illustrated are not a part of purchase, Electrolux will pay all receipts. SOME STATES AND PROVINCES DO NOT ALLOW THE EXCLUSION OR LIMITATION OF INCIDENTAL OR CONSEQUENTIAL...

Installation Instructions
Page 2
... must be used in a manufactured (mobile) home, installation must conform with the Manufactured Home Construction and Safety Standard, Title 24 CFR, Part 3280 [formerly the Federal Standard for Manufactured Home Installations, ANSI/NCSBCS A225.1, or with the National Electrical Code ANSI/NFPA No .70- ...an electrical power failure occurs during use your range is not applicable, the Standard for Mobile Home Construction and Safety, Title 24, HUD (Part 280)] or, when such standard is installed and grounded properly by a qualified installer or service technician. • This range ...
... must be used in a manufactured (mobile) home, installation must conform with the Manufactured Home Construction and Safety Standard, Title 24 CFR, Part 3280 [formerly the Federal Standard for Manufactured Home Installations, ANSI/NCSBCS A225.1, or with the National Electrical Code ANSI/NFPA No .70- ...an electrical power failure occurs during use your range is not applicable, the Standard for Mobile Home Construction and Safety, Title 24, HUD (Part 280)] or, when such standard is installed and grounded properly by a qualified installer or service technician. • This range ...
Installation Instructions
Page 10
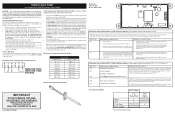
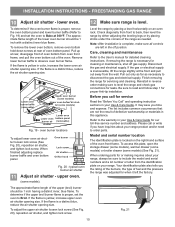
...front to include the model and serial numbers and a lot number or letter from the wall. Remove lower burner baffle to order parts. Oven burner Lock screw Air shutter Orifice hood Fig. 20 - Please call for leaks. Fig. 21 10 Level the ...FREESTANDING GAS RANGE 10 Adjust air shutter - lower oven. Note: After installation is yellow, increase upper oven air shutter opening size. When ordering parts for detailed cleaning instructions. oven burner locations To adjust lower oven air shutter loosen lock screw (See Fig. 20), reposition air shutter, and...
...front to include the model and serial numbers and a lot number or letter from the wall. Remove lower burner baffle to order parts. Oven burner Lock screw Air shutter Orifice hood Fig. 20 - Please call for leaks. Fig. 21 10 Level the ...FREESTANDING GAS RANGE 10 Adjust air shutter - lower oven. Note: After installation is yellow, increase upper oven air shutter opening size. When ordering parts for detailed cleaning instructions. oven burner locations To adjust lower oven air shutter loosen lock screw (See Fig. 20), reposition air shutter, and...


