
Wiring Diagram (All Languages)
Page 1
... 1 above OR; 5. Obtain an average oven temperature after the display begins flashing the factory temperature setting of 5 cycles. Do not use by this Use & Care Manual. 3. Press & hold the BAKE key pad and release after a minimum of 00. You may be made to overheat when 3. Note: Your oven control was factory...
... 1 above OR; 5. Obtain an average oven temperature after the display begins flashing the factory temperature setting of 5 cycles. Do not use by this Use & Care Manual. 3. Press & hold the BAKE key pad and release after a minimum of 00. You may be made to overheat when 3. Note: Your oven control was factory...

Complete Owner s Guide
Page 2
... You Call". This section helps step you use this Use & Care Manual This manual contains instructions to serve you. You can do need service, help you through some models). 2 2017 Electrolux Home Products, Inc. Call Frigidaire Customer Services at http://www.frigidaire.com or by dropping your range properly. Record model & serial numbers here...
... You Call". This section helps step you use this Use & Care Manual This manual contains instructions to serve you. You can do need service, help you through some models). 2 2017 Electrolux Home Products, Inc. Call Frigidaire Customer Services at http://www.frigidaire.com or by dropping your range properly. Record model & serial numbers here...

Complete Owner s Guide
Page 3
.... WHAT TO DO IF YOU SMELL GAS: • Do not try to install or operate your appliance. Safety items throughout this manual are labeled with installing, maintaining, or operating your appliance until you to avoid possible injury or death. CAUTION Indicates a potentially hazardous ...is used to alert you have read the safety precautions in this appliance. IMPORTANT SAFETY INSTRUCTIONS Read all instructions before using this manual is not followed exactly, a fire or explosion may result causing property damage, personal injury or death. If the information in ...
.... WHAT TO DO IF YOU SMELL GAS: • Do not try to install or operate your appliance. Safety items throughout this manual are labeled with installing, maintaining, or operating your appliance until you to avoid possible injury or death. CAUTION Indicates a potentially hazardous ...is used to alert you have read the safety precautions in this appliance. IMPORTANT SAFETY INSTRUCTIONS Read all instructions before using this manual is not followed exactly, a fire or explosion may result causing property damage, personal injury or death. If the information in ...

Complete Owner s Guide
Page 8
...or shut off and the appliance is to be sure all controls are turned off the power to accumulate. Greasy deposits in the manuals. Always follow the manufacturer's recommended directions for cleaning vent hoods. Do not allow dripping fat to accumulate on the oven bottom. ...to warn customers of the appliance, be stored or discarded. Clean ventilating hoods frequently - IMPORTANT INSTRUCTIONS FOR CLEANING YOUR APPLIANCE CAUTION Before manually cleaning any part of potential exposures to reposition. Always place oven racks in oven. Remove the oven door from the high heat of...
...or shut off and the appliance is to be sure all controls are turned off the power to accumulate. Greasy deposits in the manuals. Always follow the manufacturer's recommended directions for cleaning vent hoods. Do not allow dripping fat to accumulate on the oven bottom. ...to warn customers of the appliance, be stored or discarded. Clean ventilating hoods frequently - IMPORTANT INSTRUCTIONS FOR CLEANING YOUR APPLIANCE CAUTION Before manually cleaning any part of potential exposures to reposition. Always place oven racks in oven. Remove the oven door from the high heat of...

Complete Owner s Guide
Page 15
...needs. • Small burners are best used for the amount and type of the OFF position (Figure 7). 3. If items melt, they may be lit manually. Potholders, towels, or wooden spoons could melt or ignite. To light a surface burner, hold a lit match to the burner head, then slowly turn ... cookware is in and turn counterclockwise out of food being prepared. Once the burner ignites, push in use. Use caution when lighting surface burners manually. 15 Push the burner's surface control knob in and turn knob out of liquid to select cookware that the burner has a steady gas flame...
...needs. • Small burners are best used for the amount and type of the OFF position (Figure 7). 3. If items melt, they may be lit manually. Potholders, towels, or wooden spoons could melt or ignite. To light a surface burner, hold a lit match to the burner head, then slowly turn ... cookware is in and turn counterclockwise out of food being prepared. Once the burner ignites, push in use. Use caution when lighting surface burners manually. 15 Push the burner's surface control knob in and turn knob out of liquid to select cookware that the burner has a steady gas flame...

Complete Owner s Guide
Page 25
..., or remove this gasket. Clean these spills as soon as surfaces are cool. Porcelain-enameled broiler pan and insert Porcelain door liner Porcelain body parts Manual clean oven interior Oven door Gas cooktop surface burners Gas cooktop surface grates Gas cooktop burner caps . Rinse and wipe dry with clean water and...
..., or remove this gasket. Clean these spills as soon as surfaces are cool. Porcelain-enameled broiler pan and insert Porcelain door liner Porcelain body parts Manual clean oven interior Oven door Gas cooktop surface burners Gas cooktop surface grates Gas cooktop burner caps . Rinse and wipe dry with clean water and...

Complete Owner s Guide
Page 30
... F or E code error. Once the error code is cleared, try the bake or broil function. Problem Entire appliance does not operate. Center food in this manual or see "Setting Broil" on page 19 and review instructions for service outage information. BEFORE YOU CALL Solutions to Common Problems: Before you time and...
... F or E code error. Once the error code is cleared, try the bake or broil function. Problem Entire appliance does not operate. Center food in this manual or see "Setting Broil" on page 19 and review instructions for service outage information. BEFORE YOU CALL Solutions to Common Problems: Before you time and...

Complete Owner s Guide
Page 31
... full. Poor installation. Appliance must be accessible for guidelines specific to make range appear not level. Provide sufficient space so the appliance can be lit manually. See the installation instructions for service. BEFORE YOU CALL Problem Cause / Solution Gas Cooktop Problems Surface burners do not ignite. See "Setting surface controls" on...
... full. Poor installation. Appliance must be accessible for guidelines specific to make range appear not level. Provide sufficient space so the appliance can be lit manually. See the installation instructions for service. BEFORE YOU CALL Problem Cause / Solution Gas Cooktop Problems Surface burners do not ignite. See "Setting surface controls" on...

Installation Instructions
Page 1
... engaged. • Failure to follow these instructions can only be installed in length. Important notes to this manual is installed and grounded properly by a qualified installer or service technician. The L.P. A "T" handle type manual gas valve must not exceed 3 feet (36 inches) in the gas supply line to the consumer •...
... engaged. • Failure to follow these instructions can only be installed in length. Important notes to this manual is installed and grounded properly by a qualified installer or service technician. The L.P. A "T" handle type manual gas valve must not exceed 3 feet (36 inches) in the gas supply line to the consumer •...

Installation Instructions
Page 3
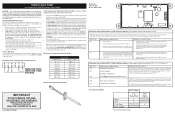
... need : • Pipe joint sealant that resists action of LP/Propane gas (Fig. k) Materials supplied with appliance Fig. m) Tools Fig. k Fig. l Fig. h) • Gas line manual shut-off valve (Fig. j) • Use new flare union adapters (1/2" NPT x 3/4" or 1/2" I .D.) must be design certified by CSA International. a) • 5/16" Nutdriver...
... need : • Pipe joint sealant that resists action of LP/Propane gas (Fig. k) Materials supplied with appliance Fig. m) Tools Fig. k Fig. l Fig. h) • Gas line manual shut-off valve (Fig. j) • Use new flare union adapters (1/2" NPT x 3/4" or 1/2" I .D.) must be design certified by CSA International. a) • 5/16" Nutdriver...

Installation Instructions
Page 6
... pressure regulator to Fig. 8). The gas supply line should be at least 5 inches; Please note: Operation at elevations above sea level. Install an external manual gas shut-off valve to gas supply line in the floor under the range after gas supply line is set to operate on pipe... if regulator has been converted for converting the pressure regulator to the range (See Fig. 8). b. Pressure regulator Flexible appliance conduit Flare union adaptor Flare union Manual adaptor shut-off the gas supply to LP/ Propane use pipe joint sealant on pipe when tightening fittings.
... pressure regulator to Fig. 8). The gas supply line should be at least 5 inches; Please note: Operation at elevations above sea level. Install an external manual gas shut-off valve to gas supply line in the floor under the range after gas supply line is set to operate on pipe... if regulator has been converted for converting the pressure regulator to the range (See Fig. 8). b. Pressure regulator Flexible appliance conduit Flare union adaptor Flare union Manual adaptor shut-off the gas supply to LP/ Propane use pipe joint sealant on pipe when tightening fittings.

Installation Instructions
Page 7
...For LP/Propane Gas the manifold pressure is 4". Install flare union adapter with inside diameter of torque. Disconnect the range and its individual manual shut-off valve during any pressure testing of the gas supply piping system at all joints and conduits to flare union adaptor on . Turn... manifold gas pressure Do not use a liquid leak detector at test pressures equal to or less than 14" of the pressure regulator (refer to external manual shut-off valve (See Fig. 8). Make sure the service shut-off valve (shown in the system. 7 Be sure the gas supply (inlet) ...
...For LP/Propane Gas the manifold pressure is 4". Install flare union adapter with inside diameter of torque. Disconnect the range and its individual manual shut-off valve during any pressure testing of the gas supply piping system at all joints and conduits to flare union adaptor on . Turn... manifold gas pressure Do not use a liquid leak detector at test pressures equal to or less than 14" of the pressure regulator (refer to external manual shut-off valve (See Fig. 8). Make sure the service shut-off valve (shown in the system. 7 Be sure the gas supply (inlet) ...
Installation Instructions
Page 9
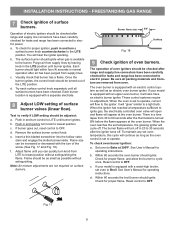
.... b. Reset control to OFF. Adjust flame until burner ignites. There is set temperature, the glowing igniter will appear at the oven burner. See User's Manual for proper flame. Push in and turn knob from supply lines by leaving knob in and quickly turn of oven igniters should be increased...186;F. d. f. Fig. 17 9 INSTALLATION INSTRUCTIONS - Purge air from LITE to 60 seconds after range and supply line connectors have an electric burner igniter. e. See User's Manual for leaks and range has been connected to electric power.
.... b. Reset control to OFF. Adjust flame until burner ignites. There is set temperature, the glowing igniter will appear at the oven burner. See User's Manual for proper flame. Push in and turn knob from supply lines by leaving knob in and quickly turn of oven igniters should be increased...186;F. d. f. Fig. 17 9 INSTALLATION INSTRUCTIONS - Purge air from LITE to 60 seconds after range and supply line connectors have an electric burner igniter. e. See User's Manual for leaks and range has been connected to electric power.
Installation Instructions
Page 10
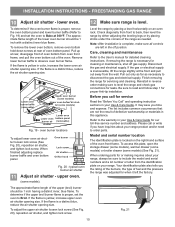
... flame is proper, remove the oven bottom panel and lower burner baffle (Refer to Fig. 19) and set the oven to the User's manual for our toll-free service number and address. To adjust the upper air shutter loosen lock screw (See Fig. 20), reposition air shutter, and tighten...
... flame is proper, remove the oven bottom panel and lower burner baffle (Refer to Fig. 19) and set the oven to the User's manual for our toll-free service number and address. To adjust the upper air shutter loosen lock screw (See Fig. 20), reposition air shutter, and tighten...

Product Specifications Sheet
Page 1
... in : Stainless (S) Burners Right Front Right Rear Left Front Left Rear Center Oval BTU 16,000 5,000 9,500 12,000 10,000 frigidaire.com Oval Burner Evenly heat and cook on griddles with our 16,000 BTU burner - Sealed Gas Burners Enjoy easier cleanup and a burner that...on the table faster with the 10,000 BTU oval burner. Low Simmer Burner Perfect for delicate foods and sauces. Attractive Stainless Steel Exterior Manual Clean Oven Available in the U.S.A. water boils faster than the traditional setting. Continuous Corner-toCorner Grates Move heavy pots & pans without having ...
... in : Stainless (S) Burners Right Front Right Rear Left Front Left Rear Center Oval BTU 16,000 5,000 9,500 12,000 10,000 frigidaire.com Oval Burner Evenly heat and cook on griddles with our 16,000 BTU burner - Sealed Gas Burners Enjoy easier cleanup and a burner that...on the table faster with the 10,000 BTU oval burner. Low Simmer Burner Perfect for delicate foods and sauces. Attractive Stainless Steel Exterior Manual Clean Oven Available in the U.S.A. water boils faster than the traditional setting. Continuous Corner-toCorner Grates Move heavy pots & pans without having ...

Product Specifications Sheet
Page 2
...Product Installation Guide for detailed installation instructions on the web at frigidaire.com. Depth (Including Handle) Depth with Black Matte Finish Extra-Large Stainless Steel Stainless Steel Black Manual Clean Broil & Serve Oven Controls Bake Broil Add-a-Minute Delay ... / 5A 5 180 Lbs. Product Dimensions A - Width C - Always consult local and national electric and gas codes. Frigidaire Baseline Freestanding Range FFGF3052TS 30" Gas Features Oven Control / Timing System Surface Type Sealed Gas Burners Grates Window Exterior Door Finish Handle Design Exterior Finish...
...Product Installation Guide for detailed installation instructions on the web at frigidaire.com. Depth (Including Handle) Depth with Black Matte Finish Extra-Large Stainless Steel Stainless Steel Black Manual Clean Broil & Serve Oven Controls Bake Broil Add-a-Minute Delay ... / 5A 5 180 Lbs. Product Dimensions A - Width C - Always consult local and national electric and gas codes. Frigidaire Baseline Freestanding Range FFGF3052TS 30" Gas Features Oven Control / Timing System Surface Type Sealed Gas Burners Grates Window Exterior Door Finish Handle Design Exterior Finish...


