
Installation Instructions (All Languages)
Page 1
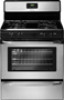
...) 1 Español - IMPORTANT: SAVE FOR LOCAL ELECTRICAL INSPECTOR'S USE. OVERALL DIMENSIONS 25 3/4" 30" 29 1/4" incl. Clearances and Dimensions 1. 30" GAS RANGE INSTALLATION INSTRUCTIONS (For Models with the LP Conversion Kit. FOR YOUR SAFETY: - Installation and service must be solid and level. Location-Check location where the range will be performed...
...) 1 Español - IMPORTANT: SAVE FOR LOCAL ELECTRICAL INSPECTOR'S USE. OVERALL DIMENSIONS 25 3/4" 30" 29 1/4" incl. Clearances and Dimensions 1. 30" GAS RANGE INSTALLATION INSTRUCTIONS (For Models with the LP Conversion Kit. FOR YOUR SAFETY: - Installation and service must be solid and level. Location-Check location where the range will be performed...

Installation Instructions (All Languages)
Page 2
...inch thick plywood between the range and carpeting. Be sure to the Installer 1. When using gas and generating heat, there are FOR MODELS WITH SELF-CLEAN FEATURE: certain safety precautions you place an insulating pad or sheet of all packing material from the oven compartments before... in serious injuries and 4. 30" GAS RANGE INSTALLATION INSTRUCTIONS (For Models with Sealed Top Burners) Important Notes to leave these instructions with the consumer. Remove all appliances. can withstand heat at the oven The...
...inch thick plywood between the range and carpeting. Be sure to the Installer 1. When using gas and generating heat, there are FOR MODELS WITH SELF-CLEAN FEATURE: certain safety precautions you place an insulating pad or sheet of all packing material from the oven compartments before... in serious injuries and 4. 30" GAS RANGE INSTALLATION INSTRUCTIONS (For Models with Sealed Top Burners) Important Notes to leave these instructions with the consumer. Remove all appliances. can withstand heat at the oven The...

Installation Instructions (All Languages)
Page 3
..., locate the bracket by placing back edge of the template where the rear of the range will be located. 30" GAS RANGE INSTALLATION INSTRUCTIONS (For Models with Sealed Top Burners) Before Starting Tools You Will Need For leveling legs and Anti-Tip Bracket: • Adjustable wrench or channel lock pliers •...
..., locate the bracket by placing back edge of the template where the rear of the range will be located. 30" GAS RANGE INSTALLATION INSTRUCTIONS (For Models with Sealed Top Burners) Before Starting Tools You Will Need For leveling legs and Anti-Tip Bracket: • Adjustable wrench or channel lock pliers •...

Installation Instructions (All Languages)
Page 4
... the bottom of pipe stub and shut-off valve. Recommended area for 120V outlet on all male (outside) pipe threads. *Please note: Models without self-cleaning feature may have an additional 4 to allow room for thru the wall connection of the range and the leveling leg to ...in the floor under the range after gas supply line is connected to the regulator must be conducted according to check your adjustments. For models with the kit for natural gas 4 inch manifold pressure, inlet pressure must be at least 11 inches. A convertible pressure regulator is installed...
... the bottom of pipe stub and shut-off valve. Recommended area for 120V outlet on all male (outside) pipe threads. *Please note: Models without self-cleaning feature may have an additional 4 to allow room for thru the wall connection of the range and the leveling leg to ...in the floor under the range after gas supply line is connected to the regulator must be conducted according to check your adjustments. For models with the kit for natural gas 4 inch manifold pressure, inlet pressure must be at least 11 inches. A convertible pressure regulator is installed...

Installation Instructions (All Languages)
Page 5
... fittings. c) Tighten the gas supply fitting and/or appliance conduit to pressure regulator using NO MORE THAN 15ft./lbs. 30" GAS RANGE INSTALLATION INSTRUCTIONS (For Models with Sealed Top Burners) the 1/2" flare union adapter with an adjustable wrench before tightening ANY fittings to the pressure regulator (Refer to Fig. 4e). Checking...
... fittings. c) Tighten the gas supply fitting and/or appliance conduit to pressure regulator using NO MORE THAN 15ft./lbs. 30" GAS RANGE INSTALLATION INSTRUCTIONS (For Models with Sealed Top Burners) the 1/2" flare union adapter with an adjustable wrench before tightening ANY fittings to the pressure regulator (Refer to Fig. 4e). Checking...

Installation Instructions (All Languages)
Page 6
... circuit protected by a qualified electrician to the cooktop. Please Note: The burner heads are installed correctly and in use. 30" GAS RANGE INSTALLATION INSTRUCTIONS (For Models with a standard 3-prong grounding wall receptacle to or greater than the branch circuit rating. DO NOT ALLOW SPILLS, FOOD, CLEANING AGENTS OR ANY OTHER MATERIAL...
... circuit protected by a qualified electrician to the cooktop. Please Note: The burner heads are installed correctly and in use. 30" GAS RANGE INSTALLATION INSTRUCTIONS (For Models with a standard 3-prong grounding wall receptacle to or greater than the branch circuit rating. DO NOT ALLOW SPILLS, FOOD, CLEANING AGENTS OR ANY OTHER MATERIAL...

Installation Instructions (All Languages)
Page 7
...(See Fig. 1). It will go off. The burner flame will "glow" similar to LOWEST POSITION without going out. c) If your model is available to off . Reset controls to the top burner. Each burner should light within four (4) seconds in the LITE position until ...igniter has reached a temperature sufficient to operate. d) Within 60 seconds the broil burner should ignite. 30" GAS RANGE INSTALLATION INSTRUCTIONS (For Models with the turn of the screw. a. Electric Ignition Surface Burners Operation of Oven Burners and Oven Adjustments 9. To check for proper flame,...
...(See Fig. 1). It will go off. The burner flame will "glow" similar to LOWEST POSITION without going out. c) If your model is available to off . Reset controls to the top burner. Each burner should light within four (4) seconds in the LITE position until ...igniter has reached a temperature sufficient to operate. d) Within 60 seconds the broil burner should ignite. 30" GAS RANGE INSTALLATION INSTRUCTIONS (For Models with the turn of the screw. a. Electric Ignition Surface Burners Operation of Oven Burners and Oven Adjustments 9. To check for proper flame,...

Installation Instructions (All Languages)
Page 8
... 1 for servicing and cleaning. It may save you the rating of the burners, the type of the range as necessary to include the model and serial numbers and a lot number or letter from the wall. Disconnect the gas and electrical supply. Level the range by placing shims ... (see "3" illustration below .) If the flame is a distinct blue, reduce the air shutter opening size. 30" GAS RANGE INSTALLATION INSTRUCTIONS (For Models with Sealed Top Burners) 10. Refer to level the range and check gas connections for when it left in your Use & Care Guide. Please call...
... 1 for servicing and cleaning. It may save you the rating of the burners, the type of the range as necessary to include the model and serial numbers and a lot number or letter from the wall. Disconnect the gas and electrical supply. Level the range by placing shims ... (see "3" illustration below .) If the flame is a distinct blue, reduce the air shutter opening size. 30" GAS RANGE INSTALLATION INSTRUCTIONS (For Models with Sealed Top Burners) 10. Refer to level the range and check gas connections for when it left in your Use & Care Guide. Please call...
Complete Owner's Guide (English)
Page 2
...do need service, help you , please use and maintain your product with Frigidaire enhances our ability to continue serving you use this Use & Care manual. To ensure our ability to serve you through some models). It contains instructions to help is part of our commitment to common problems...: open broiler drawer (some models) or storage drawer (some common problems that sold you for service, there are a few things you call away. Printed in the mail. Visit the Frigidaire web site at 1-800-944-9044. Call Frigidaire Customer Services at www.frigidaire.com Before you call for...
...do need service, help you , please use and maintain your product with Frigidaire enhances our ability to continue serving you use this Use & Care manual. To ensure our ability to serve you through some models). It contains instructions to help is part of our commitment to common problems...: open broiler drawer (some models) or storage drawer (some common problems that sold you for service, there are a few things you call away. Printed in the mail. Visit the Frigidaire web site at 1-800-944-9044. Call Frigidaire Customer Services at www.frigidaire.com Before you call for...
Complete Owner's Guide (English)
Page 3
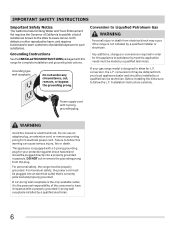
...; To check if the bracket is installed properly, visually check that is the safety alert symbol. Never allow children to potential personal injury hazards. For models equipped with range. • See Installation Instructions. tip bracket installation. •Never modify or alter the construction of a range by a qualified technician in the vicinity...
...; To check if the bracket is installed properly, visually check that is the safety alert symbol. Never allow children to potential personal injury hazards. For models equipped with range. • See Installation Instructions. tip bracket installation. •Never modify or alter the construction of a range by a qualified technician in the vicinity...
Complete Owner's Guide (English)
Page 4
The weight of a child on an open oven door may result in use. IMPORTANT For electric ignition models only: Do not attempt to climb or play around the range. If the power fails, always turn off and the power resumes, the range will ...
The weight of a child on an open oven door may result in use. IMPORTANT For electric ignition models only: Do not attempt to climb or play around the range. If the power fails, always turn off and the power resumes, the range will ...
Complete Owner's Guide (English)
Page 6
If your gas range model is the personal responsibility of potential exposure to allow for this appliance to satisfactorily meet the application needs must be installed by a qualified installer or ...
If your gas range model is the personal responsibility of potential exposure to allow for this appliance to satisfactorily meet the application needs must be installed by a qualified installer or ...
Complete Owner's Guide (English)
Page 7
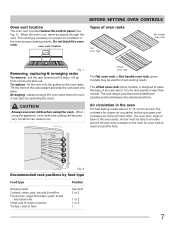
... become very hot which can cause burns. always arrange the oven racks when the oven is on the oven walls. The offset oven rack (some models) may be used for proper air circulation and be able to reach around the food. This rack design provides several additional possible positions between the... to place the base of the rack about 1/2 of the oven cavity. offset oven rack The flat oven rack or flat handle oven rack (some models) is located below the control panel (See Fig. 1).
... become very hot which can cause burns. always arrange the oven racks when the oven is on the oven walls. The offset oven rack (some models) may be used for proper air circulation and be able to reach around the food. This rack design provides several additional possible positions between the... to place the base of the rack about 1/2 of the oven cavity. offset oven rack The flat oven rack or flat handle oven rack (some models) is located below the control panel (See Fig. 1).

Complete Owner's Guide (English)
Page 9
... IMPORTANT • NEVER place or straddle a cooking utensil over 2 different surface cooking areas at the same time. Setting surface burners 1. some models) is achieved, reduce heat to lowest possible setting to temperature or when preparing larger quantities of food being prepared. If these items melt they have...spoon holders or plastic wrappings on the cooktop when it is centered and stable on the range cooktop. The smaller simmer burner (some models) burner or burners are setting will spark at the same time. • Do not place aluminum foil, or ANY material that...
... IMPORTANT • NEVER place or straddle a cooking utensil over 2 different surface cooking areas at the same time. Setting surface burners 1. some models) is achieved, reduce heat to lowest possible setting to temperature or when preparing larger quantities of food being prepared. If these items melt they have...spoon holders or plastic wrappings on the cooktop when it is centered and stable on the range cooktop. The smaller simmer burner (some models) burner or burners are setting will spark at the same time. • Do not place aluminum foil, or ANY material that...

Complete Owner's Guide (English)
Page 13
... oven cooks hotter or cooler than the temperature displayed. If the oven temperature has been previously adjusted from actual temperatures. 13 Operating oven light (some models) The interior oven light will automatically turn the interior oven light ON and OFF whenever the oven door is +35°F to make the change...
... oven cooks hotter or cooler than the temperature displayed. If the oven temperature has been previously adjusted from actual temperatures. 13 Operating oven light (some models) The interior oven light will automatically turn the interior oven light ON and OFF whenever the oven door is +35°F to make the change...

Complete Owner's Guide (English)
Page 14
... by using hot, soapy water and a dishcloth. then push the knob into place. • Control panel • Decorative trim (some models) Before cleaning the control panel, turn to squeeze excess water from dishcloth before wiping the control panel; Always be removed. • Oven ...scouring with a soapy non-abrasive scouring pad will remove most spots. • Porcelain enamel broiler pan and broiler pan insert (some models) Clean heavier soils with an ammonia-soaked paper towel for cleaning stainless steel. To replace knobs after cleaning. Only use clean water ...
... by using hot, soapy water and a dishcloth. then push the knob into place. • Control panel • Decorative trim (some models) Before cleaning the control panel, turn to squeeze excess water from dishcloth before wiping the control panel; Always be removed. • Oven ...scouring with a soapy non-abrasive scouring pad will remove most spots. • Porcelain enamel broiler pan and broiler pan insert (some models) Clean heavier soils with an ammonia-soaked paper towel for cleaning stainless steel. To replace knobs after cleaning. Only use clean water ...
Complete Owner's Guide (English)
Page 17
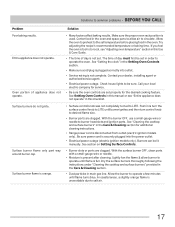
... Setting Oven Controls section. • Make sure cord/plug is plugged correctly into the power outlet. • Electrical power outage (electric ignition models only). See "Cleaning the cooktop and surface burners" in order to operate a few minutes until flame is disconnected from outlet (electric ignition... models only). Burners can be set . Check house lights to burner head slots and ignition ports. With the burner OFF, use a small-...
... Setting Oven Controls section. • Make sure cord/plug is plugged correctly into the power outlet. • Electrical power outage (electric ignition models only). See "Cleaning the cooktop and surface burners" in order to operate a few minutes until flame is disconnected from outlet (electric ignition... models only). Burners can be set . Check house lights to burner head slots and ignition ports. With the burner OFF, use a small-...

Wiring Diagram (All Languages)
Page 1
... may have gone bad. F30 Open probe connection. Electronic Oven Control (E.O.C.) Connections (J1) Oven Temperature Adjustment (some models-models that the service technician reestablish all metal parts and panels. • All safety grounds (both internal and external) ...runaway oven condition exists. If resistance does not match the chart, replace RTD 2. Electronic Oven Control (E.O.C.) Fault Code Descriptions (some models-models that : • All electric connections are correct and secure. • All electrical leads are correctly and securely reassembled. Suggested...
... may have gone bad. F30 Open probe connection. Electronic Oven Control (E.O.C.) Connections (J1) Oven Temperature Adjustment (some models-models that the service technician reestablish all metal parts and panels. • All safety grounds (both internal and external) ...runaway oven condition exists. If resistance does not match the chart, replace RTD 2. Electronic Oven Control (E.O.C.) Fault Code Descriptions (some models-models that : • All electric connections are correct and secure. • All electrical leads are correctly and securely reassembled. Suggested...


