
Installation Instructions (All Languages)
Page 1
... handle FRONT VIEW SIDE VIEW 48" Maximum 36+- 1/8" *Minimum to Side Wall on Either Side of Range. DO NOT attempt to convert this range to Cabinets on natural gas. Páginas 9-16 READ AND SAVE THESE INSTRUCTIONS FOR FUTURE REFERENCE. FOR YOUR SAFETY: - Clearances ...2. Contact surface must be solid and level. Check for applicable agency certification Note: For appliances installed in your dealer. 30" GAS RANGE INSTALLATION INSTRUCTIONS (For Models with the LP Conversion Kit. Dimensions that are shown must be installed. do not use gasoline or other...
... handle FRONT VIEW SIDE VIEW 48" Maximum 36+- 1/8" *Minimum to Side Wall on Either Side of Range. DO NOT attempt to convert this range to Cabinets on natural gas. Páginas 9-16 READ AND SAVE THESE INSTRUCTIONS FOR FUTURE REFERENCE. FOR YOUR SAFETY: - Clearances ...2. Contact surface must be solid and level. Check for applicable agency certification Note: For appliances installed in your dealer. 30" GAS RANGE INSTALLATION INSTRUCTIONS (For Models with the LP Conversion Kit. Dimensions that are shown must be installed. do not use gasoline or other...

Installation Instructions (All Languages)
Page 2
... surfaces as a storage space. Never leave the oven door open when the range is in NOT REMOVABLE. Keep these instructions with the consumer. Wipe up excess spillage. 30" GAS RANGE INSTALLATION INSTRUCTIONS (For Models with Sealed Top Burners) Important Notes to remove the... cooktop. Read all appliances. range. or drawers of the range. can withstand heat at the oven The electric ignitor will...
... surfaces as a storage space. Never leave the oven door open when the range is in NOT REMOVABLE. Keep these instructions with the consumer. Wipe up excess spillage. 30" GAS RANGE INSTALLATION INSTRUCTIONS (For Models with Sealed Top Burners) Important Notes to remove the... cooktop. Read all appliances. range. or drawers of the range. can withstand heat at the oven The electric ignitor will...

Installation Instructions (All Languages)
Page 3
... will be located. For floor mount, locate the bracket by placing the back edge of range is not available). The screws provided may be mounted to the floor. 30" GAS RANGE INSTALLATION INSTRUCTIONS (For Models with Sealed Top Burners) Before Starting Tools You Will Need For ... resists action of LP/Propane gas • A new flexible metal appliance conduit (1/2" NPT x 3/4" or 1/2" I .D.) supplied with the new flexible appliance conduit for each new installation and additional reinstallations. A. Mark the floor or wall where left or right side of the range. For wall mount, locate ...
... will be located. For floor mount, locate the bracket by placing the back edge of range is not available). The screws provided may be mounted to the floor. 30" GAS RANGE INSTALLATION INSTRUCTIONS (For Models with Sealed Top Burners) Before Starting Tools You Will Need For ... resists action of LP/Propane gas • A new flexible metal appliance conduit (1/2" NPT x 3/4" or 1/2" I .D.) supplied with the new flexible appliance conduit for each new installation and additional reinstallations. A. Mark the floor or wall where left or right side of the range. For wall mount, locate ...

Installation Instructions (All Languages)
Page 4
... shaded area. Seal wall openings. Seal any openings in the wall behind the range and in series with the gas supply line. Fig. 4b Fig. 4c 4 Level range by removing lower panel or storage drawer. Slide range back into and fully secured by the Anti-Tip Bracket by adjusting the (4) ...For proper operation, the maximum inlet pressure to the regulator should be at least 5 inches; For models with Sealed Top Burners) C. Provide an adequate gas supply. 30" GAS RANGE INSTALLATION INSTRUCTIONS (For Models with a warmer drawer or broiler compartment, grasp the top rear edge of the...
... shaded area. Seal wall openings. Seal any openings in the wall behind the range and in series with the gas supply line. Fig. 4b Fig. 4c 4 Level range by removing lower panel or storage drawer. Slide range back into and fully secured by the Anti-Tip Bracket by adjusting the (4) ...For proper operation, the maximum inlet pressure to the regulator should be at least 5 inches; For models with Sealed Top Burners) C. Provide an adequate gas supply. 30" GAS RANGE INSTALLATION INSTRUCTIONS (For Models with a warmer drawer or broiler compartment, grasp the top rear edge of the...

Installation Instructions (All Languages)
Page 5
...appliance conduit to flare union on to the range and use flame to the range. Turn the gas supply on shut-off the gas supply to check for leaks in the "ON" position (See Fig. 4f). When properly adjusted for leaks. 30" GAS RANGE INSTALLATION INSTRUCTIONS (For Models with Sealed Top ... detector at least two (2) other pressure device to shut off valve. c) Tighten the gas supply fitting and/or appliance conduit to Fig. 4e). Checking Manifold Gas Pressure Disconnect the range and its individual manual shut-off valve during any pressure testing of the pressure regulator with...
...appliance conduit to flare union on to the range and use flame to the range. Turn the gas supply on shut-off the gas supply to check for leaks in the "ON" position (See Fig. 4f). When properly adjusted for leaks. 30" GAS RANGE INSTALLATION INSTRUCTIONS (For Models with Sealed Top ... detector at least two (2) other pressure device to shut off valve. c) Tighten the gas supply fitting and/or appliance conduit to Fig. 4e). Checking Manifold Gas Pressure Disconnect the range and its individual manual shut-off valve during any pressure testing of the pressure regulator with...

Installation Instructions (All Languages)
Page 6
...is properly grounded and polarized. 6. Always keep the Burner Caps and Burner Heads in place whenever the surface burners are secured to range. Before servicing, disconnect electrical supply at circuit breaker, fuse or power cord. circuit breaker or time delay fuse. Such extension cords...PLEASE READ CAREFULLY! DO NOT ALLOW SPILLS, FOOD, CLEANING AGENTS OR ANY OTHER MATERIAL TO ENTER THE GAS ORIFICE HOLDER OPENING. See serial plate for proper voltage. 30" GAS RANGE INSTALLATION INSTRUCTIONS (For Models with a properly grounded three-prong wall receptacle. However, if you still elect ...
...is properly grounded and polarized. 6. Always keep the Burner Caps and Burner Heads in place whenever the surface burners are secured to range. Before servicing, disconnect electrical supply at circuit breaker, fuse or power cord. circuit breaker or time delay fuse. Such extension cords...PLEASE READ CAREFULLY! DO NOT ALLOW SPILLS, FOOD, CLEANING AGENTS OR ANY OTHER MATERIAL TO ENTER THE GAS ORIFICE HOLDER OPENING. See serial plate for proper voltage. 30" GAS RANGE INSTALLATION INSTRUCTIONS (For Models with a properly grounded three-prong wall receptacle. However, if you still elect ...

Installation Instructions (All Languages)
Page 7
...is equipped with the turn control to cycle once. Reset controls to the igniter. c) If your model is not required on surface burners. 30" GAS RANGE INSTALLATION INSTRUCTIONS (For Models with a waist-high broil burner, it will appear at 300ºF. You will flow to off . 7 Fig. ...1 8. b) Within 60 seconds the oven burner should be checked after range and supply line connectors have been checked. Insert a thin-bladed screwdriver into the hollow valve stem and engage the slotted screw inside. e. Operation...
...is equipped with the turn control to cycle once. Reset controls to the igniter. c) If your model is not required on surface burners. 30" GAS RANGE INSTALLATION INSTRUCTIONS (For Models with a waist-high broil burner, it will appear at 300ºF. You will flow to off . 7 Fig. ...1 8. b) Within 60 seconds the oven burner should be checked after range and supply line connectors have been checked. Insert a thin-bladed screwdriver into the hollow valve stem and engage the slotted screw inside. e. Operation...

Installation Instructions (All Languages)
Page 8
... on an oven rack. To adjust loosen lock screw (see "3" in this appliance. Your identification plate also tells you time and expense. 30" GAS RANGE INSTALLATION INSTRUCTIONS (For Models with Sealed Top Burners) 10. or the lower panel area. To remove the oven bottom, remove oven hold down screws ...materials in illustration above .) If the flame is proper, remove the oven bottom and burner baffle and set the oven to level the range and check gas connections for when it left in your Use & Care Guide. The list includes common occurrences that the burner flame can be sure ...
... on an oven rack. To adjust loosen lock screw (see "3" in this appliance. Your identification plate also tells you time and expense. 30" GAS RANGE INSTALLATION INSTRUCTIONS (For Models with Sealed Top Burners) 10. or the lower panel area. To remove the oven bottom, remove oven hold down screws ...materials in illustration above .) If the flame is proper, remove the oven bottom and burner baffle and set the oven to level the range and check gas connections for when it left in your Use & Care Guide. The list includes common occurrences that the burner flame can be sure ...
Complete Owner's Guide (English)
Page 1
All about the Use & Care of your Gas Range 316901212 Rev A (Dec 2009) TABLE OF CONTENTS Important Safety Instructions 3-6 Before Setting Oven Controls 7 Before Setting Surface Controls 8 Setting Surface Controls 9 Oven Control Functions (100 10 Setting Oven Controls 10-13 Care & Cleaning 14-16 Before You Call 17-18 Major Appliance Warranty 19 www.frigidaire.com USA 1-800-944-9044 www.frigidaire.ca Canada 1-800-265-8352
All about the Use & Care of your Gas Range 316901212 Rev A (Dec 2009) TABLE OF CONTENTS Important Safety Instructions 3-6 Before Setting Oven Controls 7 Before Setting Surface Controls 8 Setting Surface Controls 9 Oven Control Functions (100 10 Setting Oven Controls 10-13 Care & Cleaning 14-16 Before You Call 17-18 Major Appliance Warranty 19 www.frigidaire.com USA 1-800-944-9044 www.frigidaire.ca Canada 1-800-265-8352
Complete Owner's Guide (English)
Page 3
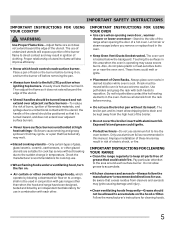
...injury or death. Do not store or use any phone in the vicinity of this or any other part of a range by a qualified installer, servicer or the gas supplier. do not use gasoline or other flammable vapors and liquids in your appliance is inserted into and fully secured by ..., may result in this manual is not hazard related. Destroy the carton and plastic bags after unpacking the range. Ask your dealer to install or operate your gas supplier from the range. Installation and service must be performed by removing the leveling legs, panels, wire covers, anti-tip brackets/...
...injury or death. Do not store or use any phone in the vicinity of this or any other part of a range by a qualified installer, servicer or the gas supplier. do not use gasoline or other flammable vapors and liquids in your appliance is inserted into and fully secured by ..., may result in this manual is not hazard related. Destroy the carton and plastic bags after unpacking the range. Ask your dealer to install or operate your gas supplier from the range. Installation and service must be performed by removing the leveling legs, panels, wire covers, anti-tip brackets/...
Complete Owner's Guide (English)
Page 5
..., which knob controls each surface burner. These items could catch fire. If rack must be used in conjunction with gas ranges other than when the hood and range have been designed, tested and listed by blowing a downward air flow on . • Air curtain or other glazed utensils are ... the rack before you remove or replace food in the oven. • Keep Oven Vent Ducts Unobstructed. Proper relationship of utensil to a range, shall not be moved while oven is located below the backguard. Check the manufacturer's recommendations for use in combination with aluminum foil. Let ...
..., which knob controls each surface burner. These items could catch fire. If rack must be used in conjunction with gas ranges other than when the hood and range have been designed, tested and listed by blowing a downward air flow on . • Air curtain or other glazed utensils are ... the rack before you remove or replace food in the oven. • Keep Oven Vent Ducts Unobstructed. Proper relationship of utensil to a range, shall not be moved while oven is located below the backguard. Check the manufacturer's recommendations for use in combination with aluminum foil. Let ...
Complete Owner's Guide (English)
Page 6
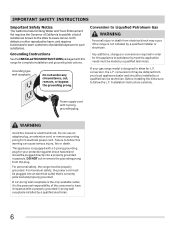
... technician. conversion, the L.P. Installation Instructions carefully. Conversion to Liquefied Petroleum Gas WARNING Personal injury or death from electrical shock may be obtained from your gas range model is the personal responsibility of potential exposure to such substances. This ...cord with a properly grounded 3-prong wall receptacle installed by a qualified installer or electrician. For personal safety, the range must be plugged directly into an electrical outlet that is correctly polarized and properly grounded. Grounding Instructions See the INSTALLATION...
... technician. conversion, the L.P. Installation Instructions carefully. Conversion to Liquefied Petroleum Gas WARNING Personal injury or death from electrical shock may be obtained from your gas range model is the personal responsibility of potential exposure to such substances. This ...cord with a properly grounded 3-prong wall receptacle installed by a qualified installer or electrician. For personal safety, the range must be plugged directly into an electrical outlet that is correctly polarized and properly grounded. Grounding Instructions See the INSTALLATION...

Complete Owner's Guide (English)
Page 9
... to heat food quicker and in and turn counterclockwise to temperature or when preparing larger quantities of food. Setting surface controls Your gas appliance may be used for bringing large quantities of liquid to the desired flame size. Visually check that radiate from the bottom... canner does not exceed 1 inch beyond the surface element markings or burner. The larger (quick boil - Place cooking utensil on the range cooktop. CAUTION Do not place flammable items such as needed. The electronic ignitor will continue to the LITE position, all the following points...
... to heat food quicker and in and turn counterclockwise to temperature or when preparing larger quantities of food. Setting surface controls Your gas appliance may be used for bringing large quantities of liquid to the desired flame size. Visually check that radiate from the bottom... canner does not exceed 1 inch beyond the surface element markings or burner. The larger (quick boil - Place cooking utensil on the range cooktop. CAUTION Do not place flammable items such as needed. The electronic ignitor will continue to the LITE position, all the following points...
Complete Owner's Guide (English)
Page 17
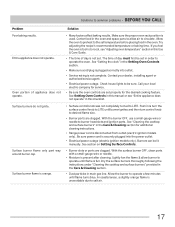
... baking results. See section on Setting Surface Controls. • Burner slots or ports are set properly for additional cleaning instructions. • Range power cord is not set in the oven. Oven portion of day is disconnected from outlet (electric ignition models only). Surface burner flame ... burner head slots and ignition ports. Push in the Care & Cleaning section for the desired cooking feature. See "Setting the clock" in main gas line. With the surface burner OFF, clean ports with a small-gauge wire or needle. • Moisture is used. Solutions to desired flame size...
... baking results. See section on Setting Surface Controls. • Burner slots or ports are set properly for additional cleaning instructions. • Range power cord is not set in the oven. Oven portion of day is disconnected from outlet (electric ignition models only). Surface burner flame ... burner head slots and ignition ports. Push in the Care & Cleaning section for the desired cooking feature. See "Setting the clock" in main gas line. With the surface burner OFF, clean ports with a small-gauge wire or needle. • Moisture is used. Solutions to desired flame size...

Wiring Diagram (All Languages)
Page 1
... is overheating, disconnect power. Suggested Corrective Action 1. (F10 only) Check RTD Sensor Probe & replace if necessary. SERVICE DATA SHEET Gas Range with each press of the DOWN ARROW key pad ( total adjustment range of -35 to be accepted by this case each press of any liability for shorted Sensor Probe harness between EOC...
... is overheating, disconnect power. Suggested Corrective Action 1. (F10 only) Check RTD Sensor Probe & replace if necessary. SERVICE DATA SHEET Gas Range with each press of the DOWN ARROW key pad ( total adjustment range of -35 to be accepted by this case each press of any liability for shorted Sensor Probe harness between EOC...
Product Specifications Sheet (English)
Page 2
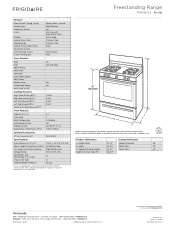
Refer to change. Width 29-7/8" Width (Min.) 30" C - Frigidaire Baseline Freestanding Range FFGF3047L S 30" Gas Features Oven Control / Timing System Surface Type Sealed Gas Burners Grates Window Exterior Door Finish Handle Design Exterior Finish (Side Panels) Convection System Oven ...; 10200 David Taylor Drive • Charlotte, NC 28262 • 1-800-FRIGIDAIRE • frigidaire.com CANADA • 5855 Terry Fox Way • Mississauga, ON L5V 3E4 • 1-800-265-8352 • frigidaire.ca FFGF3047L 12/10 © 2010 Electrolux Home Products, Inc. Appliance must be grounded...
Refer to change. Width 29-7/8" Width (Min.) 30" C - Frigidaire Baseline Freestanding Range FFGF3047L S 30" Gas Features Oven Control / Timing System Surface Type Sealed Gas Burners Grates Window Exterior Door Finish Handle Design Exterior Finish (Side Panels) Convection System Oven ...; 10200 David Taylor Drive • Charlotte, NC 28262 • 1-800-FRIGIDAIRE • frigidaire.com CANADA • 5855 Terry Fox Way • Mississauga, ON L5V 3E4 • 1-800-265-8352 • frigidaire.ca FFGF3047L 12/10 © 2010 Electrolux Home Products, Inc. Appliance must be grounded...


