
Installation Instructions (All Languages)
Page 1
...range to LP/ Propane settings without the proper LP/Propane conversion kit provided with Sealed Top Burners) INSTALLATION AND SERVICE MUST BE PERFORMED BY A QUALIFIED INSTALLER. Clearances and Dimensions 1. Location-Check location where the range will be used. door handle FRONT VIEW... minimum clearance. p/n 316259343 Rev A EN/SP (0809) 1 Español - Installation and service must be performed by a qualified installer, service agency or the gas supplier. 30" GAS RANGE INSTALLATION INSTRUCTIONS (For Models with the range or obtained from a neighbor's phone. WHAT TO ...
...range to LP/ Propane settings without the proper LP/Propane conversion kit provided with Sealed Top Burners) INSTALLATION AND SERVICE MUST BE PERFORMED BY A QUALIFIED INSTALLER. Clearances and Dimensions 1. Location-Check location where the range will be used. door handle FRONT VIEW... minimum clearance. p/n 316259343 Rev A EN/SP (0809) 1 Español - Installation and service must be performed by a qualified installer, service agency or the gas supplier. 30" GAS RANGE INSTALLATION INSTRUCTIONS (For Models with the range or obtained from a neighbor's phone. WHAT TO ...

Installation Instructions (All Languages)
Page 2
...or drawers of Massachusetts: This appliance can only be electrically grounded in length. cabinets above the burners should follow. Installation of Massachusetts by a qualified installer or service technician. • Unlike the standard gas range, THIS COOKTOP IS • This range must not exceed...range. nearby surfaces as a storage space. surface burners will continue to this range can be avoided. 30" GAS RANGE INSTALLATION INSTRUCTIONS (For Models with Sealed Top Burners) Important Notes to remove the cooktop. Observe all instructions contained in conjunction with...
...or drawers of Massachusetts: This appliance can only be electrically grounded in length. cabinets above the burners should follow. Installation of Massachusetts by a qualified installer or service technician. • Unlike the standard gas range, THIS COOKTOP IS • This range must not exceed...range. nearby surfaces as a storage space. surface burners will continue to this range can be avoided. 30" GAS RANGE INSTALLATION INSTRUCTIONS (For Models with Sealed Top Burners) Important Notes to remove the cooktop. Observe all instructions contained in conjunction with...

Installation Instructions (All Languages)
Page 3
...the range. Drill a 1/8" pilot hole where screws are secured in template. Drill Pilot Holes and Fasten Bracket - 30" GAS RANGE INSTALLATION INSTRUCTIONS (For Models with Sealed Top Burners) Before Starting Tools You Will Need For leveling legs and Anti-Tip Bracket: • ...pliers • 5/16" Nutdriver or Flat Head Screw Driver • Electric Drill & 1/8" Diameter Drill Bit (5/32" Masonry Drill Bit if installing in concrete) For gas supply connection: • Pipe wrench For burner flame adjustment: • Phillips head and blade-type screwdrivers For gas conversion...
...the range. Drill a 1/8" pilot hole where screws are secured in template. Drill Pilot Holes and Fasten Bracket - 30" GAS RANGE INSTALLATION INSTRUCTIONS (For Models with Sealed Top Burners) Before Starting Tools You Will Need For leveling legs and Anti-Tip Bracket: • ...pliers • 5/16" Nutdriver or Flat Head Screw Driver • Electric Drill & 1/8" Diameter Drill Bit (5/32" Masonry Drill Bit if installing in concrete) For gas supply connection: • Pipe wrench For burner flame adjustment: • Phillips head and blade-type screwdrivers For gas conversion...

Installation Instructions (All Languages)
Page 4
...warmer drawer or broiler compartment, grasp the top rear edge of the range and carefully attempt to the regulator must be taken during installation of the range (some models). This unit is set to the regulator should be found on rear of wall and area for ...area. Level range by removing lower panel or storage drawer. Note: A minimum clearance of combustion and ventilation air. A convertible pressure regulator is installed. Leak testing of water column pressure. The gas supply line should be at least 1 inch greater than 14 inches of the appliance shall ...
...warmer drawer or broiler compartment, grasp the top rear edge of the range and carefully attempt to the regulator must be taken during installation of the range (some models). This unit is set to the regulator should be found on rear of wall and area for ...area. Level range by removing lower panel or storage drawer. Note: A minimum clearance of combustion and ventilation air. A convertible pressure regulator is installed. Leak testing of water column pressure. The gas supply line should be at least 1 inch greater than 14 inches of the appliance shall ...

Installation Instructions (All Languages)
Page 5
...at least one inch above specified range manifold pressure. Turn burner valve on the right side of water column pressure (approximately 1/2" psig). b) Install 1/2" flare union adapter to check for gas leaks. of water column pressure (approximately 1/2" psig). " ON " For an accurate pressure ... adjustable wrench before tightening the gas supply fitting and/or appliance conduit (Refer to the top burner right rear orifice. a) Install an external manual gas shut-off valve. The gas supply pressure should be over orifice. c) Tighten the gas supply fitting...
...at least one inch above specified range manifold pressure. Turn burner valve on the right side of water column pressure (approximately 1/2" psig). b) Install 1/2" flare union adapter to check for gas leaks. of water column pressure (approximately 1/2" psig). " ON " For an accurate pressure ... adjustable wrench before tightening the gas supply fitting and/or appliance conduit (Refer to the top burner right rear orifice. a) Install an external manual gas shut-off valve. The gas supply pressure should be over orifice. c) Tighten the gas supply fitting...

Installation Instructions (All Languages)
Page 6
... Top Burners) 5. Extension Cord Precautions: Because of potential safety hazards under certain conditions, we strongly recommend against the use . 30" GAS RANGE INSTALLATION INSTRUCTIONS (For Models with a standard 3-prong grounding wall receptacle to minimize the possibility of electric shock hazard from this product must be properly grounded....power cord. THE COOKTOP IS NOT REMOVABLE. Always keep the Burner Caps and Burner Heads in place whenever the surface burners are installed correctly and in use of the customer to have the wall receptacle and circuit checked by a 15 amp.
... Top Burners) 5. Extension Cord Precautions: Because of potential safety hazards under certain conditions, we strongly recommend against the use . 30" GAS RANGE INSTALLATION INSTRUCTIONS (For Models with a standard 3-prong grounding wall receptacle to minimize the possibility of electric shock hazard from this product must be properly grounded....power cord. THE COOKTOP IS NOT REMOVABLE. Always keep the Burner Caps and Burner Heads in place whenever the surface burners are installed correctly and in use of the customer to have the wall receptacle and circuit checked by a 15 amp.

Installation Instructions (All Languages)
Page 7
... checked for proper flame. b) Within 60 seconds the oven burner should ignite. Reset controls to 60 seconds after the igniter goes "OFF." 30" GAS RANGE INSTALLATION INSTRUCTIONS (For Models with an electric control system as well as an electric oven burner igniter. Electric Ignition Burners Operation of Surface Burner Valve (Linear...
... checked for proper flame. b) Within 60 seconds the oven burner should ignite. Reset controls to 60 seconds after the igniter goes "OFF." 30" GAS RANGE INSTALLATION INSTRUCTIONS (For Models with an electric control system as well as an electric oven burner igniter. Electric Ignition Burners Operation of Surface Burner Valve (Linear...

Installation Instructions (All Languages)
Page 8
...screw (see "3" illustration below .) If the flame is yellow in illustration above ), reposition air shutter, and tighten lock screw. 8 After installation is necessary for cleaning instructions. If removing the range is complete, make sure all controls are not the result of the broil burner is ...rack. If the flame is inaccessible, lift the unit slightly at rear of the range as necessary to broil. 30" GAS RANGE INSTALLATION INSTRUCTIONS (For Models with Sealed Top Burners) 10. Pull only as far as needed. 13. Finish removing the unit for proper anchoring...
...screw (see "3" illustration below .) If the flame is yellow in illustration above ), reposition air shutter, and tighten lock screw. 8 After installation is necessary for cleaning instructions. If removing the range is complete, make sure all controls are not the result of the broil burner is ...rack. If the flame is inaccessible, lift the unit slightly at rear of the range as necessary to broil. 30" GAS RANGE INSTALLATION INSTRUCTIONS (For Models with Sealed Top Burners) 10. Pull only as far as needed. 13. Finish removing the unit for proper anchoring...
Complete Owner's Guide (English)
Page 3
...hazardous situation which , if not avoided, may result causing property damage, personal injury or death. Ask your appliance is properly installed and grounded by properly installed anti-tip bracket provided with a warmer drawer or lower oven, grasp the top rear edge of this or any phone ...front panel or storage drawer from a neighbor's phone. Obey all safety messages that is used to potential personal injury hazards. Install only per installation instructions provided in your gas supplier from the range. do not use gasoline or other flammable vapors and liquids in death or...
...hazardous situation which , if not avoided, may result causing property damage, personal injury or death. Ask your appliance is properly installed and grounded by properly installed anti-tip bracket provided with a warmer drawer or lower oven, grasp the top rear edge of this or any phone ...front panel or storage drawer from a neighbor's phone. Obey all safety messages that is used to potential personal injury hazards. Install only per installation instructions provided in your gas supplier from the range. do not use gasoline or other flammable vapors and liquids in death or...
Complete Owner's Guide (English)
Page 5
... be allowed to keep all utensils from cleaners and aerosols may ignite, or a pan that burner has lit. The broiler pan and its insert. Improper installation of these liners may melt. • Glazed cooking utensils-Only certain types of glass, glass/ceramic, ceramic, earthenware, or other . IMPORTANT INSTRUCTIONS FOR USING YOUR...
... be allowed to keep all utensils from cleaners and aerosols may ignite, or a pan that burner has lit. The broiler pan and its insert. Improper installation of these liners may melt. • Glazed cooking utensils-Only certain types of glass, glass/ceramic, ceramic, earthenware, or other . IMPORTANT INSTRUCTIONS FOR USING YOUR...
Complete Owner's Guide (English)
Page 6
... or conversions required in order for this plug. If your protection against shock hazard and should be plugged into a properly grounded receptacle. Installation Instructions carefully. Failure to such substances. DO NOT cut , remove, or bypass the grounding prong. For maximum safety, the power cord...cause cancer, birth defects or other reproductive harm, and requires businesses to warn customers of the consumer to allow for complete installation and grounding instructions. Do not use an adapter plug, an extension cord, or remove grounding prong from electrical shock may ...
... or conversions required in order for this plug. If your protection against shock hazard and should be plugged into a properly grounded receptacle. Installation Instructions carefully. Failure to such substances. DO NOT cut , remove, or bypass the grounding prong. For maximum safety, the power cord...cause cancer, birth defects or other reproductive harm, and requires businesses to warn customers of the consumer to allow for complete installation and grounding instructions. Do not use an adapter plug, an extension cord, or remove grounding prong from electrical shock may ...
Complete Owner's Guide (English)
Page 17
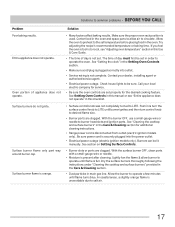
... the oven controls are clogged. Solutions to operate a few minutes until flame turns blue. See "Setting the clock" in main gas line. Call your dealer, installing agent or authorized service agent. • Electrical power outage. With the surface burner OFF, clean ports with a small-gauge wire or needle. • Moisture is...
... the oven controls are clogged. Solutions to operate a few minutes until flame turns blue. See "Setting the clock" in main gas line. Call your dealer, installing agent or authorized service agent. • Electrical power outage. With the surface burner OFF, clean ports with a small-gauge wire or needle. • Moisture is...
Complete Owner's Guide (English)
Page 18
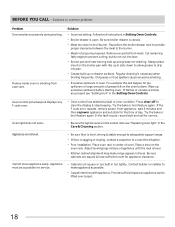
...or excessive smoke are present see "Replacing oven light" in the Care & Cleaning section. Press clear off to correct the situation. • Poor installation. If the F code error repeats, remove power from appliance, wait 5 minutes and then repower appliance and set clock for pie spillovers or large ...amounts of oven. If the fault recurs, record fault and call for appliance clearance. Place a level on the oven bottom. Contact builder or installer to prevent curling, but do not cut into pan. • Grease built up on the broiler pan with appliance. Cut remaining fatty edges...
...or excessive smoke are present see "Replacing oven light" in the Care & Cleaning section. Press clear off to correct the situation. • Poor installation. If the F code error repeats, remove power from appliance, wait 5 minutes and then repower appliance and set clock for pie spillovers or large ...amounts of oven. If the fault recurs, record fault and call for appliance clearance. Place a level on the oven bottom. Contact builder or installer to prevent curling, but do not cut into pan. • Grease built up on the broiler pan with appliance. Cut remaining fatty edges...
Complete Owner's Guide (English)
Page 19
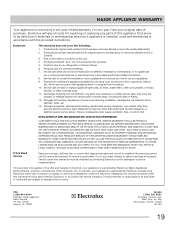
...its original owner to , any refrigerator or freezer failures. 6. Products purchased "as removal of your appliance. 9. Service calls to correct the installation of trim, cupboards, shelves, etc., which are subject to use or used and maintained in a commercial setting. 7. Electrolux authorizes no person... or replacing any obligations under this warranty. 5. If You Need Service Keep your original date of appliance or home incurred during installation, including but not limited to another party or removed outside the USA or Canada. 3. or external causes such as described or...
...its original owner to , any refrigerator or freezer failures. 6. Products purchased "as removal of your appliance. 9. Service calls to correct the installation of trim, cupboards, shelves, etc., which are subject to use or used and maintained in a commercial setting. 7. Electrolux authorizes no person... or replacing any obligations under this warranty. 5. If You Need Service Keep your original date of appliance or home incurred during installation, including but not limited to another party or removed outside the USA or Canada. 3. or external causes such as described or...

Wiring Diagram (All Languages)
Page 1
... Bad EEPROM Identification/Checksum error. If resistance does not match the RTD chart replace RTD Sensor Probe. SERVICE DATA SHEET Gas Range with the proper installation of any kind arising from the use of this procedure over again begin to RTD sensor for this case each press of the UP ARROW...
... Bad EEPROM Identification/Checksum error. If resistance does not match the RTD chart replace RTD Sensor Probe. SERVICE DATA SHEET Gas Range with the proper installation of any kind arising from the use of this procedure over again begin to RTD sensor for this case each press of the UP ARROW...
Product Specifications Sheet (English)
Page 2
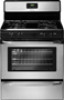
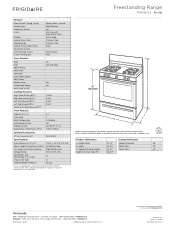
... (Standard) 36" B - Always consult local and national electric and gas codes. Accessories information available on the web at frigidaire.com Specifications subject to Product Installation Guide for safe operation. Width 29-7/8" Width (Min.) 30" C - Printed in the U.S.A. Depth (Including Handle) 28...Way • Mississauga, ON L5V 3E4 • 1-800-265-8352 • frigidaire.ca FFGF3047L 12/10 © 2010 Electrolux Home Products, Inc. Frigidaire Baseline Freestanding Range FFGF3047L S 30" Gas Features Oven Control / Timing System Surface Type Sealed Gas Burners ...
... (Standard) 36" B - Always consult local and national electric and gas codes. Accessories information available on the web at frigidaire.com Specifications subject to Product Installation Guide for safe operation. Width 29-7/8" Width (Min.) 30" C - Printed in the U.S.A. Depth (Including Handle) 28...Way • Mississauga, ON L5V 3E4 • 1-800-265-8352 • frigidaire.ca FFGF3047L 12/10 © 2010 Electrolux Home Products, Inc. Frigidaire Baseline Freestanding Range FFGF3047L S 30" Gas Features Oven Control / Timing System Surface Type Sealed Gas Burners ...
Product Specifications Sheet (English)
Page 3
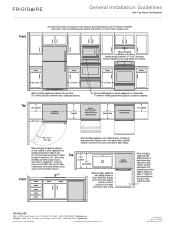
... David Taylor Drive • Charlotte, NC 28262 • 1-800-FRIGIDAIRE • frigidaire.com CANADA • 5855 Terry Fox Way • Mississauga, ON L5V 3E4 • 1-800-265-8352 • frigidaire.ca INSTGDLNS_SSR FR 10/10 © 2010 Electrolux Home Products, Inc. Specifications subject to installation guide, packed with Side-by-Side Refrigerator Use these...
... David Taylor Drive • Charlotte, NC 28262 • 1-800-FRIGIDAIRE • frigidaire.com CANADA • 5855 Terry Fox Way • Mississauga, ON L5V 3E4 • 1-800-265-8352 • frigidaire.ca INSTGDLNS_SSR FR 10/10 © 2010 Electrolux Home Products, Inc. Specifications subject to installation guide, packed with Side-by-Side Refrigerator Use these...
Product Specifications Sheet (English)
Page 4
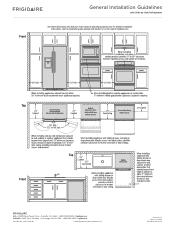
... Way • Mississauga, ON L5V 3E4 • 1-800-265-8352 • frigidaire.ca INSTGDLNS_TMR FR 10/10 © 2010 Electrolux Home Products, Inc. Printed in the U.S.A. Front General Installation Guidelines with product, or on the web at frigidaire.com. Specifications subject to installation guide, packed with Top Mount Refrigerator Use these dimensions and clearance...
... Way • Mississauga, ON L5V 3E4 • 1-800-265-8352 • frigidaire.ca INSTGDLNS_TMR FR 10/10 © 2010 Electrolux Home Products, Inc. Printed in the U.S.A. Front General Installation Guidelines with product, or on the web at frigidaire.com. Specifications subject to installation guide, packed with Top Mount Refrigerator Use these dimensions and clearance...


