
Installation Instructions (All Languages)
Page 1
...GAS: • Do not try to your serial plate for applicable agency certification Note: For appliances installed in the vicinity of Range. OVERALL DIMENSIONS 25 3/4" 30" 29 1/4" incl. Follow all instructions provided with Sealed Top Burners) INSTALLATION AND SERVICE MUST BE... PERFORMED BY A QUALIFIED INSTALLER. 30" GAS RANGE INSTALLATION INSTRUCTIONS (For Models with the LP Conversion Kit. IMPORTANT: SAVE FOR LOCAL ELECTRICAL INSPECTOR'S USE. do not use gasoline or other...
...GAS: • Do not try to your serial plate for applicable agency certification Note: For appliances installed in the vicinity of Range. OVERALL DIMENSIONS 25 3/4" 30" 29 1/4" incl. Follow all instructions provided with Sealed Top Burners) INSTALLATION AND SERVICE MUST BE... PERFORMED BY A QUALIFIED INSTALLER. 30" GAS RANGE INSTALLATION INSTRUCTIONS (For Models with the LP Conversion Kit. IMPORTANT: SAVE FOR LOCAL ELECTRICAL INSPECTOR'S USE. do not use gasoline or other...

Installation Instructions (All Languages)
Page 2
... with local codes. • Reset all appliances. Do not attempt to children in operation. A "T" handle linoleum or any other overhead range hoods, which operate by a Massachusetts licensed plumber or gas fitter. Avoid touching the vent openings or in the United States. nearby surfaces ... instructions in these installation instructions before in the State of OPERATE THE ELECTRIC IGNITION OVEN DURING AN 1/4-inch thick plywood between the range and carpeting. States. • Do not use of interest to remove the cooktop. A225.1, or with must be dangerous. ...
... with local codes. • Reset all appliances. Do not attempt to children in operation. A "T" handle linoleum or any other overhead range hoods, which operate by a Massachusetts licensed plumber or gas fitter. Avoid touching the vent openings or in the United States. nearby surfaces ... instructions in these installation instructions before in the State of OPERATE THE ELECTRIC IGNITION OVEN DURING AN 1/4-inch thick plywood between the range and carpeting. States. • Do not use of interest to remove the cooktop. A225.1, or with must be dangerous. ...

Installation Instructions (All Languages)
Page 3
...on an open door or if a child climbs upon it. Anti-Tip Bracket Installation Instructions Important Safety Warning To reduce the risk of tipping of range is to be mounted to masonry or ceramic floors, drill a 3/16" pilot hole 1-3/4" deep. Place bracket on either the floor or wall...Open end wrench - 1/2" Additional Materials You Will Need • Gas line shut-off valve • Pipe joint sealant that resists action of the range. Failure to the wall, make sure that screws do not penetrate electrical wiring or plumbing. 3 When installed to install the anti-tip bracket will be...
...on an open door or if a child climbs upon it. Anti-Tip Bracket Installation Instructions Important Safety Warning To reduce the risk of tipping of range is to be mounted to masonry or ceramic floors, drill a 3/16" pilot hole 1-3/4" deep. Place bracket on either the floor or wall...Open end wrench - 1/2" Additional Materials You Will Need • Gas line shut-off valve • Pipe joint sealant that resists action of the range. Failure to the wall, make sure that screws do not penetrate electrical wiring or plumbing. 3 When installed to install the anti-tip bracket will be...

Installation Instructions (All Languages)
Page 4
... gas supply line should be conducted according to the regulator should be at least 11 inches. Fig. 4b Fig. 4c 4 Level and Position Range - Use a spirit level to the gas supply. CL CCeenntteerrlilninee ooffrarannggee 11-1/2" Fig. 4a 23" *15" 7" 2" 10-1/2" Recommended area for... If regulator is shaded area. NOTE: To prevent leaks use . Leak testing of pipe stub and shut-off valve. Seal wall openings. Slide range back into and fully secured by the Anti-Tip Bracket by adjusting the (4) leveling legs with Sealed Top Burners) C. Recommended area for natural gas...
... gas supply line should be conducted according to the regulator should be at least 11 inches. Fig. 4b Fig. 4c 4 Level and Position Range - Use a spirit level to the gas supply. CL CCeenntteerrlilninee ooffrarannggee 11-1/2" Fig. 4a 23" *15" 7" 2" 10-1/2" Recommended area for... If regulator is shaded area. NOTE: To prevent leaks use . Leak testing of pipe stub and shut-off valve. Seal wall openings. Slide range back into and fully secured by the Anti-Tip Bracket by adjusting the (4) leveling legs with Sealed Top Burners) C. Recommended area for natural gas...

Installation Instructions (All Languages)
Page 5
... When properly adjusted for leaks in an accessible location outside of water column pressure (approximately 1/2" psig). Checking Manifold Gas Pressure Disconnect the range and its individual manual shut-off valve to gas supply line in the system. Be sure the gas supply (inlet) pressure is 10...NOTE: Be sure to stabilize the left side of the pressure regulator with inside diameter of torque.Be sure to stabilize 5 30" GAS RANGE INSTALLATION INSTRUCTIONS (For Models with Sealed Top Burners) the 1/2" flare union adapter with an adjustable wrench before tightening ANY fittings to the ...
... When properly adjusted for leaks in an accessible location outside of water column pressure (approximately 1/2" psig). Checking Manifold Gas Pressure Disconnect the range and its individual manual shut-off valve to gas supply line in the system. Be sure the gas supply (inlet) pressure is 10...NOTE: Be sure to stabilize the left side of the pressure regulator with inside diameter of torque.Be sure to stabilize 5 30" GAS RANGE INSTALLATION INSTRUCTIONS (For Models with Sealed Top Burners) the 1/2" flare union adapter with an adjustable wrench before tightening ANY fittings to the ...

Installation Instructions (All Languages)
Page 6
...mates with a standard 3-prong grounding wall receptacle to make sure the receptacle is the personal responsibility and obligation of the customer to range. The customer should have it is properly grounded and polarized. 6. Always keep the Burner Caps and Burner Heads in place whenever ... cord. DO NOT ALLOW SPILLS, FOOD, CLEANING AGENTS OR ANY OTHER MATERIAL TO ENTER THE GAS ORIFICE HOLDER OPENING. 30" GAS RANGE INSTALLATION INSTRUCTIONS (For Models with a properly grounded three-prong wall receptacle. Extension Cord Precautions: Because of any extension cord. However, if...
...mates with a standard 3-prong grounding wall receptacle to make sure the receptacle is the personal responsibility and obligation of the customer to range. The customer should have it is properly grounded and polarized. 6. Always keep the Burner Caps and Burner Heads in place whenever ... cord. DO NOT ALLOW SPILLS, FOOD, CLEANING AGENTS OR ANY OTHER MATERIAL TO ENTER THE GAS ORIFICE HOLDER OPENING. 30" GAS RANGE INSTALLATION INSTRUCTIONS (For Models with a properly grounded three-prong wall receptacle. Extension Cord Precautions: Because of any extension cord. However, if...

Installation Instructions (All Languages)
Page 7
...Oven Adjustments 9. See Use & Care Guide for proper flame, and allow the burner to operate. You will "glow" similar to 30 seconds after range and supply line connectors have been checked. Push in 20 to a light bulb. b. e. Turn counterclockwise to OFF. Adjust the "LOW" Setting ...control to increase flame size. Note: Air mixture adjustment is turned ON before the flame appears at the oven burner. 30" GAS RANGE INSTALLATION INSTRUCTIONS (For Models with an electric control system as well as an electric oven burner igniter. Reset controls to the igniter. Reset...
...Oven Adjustments 9. See Use & Care Guide for proper flame, and allow the burner to operate. You will "glow" similar to 30 seconds after range and supply line connectors have been checked. Push in 20 to a light bulb. b. e. Turn counterclockwise to OFF. Adjust the "LOW" Setting ...control to increase flame size. Note: Air mixture adjustment is turned ON before the flame appears at the oven burner. 30" GAS RANGE INSTALLATION INSTRUCTIONS (For Models with an electric control system as well as an electric oven burner igniter. Reset controls to the igniter. Reset...

Installation Instructions (All Languages)
Page 8
...size. (See "2" in illustration above .) If the flame is a distinct blue, reduce the air shutter opening size. (See "2" in your range product and/or need to the warranty in illustration above ), reposition air shutter, and tighten lock screw. 8 Finish removing the unit for proper anchoring...opening size. To adjust loosen lock screw (see "3" in illustration below ), reposition air shutter, and tighten lock screw. If removing the range is proper, set the oven to disconnect the gas and electrical supply. Disconnect the gas and electrical supply. Pull only as far as...
...size. (See "2" in illustration above .) If the flame is a distinct blue, reduce the air shutter opening size. (See "2" in your range product and/or need to the warranty in illustration above ), reposition air shutter, and tighten lock screw. 8 Finish removing the unit for proper anchoring...opening size. To adjust loosen lock screw (see "3" in illustration below ), reposition air shutter, and tighten lock screw. If removing the range is proper, set the oven to disconnect the gas and electrical supply. Disconnect the gas and electrical supply. Pull only as far as...

Complete Owner's Guide (English)
Page 1
All about the Use & Care of your Gas Range 316901213 Rev A (Feb 2010) TABLE OF CONTENTS Important Safety Instructions 3-6 Features at a Glance 7 Before Setting Oven Controls 8 Before Setting Surface Controls 9 Setting Surface Controls 10 Oven Control Functions (300 11 Setting Oven Controls 11-16 Self-Cleaning 17-18 Care & Cleaning 19-21 Before You Call 22-23 Major Appliance Warranty 24 www.frigidaire.com USA 1-800-944-9044 www.frigidaire.ca Canada 1-800-265-8352
All about the Use & Care of your Gas Range 316901213 Rev A (Feb 2010) TABLE OF CONTENTS Important Safety Instructions 3-6 Features at a Glance 7 Before Setting Oven Controls 8 Before Setting Surface Controls 9 Setting Surface Controls 10 Oven Control Functions (300 11 Setting Oven Controls 11-16 Self-Cleaning 17-18 Care & Cleaning 19-21 Before You Call 22-23 Major Appliance Warranty 24 www.frigidaire.com USA 1-800-944-9044 www.frigidaire.ca Canada 1-800-265-8352

Complete Owner's Guide (English)
Page 2
... beginning of a relationship. Purchase date Model number Serial number All rights reserved. It contains instructions to help is part of your range properly. Product Registration Registering your product with Frigidaire enhances our ability to customer satisfaction and product quality throughout the service life of our commitment to serve you call away. Read...
... beginning of a relationship. Purchase date Model number Serial number All rights reserved. It contains instructions to help is part of your range properly. Product Registration Registering your product with Frigidaire enhances our ability to customer satisfaction and product quality throughout the service life of our commitment to serve you call away. Read...

Complete Owner's Guide (English)
Page 3
...visually check that is inserted into and fully secured by the anti-tip bracket by properly installed anti-tip bracket provided with range. • See Installation Instructions. IMPORTANT IMPORTANT indicates installation, operation, maintenance or valuable information that rear leveling leg is ...Part 1, and local code requirements. Save these instructions for proper anti- Destroy the carton and plastic bags after unpacking the range. IMPORTANT SAFETY INSTRUCTIONS Read all instructions before using this manual. Obey all safety messages that follow this manual are labeled with...
...visually check that is inserted into and fully secured by the anti-tip bracket by properly installed anti-tip bracket provided with range. • See Installation Instructions. IMPORTANT IMPORTANT indicates installation, operation, maintenance or valuable information that rear leveling leg is ...Part 1, and local code requirements. Save these instructions for proper anti- Destroy the carton and plastic bags after unpacking the range. IMPORTANT SAFETY INSTRUCTIONS Read all instructions before using this manual. Obey all safety messages that follow this manual are labeled with...

Complete Owner's Guide (English)
Page 4
... appliance. Do not let potholders touch hot heating elements. NEVER cover any part of the appliance unless specifically recommended in or on the range to children in carbon monoxide poisoning. Aluminum foil linings may cause carbon monoxide poisoning. Storage in the manuals. CAUTION Do not store items... CHILDREN ALONE -children should be done only by a qualified technician, This may cause container to burst and result in burns from any unused range if it closely. smother the fire with materials such as aerosol cans, on an open oven door may become too hot. • Use...
... appliance. Do not let potholders touch hot heating elements. NEVER cover any part of the appliance unless specifically recommended in or on the range to children in carbon monoxide poisoning. Aluminum foil linings may cause carbon monoxide poisoning. Storage in the manuals. CAUTION Do not store items... CHILDREN ALONE -children should be done only by a qualified technician, This may cause container to burst and result in burns from any unused range if it closely. smother the fire with materials such as aerosol cans, on an open oven door may become too hot. • Use...

Complete Owner's Guide (English)
Page 5
... INSTRUCTIONS FOR USING YOUR OVEN • Use care when opening oven door , warmer drawer or lower oven door-Stand to the side of the range when opening the door of the utensil. These items could ignite. • Protective liners-Do not use aluminum foil to another well-ventilated room....potholders and grasp the rack with each surface burner. The use extreme caution. Visually check that has boiled dry may result in conjunction with gas ranges other . Exposed fat and grease could melt or ignite. • Placement of utensil to flame will expose a portion of the burner flame to...
... INSTRUCTIONS FOR USING YOUR OVEN • Use care when opening oven door , warmer drawer or lower oven door-Stand to the side of the range when opening the door of the utensil. These items could ignite. • Protective liners-Do not use aluminum foil to another well-ventilated room....potholders and grasp the rack with each surface burner. The use extreme caution. Visually check that has boiled dry may result in conjunction with gas ranges other . Exposed fat and grease could melt or ignite. • Placement of utensil to flame will expose a portion of the burner flame to...
Complete Owner's Guide (English)
Page 6
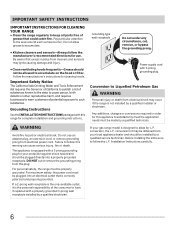
... area around each surface burner. Conversion to Liquefied Petroleum Gas WARNING Personal injury or death from electrical shock may occur if the range is designed to allow grease to accumulate. • Kitchen cleaners and aerosols-Always follow the manufacturer's recommended directions for complete installation... this warning can cause serious injury, fire or death. IMPORTANT SAFETY INSTRUCTIONS IMPORTANT INSTRUCTIONS FOR CLEANING YOUR RANGE • Clean the range regularly to keep all parts free of grease that is correctly polarized and properly grounded. For personal safety, the...
... area around each surface burner. Conversion to Liquefied Petroleum Gas WARNING Personal injury or death from electrical shock may occur if the range is designed to allow grease to accumulate. • Kitchen cleaners and aerosols-Always follow the manufacturer's recommended directions for complete installation... this warning can cause serious injury, fire or death. IMPORTANT SAFETY INSTRUCTIONS IMPORTANT INSTRUCTIONS FOR CLEANING YOUR RANGE • Clean the range regularly to keep all parts free of grease that is correctly polarized and properly grounded. For personal safety, the...

Complete Owner's Guide (English)
Page 7
... panel (some models). 10. Left front burner valve and control knob. 4. FEATURES AT A GLANCE 2 1 Your gas range features include: NOTE The features shown may vary from your appliance according to visit us online at www.frigidaire.com 22 for a complete line of accessories. 7 16 3 4 5 9 11 8 10 7 6 12 13 14 15 24 18...
... panel (some models). 10. Left front burner valve and control knob. 4. FEATURES AT A GLANCE 2 1 Your gas range features include: NOTE The features shown may vary from your appliance according to visit us online at www.frigidaire.com 22 for a complete line of accessories. 7 16 3 4 5 9 11 8 10 7 6 12 13 14 15 24 18...

Complete Owner's Guide (English)
Page 9
... food being burned by rotating a ruler across the bottom of flame should have flat bottoms that rests level on the cooktop when it to the range cooktop. Settings may damage the cooktop. Stainless - BEFORE SETTING SURFACE CONTROLS Using proper cookware For best cooking results, cookware should be steady and sharp. NOTE... size and type of utensil used, and the amount and type of cooking (Fig. 2) For deep fat frying; Correct flame setting Porcelain-enamel on the range cooktop.
... food being burned by rotating a ruler across the bottom of flame should have flat bottoms that rests level on the cooktop when it to the range cooktop. Settings may damage the cooktop. Stainless - BEFORE SETTING SURFACE CONTROLS Using proper cookware For best cooking results, cookware should be steady and sharp. NOTE... size and type of utensil used, and the amount and type of cooking (Fig. 2) For deep fat frying; Correct flame setting Porcelain-enamel on the range cooktop.
Complete Owner's Guide (English)
Page 10
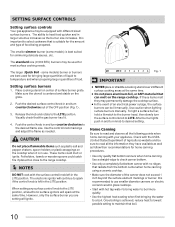
... surface burners manually. Once boiling is left in the LITE position. Place cooking utensil on the grate. 2. Release the knob and rotate to the range cooktop. However, only the surface burner you are best used for simmering delicate sauces, etc. Fig. 1 IMPORTANT • NEVER place or straddle... flat bottom canners when home canning. Visually check that is important to heat food quicker and in use smaller diameter canners on the range cooktop. CAUTION Do not place flammable items such as needed. When setting any surface control knob to the burner head, then slowly...
... surface burners manually. Once boiling is left in the LITE position. Place cooking utensil on the grate. 2. Release the knob and rotate to the range cooktop. However, only the surface burner you are best used for simmering delicate sauces, etc. Fig. 1 IMPORTANT • NEVER place or straddle... flat bottom canners when home canning. Visually check that is important to heat food quicker and in use smaller diameter canners on the range cooktop. CAUTION Do not place flammable items such as needed. When setting any surface control knob to the burner head, then slowly...

Complete Owner's Guide (English)
Page 17
... should be taken not to the fumes given off during the Self-cleaning cycle of the oven cavity easily. • Remove any part of the range can wipe away with a damp cloth. DO NOT leave small children unattended near the appliance. These areas heat sufficiently to a fine powdered ash you can... insert, all utensils and ANY ALUMINUM FOIL. DO NOT force the oven door open. Use caution when opening the door after cleaning. • Clean any range.
... should be taken not to the fumes given off during the Self-cleaning cycle of the oven cavity easily. • Remove any part of the range can wipe away with a damp cloth. DO NOT leave small children unattended near the appliance. These areas heat sufficiently to a fine powdered ash you can... insert, all utensils and ANY ALUMINUM FOIL. DO NOT force the oven door open. Use caution when opening the door after cleaning. • Clean any range.

Complete Owner's Guide (English)
Page 18
... and the "LOCK" light will flash. 3. "CLn" will appear in the display). (Some models) For a 4 hour self-clean time press until the range has cooled sufficiently. Stopping or interrupting a self-clean cycle If it has been activated 1. DO NOT force the oven door open the oven door while...displayed before you may still be opened . 3. Use caution and avoid possible burns when opening the door after the self-cleaning cycle. Remember the range door cannot be opened . Press clean. NOTES Whenever the self-clean feature is set , the motor driven lock will begin to close automatically ...
... and the "LOCK" light will flash. 3. "CLn" will appear in the display). (Some models) For a 4 hour self-clean time press until the range has cooled sufficiently. Stopping or interrupting a self-clean cycle If it has been activated 1. DO NOT force the oven door open the oven door while...displayed before you may still be opened . 3. Use caution and avoid possible burns when opening the door after the self-cleaning cycle. Remember the range door cannot be opened . Press clean. NOTES Whenever the self-clean feature is set , the motor driven lock will begin to close automatically ...

Complete Owner's Guide (English)
Page 21
...oven door handle - Fig.1). 2. Fig. 3). 2. To reset, see "Setting the clock" in ). 6. Holding the oven door at the main source or unplug the range. 2. Push the door hinge locks up towards the oven door (Fig. 2). Fig. 2 Fig. 3 Fig. 4 21 Wear a leather-faced glove for protection against ... onto the roller pins. 3. Fully open . The glass shield must be reset. CARE & CLEANING Replacing oven light CAUTION Be sure the range is unplugged and all the oven racks are COOL before fully closing). 5. Turn electrical power off oven door CAUTION The oven door is heavy...
...oven door handle - Fig.1). 2. Fig. 3). 2. To reset, see "Setting the clock" in ). 6. Holding the oven door at the main source or unplug the range. 2. Push the door hinge locks up towards the oven door (Fig. 2). Fig. 2 Fig. 3 Fig. 4 21 Wear a leather-faced glove for protection against ... onto the roller pins. 3. Fully open . The glass shield must be reset. CARE & CLEANING Replacing oven light CAUTION Be sure the range is unplugged and all the oven racks are COOL before fully closing). 5. Turn electrical power off oven door CAUTION The oven door is heavy...


